Business Content extractors do not support all hierarchies in the R/3 source system, such as Treasury Cash Management, so there is no standard DataSource to link these hierarchies to BW. Learn a workaround to this problem by creating an empty DataSource to extract an existing hierarchy from R/3 and load it directly into BW.
Key Concept
The user exit EXIT_SAPLRSAP_004 in the R/3 source system allows you to enhance your hierarchy DataSources. It is a flexible way to manipulate the data and gives you the opportunity to meet complex requirements.
Say you want to extract an existing hierarchy from an SAP R/3 system and load it into BW so you can present your reports in a hierarchical way. For example, by loading a cost center hierarchy into BW, you could show expenses at the top node and then drill down to the lower nodes to see the details.
Although standard Business Content extractors support main hierarchies (e.g., cost center, general ledger [G/L] account, material, plant, work center), they do not support all hierarchies in the R/3 source system, such as Treasury Cash Management. In this case, SAP does not provide a standard DataSource to link R/3 hierarchies to BW.
So what are your options? In my example of working in Treasury Cash Management, you could define hierarchies for planning levels and create your own ABAP program to extract the data from R/3, send it to a flat file, then upload the flat file into BW via a custom DataSource, a multistep process. This is what I call the “traditional” method.
I developed a workaround that allows you to bypass the step of creating a flat file and extract directly from R/3 in a single step, like any Business Content DataSource. My workaround combines two different standard SAP mechanisms: the generation of a hierarchy DataSource on the R/3 IMG side and the user exit EXIT_SAPLRSAP_004 on the R/3 side. I tested this workaround with BW 3.5 and plug-in (PI) 2004-1, but it also works with BW 2.0B with PI 2002-1 and later.
In the steps that follow, I will show you how to create an empty hierarchy DataSource and populate it by using EXIT_SAPLRSAP_004. You then can link this DataSource in BW to the InfoSource belonging to the Info-Object like any other DataSource. When BW receives the data, the DataSource created with this workaround does not differ from a standard SAP DataSource. Table 1 shows the difference between my workaround and the traditional method.
| |
Generate and fill DataSource with user exit (workaround method) |
Write data to flat file and load with custom DataSource (traditional method) |
| Source of data |
R/3 directly |
R/3 via flat file |
| Flat file to store |
No |
Yes |
| Extraction mechanism |
ABAP within a user exit |
Independent ABAP program |
| Security |
No specific security required |
Program needs security to access the file |
| Scheduling |
No dependency |
Dependency between creation and loading of file in BW |
|
| Table 1 |
Workaround method vs. traditional method |
The main advantage of this strategy is that you use BW’s standard extraction mechanism to extract data from R/3. You take just one step to execute it: Extract R/3 data to BW directly. Once you set up the hierarchy DataSource with this workaround, it’s like extracting from any other R/3 DataSource.
The prerequisite for this workaround is identifying the source table of the hierarchy, where the relationships between the parent and child nodes are found. Identify the source table via transaction SE11 by looking at the tables involved in the data element used in the hierarchy. You may need the help of an ABAP programmer to perform this step.
While I use the Treasury Cash Management example, the steps that follow apply to any other hierarchy not supported by Business Content. The Treasury Cash Management hierarchy is maintained with transaction TRMH in R/3. I created a small hierarchy called ZTE for the sample data used in this article (Figure 1).

Figure 1
Hierarchy ZTE in Treasury Cash Management created with transaction TRMH
In the Treasury Cash Management example, the hierarchy node data is stored in the table TKCHW (Figure 2). In this table, each node of the hierarchy is stored in field WERT1. The field NODID is an internal key unique to every node. The field PARNT identifies the parent node ID, to which the child node belongs. For example, in Figure 2, B4 (Bank collection) has an ID of 5 and a parent ID of 3. TD (Fixed-term deposit) has an ID of 3, making it the parent of B4. Those records are the tabular representation of the ZTE hierarchy created with TRMH in Figure 1.
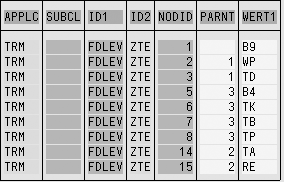
Figure 2
Table TKCHW for hierarchy ZTE
Note
Business Content does not deliver standard DataSources for finance custom hierarchies, but BW frequently uses them, so SAP provides a tool to generate certain DataSource hierarchies (transaction BW07). These hierarchies, created via transaction GS01 (used with Financial Accounting or Controlling for creation of sets), are the exception to the hierarchies discussed in this article.
Configure the Extractor
In the steps that follow, I will walk you through my workaround. I will create an empty hierarchy, generate the DataSource, and populate it with data from the TKCHW table via EXIT_SAPLRSAP_004.
Step 1. Enter transaction MCK1 to create the empty hierarchy. You can enter any hierarchy technical name and description you want, but you have to enter a data element related to the hierarchy that holds the nodes in the source table. In the Treasury Cash Management example, WERT1 holds the data for the ZTE hierarchy, so I entered WERT1 in the Data element field shown in Figure 3. Click on the execute icon (green check mark), then click on the save icon.

Figure 3
Use transaction MCK1 to create the empty hierarchy
The result, shown in the Create General Hierarchy: Definition screen (Figure 4), is an empty hierarchy with only the top node. Don’t add more nodes, since this hierarchy is just an empty shell.

Figure 4
Empty hierarchy including just the top node
Step 2. Use transaction BW10 to generate the DataSource hierarchy. Enter WERT1 in the Data Element for the Logical General Hierarch field (Figure 5) and click on the execute icon. In the pop-up window that appears, click on the Yes button to create a hierarchy DataSource called 4R_WERT1_LGEN_HIER.

Figure 5
The data element WERT1 holds the hierarchy nodes
Note
You can also use transaction SBIW, under Settings for Application>Specific DataSources (PI)>Logistics>Generate DataSources for General Hierarchies to generate the DataSource hierarchy.
BW automatically generates the name of the DataSource and it cannot be changed. Also, BW10 only performs the generation; it does not allow you to see the DataSource. You can check if a DataSource generated correctly by using the DataSource browser (RSA6) to display it. As shown in Figure 6, 4R_WERT1_LGEN_HIER is found via menu path SAP-R/3>SD>SD-IO.
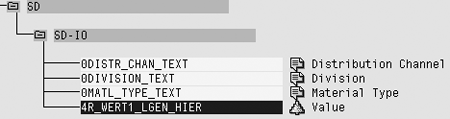
Figure 6
4R_WERT1_LGEN_HIER via transaction RSA6 menu path SAP-R/3>SD>SD-IO
Step 3. Add ABAP coding into the user exit EXIT_SAPLRSAP_004. This coding allows you to populate the DataSource created in step 2. If this exit is not active, you need to use transaction CMOD to make it active. I will not detail the steps to do that since it is well documented on help.sap.com. Look for the document “Enhancements to the SAP Business Information Warehouse.”
To access the user exit to enter the ABAP code, go into transaction SE38 and enter ZXRSAU04 in the Program field (Figure 7). Click on the Change button to enter the ABAP code shown in Figure 8.
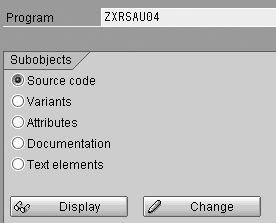
Figure 7
Enter ZXRSAU04 in the Program field
*&---------------------------------------------------------------------*
*& Include ZXRSAU04 *
*&---------------------------------------------------------------------* DATA: WA_TKCHW LIKE TKCHW,
W_NODEID(5) TYPE N,
W_PARENT LIKE TKCHW-WERT1,
WA_DP LIKE ROSHIENODE.
DATA: ITAB_TKCHW LIKE TABLE OF TKCHW WITH HEADER LINE,
ITAB_DP LIKE TABLE OF WA_DP WITH HEADER LINE. * The constant C_OBJECT contains the BW InfoObject name, which the
* hierarchy belongs to
CONSTANTS: C_OBJECT LIKE ROSHIENODE-IOBJNM VALUE '0P_LEVEL'. * Add logic specific to the DataSource
IF I_DATASOURCE = '4R_WERT1_LGEN_HIER'. * Delete content of shell DataSource (contains only top node)
REFRESH C_T_HIENODE. * Select data from source table TKCHW
* The WHERE clause is used to restrict on the specific ZTE hierarchy
SELECT * FROM TKCHW
INTO TABLE ITAB_TKCHW
WHERE ID1 = 'FDLEV' AND ID2 = 'ZTE'.
IF SY-SUBRC EQ 0. * The variable W_NODEID is a counter, and will be used to populate the
* hierarchy node IDs
W_NODEID = 1. * Each record of table TKCHW represents a node of the hierarchy and will
* be appended to the data package
LOOP AT ITAB_TKCHW INTO WA_TKCHW.
CLEAR WA_DP.
WA_DP-NODEID = W_NODEID.
WA_DP-IOBJNM = C_OBJECT.
* WERT1 represents the value of the hierarchy node, in the cash
* management example
WA_DP-NODENAME = WA_TKCHW-WERT1. * Need to find the parent ID of the node in source table TKCHW
* and then if found look in the ITAB_DP to seek for the parent IDs. The
* hierarchy level of the node is derived from its parent by simply
* adding 1. If the parent is not found it means it's the top node, in
* this case the parent ID is 0 and the level is 1.
READ TABLE ITAB_TKCHW WITH KEY
NODID = WA_TKCHW-PARNT.
IF SY-SUBRC = 0.
W_PARENT = ITAB_TKCHW-WERT1.
READ TABLE ITAB_DP WITH KEY
NODENAME = W_PARENT.
IF SY-SUBRC = 0.
WA_DP-PARENTID = ITAB_DP-NODEID.
WA_DP-TLEVEL = ITAB_DP-TLEVEL + 1.
ENDIF.
ELSE.
WA_DP-PARENTID = 0.
WA_DP-TLEVEL = 1.
ENDIF. * Each node is inserted in the internal table ITAB_DP, while the node ID
* is increased by 1
APPEND WA_DP TO ITAB_DP.
W_NODEID = W_NODEID + 1.
ENDLOOP. * When all nodes are processed, they are appended to the user exit
* table C_T_HIENODE, which holds the hierarchy data
APPEND LINES OF ITAB_DP TO C_T_HIENODE.
ENDIF.
ENDIF.
|
| Figure 8 |
Add ABAP code into the user exit EXIT_SAPLRSAP_004 |
Of course, you will have to adjust my code to fit your needs, but you can use this code as a template. The logic of the code is explained in the comments indicated by asterisks.
By adding the code shown in Figure 8, EXIT_SAPLRSAP_004 populates the empty hierarchy DataSource by reading the nodes from the table TKCHW and inserting each of the nodes into the internal table ITAB_DP. The code assigns a node ID, the InfoObject name, a node name, and, finally, the parent node. The end of the code appends the internal table content to internal table C_T_HIENODE. Click these links for more information about other internal tables used in user exits, as well as the code shown in Figure 8.
Configure the Extractor in BW
Once you finish with the extractor on the R/3 side, you need to configure the BW portion to load the hierarchy into a BW InfoObject. In this section, I will explain how to replicate the created DataSource in BW and assign it to the InfoSource that feeds the InfoObject where I want the hierarchy assigned. Then, I will create an InfoPackage from the DataSource, select the hierarchy, and load it into BW, where the hierarchy will then be available for reporting.
Step 1. Prepare the InfoObject 0P_LEVEL to accept data from the DataSource. In BW go to Administrator Workbench via RSA1 and find the desired InfoObject, in this case, 0P_LEVEL, and double-click on it to edit it in the Change Characteristic screen (Figure 9). On the Hierarchy tab, select the check box with hierarchies. In the Hierarchy Properties area, Hierarchy not time-dependent is selected by default. Activate the InfoObject by clicking on the activate icon. When you make the changes shown in Figure 9, the InfoObject 0P_LEVEL is ready to hold the data coming from the DataSource.
NoteIf the InfoObject 0P_LEVEL doesn’t exist in your system, that means it was not installed from the Business Content. You can install 0P_LEVEL just like any other Business Content object. To find out more details about installing Business Content objects, go to help.sap.com and search for “Installing Business Content.”
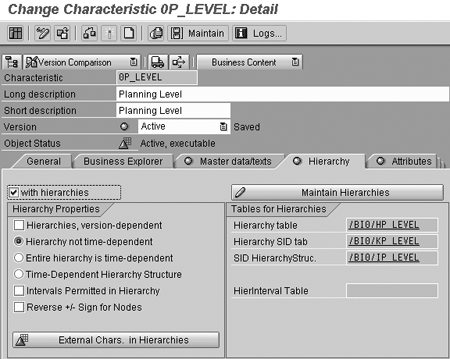
Figure 9
Select the Hierarchy tab to maintain the 0P_LEVEL InfoObject
Note
The workaround described here is tested for hierarchies that are not time-dependent, but it can work with for time-dependent hierarchies by adjusting the code in the user exit
Step 2. Replicate the DataSource in BW. Click on Source Systems in the RSA1 transaction (Figure 10). Find your source system in the pane on the right side, right-click on it, and select DataSource Overview from the pop-up menu.
Then go to SAP Application Components>Sales and Distribution>Sales Master Data (Figure 11). All DataSources generated from the BW10 transaction in R/3 fall under the Sales Master Data node. Right-click on Sales Master Data to perform Replicate DataSources. 4R_WERT1_LGEN_HIER appears under Sales Master Data after the replication is complete.

Figure 10
Click on Source Systems for a list of available source systems

Figure 11
Replication of DataSource 4R_WERT1_LGEN_HIER
Step 3. Assign the DataSource to the InfoSource. Click on the icon with a dash next to 4R_WERT1_LGEN_HIER in Figure 11 to assign it to an InfoSource. Because the InfoSource name is usually the same as the InfoObject name, label the InfoSource 0P_LEVEL, too, by entering 0P_LEVEL in the Others field (Figure 12). Click on the continue icon. Answer Yes on the pop-up screen to complete the assignment.
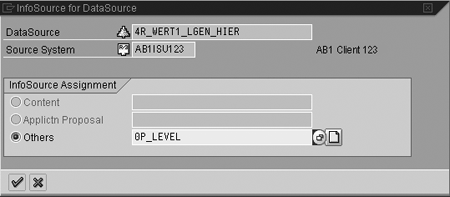
Figure 12
Name the InfoSource 0P_LEVEL to match the InfoObject name
On the Transfer Rules screen that appears (Figure 13), type the InfoObject name 0P_LEVEL into the InfoObject column. Click on the save icon.

Figure 13
Enter the InfoObject name 0P_LEVEL in the InfoObject column
Step 4. Create the InfoPackage and load the ZTE hierarchy data. Enter transaction RSA1. Under InfoSources, find the InfoSource 0P_LEVEL. The DataSource 4R_WERT1_LGEN_HIER is now available under your R/3 source system where the DataSource was created. Right-click on the R/3 source system and select Create InfoPackage. Add a description of the InfoPackage in the InfoPackage Description field, as shown in Figure 14, and click on the Save button.
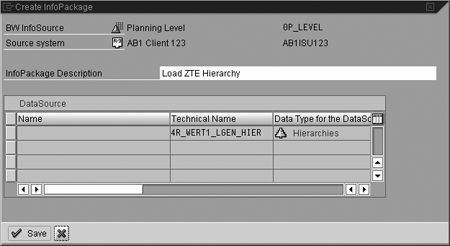
Figure 14
Create the Load ZTE Hierarchy InfoPackage
Note
You can use the same DataSource to load many hierarchies, but an InfoPackage can only load one hierarchy at the time.
After clicking on the Save button, the Maintain InfoPackage screen appears (Figure 15). On the Hierarchy Selection tab, select the hierarchy ZTE.

Figure 15
Select the hierarchy ZTE
You do not need to change any other options. The ...and Flag for Activation or Activate It check box is checked by default. Select the Schedule tab and click on the Start button to load the hierarchy from the source system. Like any other DataSource, you can check the load with the monitor icon. 
Once the load is successful, you can view the ZTE hierarchy from transaction RSH1 by double-clicking on it from the list. You can also click on the icon depicting a tree  in the toolbar of the monitor to display the hierarchy once the load is completed. The result is shown in Figure 16.

Figure 16
View the ZTE hierarchy via transaction RSH1
The hierarchy shown in Figure 16 depicts the R/3 side from transaction TRMH. Now you can include the ZTE hierarchy in any reports using the InfoObject 0P_LEVEL. Of course, the description of the nodes is not present on the hierarchy. To load them, you need to add another text DataSource and load it into 0P_LEVEL, because the texts are stored into a different table.
Christian Harrington
Christian Harrington is an independent SAP NetWeaver BI consultant. He has worked with BI tools since 2000, helping large companies implement data warehouses. He has 13 years of experience in IT and has worked as a developer, functional analyst, business analyst, and architect. You may contact him in English or French.
You may contact the author at christian.harrington@videotron.ca.
If you have comments about this article or publication, or would like to submit an article idea, please contact the editor.