Shreekant Shiralkar, Meenakshi Chopra, and Achin Kimtee of Tata Consultancy Services show how to source and process text data from unstructured sources such as Twitter using SAP BusinessObjects Data Services 4.1. See how to extract keywords from the social media site Twitter and then analyze customer sentiment.
Key Concept
Extracting unstructured text data from social media and using it to analyze customer sentiments, market trends, and the public’s perception of products, services, or advertisements has become essential to staying relevant and competitive. The retail, insurance, consumer products, and goods industries are improving their competitive edge by inclusive engagement with their customers through such analytics.
SAP BusinessObjects Data Services (BODS) can access social media such as Twitter and extract unstructured data that you then can use for analysis of trends such as customer sentiment. From Data Services 4.0, the Text Data Processing feature was made part of SAP Data Services. It allows you to extract keywords from unstructured text based on a dictionary or rule. The keywords are then analyzed for positive or negative remarks.
SAP Data Services cannot directly access social media content from sites such as Twitter, LinkedIn, or Facebook, although it can customize the available software development kit (SDK) to fetch data from social media. We cover the steps for configuring the BODS to read this streaming data using a Java-based Twitter API and then to provide data for sentiment analysis. We also explain the logic behind the code created for the Twitter API.
Technical Prerequisites
To develop the adapter that enables sourcing the text data from Twitter, you need the following:
- SAP BODS version 4.0 or version 4.1, as earlier versions do not support text data processing
- An integrated development environment [IDE] such as eclipse or NetBeans to develop Java code or a Java SDK for code compilation. You can write the code on any text editor.
Although we use SAP HANA in this article, you can use any available database. The process for sourcing text data from Twitter and its extraction using BODS is accomplished in four steps:
1. Create an adapter for Twitter
2. Deploy the adapter on a BODS server
3. Create an adapter instance in the BODS Management Console
4. Design the data flow for using the adapter instance with the BODS Designer
Create an Adapter for Twitter
Twitter is a microblogging site that generates up to 200 million Tweets per day. Twitter provides various APIs to developers to access data from Tweets and allows other applications to communicate with it.
Twitter provides the following APIs:
- Search API. The Search API allows users to search Tweets with specific keywords or Tweets pertaining to specific users.
- REST API. The REST API is used to access user timelines, status updates, and user information.
- Streaming API. The Streaming API is a family of real-time APIs for Tweets and other social events.
- Twitter for Websites. The Twitter for Website API is a suite that enables Web developers to integrate Twitter functions into their Web pages. These functionalities include a Tweet button and a Follow button.
You use a streaming API to extract the text from Tweets in real time for a specified list of Twitter users.
Prerequisites for Twitter API
The prerequisite steps for creating a Twitter API are:
Step 1. Create a developer ID on https://dev.twitter.com.
Step 2. Log in to the site using your Twitter account and register the new application.
Step 3. Upon registration, the Twitter development site generates a consumer key and a consumer secret key.
Step 4. Post registration, you request an access token and access secret token.
To determine the application making the data request you need the consumer key and consumer secret key. You also need the access token and access secret token to determine if users have permission to access their customer accounts.
Twitter Adapter Development
Custom adapters created using the Data Services Adapter SDK are part of the Data Services platform. These adapters help communicate and integrate information resources with the Data Services platform. The adapter acts as a bridge and helps to translate the resource’s information into a format the Data Services platform can understand. It is also used to publish the information from the Data Services platform to the resource in a format that the information resource understands.
To develop the adapter using a Twitter-streaming API, follow these steps:
Step 1. Go to the Data Serviceslib folder on your BODS server. This folder location is installation specific (i.e., depends on where the Data Services was installed). Copy acta_adapter_sdk.jar from the Data Serviceslib folder to the Java lib directory in the Integrated Development Environment (IDE). The Twitter adapter uses the libraries from this jar (Figure 1).
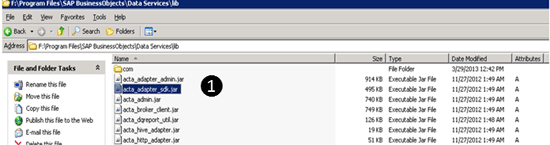
Figure 1
Copy acta_adapter_sdk.jar from the Data Services folder
Step 2. Create the FeedsAdapter.jar. The following classes are implemented in this adapter:
- FeedsAdapter. The FeedsAdapter class implements the Adapter interface. The functionality of this module is to set the root directory for the adapter and link with other adapter components.
- FeedsAdapterBeanInfo. FeedsAdapterBeanInfo is used to customize the FeedsAdapter so that you can set or modify the root folder at the time of installation in the Management Console.
- Import. This class enables the adapter to import metadata.
- FeedsImportByName. This class describes the data and their types that the user has to input at the time of import.
- FeedsImportByNameBeanInfo. This class helps in modifying and adding the fields for input of data specified in FeedsImportByName at the time of import.
- RootNode. This class creates root nodes under which metadata nodes are categorized into various groups.
- FileNode. FileNode implements MetadataNode. The MetadataNode icon supports the metadata browsing framework in the Designer. It represents functions during metadata browsing and also contains metadata information.
- Browse. Browse is used to create a list of root nodes for metadata browsing. It also displays the list of metadata nodes for the root node selected while browsing the adapter.
- FeedsSession. This class allows the user to configure a session for the adapter so that each instance of the feeds adapter has a separate working directory for itself.
- FeedsSessionBeanInfo. This class is used to customize the session for the adapter.
FetchFeeds. This class implements the function call from Data Services Query Transform. When the job executes, it calls the function, which invokes the FetchFeeds class. The function reads the Twitter username from XML input into the Query Transform and fetches the feeds for the given username. The desired data is extracted from the feeds and a new XML string is created that is then sent back to the calling data flow. The FetchFeeds class implements the main functionality with the high-level logic shown in Figure 2. Note that the JSON reference in the figure is an acronym for JavaScript Object Notation. The Twitter response is returned in this format by the Twitter API 1.
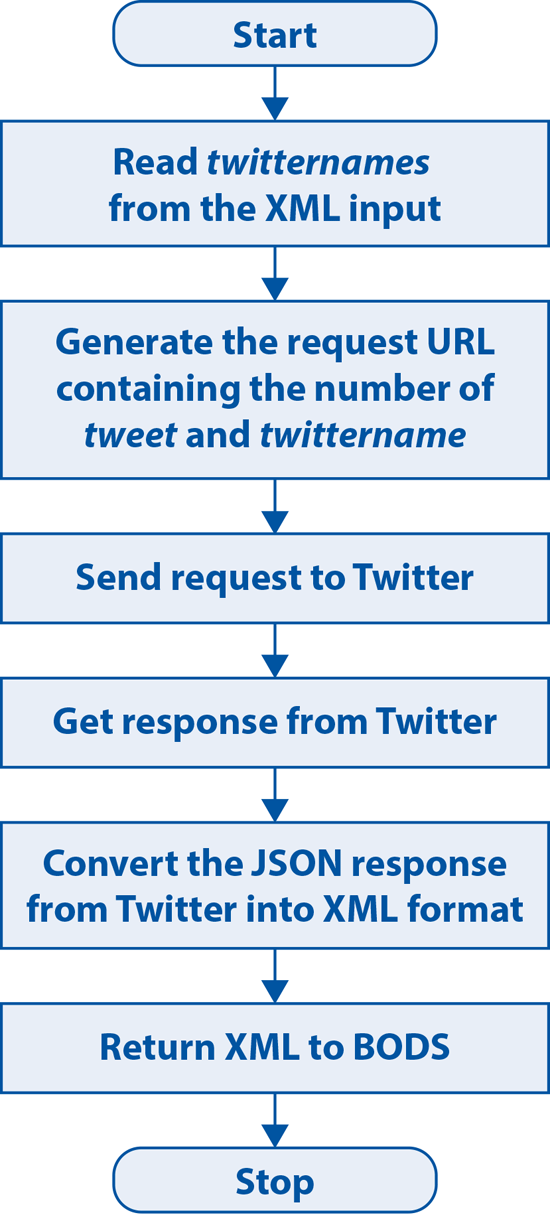
Figure 2
Logic for sourcing data from Twitter and delivering it to Data Services
Step 3. Export the developed FeedsAdapter.jar file from the Java development environment to the local development machine.
Now we show you how to deploy this adapter code on the Data Services server.
Deploy the Adapter on the BO Data Services Server
Installing the adapter on the Data Services server installation directory is accomplished in three steps: copy the FeedsAdapter.jar into %LINK_DIR%lib, create the FeedsAdapter.xml config template, and create a FeedsAdapter.xml startup template.
Step 1. Copy the FeedsAdapter .jar from the eclipse exported location and paste it into the %LINK_DIR%lib directory on the Data Services server.
Step 2. The config template xml displays the newly created adapter in a list of the installed adapters in the Management Console. It defines the attributes such as the display name of the adapter and SDK version. To generate the configuration template, go to Run > cmd and run the command shown in Figure 3.

Figure 3
Generate the configuraiton template with this code
The command in Figure 3 consists of the adapter jar name (FeedsAdapter.jar), all the other jars that are required, the fully qualified adapter class name, and the location where FeedsAdapter.xml has to be created. You create the configuration template in the configtemplates folder (%LINK_DIR%adaptersconfigtemplates). Figure 4 shows the screen that appears when the command is successfully executed.
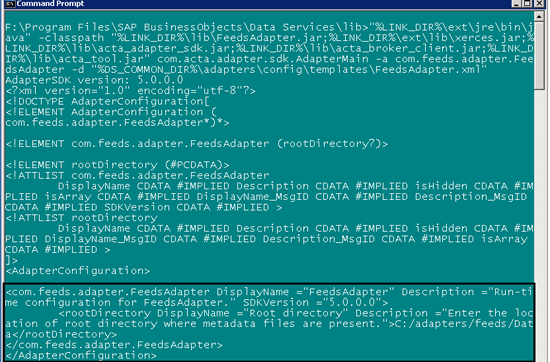
Figure 4
Configuration template script
Step 3. Create a start-up template XML in install directory (%LINK_DIR%adaptersinstall). This XML provides the start-up template for the adapter instance in the Management Console. To generate the start-up template go to Run > cmd and run the command shown in Figure 5.

Figure 5
Generate the start-up template
The command consists of the adapter jar name (FeedsAdapter.jar), other required jar files, and the location of the start-up template. When you execute the script, it successfully creates the start-up template xml shown in Figure 6.
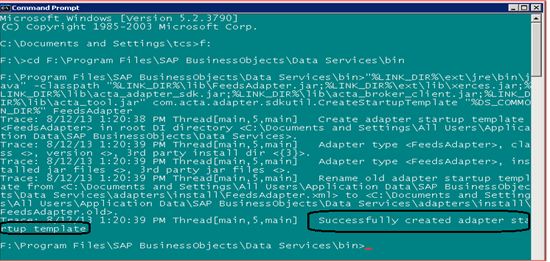
Figure 6
Start-up template script
Note
%LINK_DIR% is the installation directory for BODS, and its location
varies from system to system. In BODS 4.1, some of the folders have
moved from %LINK_DIR% to %DS_COMMON_DIR%. Ensure that the adapter main
class name is fully qualified and that the classpath contains all the
necessary jar files while creating the start-up template xml, if you
have to make changes manually.
After you install the adapter by following the preceding steps, the configuration template XML (Figure 7) and start-up template XML (Figure 8) are available in the templates and install folders, respectively, of the installation directory.
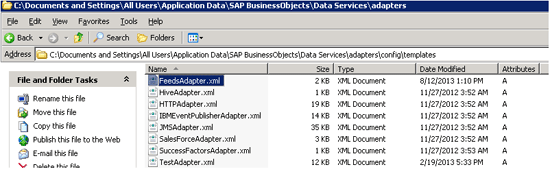
Figure 7
Configuration template XML
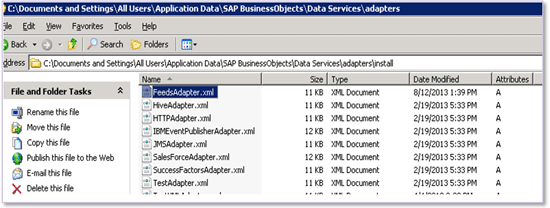
Figure 8
Start-up templae XML
The next step is to create an adapter instance in the BODS Management Console.
Create an Adapter Instance in the BODS Management Console
After you deploy the .jar file on the BODS server, you create the adapter instance within the Data Services Management Console for the FeedsAdapter. To create an instance for the FeedsAdapter, open the Data Services Management Console by going to https://ServerName:8080/DataServices.
Step 1. Click the job server (1 of Figure 9) in the Adapter Instances node.
Step 2. Go to the Adapter Configuration tab (2 of Figure 9).
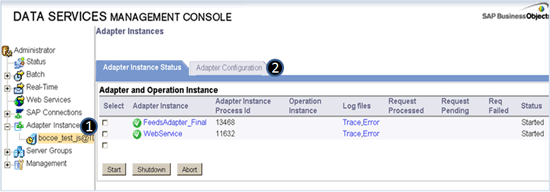
Figure 9
Select the job server
Step 3. Adapter Configuration Tab opens as shown in Figure 10. Click the Add button and the Select the FeedsAdapter (Figure 11).

Figure 10
Adapter Configuration tab
Figure 11
Select FeedsAdapter
Step 4. The Adapter instance start-up configuration window opens. Enter the name for the new instance of the FeedsAdapter in Adapter Instance Name field (Figure 12).

Figure 12
Name the instance for the FeedsAdapter
Step 5. Click the Apply button. Go back to the status page and check the status of new adapter instance you just created (Figure 13).
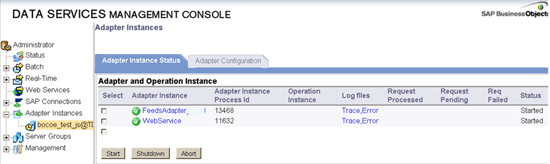
Figure 13
Adapter status
Design the Dataflow Using the Adapter Instance in the BODS Designer [header 2]
Now we discuss how the adapter is consumed in the BODS Designer for reading the streaming data and subsequently used for text data analysis. We create two data flows. The first data flow fetches the Twitter data and stores it into a relational database table. The second performs text data processing, and the output can be saved again in any relational database. We saved the output in an SAP HANA target table. In any other data services environment, you can use the available database as the target.
Dataflow 1: Fetch Twitter Data
To fetch the Twitter data follow these steps:
Step 1. Create a DataStore of the type Adapter and select the adapter instance from the list (Figure 14).
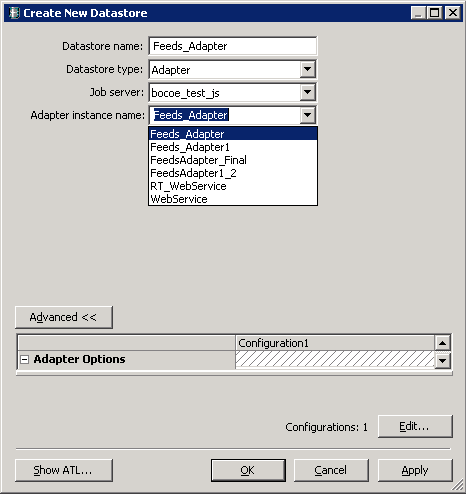
Figure 14
Create a new DataStore
Step 2. Right-click the adapter and select Import by Name (Figure 15). The account type is Twitter. The Metadata Name is func_call. There are two metadata files in the root folder – func_call.in and func_call.out. Therefore, the metadata name has to be the same (i.e., func_call). The Number of Feeds field is for the number of data feeds the user wants to fetch.

Figure 15
Import function
Step 3. Create a new job Feeds_Adapter. Add the data flow Data_from_twitter, which fetches data from Twitter and puts it into a relational database (Figure 16).
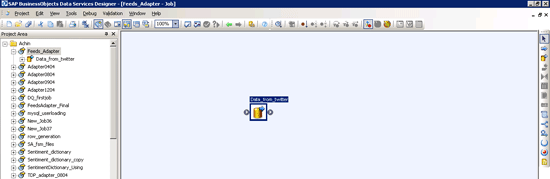
Figure 16
Add new Dataflow Data_from_Twitter
Step 4. Add a source table adapter_username and query transform to it (Figure 17).
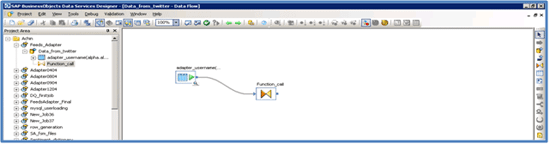
Figure 17
Add Source Table
Step 5. In the query transform, right-click the query and select a new function call. Select the DataStore and then choose the function that needs to be imported (Figure 18).
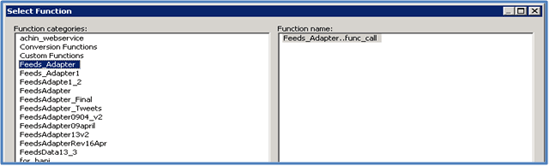
Figure 18
Select the function
Step 6. Map the input username to CustomerName. CustomerName is the input to the function that returns four tags from Twitter: created_at, id, text, and name as output (Figure 19).
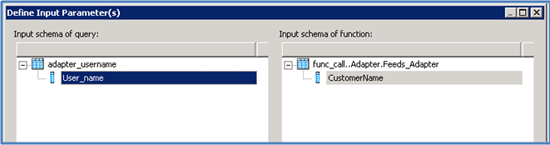
Figure 19
Define input parameters
Step 7. Add another query to the data flow that unnests the nested schema from the function (Figure 20).
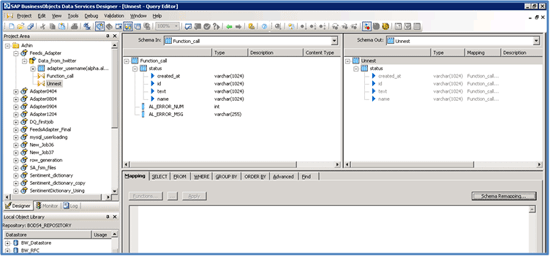
Figure 20
Unnest the Nested Schema
Step 8. Add a template table as the target and connect it to data flow (Figure 21).

Figure 21
Add the template target table
Step 9. Execute the job and see the result data in the template table data_from_twitter (Figure 22).

Figure 22
Job Execute results
Dataflow 2: Text Data Processing [header 3]
Step 10. Add the second dataflow TDP_Twitter in the sequence. This data flow does text data processing on the Twitter data and categorizes the sentiments as weak, strong, or neutral (Figure 23).
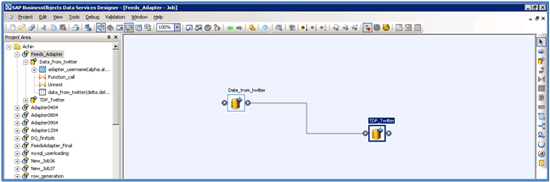
Figure 23
Add DataFlow TDP_Twitter
Step 11. Add output from the previous dataflow (TDP_Twitter) as the source to the new dataflow. Add Base_EntityExtraction to the source (Figure 24).

Figure 24
Add Base_EntityExtraction
Step 12. Map the text column from input to the text in the transform. Map other input columns as they are. Select a few output columns as per the requirement (Figure 25).
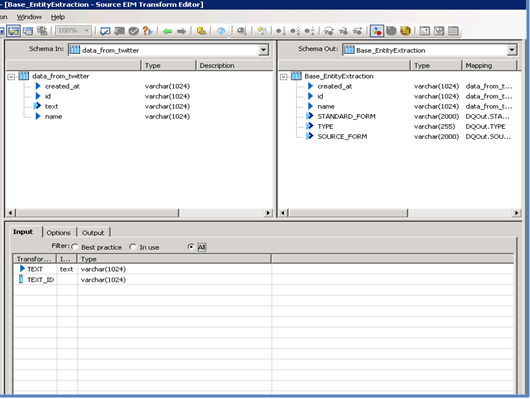
Figure 25
Map input and select output columns
Step 13. In the Options tab, select the language as English and check Dictionary Only as NO (Figure 26). The Dictionary Only field has two drop-down options, YES or NO. This field is set to YES when you want to use a prebuilt or custom dictionary. For sentiment analysis you use a rule instead of a dictionary, and therefore this field is set to NO.
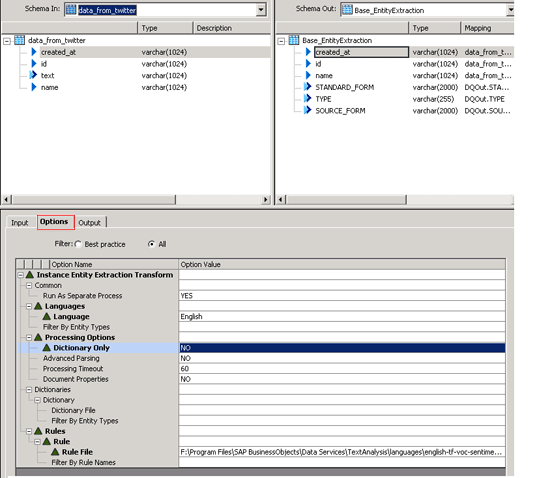
Figure 26
Options tab in base entity Extraction Transform
Step 14. In Rule File option in Figure 26, browse for english-tf-voc-sentiment.fsm in the languages folder in the installation directory (Figure 27).
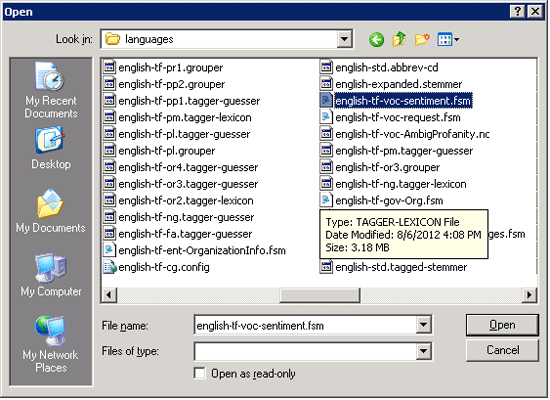
Figure 27
Select a Rule File
Step 15. Execute the job Feeds_Adapter by right-clicking [ Feeds_Adapter] and selecting Execute (Figure 28).
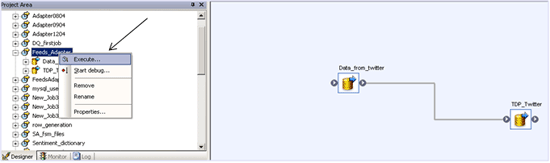
Figure 28
Execute the job to source data from Twitter
Step 16. Both the data flows run and provide the output of sentiment analysis in an SAP HANA target table (Figure 29). The output text data can be used for customer sentiment analysis – for example, categorizing it as strong, weak, or neutral.

Figure 29
Final output of sentiment analysis
(The JAVA code logic for sourcing text from Twitter was contributed by
Siddhant Mishra, an associate at Tata Consultancy Services who
specializes in Java programming, Web application development, and
business intelligence.)
Shreekant W. Shiralkar
Shreekant W. Shiralkar is a senior management professional with experience on leading and managing business functions as well as technology consulting. He has authored best selling books and published many white papers on technology. He also holds patents for innovations. Presently he is global head of the SAP Analytics Centre of Excellence at Tata Consultancy.
You may contact the author at s-shiralkar@yahoo.com.
If you have comments about this article or publication, or would like to submit an article idea, please contact the editor.

Meenakshi Chopra
Meenakshi Chopra is an associate at Tata Consultancy Services with 15 years of experience in IT serving the banking, manufacturing, and travel & hospitality Industries. Meenakshi is part of the leadership at SAP Analytics and SAP HANA Center of Excellence at Tata Consultancy and is engaged in architecting and designing solutions on SAP BusinessWarehouse, SAP BusinessObjects, and SAP HANA platforms. She is an engineer with specialization in electronic instrumentation.
You may contact the author at meenakshi.chopra@tcs.com.
If you have comments about this article or publication, or would like to submit an article idea, please contact the editor.

Achin Kimtee
Achin Kimtee is a software engineer with three years of IT experience. Currently he is working in Tata Consultancy Services as SAP Business Objects consultant. His core technical area is SAP Data Services while he has also worked in SAP Business Objects reporting tools such as Universe Design, Dashboards, and Web Intelligence.
You may contact the author at achin.kimtee@tcs.com.
If you have comments about this article or publication, or would like to submit an article idea, please contact the editor.