By understanding and leveraging all the Warehouse Management (WM) tools SAP provides, you can satisfy even your most complex placement requirements. Here’s how to get started.
Key Concept
SAP’s Warehouse Management (WM) module provides extensive placement strategies, which you can configure to meet a wide variety of needs. SAP WM has the ability to be simplistic (“Just find an empty bin”) or robust (“Find an opportunity to consolidate this putaway with material already in the bin considering capacity constraints”).
- Safe: Keeping heavy
items in the “golden” zone
(waist height) avoids bending over
and back injuries. Enforcing maximum
stack heights can keep pallets from
becoming so high they collapse.
- Rapid: Placing
fast-moving items in the locations
closest to shipping areas allows for
faster picking for the items that are
most frequently required.
- Low-cost: Effective
placement of materials can reduce replenishments
or other non-value-added moves.
- Accurate: Using
radio frequency (RF) technology to
confirm locations coupled with strategies
to isolate items likely to be pilfered
allows confidence that you can locate
materials when they are needed.
- Damage-averse: Enforcing
stack heights or placement into locations
suited for certain material storage
reduces product damage.
Solid placement and removal strategies
are usually the result of observing these
principles. The Warehouse Management
(WM) module in SAP R/3 and ECC can assist
in these areas. This article examines
some of SAP’s placement strategies
and how they can help enforce wise storage
of materials. In a subsequent article,
I’ll examine removal strategies.
Note
SAP intends WM to be highly independent of other SAP modules; however, most users will find that Inventory Management (IM) is required to implement WM. This is true through ECC, although with later versions the ability to run independently of other SAP modules has increased.
Understand the Control
Elements
Learning how to manipulate SAP’s
standard-delivered warehouse management
strategies requires an understanding
of how SAP organizes the warehouse. The
strategies work within SAP’s organizational
elements and can influence how a warehouse
is systematically defined. The few terms
detailed in Table 1 are just a subset
of the control elements SAP WM provides;
others are relevant only for picking
and I’ll address them in a follow-up
article. For now, I’ll look at
how SAP uses these elements, along with
strategies, to place materials into a
warehouse.
Step 1. Locate a storage type. WM
allows users to define putaway indicators
on the material master. The putaway indicator
is a pointer to IMG configuration that
defines the sequence in which storage
types (zones) should be searched when
seeking a putaway location. These putaway
locations can be influenced by a variety
of factors, such as the type of receipt
being performed. Figures 1 and 2 show
the Warehouse mgmt 1 view
of the material master (transaction MM02)
and the WM configuration (transaction OLML then Options>Warehouse
Management> Strategies>Activate
Storage Type Search) governing
the putaway sequences. Notice that the Stock
placement indicator showing 002 is
referenced in the placement table in
Figure 2.
| WM term |
What it is |
A warehouse example |
| Storage
type |
A warehouse zone; an area where
all bins generally serve the same
purpose |
A high rack location |
| Storage
section |
A subdivision of a storage type
(zone); a subset of bins that should
be treated slightly differently than
other bins within that storage type |
A row (level) within a high rack
location |
| Storage
section |
A distinct location to which you
can direct a user |
A specific slot within the warehouse |
| Table
1 |
Key
SAP WM terms |
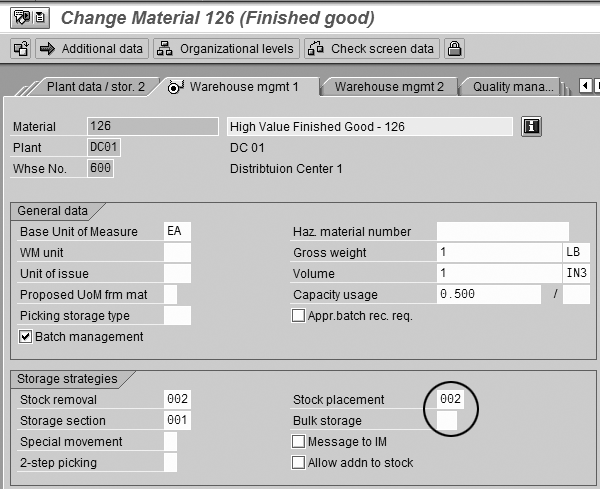
Figure 1
Locate a storage type in WM view 1 on the material master

Figure 2
Find the storage type in the Storage Type Search sequence
The storage type search sequence table
has a significant number of key fields.
The first three shown in Figure 2 are
the simplest to understand and most commonly
used. The warehouse number (Whse)
allows different warehouses to have different
strategies, potentially even for the
same material. This is important because
it is unlikely that any two warehouses,
even within the same distribution network
for the same company, will be set up
in the same way.
The second column, operation (Operat),
is generally either A or E: A for
the strategy for picks and E for
the strategy for placements (an easy
way to remember that is A for “away
from the bin” and E for “entering
the bin”). The need for A or E may
not be apparent, as you may think different
indicators could be used for placements
or removals versus a combination of
indicators and operations. Once you
engage in more advanced placement scenarios,
the ability to define custom operations
beyond the standard A and E and link
them to specific movement indicators
becomes valuable.
The third column shows the linkage
between a strategy and the item (TyIn).
The material master in Figure 1 referenced
strategy 002 and is
the warehouse management view for warehouse 600 (the
WM views are warehouse-specific). This
means that for a placement in warehouse 600,
the system looks first in the warehouse
column for 600, then
in the operation column for E,
since this is a putaway, and lastly
in the indicator column for 002.
The non-key fields (white area with
column heading 1 and moving to the
right) indicate the storage types (zones)
where the material should be placed
and the preference for placing into
each storage type. The most preferred
zone is on the left and the least desirable
zone is on the right. You can define
up to 30 zones within the search sequence.
The remaining columns can influence
the putaway if the material is in a
specific status or based on the type
of inventory management movement causing
the warehouse placement.
In Figure 2, you can see the material
should be placed in storage type 025.
However, if no suitable bins are found,
then the system searches in storage
type 005. Other items
in the warehouse might have completely
different putaway strategies. For example,
if the strategy assigned to a material
was 001, in this example
the system would look in storage type 003 and
then 001.
Step 2. Identify an appropriate
storage section. Another
of the WM organizational elements
is a section indicator. Storage sections
are similar to storage types in that
you can define an indicator and a
sequence of sections searched. The
method for defining a search through
storage sections is similar to the
method for defining a search through
storage types: create the strategy
and link an indicator to that strategy
to the material on the material master. Figure
3 shows the section indicator
on the material master. In Figure
4, you can see how that
indicator is telling the system what
sections to search in storage type 025.

Figure 3
Set the storage section indicator on the Warehouse mgmt 1 view to search

Figure 4
Find the section in the Storage Section Search sequence
In this example, the system looks
first for bins within the FST (fast)
section and then in the SLW (slow)
section. A different item that is not
ordered as often could be placed in
the same storage type but go into the SLW section
simply by copying the existing search
sequence into a new search sequence
and reversing the FST and SLW sections.
Step 3. Understand how a
specific bin is identified. Most
people may think of “addition
to stock” or “next empty
bin” as strategies, but they
are actually attributes of the storage
type. After SAP finds the appropriate
storage type and section for a material,
it runs the strategy associated with
that storage type to actually identify
a bin. This may seem straightforward,
and I’m identifying bins in
the simplest of terms for the sake
of this article, but many considerations
beyond the strategy can come into
play. For example, available bin
capacity, the maximum weight allowed
within the bin, and even the container
in which the goods are transported
(wire basket, industrial pallet,
plastic tote) can influence which
bin is selected. In fact, you can
classify bins via a Storage
bin type attribute
to be more inclined to accept European-sized
pallets than American. This seemingly
trivial distinction can actually
be very useful for warehouses with
both European and American manufacturing
plants supplying products.
Apart from such complexities, any
company using WM must address certain
strategies when locating a bin. Table
2 shows the most common strategies.
| WM strategy |
What it does |
An example of where
to use it |
| Addition
to stock |
Looks for opportunities to consolidate
stock within a bin |
A warehouse that is space-constrained,
where mixing of products is not
a concern |
| Near
picking bin |
If the item has a fixed picking
position, try to place materials
near that fixed picking location |
A facility that wants to reduce
replenishment time by always having
a pallet located near the primary
picking location |
| Bulk |
Allows user to store many pallets
of product within a location while
setting limits on material placement
so the bin is still turned regularly |
A location where items stored
on the floor in long rows and the
first — and probably oldest — items
are inaccessible until all other
items have been picked |
| Next
empty bin |
Locates the next empty bin in
that storage type/section combination |
When each material is to be placed
in its own location |
| Table
2 |
Common
bin location strategies |
Figure 5 where the
Putaway strategy is indicated. This
is defined at OLML>Warehouse
Management>Master Data>Define
storage type.

Figure 5
Storage type definition, where a Putaway strategy is assigned to a storage type (zone)
How It All Works Together
Figure 6 shows how
WM finds an appropriate storage type,
looks for an appropriate storage section,
optionally looks for an appropriate
bin type (e.g., the European pallets
vs. American pallets issue), and then
ultimately looks for an appropriate
storage bin.
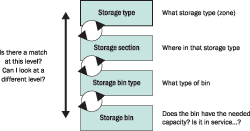
Figure 6
How the system searches within WM organizational elements for an available bin
Remember that the search process is
nested. When a storage type is identified,
all possibilities within that storage
type are searched. Likewise within
a storage section, all possibilities
within that storage section are searched. Figure
7 shows how an SAP system
searches all permutations within a
storage type and then moves to the
next storage type where it again searches
all permutations before looking to
yet another storage type, and so on.

Figure 7
The system searches within a storage type for all permutations, then looks to the next storage type and search all permutations, and so on until a bin is found
Troubleshooting
Despite the robust ability of WM
to identify appropriate bins for placement,
any project can have an “But
I cannot do…” moment.
Frequently, the strategy is blamed,
but a couple considerations to remember
are:
- If the strategy does not seem
flexible enough for your storage
type, perhaps you need to split your
storage type into two and assign
different strategies to each.
- Through the use of storage sections,
can you subdivide storage types,
enabling more granular placement
of material?
- Could one of the more complex
areas this article alluded to, such
as a capacity check, enforce required
constraints on the bin?
Unfortunately putaway rules and the
warehouse structure supporting the
putaway process sometimes interact
unfavorably. For example, retrieval
strategies follow a similar process
to find the removal bin, and you may
find that configuring the warehouse
for an optimal putaway strategy occasionally
interferes with the desired warehouse
structure for an optimal retrieval
strategy. In this case, WM allows custom
placement strategies, which can enhance
what SAP provides. For more information,
it is worthwhile to investigate user
exit MWMTO003. Refer
to the SAP-provided documentation for
that user exit and the article, “Develop
Custom Placement Strategies in WM” by
Ali Sarraf in the September 2005 issue
of SCM Expert.
While SAP WM provides significant
flexibility, it is best not to become
more sophisticated than necessary (or
than users can understand). An overly
sophisticated putaway strategy can
lead to overly complex placement processes,
in which problems can take a long time
to diagnose. In this case, the best
alternative is to simplify the strategy.
Troubleshooting assistance is possible
via an SAP-provided tool in the transfer
order generation screen (Figure
8). To view the search log,
create the transfer order in the foreground
(for example, via transaction LT01),
and select Environment>Storage
bin search log.
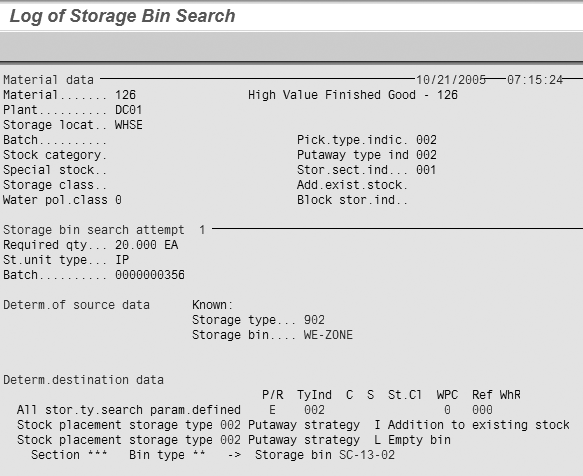
Figure 8
Review the rules SAP considered when generating a problematic putaway
Chris Moose
Chris Moose is a partner in IBM's Global Business Services organization where he is the sponsor of SAP warehouse management and transportation management offerings. With worldwide responsibility for these offerings, he has helped expand IBM's delivery capabilities globally and has personally delivered projects on four different continents. His specific interests include the use of technology to address the historical fixed cost nature of supply chains enabling flexibility and then quantifying that business value with a benefits realization focus. In addition to his practice management and delivery focus, Chris is a frequent speaker at industry events as well as an author for industry magazines.
You may contact the author at chris.moose@us.ibm.com.
If you have comments about this article or publication, or would like to submit an article idea, please contact the editor.