Find out how to use a Business Add-In in SAP BusinessObjects Planning and Consolidation to read the dimension members and their properties within the same AppSet or any other AppSet. This enables you to create reports from data that you access in two different applications.
Key Concept
Business Add-Ins (BAdIs) furnish developers with the ability to extend the SAP application to realize unique business logic not available in the SAP standard delivery. While the concept of BAdIs was introduced as early as SAP R/3 Release 4.6, only as of SAP NetWeaver 7.0 has this technology been integrated in the new Enhancement Framework and been based on ABAP Objects. You can use BAdIs for numerous reasons, such as to personalize the application to meet a requirement for your industry or country.
A typical SAP BusinessObjects Planning and Consolidation implementation has one application set (AppSet) with several applications (i.e., sales planning and profitability planning) in the same AppSet. Because most planning applications are tightly integrated, you often may need to look up application data from another application (or look up a dimension member or dimension member attribute) and then execute business logic on the data. In the case of SAP BusinessObjects Planning and Consolidation, you can do this by using a Business Add-In (BAdI) to furnish lower-level access to AppSet dimensional data and transactional data.
For example, say you use the sales planning application to plan the monthly sales by material. You need to calculate the cost of the goods sold. The cost for each material is stored in a different cost application. You could use the BAdI to read the cost from the cost application and use it in the sales plan application logic.
I provide a sample ABAP program that explains how to read the dimension members and their properties within the same AppSet or any other AppSet using this feature. My scenario uses a BAdI to read another application’s data based on a member’s property or attribute. In my example, I want to read promotion data stored at the product group level in the promotion application based on the product attribute from the source application, sales.
This example requires the following software:
- SAP NetWeaver BW 7.0 with an SAP BusinessObjects Planning and Consolidation Add-on
- SAP BusinessObjects Planning and Consolidation 7.0, version for SAP NetWeaver
-
.NET server
Create the Sales and Promotion Applications
Follow these steps to create the two applications D_SALES (sales planning application) and D_PROMOTION (promotion planning application) to demonstrate the use of a BAdI in SAP BusinessObjects Planning and Consolidation.
Step 1. Create a reporting financial application D_SALES from the BPC Admin client with the dimensions shown in Figure 1.
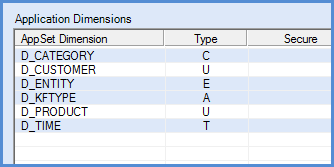
Figure 1
The dimensions you need for the D_SALES application
Step 2. Populate each dimension with values. From the BPC Admin, select the dimension, click Maintain dimension members values, and add entries. I want to plan sales dollars at the customer, product, and entity level in the sales application. I need to populate the customer, product, and entity to store the data at that level. The CATEGORY dimension stores the version (e.g., plan, budget, actual). In my example I focus on PLAN1 (row 4) in Figure 2, so the other rows are optional.

Figure 2
Add members to the category dimension
For the time dimension, add three rows: JAN.2010, FEB.2010, and MAR.2010. For the KFTYPE dimension, add three entries: SALEPRICE, DISCOUNT, and ACTPRICE. Finally, for the customer dimension, add customers — I focus on CUST1 in my example (Figure 3).
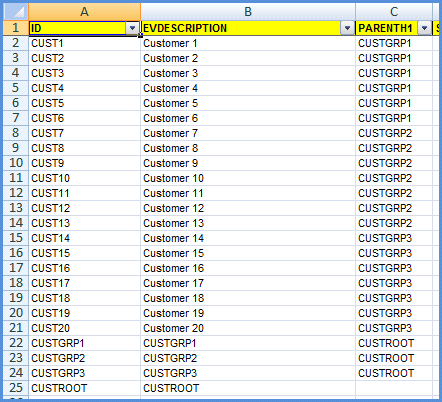
Figure 3
The CUST1 member is used in the example — the rest of the members are optional
Step 3. From the BPC Admin client, create the D_PROMOTION application with the dimensions in Figure 4. You need to create this application to plan the product promotion at the product group level. You can use the same category, entity, and time dimension in this application as in the D_SALES application.
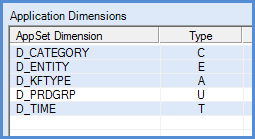
Figure 4
Make sure that the promotion application includes all these dimensions
Because you are using the same values for the category, entity, and time dimensions, you only need to add members to the product group dimension. As shown in Figure 5, add PENCIL, ERASER, and GLUESTICK to the product group dimension. (The other entries are optional.)
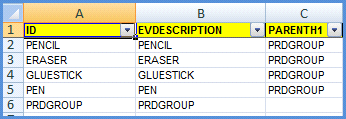
Figure 5
Add members to the product group dimension
Create Input Schedules for Data Entry
You now have two applications: the sales application and the promotion application. I’ll use the sales application to plan the product sales at the customer level with three accounts (i.e., key figures):
- ACTPRICE: Actual price of the product
- DISCOUNT: Discount given to the customer based on the product and the region or entity
- SALEPRICE: Sales price after the discount
I’ll use the promotion application to plan the promotion at a product group level.
Step 1. Now you need to plan the promotion data by entity (store) at the product group level. In my example, I use STORE1 as the entity, DISCOUNT as the KFTYPE, 2010.Q1 as the time, and PERIODIC as the measure (Figure 6). Select these entries on each dimension on the Current View by clicking the Dimension Name link and selecting the value from the dimension members list.

Figure 6
Set the values for the promotion plan data
Step 2. After selecting the Current View data, create the input schedule to enter the plan data. From the eAnalyzer menu in the BPC Excel GUI, select Open Dynamic Report template. Then select Subtotals by Accounts to create an input schedule for the D_PROMOTION application where you can enter the promotion data and store it to the promotion application. On the input schedule created from previous step, enter values for PENCIL, ERASER, and GLUESTICK for 2010.JAN as shown in Figure 7. For example, for January 2010, I am planning a 5% discount for pencils.

Figure 7
The input schedule
Click the Send Data link on the right panel from the input schedule to send the data. The system updates the 2010.Q1 column automatically (Figure 8).

Figure 8
After you send the data, the system updates the 2010.Q1 totals automatically
Step 3. Now switch the application from D_PROMOTION to D_SALES on the BPC Excel GUI current view. I am planning the sales plan data for all the products for customer CUST1 in ENTITY STORE1 for 2010.JAN. Select the members on the Current View as shown in Figure 9.
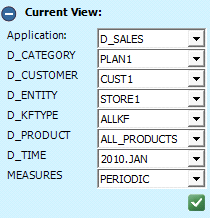
Figure 9
Select the values for the sales application
After selecting the members on the current view, follow menu path eAnalyzer > Open Dynamic Report template > Subtotals by Accounts to create a new input schedule for the D_SALES application. The business users enter the sales plan data and then store it in the sales application.
Step 4. Enter sales plan values for the products (e.g., Pen Type 1) for period 2010.JAN using the input schedule (Figure 10). When the users enter plan data, the column background changes to red to indicate that the column value has been changed. Because I selected 2010.JAN on the current view in Figure 9, the period is not shown on the input schedule.

Figure 10
Sales Plan data for Pen Type 1, Pen Type 2, Pen Type 3, Pencil Type 1, and Glue Stick Type 1
Step 5. Click the Send Data link from the right panel on the input schedule to save the plan data values to the sales application. After you save the data, the All KF Types column shows the total of all the accounts and amounts, including sale price, discount, and actual price (Figure 11).

Figure 11
Saved input schedule with the ALL KF Types column populated
Create BAdI ZBPC_BADI_LOGIC_IMP
To calculate the sales price on the sales planning application, you need to use the promotion stored in the promotion application as part of the calculation. The process should flow as follows:
- Read the promotion application
- Get the discount percentage for the each product group for the period
- Post the discount amount to the sales application
- Calculate the sales price after the discount amount in the sales application
- Post it to the sales application
To achieve this, create a new BAdI implementation ZBPC_BADI_LOGIC_IMP and the process chain ZPC_CALC_DISCOUNTS to run the script logic by following the steps described in “How to Pass Parameters to Custom Logic BADI using START_BADI.”
For each line from the sales InfoCube, the BAdI logic needs to read the product, read the product’s attribute D_PRDGRP, and then read the promotion InfoCube to get the promotion (i.e., plan value) for the product group for the time period. Insert the code provided for this at the end of the article into ZBPC_BADI_LOGIC_IMP.
Execute BAdI ZBPC_BADI_LOGIC_IMP
Now that you have created the BAdI implementation, you need to execute the BAdI so that the system calculates the business logic and sale price and stores the sale price in the sales application. To execute the BAdI, create script logic by going to the left panel in the BPC Admin GUI and following menu path Application > SALES > Script Logic. Click the Create New Logic link on the right panel and then click CALC_PROMOTION in the sales application. In the screen that appears, enter the code shown in Figure 12.
Note
This example executes the logic for 2010.JAN only. However, you can execute the logic using <ALL> for all months.

Figure 12
The code to call the BAdI from the script logic
Next, navigate to Manage Data > Maintain Data Management > Maintain Packages. On the right panel, right-click and select Add a new package Group — Publish. Then, select the newly created Publish folder on the left side panel.
From the right panel, right-click and Select Add a new Package — CALC_PROMOTION. As shown in Figure 13, provide the description Calculate Promotion and select the process chain you created in the “Create BAdI ZBPC_BADI_LOGIC_IMP” section (in my example, ZPC_CALC_DISCOUNTS).

Figure 13
New Package CALC_PROMOTION under the Publish Package Group
Next, execute the Data Manager package by following menu path eTools > Data Manager > Run a Package. Select the Publish package folder on the left side. Select the CALC_PROMOTION on the right panel and click the Run button on the bottom of the screen.
After you execute the package, switch to the sales input template you created in the “Create Input Schedules for Data Entry” section. The discount percentage should be populated in the sales application and the sales price after discount should be calculated using the discount. All three accounts have values now (Figure 14).

Figure 14
The final input schedule output with values for sale price and discount
Thiagu Bala
Thiagu Bala is the owner of Aster Logic, Inc., and is an SAP-certified consultant in SAP BW 2.0, 3.0, and 3.5, SAP NetWeaver 7.0, SEM-BPS/CPM, Integrated Planning (IP), SAP BusinessObjects, and Crystal Reports. He has more than 13 years of experience in SAP specializing in BI, IP, SAP BusinessObjects, and SAP BusinessObjects Planning and Consolidation. You can check his profile on https://www.linkedin.com/in/thiagubala.
You may contact the author at thiagu.bala@asterlogic.com.
If you have comments about this article or publication, or would like to submit an article idea, please contact the editor.


