Manager
Explore the standard way of creating and customizing the standard transaction type SMIN for incident management. Use a wizard-based feature in SAP Solution Manager 7.1 to create a Z transaction type, enabling users to have work center-based customized transaction types per their requirements. This method is faster than modifying the standard transaction type, and reduces much of the risk.
Key Concept
SAP Solution Manager 7.1 Incident Management provides a quick, easy way of creating a customer-specific transaction type for incident management via a standard wizard available in SAP Solution Manager 7.1. It reduces the time to implement customized service desk or incident management for any company.
During multiple SAP Solution Manager 7.1 implementations, I have seen the standard transaction type SMIN (which replaces SLFN) is not always used because of customer-specific requirements such as a customer-specific status profile, text, or additional partner functions. This requires a customized version of the transaction type with a different set of status values or new actions for tasks such as triggering emails. For example, if a company wants to have 10 additional status values or another set of partner functions apart from the standard options, it can do so without modifying the standard transaction type. Instead the company can create a new status value or partner function based on company needs.
A transaction type comprises various subcomponents such as user status profile, action profile, number range settings, partner determination, and text determination procedure. You might need to customize status values (e.g., various levels of support for different issues) so you can explore a new way of configuring them via the standard wizard offered out of the box in SAP Solution Manager 7.1. It takes care of all the necessary SAP Notes and other settings in proper order.
I’ll show you the steps required to create a new transaction type, ZMIN, based on SMIN in SAP Solution Manager 7.1. You can do this by using a standard wizard in transaction SOLMAN_SETUP.
Note
I am assuming you have completed the other basic (and required for running incident management) settings per
the incident management configuration guide. Settings include completion of transaction SOLMAN_SETUP post-installation activities and master data creation (e.g., business partner and IBase).
Step-by-Step Process
Enter transaction code SOLMAN_SETUP in SAP Solution Manager 7.1 (Figure 1).

Figure 1
Initial screen in SAP Solution Manager 7.1
The initial screen for the wizard opens in the browser (Figure 2). Click IT Service Management on the left side to bring up the screen in Figure 3. (Since I’m assuming standard setup for incident management is complete and running, I’m skipping the first step of checking prerequisites.)

Figure 2
Initial SAP Solution Manager setup screen in Web browser
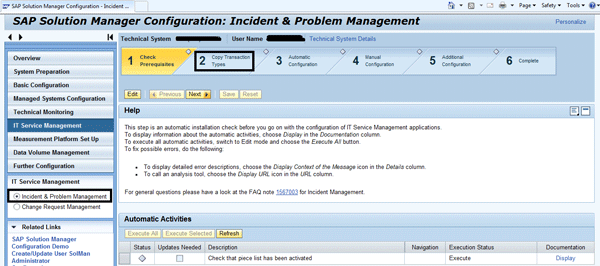
Figure 3
Incident and problem management copying step
Go through the help text as shown in the figure to understand the prerequisites required for a particular step. Note that there is documentation attached to each step, so click the Display link to open the document for any step for which you need more information (Figure 4).

Figure 4
Documentation for the Check that piece list has been activated step in Figure 3
Click the Copy Transaction Types step (Figure 5). Click the Edit button to go into change mode. Then click the Transaction link (Figure 6).

Figure 5
Display screen with manual activities
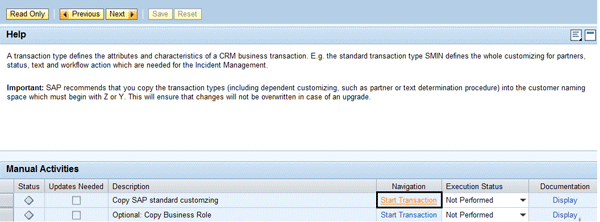
Figure 6
Start Transaction option in edit mode
Another window in the Web browser opens with the initial interface for copying the transaction type (Figure 7). Press F4 to select the standard transaction type SMIN.
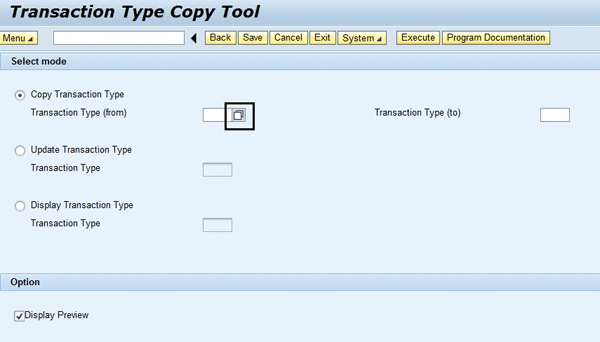
Figure 7
Select the standard transaction type
This provides the standard list of all existing transaction types. Choose the SMIN option and press Enter (Figure 8).
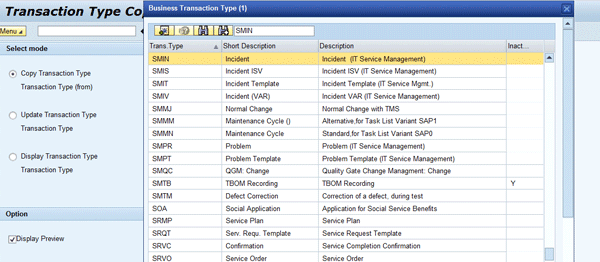
Figure 8
Search results with standard transaction types available
Choosing SMIN takes you back to the initial copy transaction type screen with SMIN as the source value (Figure 9). In the Transaction Type (to) field, enter ZMIN (the name of your new Z transaction type).

Figure 9
Source and target transaction type value
The next screen allows you to create the various subcomponents of the transaction type (Figure 10). You can also add descriptions to each subcomponent.
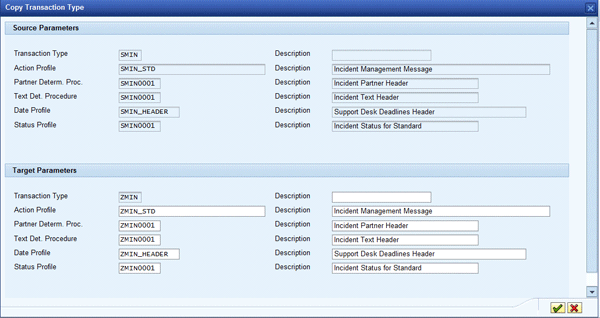
Figure 10
Customizing description for target parameters
Press Enter to go to the screen in Figure 11. This lists all the affected table entries and tells you the detail while creating the new transaction type. This is just an additional message for your understanding so you can verify you are proceeding correctly. It will be in display mode only. Click the Start Copying process button so your custom transaction type is created, along with all the subcomponents.
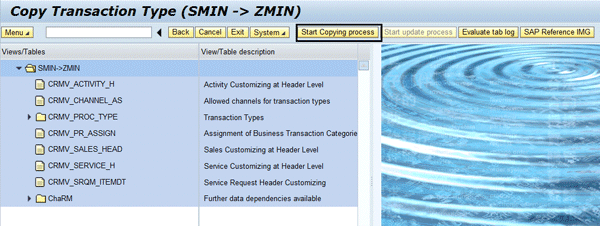
Figure 11
Views/Tables detailed entry screen
Since you could have a three-tier or two-tier system landscape, you get the option of saving the new transaction type and other subcomponents in a transport request. You can do all this customizing in the development system and later move it to quality or production after testing. The pop-up screen in Figure 12 appears for saving the changes to the transport request. Provide the value and click the green check mark icon.

Figure 12
Prompt for customizing request
Similarly, you get a prompt for workbench transport request (Figure 13). Provide the value and proceed further.

Figure 13
Workbench request
You get a confirmation message and all the icons are green if everything is correct (Figure 14). If not, the icon is red and you can expand on the node to see what went wrong.

Figure 14
Display of result log
Figure 15 shows the detailed log for the first line item in the previous screen.

Figure 15
Detailed view of result log
Click the Exit button and return to the Copy Transaction Type screen (Figure 16). Click the Exit button again until you get back to the transaction SOLMAN_SETUP wizard screen. Update the status for the Copy SAP standard customizing step to Performed (Figure 17).

Figure 16
Copy Transaction Type screen

Figure 17
Change the execution status to Performed
Now that you have created the new custom transaction type and subcomponents, you can enhance the status profile or action profile via a wizard in transaction SPRO. Use transaction SPRO or follow menu path SAP Solution Manager Implementation Guide > SAP Solution Manager > Capabilities (Optional) > Application Incident Management (Service Desk). Click the status profile or action profile to enhance the Z status profile or action profile as per requirement and you can create new status values or actions. This eases the entire customization process for incident management and you can quickly do the configuration with the wizard.
This wizard saves a considerable amount of time. If you do it manually via transaction SPRO, transaction types and subcomponents can only be created one by one, and later subcomponents need to be added to the custom transaction type, wasting several hours of effort.
Prakhar Saxena
Prakhar Saxena is an SAP Solution Manager-certified consultant with more than six years of experience. He currently works with Capgemini India Pvt Ltd as an SAP Solution Manager SME and is involved with SAP Solution Manager Implementations and upgrades across the world for various clients. He has worked extensively with Project Management, Test Management, Solution Documentation Assistant, Service Desk, and Change Request Management. He has also built proof of concepts (POCs) and demos for various companies around the world.
You may contact the author at prakhar_alld@yahoo.co.in.
If you have comments about this article or publication, or would like to submit an article idea, please contact the editor.


