Learn how to create a saved search in the CRM WebClient UI and make it available to a group of users. See how you can transport a predefined saved search from your development system into other environments, and expand the functionality of saved searches to make dynamic parameters. Discover how, with SAP’s new Central Sharing Tool (CST), delivered with SAP CRM 7.0 enhancement package 1, it is even easier to share saved searches and other objects across users, positions, organizations, and business roles.
Key Concept
SAP CRM makes it easy to create a saved search so that users can easily find the information they need. Whether users are searching for contacts, leads, opportunities, campaigns, or other information, they can save their search parameters so that they can quickly find the same records the next time they use SAP CRM. This functionality can be expanded so that standard searches can be made available to a group of users, saving each person the effort of creating the query. In addition, searches can be created in a development environment and promoted to production, and the saved search can be automatically updated so that the parameters are dynamic.
Anyone who is familiar with the CRM WebClient UI understands the importance of effective search capabilities. Before you can view or edit any type of SAP CRM record, you must first perform a search to generate a list of records that meet specific criteria and then drill down into the record you want to view or edit by selecting it from the list. Because users tend to look at the same groups of records on a regular basis, SAP provides the capability to save search parameters so that they can be used for subsequent queries. Users can then go into their list of saved searches to quickly retrieve SAP CRM records they want to review.
Saved Search Basics
Here’s an example of how the saved search functionality works. Suppose a user is responsible for reviewing all opportunity records that have a start date within the previous month. By selecting the Start Date field in the CRM WebClient UI, using the operator is between, and specifying a date range, the system quickly locates the records that match these parameters. Because this is a frequently used search, the user enters the name Opportunities This Month and clicks the Save button to make it a saved search (Figure 1).

Figure 1
Search parameters are entered on the search screen
Now that the search is saved, the user can access it to quickly retrieve the same set of records. On the Home screen the query now appears under My Saved Searches (Figure 2). Each search on the list is a hyperlink, so clicking the name takes the user to the search result list for the selected query.

Figure 2
Saved searches appear on the Home screen under My Saved Searches
In addition, saved searches are accessible from many screens within the CRM WebClient UI. In the upper-right section of most SAP CRM screens, a pull-down list of saved searches is available (Figure 3).

Figure 3
The saved search list is available on many screens
Saved searches are also available in the Interaction Center and are particularly useful for non-customer-facing back office roles, such as second support technicians who use the agent inbox to process customer service requests. Even though the Interaction Center role is usually not configured with a home screen to provide access to the My Saved Searches seen in Figure 2, Interaction Center agents can still access saved searches via the drop-down list in the upper-right section of the screen (Figure 4).

Figure 4
Saved searches are accessible from Interaction Center roles
By selecting a search from the list and clicking the Go button, the user executes that query. SAP also provides tools for users to manage their saved queries. By clicking the Advanced button (Figure 4), users can see the parameters that have been embedded into a saved search. Additionally, you can delete unneeded saved searches by clicking the trash can icon.
Understand How Saved Searches Are Stored
If you create a search named Opportunities This Month as described above, you can see how it was stored in the system and use this information to expand the use of the query so that other users can see it. To start, use transaction code SE16 to view the contents of the following tables:
- CRMD_SHORTCUT — Look for an entry where the Description field contains the name of the saved query (Opportunities This Month). Note that a GUID has been automatically generated as the key for this table. You also see that the AUDIENCE_TYPE is USER and the AUDIENCE_KEY contains the ID of the user who created the query.
- CRMD_SHORTCUT_T — This table stores the description of each saved search in every language to which it has been translated. When you first create a saved search, you do not see an entry for it on this table because descriptions for private queries created by individual users are pulled from CRMD_SHORTCUT. Table CRMD_SHORTCUT_T is not used until the saved search is made available to a group of users.
- CRMT_DYN_QUERY — Find the table entry with a GUID that matches the key on the previous table. This table stores the query parameters in field SELECTION_PARAM, which we explore in detail later.
Make the Query Accessible to Others
To make the saved search accessible to all users within a given business role, you need to make some minor modifications to the entries on these tables. Start by using transaction code SE16 to update the relevant record on CRMD_SHORTCUT. Change the AUDIENCE_TYPE from USER to ROLE, and update AUDIENCE_KEY so that it contains the business role of the users who need to access the query.
For example, a search can be made available to all service professionals by specifying SERVICEPRO as the AUDIENCE_KEY. Next, add an entry to table CRMD_SHORTCUT_T. The GUID must match the key on CRMD_SHORTCUT, and the LANGU field should correspond to default language you are using. Once you have tested your shared query, you can translate the description to other languages by adding entries on this table, but for now, enter the same DESCRIPTION that you see on CRMD_SHORTCUT.
Once you have saved your entries on these tables, you can log in to the system under any ID that has the business role associated with the saved search. You should see the new query both on the home screen and within the list of saved searches.
Note
See
SAP Note 1372708 for a summary of how saved searches can be published to a group of users.
Transport the Query into Other Systems
A typical SAP CRM landscape includes two or three systems where development, quality assurance, and production work are done. You can maintain consistency of shared saved searches across your landscape by creating them in your development system and moving them to production via a transport request.
To do this, create a workbench request in transaction code SE10 and specify an appropriate description. Next, use transaction code SE16 to select the CRMD_SHORTCUT entry for your shared query and select Table Entry > Transport Entries to attach the record to your transport request. Continue by attaching the relevant records from CRMD_SHORTCUT_T and CRMT_DYN_QUERY to the same request, so that all the elements of the saved search are transportable. When the transport request is moved through each system of the landscape, users in each system have access to the saved search.
Make the Query Parameters Dynamic
To see how to make the saved search dynamic, you need to go back and review table CRMT_DYN_QUERY, which stores the query parameters. Use transaction code SE16 to find the table entry that corresponds to your saved search. Look carefully at the contents of field SELECTION_PARAM, and you see that the query parameters are stored as XML. Fortunately, you do not need to fully understand the XML structure to implement the desired functionality. You can simply treat the SELECTION_PARAM field as a character string and manipulate its contents to modify the query.
At a high level, you make the query dynamic by completing these steps:
- Retrieve the contents of the SELECTION_PARAM and store it as a template.
- Replace the static date parameters in the template with placeholders.
- As the date changes on a nightly basis, run a program that reads the template, replaces the placeholders with calculated values that reflect the new date, and overwrites the parameters stored on CRMT_DYN_QUERY.
The first step would be trivial, except for the fact that SELECTION_PARAM has a type of STRING and is too long to be fully displayed in transaction code SE16. Instead, you need to use a simple ABAP program to read the field and break it down into substrings that can be displayed (Figure 5).

Figure 5
Simple ABAP program to read the selection parameters for a specified query and display their full contents
When this code is run for the saved search you created, the long string value in SELECTION_PARAM is separated at the < character, which appears frequently in XML, and you can see the full value of the field (Figure 6).

Figure 6
Contents of field SELECTION_PARAM, stored as XML
Now that you know exactly what is stored in SELECTION_PARAM, you can copy its contents and store them in a template. You can store the template in any location that can be retrieved in ABAP code, such as a flat file or a text object in transaction code S010 — but in this example, reuse the ZVALUE table, which is a generic table of values that is used to associate groups of codes and values.
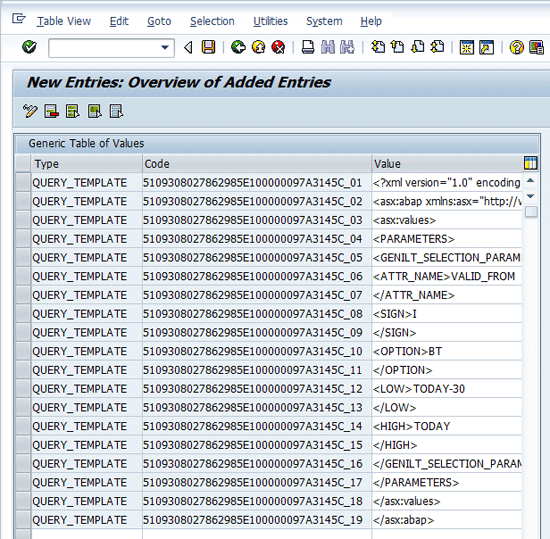
To create the required ZVALUE entries, simply copy the ABAP output starting at <?xml version=“1.0” and paste it into the Value column (Figure 7). Use QUERY_TEMPLATE as the Type for this set of records and paste the GUID of the query into the Code column. Notice that a serial number has been appended to the GUID in each line of the code. This provides you with a unique key for each row of the table, and it allows you to retrieve the lines of the query template in their proper order later. Note that the <LOW> and <HIGH> tags have been modified before they are saved to the ZVALUE table. The static dates of 20121205 and 20130204 have been replaced by the placeholders TODAY and TODAY-30.

Figure 7
The query template is copied into table ZVALUE, where the dates are replaced by placeholders
The final step of the process is to create an ABAP program that performs the following functions:
- Uses the system variable SY-DATUM to retrieve the current date
- Calculates the date 30 days ago by storing SY-DATUM – 30 in a local variable
- Reads all ZVALUE entries that have a type of QUERY_TEMPLATE, accessing them in the order they appear in the Code column
- Overwrites placeholders TODAY and TODAY-30 with the calculated dates
- Loops through the entries and appends each individual value entry to create a single string
- Updates table CRMT_DYN_QUERY with the new string, overwriting the SELECTION_PARAM field of the row where the QUERY_ID matches the GUID of the template
Note
The step-by-step details of how to create this ABAP program are beyond the scope of this article.
After this program has been developed and executed, users who access the saved search are using an updated copy of the query, and the newly calculated date range is used for record selection. As the dates shift on a daily basis, the saved search continues to reflect the dynamic date range as new dates are placed in the query parameters.
Once you have developed this process and have it working correctly for a single query, you can expand this capability to update any number of stored query templates. You may want to develop placeholders for values such as the first day of the month, first day of the quarter, first and last days of the previous year, and so forth. This technique allows you to provide your users with a wide range of dynamic saved searches, making it easy for them to quickly retrieve their SAP CRM records.
The Central Sharing Tool in SAP CRM 7.0 Enhancement Package 1
SAP delivers several usability enhancements for the CRM WebClient UI with enhancement package 1 for SAP CRM 7.0, including new features such as tagging, favorites, and sharing. We won’t delve into tagging and favorites in this article as the focus is sharing — specifically the sharing of saved searches.
The Central Sharing Tool is a new concept that is being introduced across the entire SAP Business Suite. The main advantage of the tool is that it allows power users to quickly share items such as saved searches, reports, tags, and favorites across the organization to selected users, positions, organizations, or business roles.
Configure the Central Sharing Tool
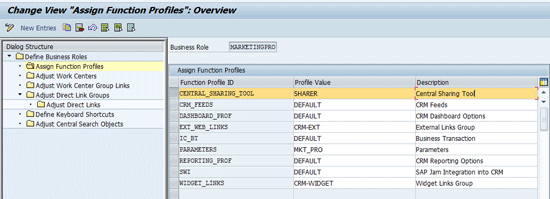
Before you can use the Central Sharing Tool, users must be assigned to a CRM WebClient UI business role that includes the function profile CENTRAL_SHARING_TOOL (such as the MARKETINGPRO role shown in Figure 8). You can view the settings for the CENTRAL_SHARING_TOOL function profile in the IMG. (Note that modifying the default settings is beyond the scope of this article.) The menu path is SAP Customizing Implementation Guide > Customer Relationship Management > UI Framework > Technical Role Definition > Define Function Profile (Figure 9).

Figure 8
Users must be assigned to a business role that contains the CENTRAL_SHARING_TOOL function profile

Figure 9
Default settings for the CENTRAL_SHARING_TOOL function profile
The Central Sharing Tool supports four profile values (i.e., user types), each with different authorizations and capabilities:
- RECIPIENT: Central sharing is enabled but recipients cannot share items with other users; recipients can only receive shared items.
- LIMITED_RECIPIENT: Central sharing is enabled but limited recipients cannot share items with other users; limited recipients can only receive shared items. In addition, limited recipients cannot delete items that were shared with them.
- SHARER: Central sharing is enabled and sharers can initiate shares.
- SUPERSHARER: Same as sharer, except that this role can also push a shared saved search directly to recipients’ saved search drop-down list boxes without any necessary action from the recipients.
The profile values (i.e., user types) are assigned at the business role level, not at the user level. After selecting the desired business role, select the F4 help for the Profile Value field inside the entry for the CENTRAL_SHARING_TOOL function profile. Then, select the desired profile value (Figure 10).

Figure 10
Select the desired profile value for your selected business role
Use the Central Sharing Tool
You can access the Central Sharing Tool via a menu link in the CRM WebClient UI navigation bar on the left side of the screen (if such a navigation bar link has been configured) or from the Share link in the CRM WebClient UI toolbar in the upper-right side of the screen (Figure 11).

Figure 11
Click the Share link in the CRM WebClient UI toolbar to access the Central Sharing Tool
The Central Sharing Tool contains two main assignment blocks. On the left side is My Sharebox, which lists all items that have been shared with the user (in the Inbox folder) and all the items the user has shared with others (in the Sent folder). The right side is the Central Sharing Tool itself, which can be used to search for and select items and then to search for and select users with whom to share the selected items.
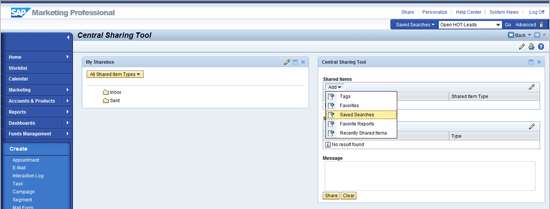
To search for and share an item (such as a saved search), click the Add button under the Shared Items section and select the desired item (Figure 12). Search for and select your desired saved search using the dialog box that appears. The selected item is automatically added to the Shared Items section.

Figure 12
Search for and select saved search to share
To search for and select a user, position, organization, or business role with whom to share the selected item, click the Add button under the Shared With section and choose, for example, the type User. Search for and select the desired user from the provided dialog box. The selected user is then automatically added to the Shared With section. Optionally, you can enter a message for the user. Click the Share button to share the selected saved search with the user (Figure 13).

Figure 13
Share saved search (with optional message) with selected user
After the sharer or supersharer has shared an item (e.g., a saved search) with another user or group of users, the new items appear in the Inbox area of the users’ My Sharebox assignment block in the Central Sharing Tool (Figure 14). Clicking the item automatically executes the link and takes the user to the corresponding item, page, or search results screen.

Figure 14
Shared saved search appears in the My Sharebox Inbox of selected recipient
William R. Pritchett
William (Bill) Pritchett has more than 25 years of IT industry experience and has worked at Dow Corning Corporation for the past 16 years. Over the past eight years he has focused on the company’s CRM systems and processes. His current responsibilities include expanding the capabilities of Dow Corning’s SAP CRM 7.0 system.
You may contact the author at bill.pritchett@dowcorning.com.
If you have comments about this article or publication, or would like to submit an article idea, please contact the editor.

John Burton
John Burton is a director of product management at SAP and is responsible for the SAP CRM Interaction Center (including ERMS) and social CRM topic areas. John has 13 years of experience at SAP and has been involved with SAP CRM and the Interaction Center since 1999. He is also the author of Maximizing Your SAP CRM Interaction Center, available at the SAPinsider Store. John is an alumnus of the University of Michigan and Central Michigan University. John can be found on LinkedIn at www.linkedin.com/in/sapjohnburton.
You may contact the author at john.burton@sap.com.
If you have comments about this article or publication, or would like to submit an article idea, please contact the editor.


