Learn steps to configure Enhanced Product Planning (EPP) and Planner Home Page (PHP) functionalities in SAP SCM 7 enhancement package 3. The PHP provides a performance overview of key products in the business user’s or planner’s portfolio through the use of the demand planning (DP), supply network planning (SNP) and production planning and detailed scheduling (PP/DS) key performance indicators (KPIs). EPP is an enhanced user interface with some added capabilities for production planners who typically have been using the Product View transaction of the SAP Advanced Planning and Optimization (SAP APO) PP/DS module. These capabilities were introduced as part of the user interface (UI) renovation for the SAP APO application through enhancement packages 2 and 3.
Key Concept
Enhanced Product Planning (EPP) is new functionality introduced for SAP Advanced Planning and Optimization (SAP APO) production planning and detailed scheduling (PP/DS). EPP is part of SAP’s SCM user interface (UI) renovation initiative providing a user interface (UI) based on SAP NetWeaver Business Client (NWBC) and Web Dynpro technology introduced in SCM 7 enhancement package 3. EPP is an enhanced interactive production planning application very similar to the Product View transaction with similar functional usability.
Planner Home Page (PHP) is an NWBC-based UI feature introduced in SCM 7 enhancement package 2 as part of SAP’s UI renovation project. It is a single-start home page display for planners that can be highly personalized using Content Blocks (also known as CHIPs) having a number of SAP APO Demand Planning (DP), Supply Network Planning (SNP), and production planning (PP) key performance indicators (KPI)s.
In SAP SCM 7 enhancement package 3, Enhanced Product Planning (EPP) enhances Product View interactive planning in a single screen. The key functional enhancements in addition to a renovated user interface (UI) are one-click Supply Network Planning (SNP) to Production Planning and Detailed Scheduling (PP/DS) order conversion, order-level notes, cross-system navigation, a side panel, and a navigation panel based on selections created in SAP Advanced Planning and Optimization (SAP APO) Demand Planning (DP), SNP, or PP/DS for product locations. The enhanced version of EPP can also display key performance indicators (KPIs) created as part of the Planner Home Page (PHP).
Introduced in SCM 7 enhancement package 2, the PHP can be highly personalized using Content Blocks (also known as Collaborative Human Interface Parts [CHIPs]). In SCM 7 enhancement package 3, SAP extended the PHP capability to include configurable SAP APO DP-specific KPIs in addition to the available SNP and PP/DS KPIs.
I describe the capabilities of EPP and PHP and explain the step-by-step setup required to use these two functionalities. I also include tips on extending the use of these functionalities.
EPP
Introduced in SCM 7 enhancement package 3, EPP is an out-of-box functionality providing a web-based, modern UI for interactive production planning capability. It is very similar to Product View, which is a central transaction for SAP APO PP/DS, but EPP features many enhancements. The key advantage of EPP is that it is intuitive and needs no additional or formal training effort from business users. Users can start using EPP right away and reap the benefits.
Prerequisite Setup
To use EPP, the following prerequisites need to be met:
- Activation of the business function SCM_APO_EPP in the SCM system
- Setup of SAP NetWeaver Business Client (NWBC) if it is not already set up
- Assignment of a suitable SAP role to user IDs
- Setup of cross-system navigation in the Core Interface (CIF)
To activate business function SCM_APO_EPP in the SCM system, execute transaction code SFW5. In the initial Switch Framework screen that displays (not shown), click the ENTERPRISE_BUSINESS_FUNCTIONS folder to scroll down to the required business function (e.g., SCM_APO_EPP). Select the check box under the Planned Status column and click the Activate Changes button to initiate activation of the business function (Figure 1). After the business function is successfully activated, the icon (the lightbulb) changes and the Planned Status remains checked. This particular business function is reversible (i.e., it can be deactivated later if required, unlike non-reversible changes where the Planned Status for the remaining business function will remain activated). Switch Framework is SAP’s approach of enabling or activating selected business functions after upgrading to a new application version through an enhancement package.

Figure 1
Activate the SCM_APO_EPP business function in the Switch Framework screen
After you activate business function SCM_APO_EPP, the following new entries are available under the SAP IMG under Advanced Planning & Optimization > Supply Chain Planning > Production Planning and Detailed Scheduling (PP/DS) > Enhanced Product Planning (EPP):
- Maintain KPI Settings
- BAdI: Cross System Navigation for Enhanced Product Planning
EPP does not need SAP IMG customization to use the application. To use KPIs, however, associated configuration needs to be done in the PHP. Refer to SAP IMG documentation for the node Maintain KPI Settings for instructions on how to complete this configuration. There is just one Business Add-in (BAdI) available for cross-system navigation for EPP. To activate this BAdI, you need to create an implementation by following menu path Production Planning and Detailed Scheduling (PP/DS) > Enhanced Product Planning (EPP) > Business Add-Ins (BAdIs) for Enhanced Product Planning > BAdI: Cross System Navigation for Enhanced Product Planning or by executing transaction code SE19.
EPP uses NWBC UI capability and the associated setup is typically done by a Basis administrator. Essentially, it requires activation of relevant Web Dynpro services by executing transaction code SICF. The EPP service WDA_RRP_EPP is available under menu path default_host > sap > bc > webdynpro > scmui. If the service is not activated, it is grayed out and the EPP application does not open successfully.
Next, the role SAP_SCM_APO_PP_PLANNER_2 needs to be assigned to a user ID who will access EPP functionality through NWBC (Figure 2). You also need to assign role SAP_SCM_CROSS_SYSTEM_NAV to enable navigation from EPP. After navigation from EPP is enabled, you can display or change relevant orders in the connected ERP system. These role assignments are typically done by a Basis security team.

Figure 2
EPP-related roles assignment to a user ID
Finally, assignment of a Remote Function Call (RFC) destination in the Core Interface (CIF) application for cross-system navigation is required to enable access to transaction data in SAP ERP from EPP. Follow IMG customizing Integration with SAP Components > Integration via APO Core Interface Function > Basic Settings for creating system landscape > Assign RFC Destinations to various Application cases. This path takes you to Figure 3.

Figure 3
Cross-System Navigation-related configuration in SAP IMG
In Figure 3, create a new entry with a CIF application selection as Cross-System Navigation and a Logical System as a connected SAP ERP Central Component (ECC) system. Enter the corresponding RFC Destination name. Click the save icon (not shown) to save your entries.
This completes the prerequisite setup for enabling EPP. Now I explain how to access and use EPP and its key features.
Accessing EPP
You can access EPP either directly from the desktop client version of NWBC or via the SAP GUI. If you access EPP directly from the desktop client version of NWBC, the Enhanced Product Planning link is available under the Production Planner role (Figure 4). After you click this link, EPP opens in a separate tab of the NWBC client.
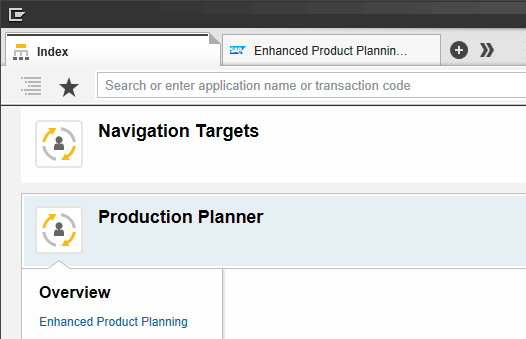
Figure 4
The Enhanced Product Planning link in NWBC Desktop Client version
If you open EPP using the SAP GUI, follow menu path User Menu > Production Planner. Expand the Production Planner folder, select WDY_Application - Enhanced Product Planning and double-click the icon to the left of WDY_Application - Enhanced Product Planning (Figure 5).

Figure 5
The Enhanced Product Planning application link in the SAP GUI
In the role SAP_SCM_APO_PP_PLANNER_2 menu, EPP links to the Web Dynpro application /SCMUI/WDA_RRP_EPP. After you click this link, EPP opens in your local default web browser (e.g., Internet Explorer) as shown in Figure 6.

Figure 6
The EPP screen with sub-sections highlighted
Note
SAP recommends installing NWBC 4.0 (or 5.0) Desktop version on your system for using EPP.
The EPP screen is divided into a Navigation Panel on the left side (outlined in red), a central main panel, and a Side Panel on the right side (outlined in green). Both the Navigation Panel and Side Panel are optional. You can display them or hide them by clicking the Navigation Panel or Side Panel buttons shown in Figure 6.
EPP’s Capabilities
Now I describe the individual capabilities that EPP has to offer.
The first one in the Navigation Panel is the use of selection types. Selection types can be DP, SNP, or a PP/DS Location-Product combination. You can maintain these selections in the respective SAP APO modules (for example, transaction Interactive Supply Demand Planning for DP and SNP or directly in EPP for PP/DS) and store them in a Personal Value List.
After you load the selections by entering a suitable Selection Name and clicking the Load Selection button above it, the Location-Product combinations are listed in the Hit List section in the Navigation panel (Figure 6). If suitable KPIs (as set up in the PHP SAP IMG configuration) are defined and assigned in the Navigation Panel, then corresponding KPI data is displayed for each Location-Product combination. This allows you to get an overview of all Location-Products in your portfolio and focus on those with out-of-threshold KPI values. Clicking such Location-Product combination loads planning data in the Element View of the main EPP screen (Figure 6). This step is like loading a single Location-Product combination in the Product View transaction.
The main screen has a Location Product Selection section, and below this section the planning data for a selected location or product is displayed. The default view is the Element View with Alerts, Forecast Consumption, Pegging Overview, and Stock Overview available in tabs (Figure 6). You can personalize the layout from tabbed to stackable so that all planning data is displayed in a top-to-bottom vertical mode instead of moving through tabs (Figure 7). To set up a personalization setting, click the personalize icon on the upper right corner (just below the Side Panel link). This action opens the Personalization pop-up screen (Figure 7).
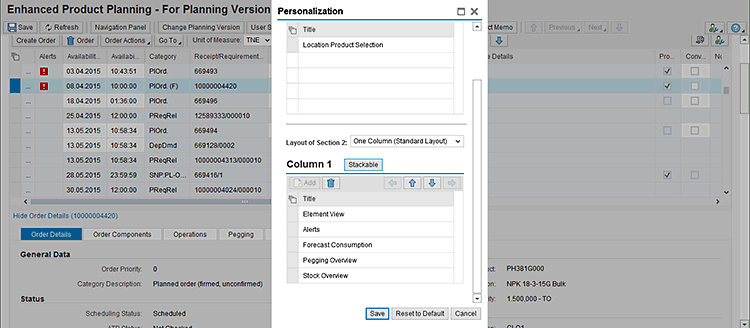
Figure 7
Personalization of the EPP main screen layout
Select all the objects listed in the Personalization screen (e.g., Element View, Alerts, Forecast Assumption, Pegging Overview, Stock Overview), click the Stackable button, and then click the Save button. in the Layout of Section 2 field, click the Stackable button, and click the save icon to save the settings. This setting switches the display of the different views from tabbed to stackable (one below the other) as shown in Figure 8.

Figure 8
The EPP main screen in stackable layout
Selecting an order line in the Element View tab automatically displays data in the Order Details tab (Figure 9). This is different in the Product View transaction in which, after you double-click an order, a separate screen opens to display order details. Additional tabs such as Pegging and Alerts can display order components, operations, pegging relationships, and alert details.
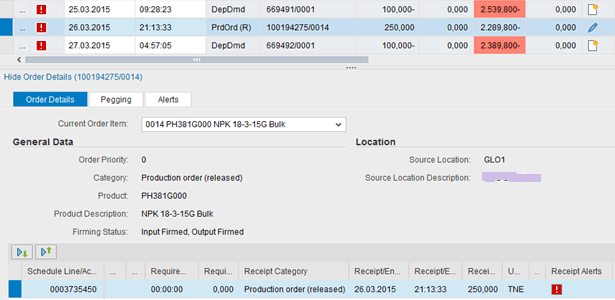
Figure 9
Order Details in EPP
Figure 10 is an example of the Pegging tab showing details for a selected production order in EPP.

Figure 10
Production order details displayed in the Pegging tab
The Side Panel provides a useful functionality of displaying master data parameters for the Location-Product combination being planned. This section is particularly helpful because you frequently want to know the master data driving planning results. Switching on the Side Panel provides visibility to the relevant information in one screen. The Master Data tabs and fields to be displayed can be personalized according to your needs by clicking the Settings button as shown in Figure 11.
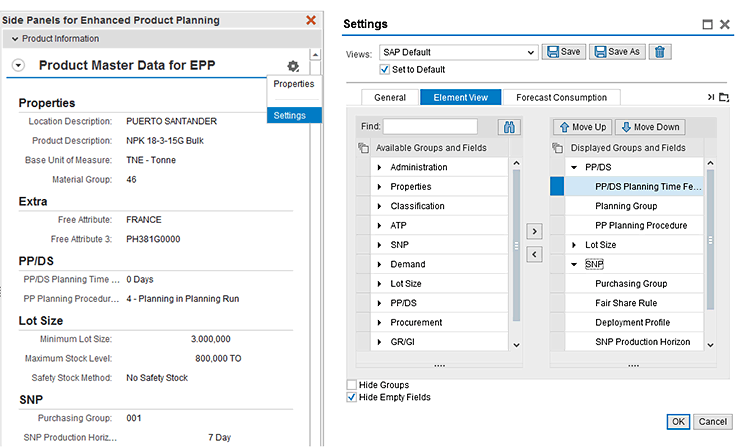
Figure 11
EPP Side Panel configuration
This now completes the overview of the different sections and sub-screens available in EPP. Now you are ready to learn the useful features introduced in this application that are enhancements over the standard PP/DS Product View transaction.
Useful Features of EPP
Several useful features enable EPP to provide better business value in terms of ease in planning effort and navigation compared with the standard APO PP/DS Product View transaction.
Create Single Order
Unlike Product View, in which you manually key in an order in the last available line, in EPP you need to click the Create Order button to create a single order. This action opens a dialog box (Figure 12) in which you can put in quantity, date, and time for the order to be created. Although Strategy is a default, a new option named Planning Direction is available. This option offers a drop-down list of options to select (e.g., Backward with Reverse). You can also click the Planning Strategy link to manually change Planning Strategy if necessary. These options provide flexibility in terms of scheduling the order to be created.
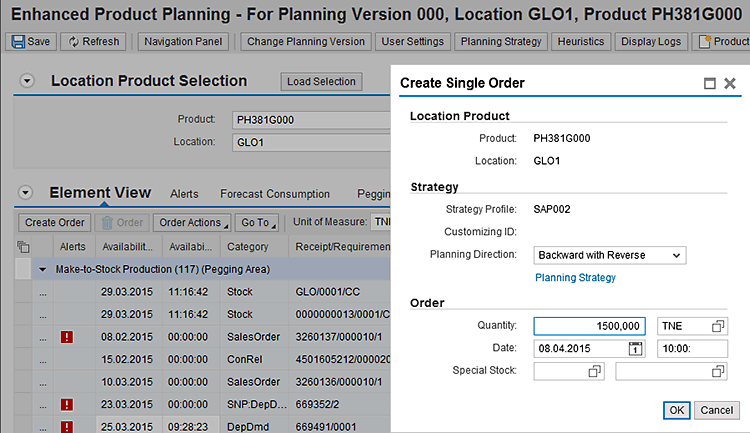
Figure 12
Create a single order in EPP
Heuristic Run
To execute any heuristic in EPP, you need to click the Heuristics button. This action opens the dialog box shown in Figure 13. The set of displayed heuristics is based on the default PP/DS Heuristic Profile assigned to the user. However, unlike Product View, there is no Product Heuristics option or separate selection for Variable Heuristics. For heuristics with the possibility of Variable Heuristics, click the run spanner icon next to the heuristics name. This action opens the dialog box for maintaining Heuristics settings before execution. For directly running heuristics, click the heuristic name link.
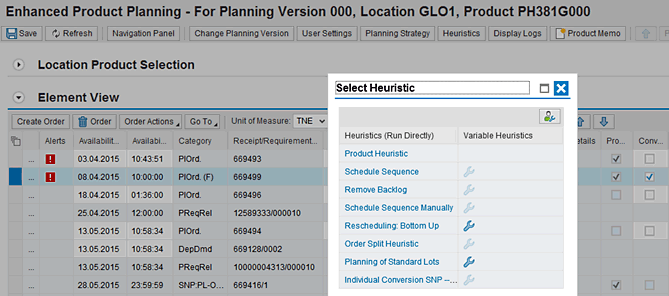
Figure 13
Running heuristics interactively in EPP
After you execute the heuristics run, Planning and Scheduling Logs are displayed just as they are in Product View. These logs provide you with the option to show Error Messages, Warning Messages, Info (information) Messages, and Status Messages either individually or all at the same time (Figure 14). The messages and text are the same as the ones generated in standard APO PP/DS logs.
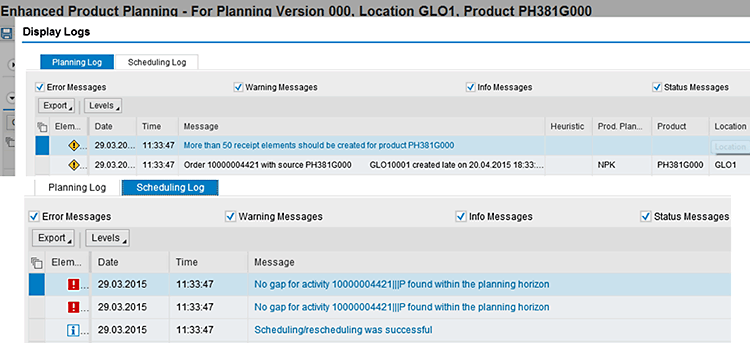
Figure 14
Planning and Scheduling Logs in EPP
Direct Conversion of SNP to PP/DS Order
Normally, converting planned orders created in SNP to a PP/DS order in Interactive Planning transactions requires running an SNP-to-PP/DS conversion heuristic. However, in EPP, you can complete this conversion by selecting the SNP planned order and then choosing Convert SNP Orders from the drop-down list of options under the Order Actions button as shown in Figure 15.

Figure 15
Select Convert SNP Orders from the list of options under Order Actions
After you select Convert SNP Orders, the system automatically runs the SNP>PPDS conversion heuristic and creates a PP/DS order displaying the log generated above the Location Product Selection heading (Figure 16).
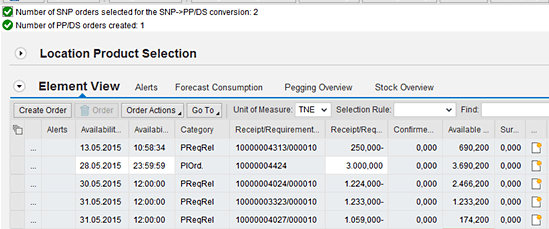
Figure 16
One-step conversion of SNP orders
Manual Planning Time Fence Setting
You can select an order element in EPP and choose the Set Planning Time Fence option under the Order Action button to assign that date as the planning time fence for the Location-Product combination (Figure 17). This setting overrides the Planning Time Fence value maintained in the Location-Product master. This setting can be reset back by reselecting the same Order Action once more.

Figure 17
Manual setting of Planning Time Fence from Order Action
Forward and Back History
Another helpful feature is provided by the Previous and Next buttons shown in Figure 18. These buttons enable you to view your navigation history of viewing planning data. Clicking the Previous button shows product locations that were displayed before. Clicking the Next button enables you to switch the view to the next set of product locations selected for display.

Figure 18
Previous and Next history navigation in EPP
Order-Level Notes
EPP enables you to create Notes for each order element. Although Product Memo is available to maintain text at the Location-Product level, to date there had been no option to have text against each order in SAP APO PP/DS. This is now possible through order-level Notes.
Note
Product Memo is standard SAP APO PP/DS functionality to add free text available in Product View but only at the Product-Location combination. You access the Product Memo by clicking the create text icon next to Product input in the Product View transaction screen.
To create order-level notes, click the notes icon. This action opens the Order Notes dialog box as shown in Figure 19. Enter free text as required and click the Save button. After you click the Save button, the notes icon changes to the change icon highlighting order-level notes that already exist. The note text can be edited anytime by clicking the change icon. This action opens the same Order Notes dialog box as shown in Figure 19.

Figure 19
Order Notes in EPP
The note text that you enter can be displayed in the Element View in the Note Details column. It is always visible against an assigned order (Figure 20).

Figure 20
Display Order Note text in EPP
Cross-System Navigation
EPP also has the capability to navigate to a selected order (both Requirement and Receipt elements) in a connected SAP ERP system in Display or Change mode. For example, select a planned order and click the Go To button. From the drop-down list of options, choose Change Planned Order in ERP (Figure 21).

Figure 21
Cross-system navigation in EPP
This action opens the selected planned order in change mode (transaction code MD12) in another tab of the NWBC as shown in Figure 22. You can now change an order in ERP, save changes, return to EPP in SAP APO, and refresh your screen to display changes. All these steps are possible without the need of logging in to SAP ERP or entering an order number in the relevant transaction. However, after you select a stock element, the system does not have an option for cross-system navigation by default.
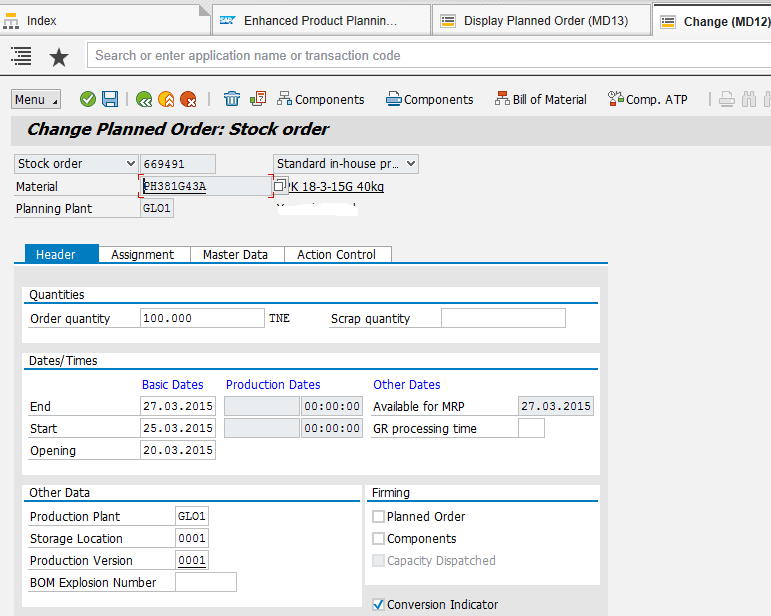
Figure 22
Cross-system navigation showing a planned order in ERP
For example, if you select an order element for stock in the Element View and click the Go To button, the system does not have an option for displaying the stock overview in ERP. Instead, the following message appears: Select a valid order type. However, as I explain in the next section, after activating the cross-system navigation BAdI, enhancement navigation to stock overview in ERP is possible from EPP on selection or order elements.
Cross-system navigation is enabled through assigned user role SAP_SCM_CROSS_ SYSTEM_NAV where foreign (i.e., connected to the SAP ERP system) display and change transactions are maintained. Additionally, the connected SAP ERP system is determined based on the RFC destination maintained in SAP IMG configuration Assign RFC Destinations to Various Application Cases setting for CIF Application Cross-system Navigation (refer back to Figure 3).
Note
Cross-system navigation functionality is possible only when the NWBC desktop client version is used and not with NWBC in the HTML or web browser versions.
Enhancement of Cross-System Navigation
SAP provides the BAdI /SAPAPO/CROSS_SYSTEM_NAV_BADI to enhance how to act on new options of cross-system navigation selection through the use of the methods GET_CUSTOM_NAVIGATION and HANDLE_CUSTOM_NAVIGATION. A maximum of five options per order type is possible.
Class /SAPAPO/CL_CROSS_NAV_BADI_EXAM contains example code (use transaction code SE24) for opening the Stock Overview (transaction code MMBE) in the connected SAP ERP system when the Stock Overview in ERP option is selected from the drop-down list of options under the Go To button in EPP (Figure 23).

Figure 23
Cross-system navigation with Stock Overview in ERP option after enhancement implementation
Closing Tips
The order-level notes functionality introduced as part of EPP is a very useful feature. For example, one production order is created covering the requirements from multiple markets coming in to a production plant in the form of a stock transfer requisition release from distribution centers in different markets.
Normally, the pegging relationship would identify this relationship of the production order at the production plant linked to the stock transfer request release element from the production plant to distribution center, but there is nothing in the production order mentioning this relationship. Instead, the production or local site planner can use EPP for regular interactive production planning to create a note for the production order with text mentioning the markets in which the order quantity is shipped along with shipping and loading instructions for logistics purposes.
However, that note text is visible only in EPP and not in any of the regular SAP APO PP/DS transactions. Therefore, the production scheduler or logistics planner using Detailed Scheduling Planning Board and Product or Receipts View transactions in APO cannot see the existence of order-level notes (let alone note text). However, there is a possible workaround combining EPP capability with two enhancements.
The Detailed Scheduling Planning Board is an SAP APO PP/DS transaction in which orders or operations are displayed against resources for interactive scheduling results review and manual rescheduling action if required.
Class /SAPAPO/CL_CA_NOTES_BO is the Business Object for order-level notes functionality. It has methods to READ_NOTES, CREATE_NOTES, UPDATE_NOTES, and DELETE_NOTES as shown in Figure 24.
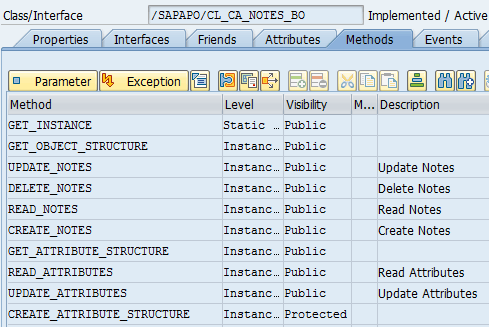
Figure 24
Method details in order notes class
Suitable class methods can be used to pass notes text in BAdI Enhancement /SAPAPO/RRP_IO_COL to display order-level notes as a new column in the Product, Receipts, or Requirement Views. The same can also be used in passing the note text data to structure /SAPAPO/CDPS_FSEL_ORDER that is called in BAdI /SAPAPO/CDPS_ORDDATA. This structure provides possible fields in the Order Field Selection option of the graphical element for the order in the APO PP/DS DS Planning Board Profile setting. When both of these enhancements are implemented, order-level note text created or maintained in EPP is visible in regular APO PP/DS transactions such as Product View and Detailed Scheduling Planning Board.
PHP
PHP functionality introduced in SCM 7 enhancement package 2 offers two broad capabilities:
- An NWBC-based UI with a PHP Alert Worklist is the starting point for handling exception-based planning by planners
- SAP APO-specific KPIs are displayed
Prerequisite Setup
For using PHP, the following are prerequisites:
- Activation of business function SCM_APO_HOME_PAGE in the SAP APO system
- Assignment of a suitable business role SAP_SCM_PLN_HOME to the user
- Setup of KPIs, KPI profiles, and assignment to the user or roles
The first prerequisite is activation of the business function SCM_APO_HOME_PAGE in the Switch Framework. To complete this step, execute transaction code SFW5 and follow menu path Advanced Planning and Optimization > Supply Chain Planning > Planner’s Home Page > My Objects. Under My Objects, you have a set of new entries:
- Maintain Key Performance Indicators (KPIs)
- Maintain KPI Profiles
- Assign KPI Profiles to Users or Roles
In the screen that appears (Figure 25), select the box under the Planned Status column for the Business Function Set SCM_APO_HOME_PAGE and click the Activate Changes button.

Figure 25
PHP business function activation in the Switch Framework
The next prerequisite is for user IDs to be assigned to SAP role SAP_SCM_PLN_HOME (the SAP APO Planner’s Home Page) to access the PHP. Note this new functionality is a Web Dynpro application that can be accessed from the NWBC UI. You can also directly open NWBC for HTML by calling transaction NWBC from the SAP APO system accessed through the standard SAP GUI.
The final prerequisite is configuration of KPIs, KPI Profiles, and assignment to users or roles in the SAP IMG for the PHP in the following sequence:
- Maintain KPI
- Maintain KPI Profiles
- Assign KPI Profile to User
The first configuration activity is to create KPIs. KPIs are SAP APO specific (i.e., DP, SNP and PP/DS KPIs can be configured with each one using its respective SAP APO module data). SAP provides a set of predefined SNP and PP/DS KPIs that can be copied and adjusted to meet your own needs. There are no predefined DP KPIs as SAP APO DP is highly configurable and contains different characteristics, planning books, and key figures based on each company’s needs.
Here is an example of an SNP predefined KPI indicating current stock level. Note that the object type is Location Product (i.e., the planning level for displaying data for this KPI). For any capacity-related KPI such as SAP_SNP_MAX_RES_UTIL, the object type is Resource.
Each DP and SNP KPI is defined for Planning Book and Data View levels for a specific key figure that is the data source. The Calculation Method defines the mathematical logic to compute a KPI based on a specified key figure. The different Calculation Methods for SNP KPIs are Sum, Maximum Value, Minimum Value, Average Value, Weighted Maximum, Weighted Minimum, Weighted Average, or most commonly Bucket Value.
For DP, the different permissible Calculation Methods are Sum, Maximum, Minimum, Average, and Bucket Value. Additionally, there is a formatting setting available for DP and SNP KPIs that can be number, quantity with unit, date and time, text, and sparkline (Bullet Graph, Column or Line Chart).
You need to define KPI calculation Horizon and Offset period (if any). Note for SNP KPIs: the Horizon is always in Days, whereas for DP KPIs, the periodicity of the Horizon (for example, l Week, Month, Quarter) needs to be mentioned. If required, the KPI value can be compared with Upper and Lower Threshold values that can be either fixed values or can be based on separate key figure values as defined in the Threshold Method. All these settings provide good capability to configure and set up a wide range of KPIs.
To set up a DP KPI for the PHP, execute transaction code SPRO and follow SAP IMG menu path Advanced Planning and Optimization > Supply Chain Planning > Planner’s Home Page > My Objects > Maintain Key Performance Indicators (KPIs). Click the execute icon beside the Maintain Key Performance Indicators (KPIs) node. This action opens the screen shown in Figure 26.
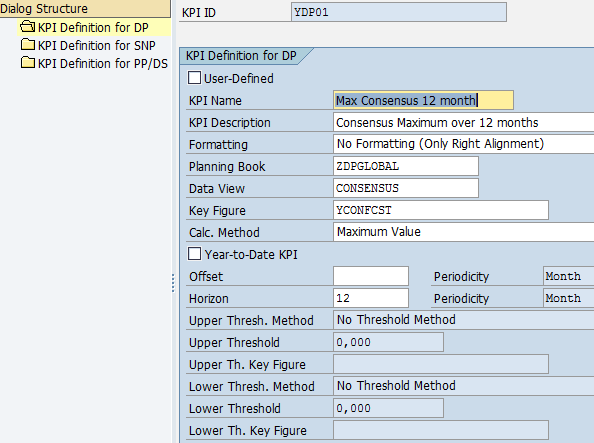
Figure 26
Setting up a DP KPI for the PHP
In the KPI Definition view, double-click KPI Definition for DP and then click the New Entries button (not shown). In the screen shown in Figure 26, enter a unique name in the KPI ID field. Populate the KPI Name and KPI Description fields. In the Formatting field, don’t change the default option No Formatting (Only Right Alignment). . Enter names in the Planning Book, Data View, and Key Figure fields. Enter a calculation method (e.g., Maximum Value in the Calc. Method field. Enter data in the Horizon and Periodicity fields as shown in Figure 26. The data for the Horizon and Periodicity is aligned with time bucket profiles used in the Data View and is considered for KPI calculation. Click the save icon after entering all necessary parameter values in the KPI.
Similarly, SNP KPIs can be created by double-clicking KPI Definition for SNP and then clicking the New Entries button (not shown). This action displays the screen shown in Figure 27.
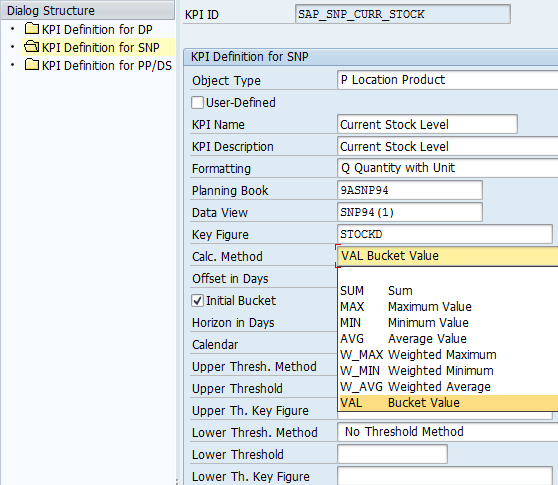
Figure 27
Set up an SNP KPI for the PHP
Normally SNP KPIs are copied from standard SAP-provided KPIs and adjusted as per project needs. In such a case, maintain the fields for KPI ID, Object Type (Location Product or Resouce), KPI Name, and KPI Description as shown in Figure 27. In the Formatting field, select an option from the drop-down list. Enter names in the Planning Book, Data View, and Key Figure fields, and in the Calc. Method field, select a calculation method (e.g., VAL Bucket Value) from the drop-down list of options. The Horizon in Days and Calendar fields must be completed. These fields are key parameters for KPI calculation. For my example, enter 30 in the Horizon in Days field and for the Calendar select No/Production/Shipping/Receiving/Resource Calendar. Click the save icon to save the SNP KPI after maintaining all necessary parameter values.
PP/DS KPI setup is a little different because there is no Planning Book, Data View, or key figure to be defined. Instead, you define the KPI input and KPI formula. The KPI Input field defines the source for KPI calculation if it is Receipt, Requirement (defined by suitable Category Group), or resource or capacity scheduling data, such as Utilization, Capacity, or Days of Supply (defined by suitable PP/DS Day’s Supply Type). In the KPI Input field you could also define another kind of input such as Planning Run Info, Delay, or Surplus and Shortage. For my example it is Utilization (Figure 28).

Figure 28
Setting up a PP/DS KPI for the PHP
Depending on the type of KPI Input selected, you need to define the KPI Formula (Maximum, Minimum, Average, Count, Sum or None), Requirement Cat. Grp (requirement category group), Receipt Cat. Grp (receipt category group), and Days’ Supply Type. Additionally, you need to define the Offset (Days) and Horizon (Days) for which data is used for KPI calculation.
SAP has provided a reasonable number of predefined PP/DS KPIs and it is best to copy them and adjust the relevant parameters such as Horizon, Requirement, or Receipt Category groups to suit your business requirements. Figure 28 is an example of a PP/DS KPI for Average Resource Utilization over the next 30 days.
The next configuration required is KPI Profile definition. KPI Profiles combine individual KPIs into a predefined grouping from a set of all available KPIs. For example, KPI Profile YSNP_KPI shown in Figure 29 has a predefined set of SNP KPIs: two Location-Product types and one Resource type.

Figure 29
Setting up the KPI Profile for SNP KPIs
The final configuration is assignment of the KPI Profiles to either User IDs or Business Roles such as SAP_SCM_PLN_HOME, which is the standard SAP role for using the PHP by users. Assign DP, SNP and PP/DS KPI Profiles as required and make sure the Active check box is selected as shown in Figure 30.

Figure 30
Assignment of a KPI Profile to PHP roles
This completes the configuration required for displaying KPIs in the My Objects content block of the PHP. You can now access the PHP either from NWBC (Figure 31) or from the SAP Easy Access Menu by clicking the Home Page Web Dynpro application link as (WDY_APPLICATION – Home Page) as shown in Figure 32.

Figure 31
Accessing the PHP from NWBC and the SAPGUI
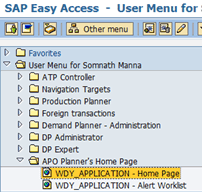
Figure 32
The Web Dynpro link to the PHP
In the PHP screen, click the personalization icon (the icon next to the refresh icon on the top right under the My Objects subscreen) to set up for first-time a selection of Objects (planning relevant data such as Product-Location combinations or Resource). Selected KPIs from the KPI Profile are displayed in the Available KPIs section (Figure 33). To transfer KPIs to the Displayed KPIs section, select the KPIs you want to move and click the Add button. This action assigns the selected KPIs to a user ID. This enables each individual user to personalize his or her specific KPIs from available KPIs as defined in the KPI Profile to be displayed in the My Object content block in the PHP.
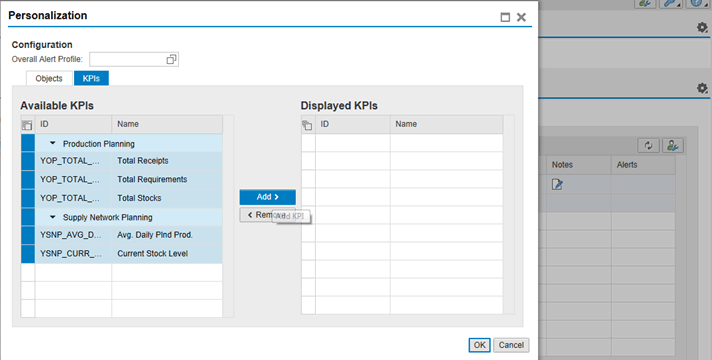
Figure 33
The Personalization screen in the PHP
After this one-time personalization is done, enter Product-Location combination with Planning Version in the My Objects content block to display the results for the selected KPIs as shown in Figure 34. You can add or remove Product-Location combinations to display KPI values as required. Likewise, resource-related KPIs are displayed in the Resource tab after adding the Resource for Location and Planning Version. For Demand Planning KPIs assign appropriate Planning Combination values in the Demand Planning tab.

Figure 34
Display selected KPIs in the PHP
One useful feature of the PHP is the ability to create Notes at Location-Product or Resource level or for Planning combination in case of Demand Planning.
This step is similar to creating order-level notes in EPP, but in PHP you can create a note per object (like Location Product) by clicking the notes icon. This action opens the Create Note dialog box (Figure 35) in which you can enter free text as required. Click the Create button to save the note. The new note now appears with the change icon under the Notes column. The note text can be edited anytime again by clicking the pencil icon. This action opens the Edit Note dialog box. One important feature while creating a note is the Product Memo option, which is selected by default.

Figure 35
Creation of Notes in the PHP
The Note created in the PHP with the Product Memo option selected shows up in regular SAP APO PP/DS transactions such as Product View (Figure 36). This is possible only when Notes are created with the Production Memo option selected. If the Production Memo option is not selected, then note text is not saved and is not available for display in regular APO transactions. Needless to say, the Note text created in the PHP can be edited in the Product Memo of Product View and vice versa with text data seamlessly showing up in respective applications (for example, Notes in the PHP and Product Memo in SAP APO PP/DS Product/Receipts/Requirement View transaction).

Figure 36
Display of a Note in Product Memo in Product View
Figure 37 is an example of a Resource-related PP/DS KPI.

Figure 37
A PP/DS KPI for a Resource
Now you have an overview of how the PHP can provide a bird’s eye view of the Planning situation for a planner, depending on his or her personalized set of KPIs across DP, SNP, and PP/DS data for a selected portfolio of Location-Products, Resources, or Planning Combination. Depending on the KPI value, you can go into relevant standard interactive planning transactions such as Product View, Product Planning Table, EPP Table for Location-Product objects, Resource Planning Table in the case of Resource objects, or Interactive Demand and Supply Planning for Demand Planning objects.
Closing Tips
- If existing KPI logic is not meeting business requirements, then consider SAP-provided BAdI /SAPAPO/USER_KPI_CALC to define the required logic and how such user-defined KPIs get data from relevant application modules.
Note: This requires ABAP coding in Method GET_KPI_DATA in the above-mentioned BAdI and also activating the User-defined check box in SAP IMG KPI definition.
- Notes created in the My Objects section of the PHP can be managed using standard SAP report /SAPAPO/PHP_NOTES_MASS_MAINT. This report displays a selection of PHP Notes by User, Date of creation, and optional criteria of Planning Version, Location, Product and Resource. There are two options for processing selected Notes:
- Mark Obsolete - To set the PHP Notes as Obsolete (so that it does not display any more in PHP only)
- Delete Forever (The note icon in the PHP is changed to New)
Somnath Manna
Somnath has 12 years of SAP experience primarily in SCM planning applications and, prior to that, three years in the engineering industry. At present, he is Senior Managing Consultant at IBM's India Global Delivery organization, serving as SCM Product Champion and Lead Consultant. He has strong experience in multi-country rollouts and support across the global Pharma, Downstream (Lube) Oil, Consumer Electronics and Premium BeautyCare industries.
You may contact the author at somanthmanna@in.ibm.com.
If you have comments about this article or publication, or would like to submit an article idea, please contact the editor.


