D. Russell Sloan shows how to use customer attributes to add metadata to key project objects. This enables tracking and management of project work such as identifying teams that are responsible for or use transaction, configuration, and development objects.
Key Concept
The customer attributes feature requires a Solution Manager 7.0 Support Package 1 or higher system up and running and the authority to perform configuration to set up the customer attributes. For maintaining search help and other data entry controls, you need authorization to create ABAP Dictionary Objects and a developer key.
SAP implementation projects have a lot of moving parts and people. Using the SAP Solution Manager Business Process Hierarchy (BPH) to map the component parts of your solution to the business processes to be delivered enables you to manage the delivery of your solution around business processes.
The components you can (and should) map to the BPH include solution documents, transaction codes, configuration, custom development, and training materials. Test cases and other items available on BPH tabs have many variations in their use and are affected by an array of integrated products for Solution Manager. Therefore, I focus on the core items listed above.
Because training materials, documentation for configuration, custom development, and solution documents are all stored as documents in the Knowledge Warehouse (KW), they are outside the scope of this article as they use KW attributes rather than customer attributes. For more information on how to leverage KW attributes, read my article, “Use Solution Manager Attributes to Help Manage Project Work.”
Customer attributes differ from KW attributes in several ways. First, they are maintained as part of the Solution Manager Implementation Guide (IMG) as configuration rather than in the Document Management Workbench (transaction code DMWB). Second, the way they are used in reporting varies considerably from KW attributes.
I cover the setup and use of customer attributes for transaction, configuration, and parts of customer development. Although this does not begin to represent a comprehensive study of the use of customer attributes, the techniques that I describe can be applied to other areas and object types in the Solution Manager system. The setup and use of Digital Signature features are beyond the scope of this article.
Setup of Customer Attributes
The key activities for setting up customer attributes are:
- Create customer attributes
- Assign attributes to objects
Create Customer Attributes
The customer attributes are defined in the IMG. The transaction code is SPRO with a navigation path of SAP Solution Manager > Capabilities (Optional) > Implementation/Upgrade > Blueprint and Configuration > Object Attributes > Define Customer Attributes. Note: Your IMG navigation path may vary slightly depending on the version and Support Package level.
From the Change View Customer Attributes: Overview screen, click the New Entries button (not shown) to create the attribute. That takes you to the screen in Figure 1. Enter the name of the attribute and the short description. Out of habit, I always start the name with a Z or a Y, although for these attributes, this is not required. Figure 1 shows the entry for the new attribute for the team assignment.
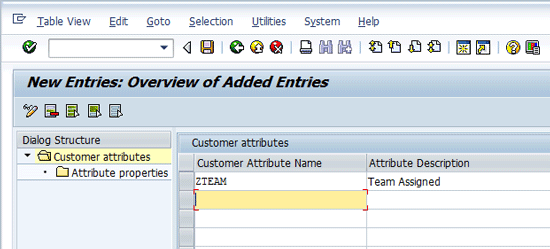
Figure 1
Create the new attribute for team assignment
After you enter all the attributes you wish to create, click the save icon and return to the overview screen. Next, you need to define the properties of the attribute. This means you must tell the Solution Manager system how to handle the new attribute that you just created.
This is done by associating the attribute with an existing Data Dictionary object. By associating the attribute with a Data Dictionary object, Solution Manager knows a great deal about how to deal with the new attribute that you just created.
For example, the related dictionary object tells Solution Manager things like:
- Data type – Is it text or a number or a date?
- Size – How to handle the attribute on screens and entry fields.
- Validations – Are there specific valid entries that can be entered based on either a value list or a search help?
Associating your attributes to existing Data Dictionary objects saves you a lot of time in defining your attributes and allows you to create many attributes that exhibit the same behaviors. For example, you can define a single date field in the Data Dictionary and associate many attributes with it so that all your date attributes behave the same way.
Note
Creation of Data Dictionary objects and search helps are beyond the scope of this article.
To assign a Data Dictionary object to your attribute, select your new attribute from the overview screen and click the Attribute properties dialogue structure element from the left side of the Overview screen in Figure 2, which takes you to Figure 3.

Figure 2
Select the attribute properties for assignment of the attribute to the dictionary object
Figure 3 shows that I assigned table ZSOLAR_STATUS and field TEAM to this attribute. This table and field were previously defined, so I was able to simply select them from the drop-downs in each column. Note in Figure 3 that I also selected Multiple-value Attribute and Attribute is visible.

Figure 3
Setting the properties for the ZTEAM attribute
The Multiple-value Attribute tells Solution Manager that the attribute can receive multiple values. In this example, I used the Team Assigned attribute to identify which team or teams are assigned to a particular object in the BPH structure. The Multiple-value Attribute setting allows you to assign more than one team to a specific object. If your project does not have this requirement, use the Single-value Attribute property setting for Multiple Values.
The Attribute is visible setting enables you to see and maintain the attribute from the SOLAR01 and SOLAR02 transaction codes. The Attribute is not visible setting is used when you want to assign attributes to objects via a custom report and not have it be viewable in SOLAR01 or SOLAR02. Some projects build custom interfaces or programmatic data maintenance based on timing or other project rules to set and use attributes of this type. The use of this property in this way is beyond the scope of this article.
Assign Attributes to Objects
Now that you’ve created your customer attributes, it’s time to assign them to the objects you want to track and manage.
Execute transaction code SPRO and follow menu path SAP Solution Manager > Capabilities (Optional) > Implementation/Upgrade > Blueprint and Configuration > Object Attributes > Assign Customer Attributes to Objects. When you first begin to assign attributes to objects, the Change View “Object Types”: Overview screen shows an empty table. Click the New Entries button to perform the first object assignment. Figure 4 shows the New Entries screen.

Figure 4
The New Entries screen for Object Types assignments
Using the drop-down, select the object type to which you wish to assign your customer attribute. In my example, I selected Program and Transaction. Figure 5 shows the selections with the drop-down so that you can see the other choices.
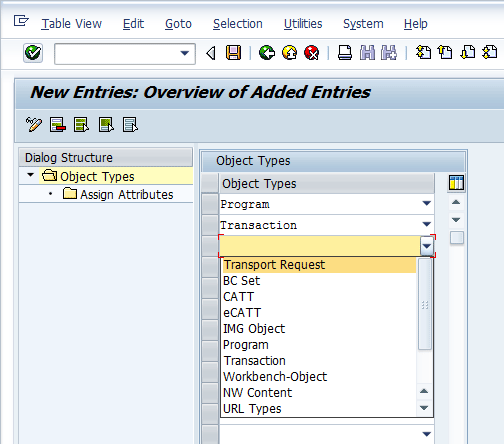
Figure 5
Object Types selection with the dropdown showing other available types
After you select your object types, go back to the Overview screen and select one of the object types to assign the customer attribute. Select the Object Types row in the table and then double-click the Assign Attributes dialogue structure element on the left of the screen (Figure 6).

Figure 6
Select the object type to assign attributes
The Assign Attributes screen appears. Click the New Entries button to assign attributes to the object type. Figure 7 shows the New Entries screen for the selected object type Program.

Figure 7
New entries for attribute assignment to the object type Program
Using the drop-down selections, you can select the customer attribute you wish to assign to the object type. If you choose more than one attribute, you can use the Attribute Order field to sequence how the attributes appear in maintenance screens. The Value Check parameter controls how Solution Manager validates the input on the attribute. By default no check is performed because blank and No Check have the same affect. The other options allow you to control whether the Data Dictionary rules are enforced and whether the attribute is required for the object. Table 1 describes how the different options control the input behavior of the maintenance screens in SOLAR01 and SOLAR02.
| Value Check option |
Description |
Required input? |
| Blank |
No Checking. Any value can be entered including blank. |
No |
No check |
Same as blank. |
No |
Check Value
|
Input values are validated against any value controls defined in the Data Dictionary for the field assigned to the customer attribute. |
No |
Input Required |
Input values are not checked against the Data Dictionary definitions. |
Yes |
Input Required and Value Check |
Input values are checked against Data Dictionary definitions. |
Yes |
Table 1
Effects of Value Check options selection
Figure 8 shows the complete assignment of customer attributes to the object type Program.
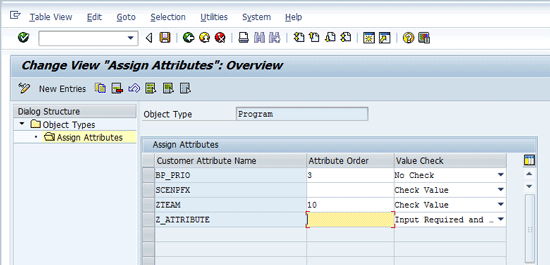
Figure 8
Program object type with customer attributes assigned
Repeat this process for transactions and IMG objects, and you’ll be all set up to proceed as follows in the rest of this article.
Using Customer Attributes in the BPH
In transactions SOLAR01 and SOLAR02 you can map and access objects on the BPH. Building the BPH is a critical step in your project. There are several Solution Manager Expert articles that address the topic of building a good BPH. One such article is “Building a Better Business Process Hierarchy (BPH),”but there are many others.
Figure 9 shows transaction SOLAR01 for a project in which I navigated to a specific business process step. I highlighted the Transactions tab to show the assigned transactions.
Figure 9
SOLAR01 project displayed at the process step level with the Transaction tab chosen to show assigned transaction codes for the process step
Select one of the transaction rows and click the attributes icon  . This action opens the Attributes Maintenance window. Note the Tab labeled Other Attributes (Figure 10).
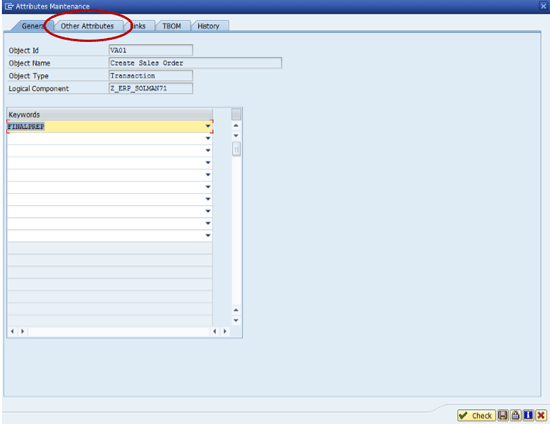
Figure 10
The Attributes Maintenance window
When you click the Other Attributes tab, the Customer Attributes are revealed. After you select the drop-down for the Assigned Team attribute, a pop-up screen displays a list of teams that can be assigned to the transaction object (Figure 11).
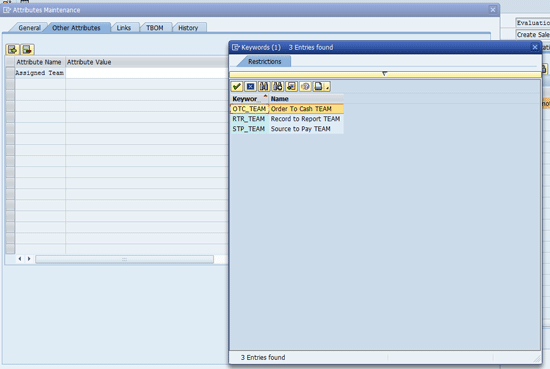
Figure 11
The Other Attributes tab with the Assigned Team dropdown opened
After you double-click a team name, it is assigned to the Assigned Team attribute. Because I set up the Assigned Team attribute as a multiple-value attribute, I can select the Assigned Team attribute row and click the insert row icon  to assign additional values for this transaction code. Figure 12 shows the screen after you click the insert row icon.

Figure 12
The Assigned Team attribute ready for multiple value entry
As before, when you click the open field for Attribute Value and click the drop-down, the available Restrictions pop-up screen opens. Double-clicking another value populates the new value into the Other Attributes tab. Figure 13 shows the Assigned Team attribute with two values assigned.

Figure 13
The Assigned Team attribute with two values assigned
To maintain attributes for programs and configuration objects, use transaction code SOLAR02. Note that by default the Configuration and Development tabs are not available in the Blueprint Phase (SOLAR01). However, you can make them visible by changing the project settings in transaction SOLAR_PROJECT_ADMIN.
Repeating the process above, you can assign values to the Other Attributes on the Configuration tab for the configuration elements and on the Development tab for the program objects. For brevity, I skip these steps so that I can begin to describe the reporting and use of the assigned attribute values.
Reporting on Customer Attributes
There are two ways to generate reports that show the customer attribute assignments for objects on the BPH. The first is from within the project maintenance transactions SOLAR01 and SOLAR02, and the second is from the reporting tree reached by transaction code SOLAR_EVAL.
From within transaction SOLAR02 – Configuration, follow menu path Environment > Project Analysis > Assignments to reveal a list of project analytics reports for structure assignments (Figure 14).
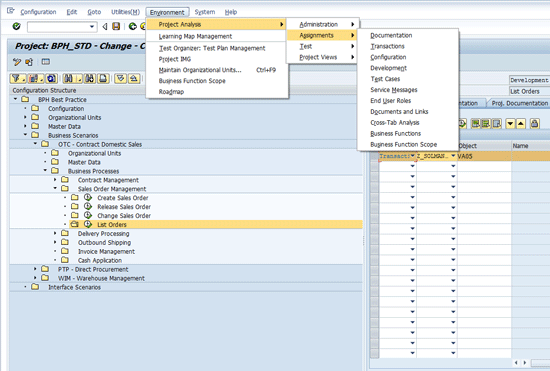
Figure 14
Analytics reports for object assignments for the BPH
For the purposes of this article, I focus on the transaction, configuration, and development reports.
Choosing Transactions from the menu launches the Solar Transaction Evaluation report. The selection screen of the report appears and you are presented with a broad collection of ways to narrow the scope of the report. Figure 15 shows the initial selection screen.

Figure 15
The selection screen for the transaction evaluation report
Scroll down to the bottom half of the selection screen to find the Other Attributes selection group. Click the Extended Attribute Selection button (Figure 16).
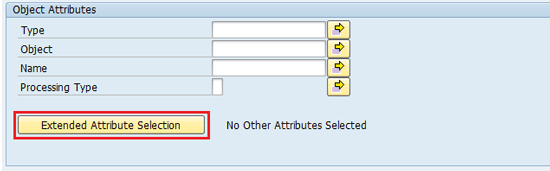
Figure 16
The Extended Attribute Selection button in the Object Attributes selection group
This action displays the previously configured customer attributes and allows you to select values to filter the report. Figure 17 shows the Select Attributes pop-up screen that is presented when you prompt (F4) for values on the Assigned Team attributes.

Figure 17
The Select Attributes pop-up screen with restrictions for entry displayed
For the purpose of illustration, I ran the report with all three teams selected. Note that when the initial report is displayed, depending on your screen variant settings, the customer attributes may not be included in the columns of the report. This is because the default view for the report is not aware of your custom attributes. You’ll need to add it to your screen variant to include it in your report.
When you execute the report, the initial report screen appears in the Hierarchy mode. By default, the customer attributes are not included and must be assigned to a screen variant. Figure 18 shows the default report with all the rows expanded.
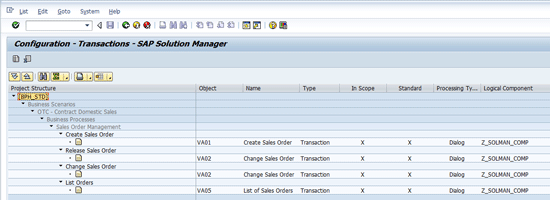
Figure 18
The Solar Transactions Evaluation report default display with all rows expanded
To see the customer attributes on the report, you must add them to the report layout. Use the Change layout menu option, which is revealed by clicking the bottom right corner of the select layout icon  . Note the little triangle in the bottom right of the icon. Figure 19 shows the menu with the Change layout option highlighted.
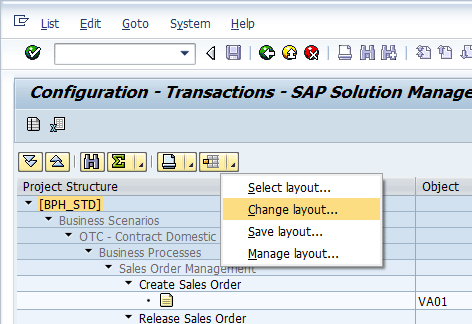
Figure 19
The Change layout option from the select layout icon
This brings up the Change Layout pop-up screen (Figure 20). The fields listed on the left are the fields that are currently selected in the order that they appear in the report from right to left. The fields on the right side of the pop-up are the ones that are not currently included in the report layout (Figure 20).
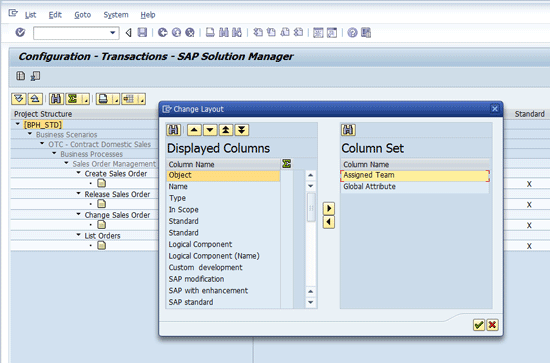
Figure 20
The Change layout pop-up screen
You can insert the Assigned Team field into the layout anywhere you wish. By default, if you select the Assigned Team and click the left arrow icon  in the middle of the window, the Assigned Team field is added to the bottom of the list on the left and is the last column on the right of the report. If you’d like to have the Assigned Team field appear elsewhere in the report layout, choose a field in the left side before selecting the Assigned Team field and clicking the left arrow icon.
Note that the Assigned Team field is inserted into the left side list above the field you select. Figures 21 and 22 show the selection of the target location (Logical Component field) and the subsequent placing of the Assigned Team field in the list.
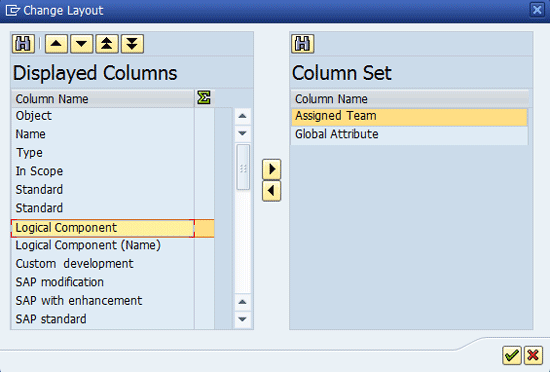
Figure 21
Select the Logical Component field so that the Assigned Team field is inserted between Standard and Logical Component
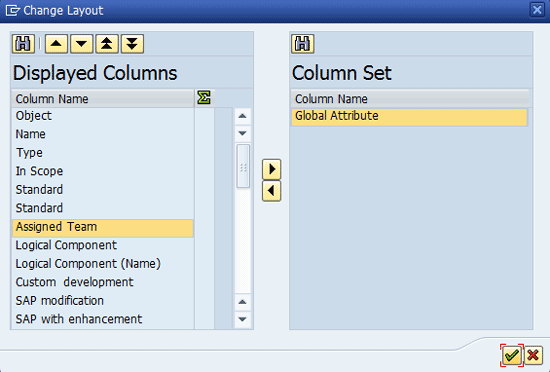
Figure 22
The Change layout pop-up screen after insertion of the Assigned Team field
Press Enter to apply the change to the report layout. The report now shows the Assigned Team Customer Attribute in the view (Figure 23).

Figure 23
The report with the Assigned Team displayed as a new column
If you do not save your changes to the layout, you have to repeat the steps above every time you run the report. To save your changes, click the bottom right corner of the select layout icon again and choose Save layout from the context menu. The Layout:Save as… pop-up screen appears (Figure 24). Enter a name and a description for the layout. By default, the User-specific check box is checked. Saving the layout with this box checked makes the layout private to your user ID. If you want the layout to be available to other users, remove this check mark and click the Save button.
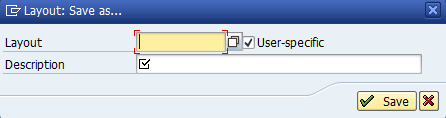
Figure 24
The Layout: Save as...pop-up window
The default view (Figure 23) is familiar as it matches the structure of the BPH, but it is not very useful for sorting. When the report is exported to Excel, it preserves the Hierarchical layout. To see the report in a tabular or list view, click the tabular view icon  in the top left corner of the screen. Figure 25 shows the report in the tabular view.
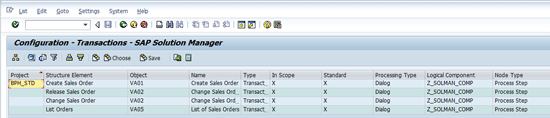
Figure 25
The transaction evaluation report in tabular view
The tabular view has its own default report layout. To apply the layout you saved previously, click the Choose button and select the layout you saved in the prior step. Figure 26 shows the report with this layout applied.
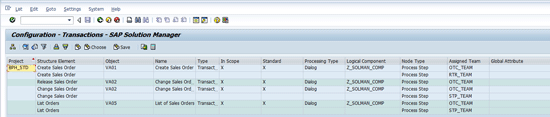
Figure 26
Tabular view of the report with the saved layout applied
Now you can see the Assigned Team column on the right side of the report. This type of layout enables you to sort and filter the report by the values in the attribute.
Export for Further Processing
You can export this report to a Comma Separated Values (CSV) text or other file formats for processing in programs such as Excel using the local file icon  at the top of the report. Clicking the local file icon or pressing F9 opens the Save list in file... pop-up screen (Figure 27).

Figure 27
The Save list in file...pop-up screen
Note
I prefer to save the files unconverted so that they are a simple CSV file. I find it to be the easiest to import into other programs. However, don’t hesitate to experiment with the other file formats to find the one that works the best for your needs.
When you click the enter icon  the system prompts you for a place to store the output file. Select a location in which you want to store the file and give it a name. Click the Generate button (Figure 28).
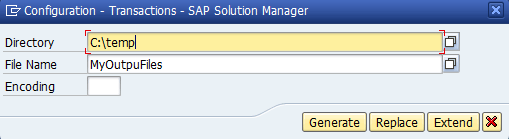
Figure 28
Save the file location and name the input pop-up
Your file is saved at the location you requested and is ready for import into the program of your choice.
Running the Reports for Configuration and Programs
Using SOLAR_EVAL [
As mentioned earlier, running the assignment analysis reports from SOLAR01 or SOLAR02 is only one way to access the project analysis reporting tools. Transaction code SOLAR_EVAL opens a portal to a wide array of project reporting tools for Solution Manager. Figure 29 shows the initial navigation screen for transaction code SOLAR_EVAL.
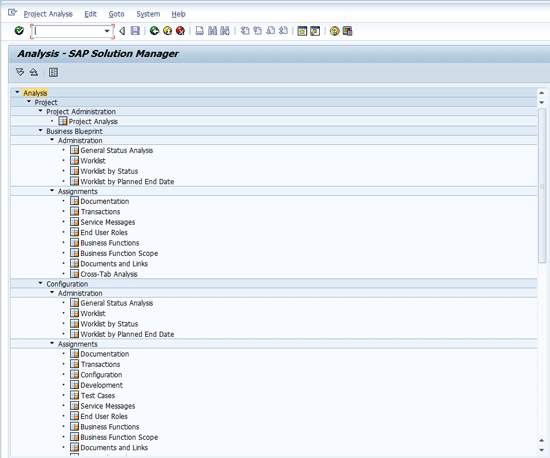
Figure 29
The initial navigation tree for the SOLAR_EVAL analysis reports portal
Note
Under the Business Blueprint Assignments section you see reports for transactions, but you do not see the reports for configuration or development. This is because the default configuration for Solution Manager projects is to have the configuration and development tabs appear only in the configuration phase (SOLAR02).
The configuration and development reports can be found under the Configuration Assignments section of the navigation portal above (Figure 29). As of this writing, Solution Manager reports do not allow you to run a single report that contains all the transactions, configuration, and development items that I’ve covered in this article with the customer attributes feature. The cross-tab analysis report, in fact, reports on all the object types I’ve covered, but it does not include customer attributes. Therefore, for now, if you want all the content in a single report, you have to run the reports separately in Solution Manager and combine them in Excel or some other listing tool that can import CSV files.
Testing
You’ve seen how to create, assign, and use customer attributes for objects on the BPH. As with all techniques like this, I encourage you to set a few of them up on a sandbox project and experiment before putting them to use in your production Solution Manager system. Also, I encourage you to take the time to define, document, and train the team on the standards about how you plan to use these customer attributes for your project. Consistent use of the attributes is the only way they bring your project real value.
D. Russell Sloan
D. Russell Sloan is a specialist in project and program governance for IBM. He focuses on the use of SAP Solution Manager for global rollout projects for IBM’s largest customers, having worked with SAP software since 1996. Russell has degrees in accounting and information systems and has been a team and project leader for SAP projects for more than 14 years. He has been developing and deploying software systems for over 30 years.
You may contact the author at solmanruss@gmail.com.
If you have comments about this article or publication, or would like to submit an article idea, please contact the editor.