How to Use Advanced SAP HANA Modeling Features to Improve Performance
SAP HANA provides some advanced and related modeling features that only a few users are currently leveraging. Two of these, value help views and mappings of input parameters, provide features that make SAP HANA run faster and, more importantly, make SAP HANA more flexible.
I explain how to use these two SAP HANA concepts to provide better usability and improved performance. These two concepts are connected, as value help views can be attached to variables and input parameters; however, I mostly address each concept separately in this article. In the first example, I focus on value help views. In the second, I explore the advanced use of input parameters as filters and the mapping of these from a lower-level view to a higher-level view.
(Note: My purpose in writing this article is to show the advanced features of SAP HANA modeling. I do not go into step-by-step details to show the navigation basics or the basics of variables or input parameters, but rather concentrate on an overview of the concepts of these advanced features and how to implement them.)
Explore related questions
Value Help Views
A value help view is a view that contains a list of possible values that can be selected when filtering is performed by the user. The most common form of a filtering operation is when the user is asked for input to an SAP HANA variable — for example, pick a customer. The default view that SAP HANA uses to present this list would be the values that are available in the main view you are trying to analyze.
For example, say you have a view (in this case, sales), and it has a custom table with 500 customers linked to an order table with 50 million orders as your main view. Depending on the design of this view, the use of it as a view as the default help view could mean the view would scan all 50 million records to present just 500 as the list of choices. In Figure 1, I show a better method for doing this using the view/table for value help feature.
The screen in Figure 1 shows how to change the default view for the value help view. In this case, using the ellipse icon (…) to choose a view (or table), I change the default view to a custom look-up view. In this example, I used a calculation view (not a table view) that yields a very small list of customers. If you were to use a table, it might include just a few of your most important customers. This would mean improvements to speed as well as usability. The improvement in speed is because the view does not have to execute the whole main view read just to get a list of choices.
The only potential drawback to using this method is if the value help view does not include customers with sales. In that case, you might not realize from the prompt that you’re not getting a complete list of all possible customers. The reverse might also be confusing. For example, the value help results might include Elvis Presley, when Elvis was not actually available as an output from the main view because he was never a customer. In this case, filtering on Elvis, the result would be null, which is correct, but it would need to execute the query to find this out.
Here’s another example. This one shows how value help views pass down to the reporting tools. Specifically, I show how a value help view can be used to offer a value list to a drop-down list in SAP BusinessObjects Design Studio. Unlike with the first option, this value help is not connected to a prompted variable, but rather is connected directly to a field on the semantics.
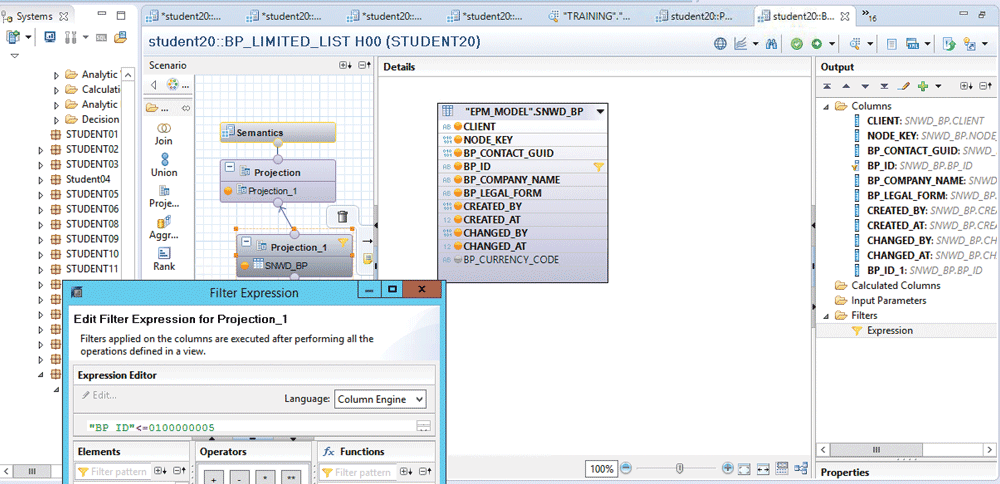
To start, I am creating a view that returns a list of five business partner IDs (shown in Figure 2). This is the view that I use as one of the value help views. I am just filtering the list to five business partners via a hardcoded filter, but ranking or other logic could be used.
The next step is to consume this view as a value help view in my next view (Figure 3).
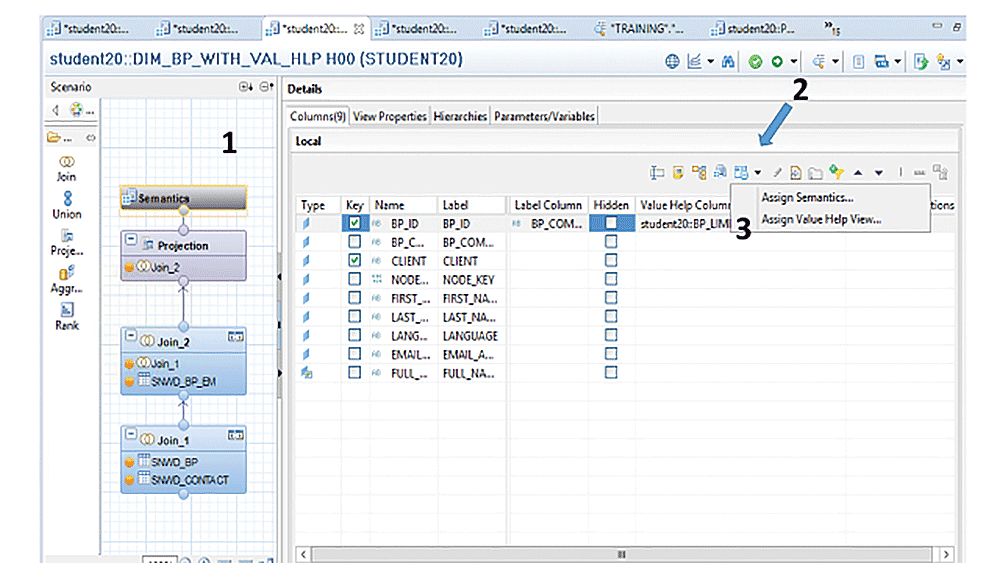
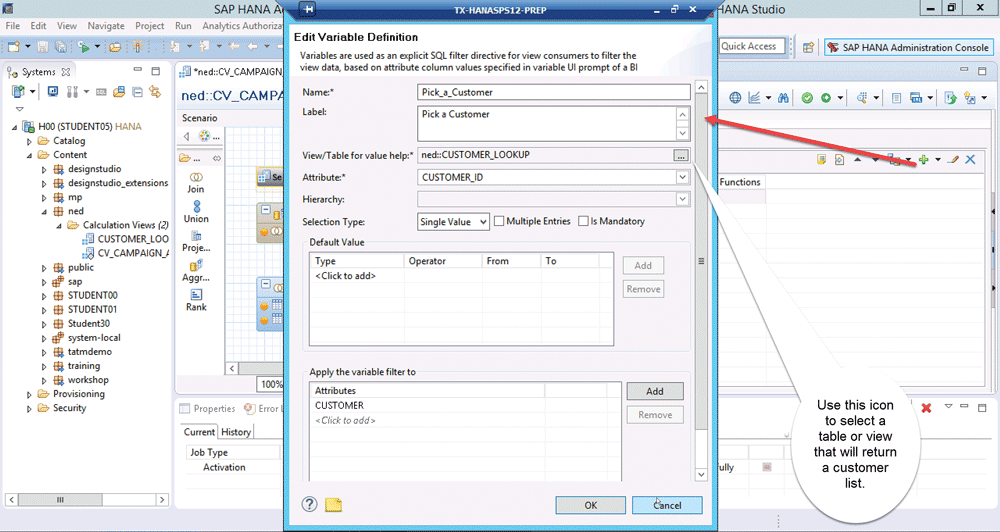
First, access the Semantics node (1) and then select the drop-down arrow on the right (2) to expand the semantics options (Assign Semantics… and Assign Value Help View…). Choose the Assign Value Help View… option (3) and the Value Help View/Table pop-up shown in Figure 4 opens.
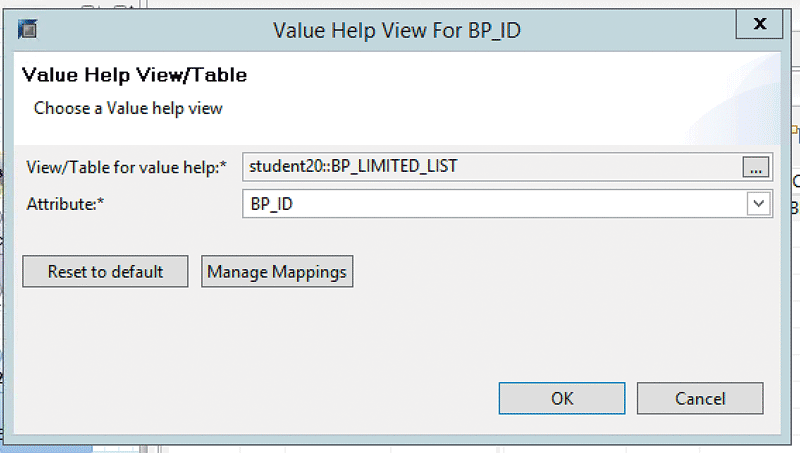
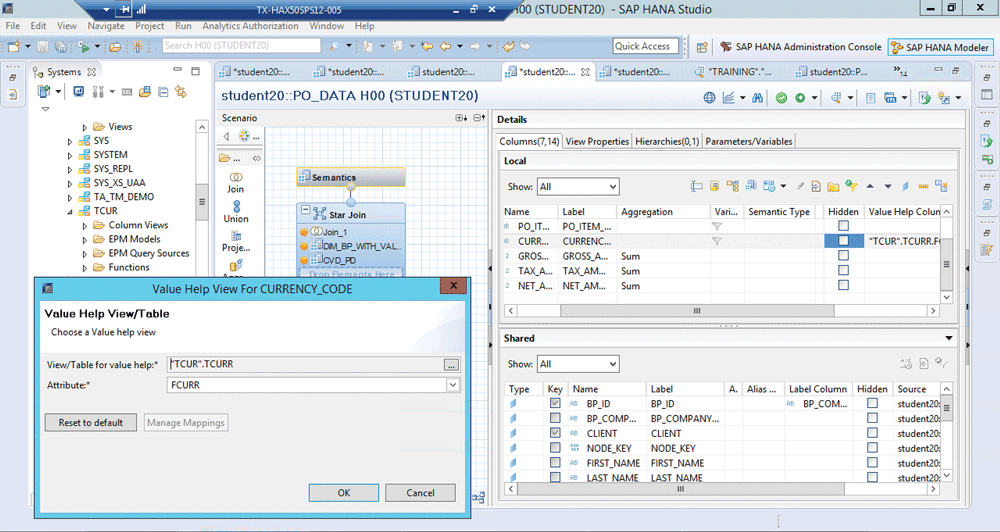
Select the ellipse icon next to the View/Table for value help field to search for the created view (or table) that you want to use with the limited business partner IDs (Figure 4). The Attribute field auto-populates with BP_ID as this was the field selected previously. Click the OK button to save the setting for the value help view you want to use. Follow these same steps to make the settings for currency (Figure 5). The only difference is that instead of basing the currency view on the business partner IDs’ table, the currency view is based on a table of currencies. This comes in handy, for example, if you have millions of transactions but only in two currencies.
As modeling pros, you understand variables; thus, it is not necessary to go into the details about how the variable screen pop-up choices are limited to the values in the customer look-up view in the first example. In this case, however, no variable is involved, so how do you see the effect of value help? Simple—use a BI reporting tool such as SAP BusinessObjects Design Studio to create an analysis application and then apply a filter to see the effect.
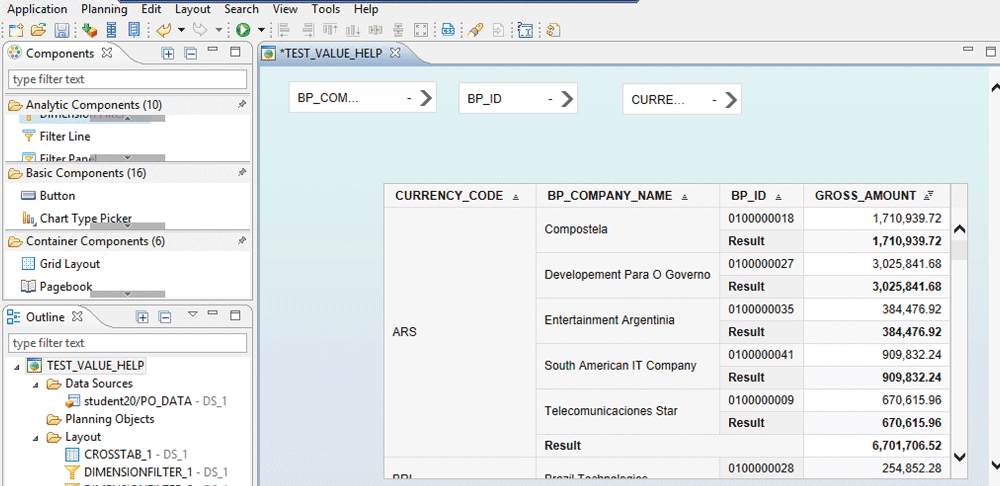
In my example in Figure 6, I used an SAP BusinessObjects Design Studio application and inserted three drop-down filter options on the dashboard: BP_COM (business partner company name), BP_ID (business partner ID), and CURRE… (currency).
Both the business partner ID and currency dimensions get their values from dedicated value help views, but the company name dimension does not. Rather this list of values is pulled from the entire result set of the whole view. This difference is illustrated in the pop-up window that appears when a dimension is selected, as shown in Figure 7. The only drawback to this method is that the full list of choices is not available, so it is not a technique that works in all cases.
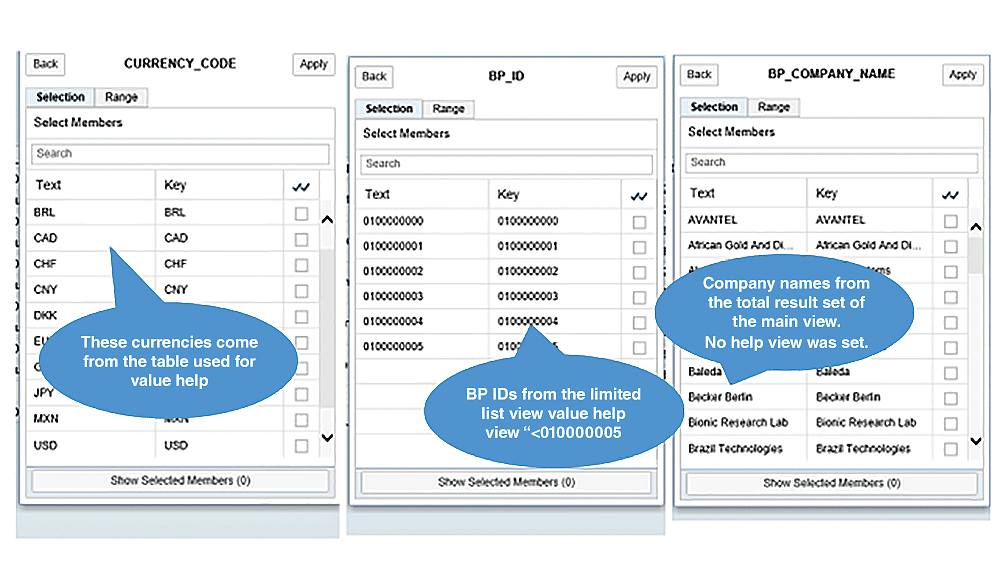
In Figure 7, the currencies listed on the left are from the table that is used for help values. The business partner IDs (the middle column) are from the limited list view value help. The company names (the last column on the right) are pulled from the result set of the main view because no help view is set.
Figure 7 in the BP selection box shows that there are only BP_IDs with values less than 100000005. That means the help for this navigation comes from the special limited list view I set up, rather than from the list of all the IDs in the data set. The currency table read is also coming not from the list of all currencies in the data set of transactions but from a dedicated table of currencies. However, Figure 7 does not demonstrate this because it contains all the currencies used by the company, and thus both the full data set and the quicker-to-access table of currencies return the same list.
Mapping Input Parameters
In this section, I discuss the advanced use of input parameters for filtering data and how these parameters can be mapped to feed values to lower-level views from a higher-level view.
(Note: Many of the input-parameter concepts discussed here also apply to variables, but when it comes to setting the filter, the method for doing this is more straightforward for variables than for input parameters. Input parameters for filtering require a bit of simple code. Because of this, input parameters are slightly harder to configure. Due to this added complexity, I use input parameters in my example scenario. There is overlapping functionally in this area; you can find more information on the differences by reading SAP Note 1691126. )
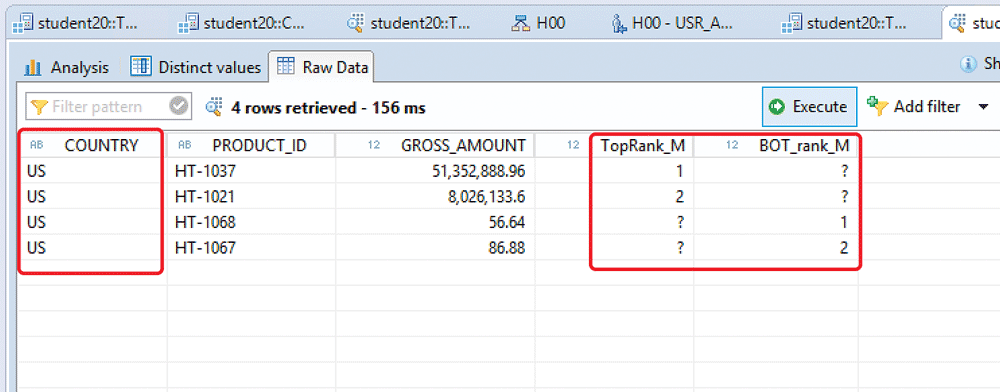
In this scenario, I am using a rank node, which returns either the top N value or bottom N value when the N value is input via a user-supplied parameter. However, the rank node does not return both top N and bottom N values at the same time, which is a requirement of my scenario. In addition, I want the resulting top and bottom N values to be country specific.
To accomplish this, I need calculation views with rank nodes (one for the bottom and one for the top). I also want the option to reuse these separately, because often just the best or the worst rankings are needed. Therefore, I need a third calculation view to union the results together. However, I do not want to make the user enter more than two inputs—one for country and one for the value of N. I can do this via input-parameter mapping.
(Tip: Although using rank nodes to have the database identify the best or worst values is very user- and performance-friendly, it is not the main subject of this article, but rather, a side benefit. The real point of the article is that input parameters can be mapped from higher-level to lower-level views, which as you see below allows reusability of lower-level views and increased performance.)
Scenario Prerequisites
The example I show in this article uses a basic concept of a rank node that gets the rank from an input parameter. Figure 8 shows the configuration of the top N input parameter. It is very straightforward. The sister view (not shown) for the bottom N has nearly the same configuration, but the input parameter is asking for the bottom N, not the top N.
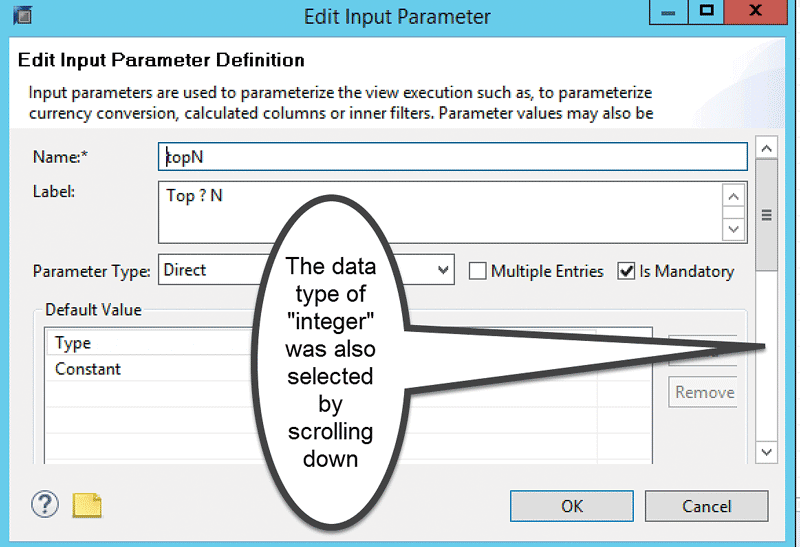
In Figure 8, in addition to the settings you can see here, you need to scroll down as shown to set the integer data type. Once you’ve viewed the settings to make sure they’re correct, click the OK button to save them. This opens the screen shown in Figure 9.
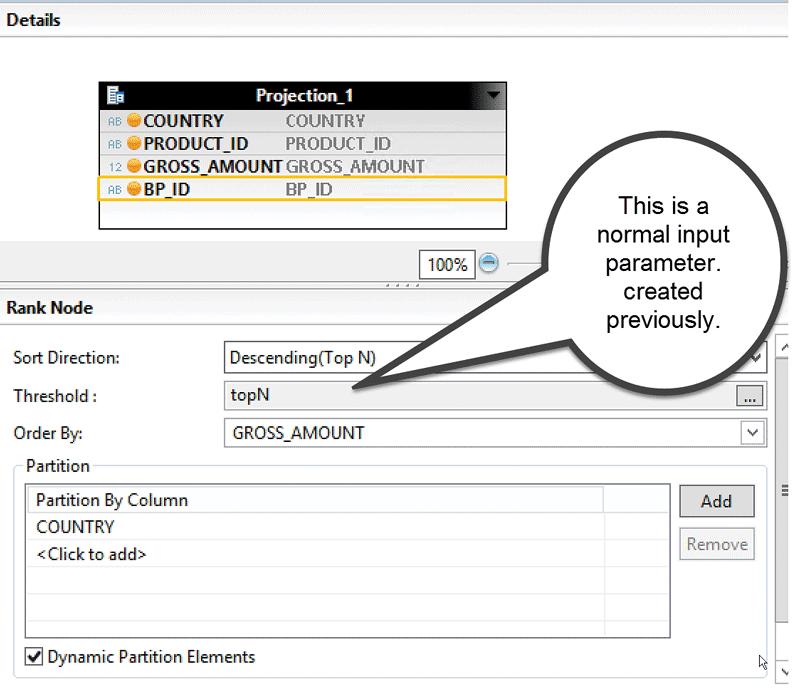
The Threshold (topN) in Figure 9 is the normal input parameter, which was created previously.
Filtering Input Parameter Details
Many readers may not be familiar with how to create an input parameter that behaves like a variable. By this, I mean that the input parameter, like a variable, provides a list of choices and then the answer is used as a filter. Using an input parameter in this way requires a bit more work.
Figure 10 shows the basic steps for creating an input parameter for country. The arrows highlight the differences between this input parameter’s settings and the default settings. For example, instead of using the Parameter Type Direct, in this scenario I choose the Column option.
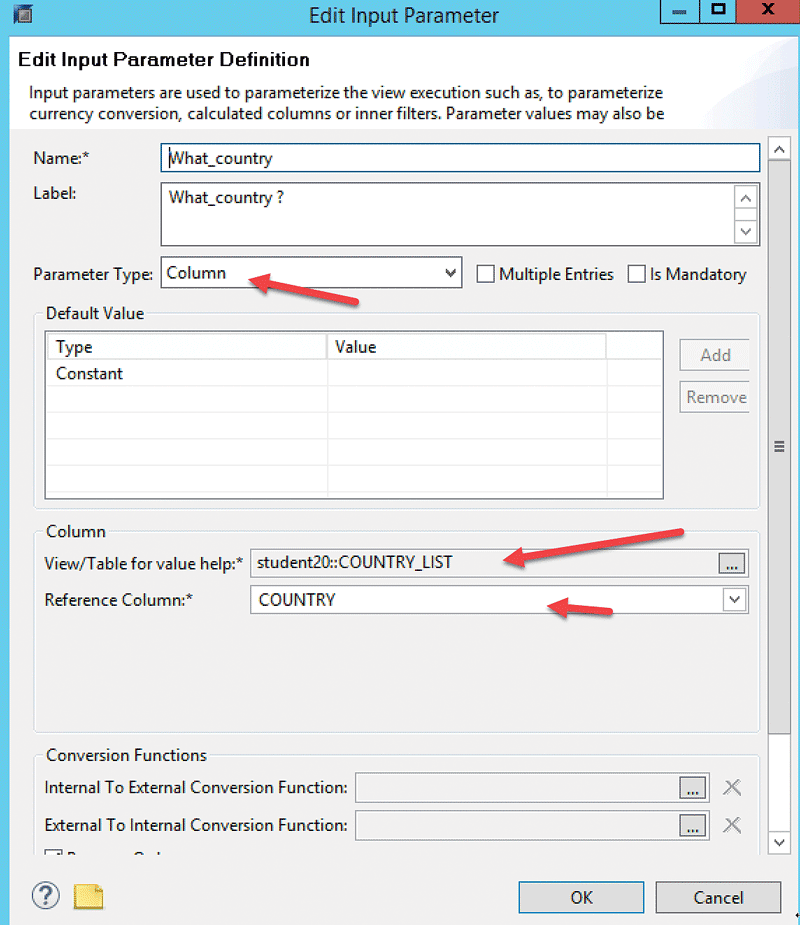
(Tip: Be aware that variables automatically provide for a list of values, whereas input parameters only do so if you do some extra work as I show here.)
Before getting in too deep, my scenario involves combining a top N view and a bottom N view into another higher-level view. All the following settings for the top N view are also performed on the bottom N view.
In Figure 10, I added a reference to the country list table and the country field as a source of value help for this country-based input parameter. The country list table (Country_list) is just a small table with a list of a few countries I already have in the system. This is just another example of a value help, but this time with a table instead of a view. Much like a variable you might be used to using, it is used to filter the data to a country choice made by the user. This time the prompt is for the country coming from this input parameter and it is prompted when the reporting tool opens. Filtering does not have to be set up in the reporting tool, as it did in my earlier example.
My goal is to filter the data on a country value entered by the user from the choices available in the Country list table. Using variables to prompt for country is one option. I would get a list of choices automatically, but I want to map the selection from one view to the next and this is a feature I want to demonstrated using input parameters. Input parameters, however, are different than variables. Basically, input parameters don’t do anything unless you put them in code (or use them in the rank node as shown previously). If I stop here with this country example the user will be asked to select a country, but the system does not actually filter the data. To finish the task—to have the system filter the data—you need to add a where clause as I show below.
Next, I explain how to add the where clause to filter the data based on the country selected. The screen in Figure 11 opens.
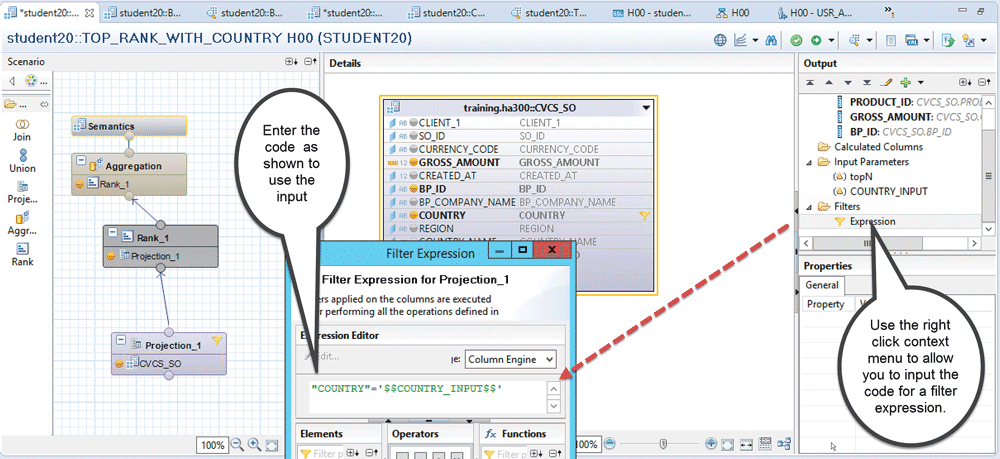
Right-click the Expression filter on the right to open the Filter Expression pop-up window. This is where you input the code for a filter in the Expression Editor box as shown in Figure 11. (In this case, the code is “country” = ‘$$ country__input$$’.) Again, you did the same thing to the bottom N view (not shown) by using a simple right-click on the filter expression text.
Mapping Details for the Input Parameters
In the final step in my scenario, I show how to create another view that unions the top and bottom rank views together. The issue is that these underlying views both have two input parameters, one for the N question in the rank and one for the country. In my scenario, I want to create input parameters at the top level (the union view) and pass the N rank and country input parameters’ answers to both underlying views. This can be done via parameter mapping.
This parameter-mapping feature is both more user friendly and a performance enhancer. On the user-friendly side, it just asks for two inputs, one for the rank N value and one for country. On the performance-enhancement side, the data is filtered at the lower-level views and then combined. This is better (faster) than combining and then filtering. This would especially be true if the views were joined vs. unioned, as joins with big data are harder for a system to perform than a union.
Before mapping the input parameters (which is the next step), let’s review the union node on the combined top and bottom N views, shown in Figure 12.
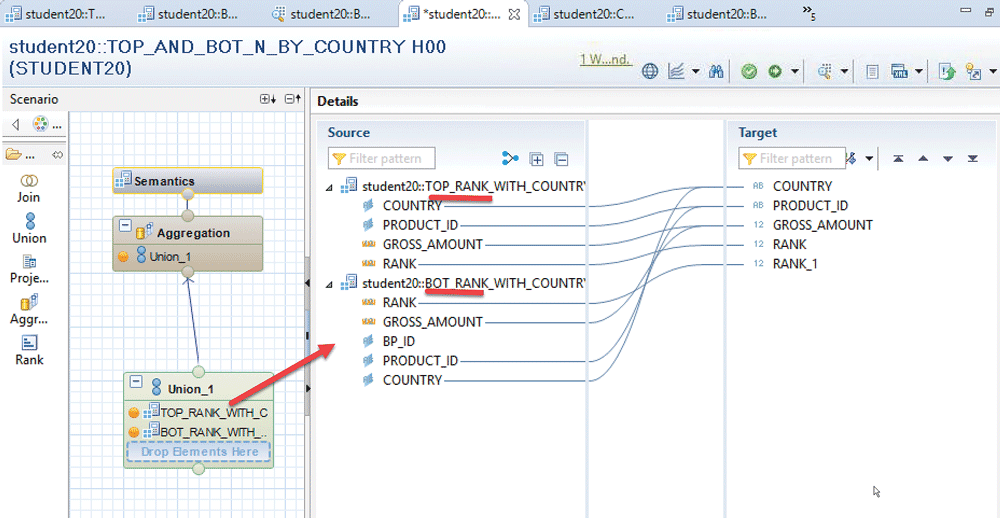
The most important detail in the union shown in Figure 12, is that the rank columns are not unioned (e.g., the rank nodes on the right do not point to more than one view on the left). This is not the focus of the article, but I think you will like how the output is easier to understand when the rank outputs that form the underlying views are not unioned. Let’s focus on the main point, however, and discuss the mapping of the input parameters that were created on the parent view to the top and bottom N views.
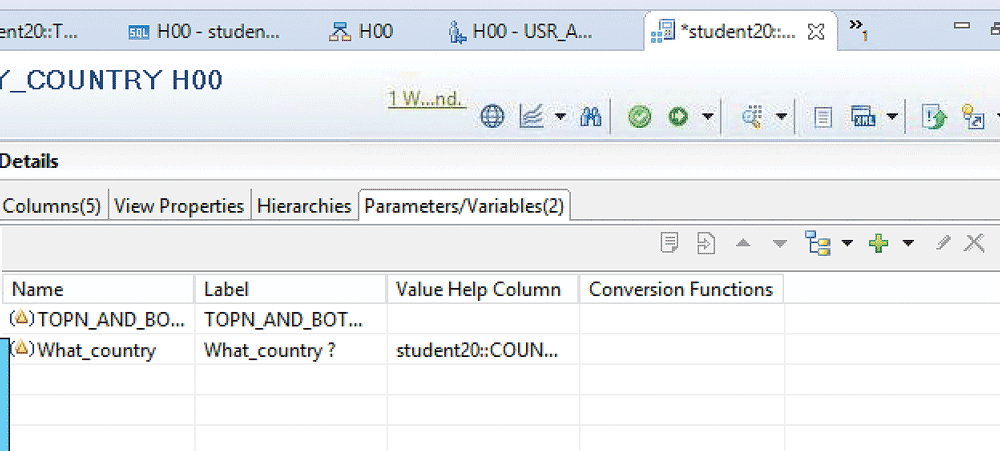
As shown in Figure 13, these input parameters have slightly different names but were created exactly like the ones on the lower-level top and bottom rank views. Note that the What_country input parameter is coming from the higher-level view and it was set up with the value help table just as I showed above on the top N view.
Now you have your calculation view and the input parameters on both the parent calculation views, as well as the lower-level top view and bottom view separately.
The final steps are to map the lower-level inputs to the parent inputs and then review the results.
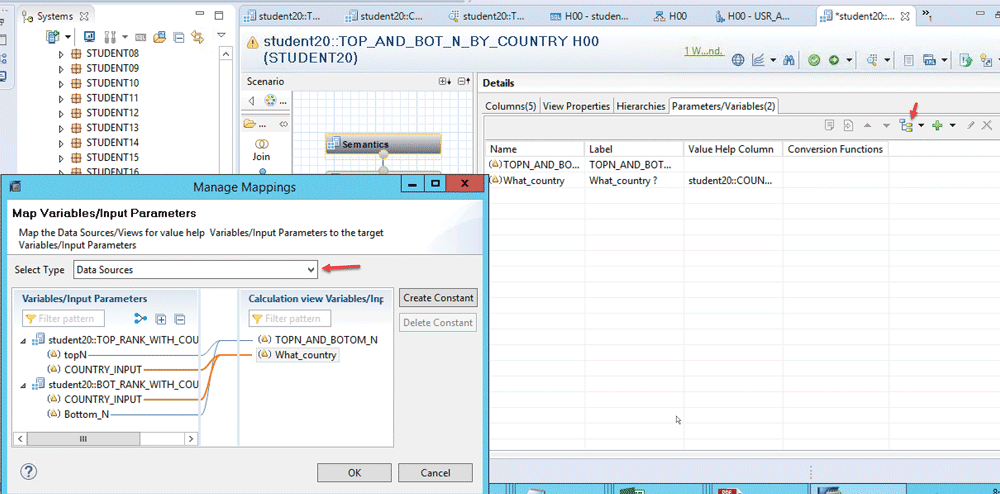
The mapping steps are shown in Figure 14. Click the highlighted icon on the top right and the Manage Mapping pop-up screen opens. Choose Data Sources from the drop-down options as the Select Type and, in the pop-up window, drag the Variables/Input Parameters (in this case, topN and COUNTRY-INPUT) from the left to the TOPN_AND_BOTOM_N and What_country calculation views, respectively, on the right.
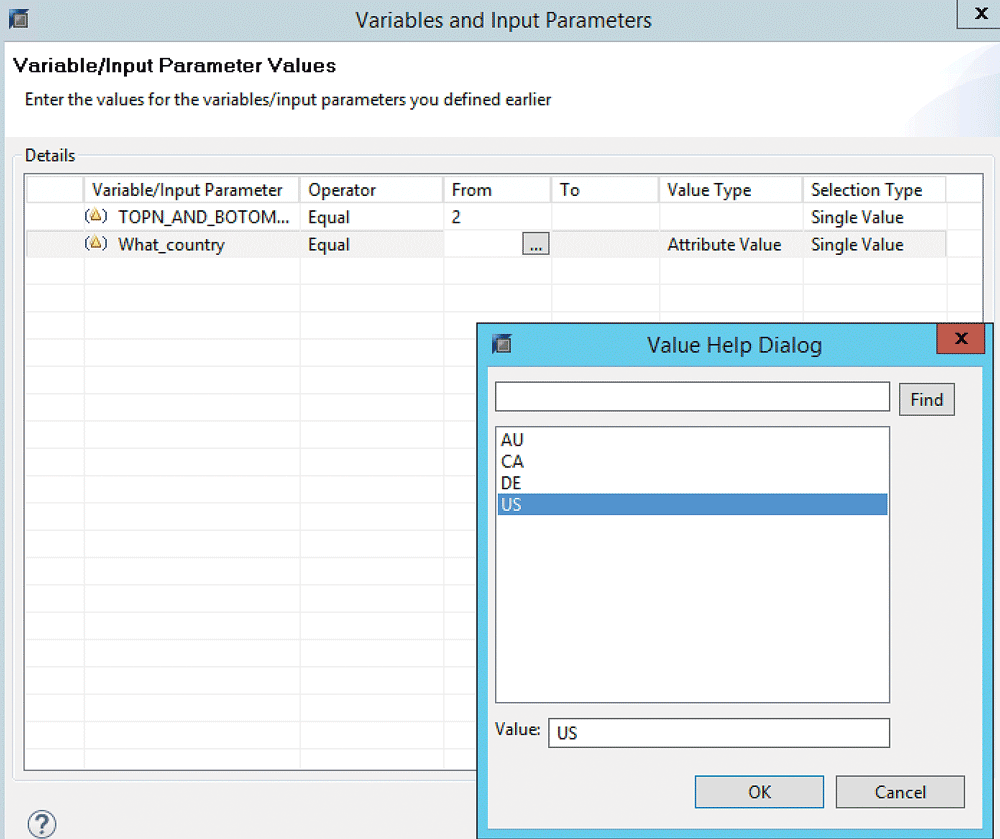
The last step is to run the higher-level view, fill in the two prompts (TOPN_AND_BOTOM_N and What_country), and see the results. The execution with the prompt to enter the inputs is shown in Figure 15.
The results are shown in Figure 16. Note that each provider returns two records because the response to the top N and bottom N ranks prompt is two. Also, note that the country for each record is passed to the where clause, yielding (in this case) just US records.