Guidance for the Q3 2017 Release of Contingent Workforce Management in SuccessFactors Employee Central
The Q3 2017 release of SuccessFactors Employee Central introduces the following new functionality for managing the contingent workforce:
- Performance management for contingent workers
- Learning management for contingent workers
- Hiring and rehiring contingent workers such as contingent-to-employee and employee-to-contingent scenarios
- Disabling contingent workers in the org chart
- Setting up email notification
(Note: Contingent workers [also referred to as non-payroll workers] deliver services to an organization on a non-permanent basis. They are often known as independent professionals, temporary contract workers, labor hires, contractors, consultants, free-lance workers, or outsourced employees.)
Figure 1 shows the three solutions for Contingent Workforce Management.
Explore related questions
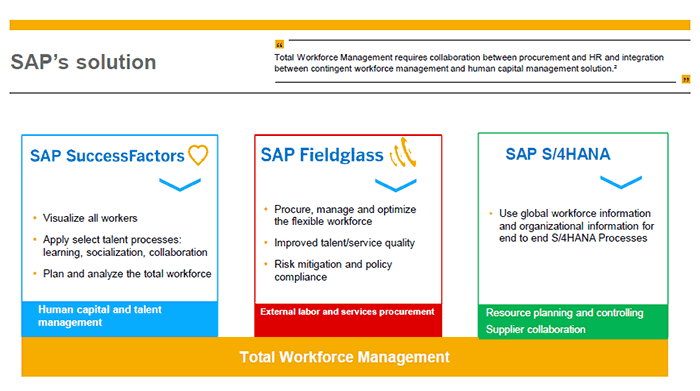
- Contingent Workforce Management stand-alone. You can use Contingent Workforce Management as a stand-alone product.
- Using Contingent Workforce Management with Fieldglass. You can also use Contingent Workforce Management with SAP Fieldglass.
- Integration with Employee Central. SAP Fieldglass can be integrated with Employee Central using the SAP HANA cloud integration tool. The integration scenario takes position information from Employee Central to create a requisition in SAP Fieldglass and then once a person is found to fill the position, the staffing information is sent to Employee Central to create a new profile.
I cover Contingent Workforce Management in SuccessFactors Employee Central. Implementation of People Profile and Employee Central are prerequisites. I focus on the following processes:
- Activate and set up the contingent worker functionality
- Create contingent workers
- Learning for contingent workers
- Performance management for contingent workers
- Hire and rehire of contingent workers
Activate and Set Up the Contingent Worker
Take the following steps to activate the contingent worker feature.
Step 1. Log in to SuccessFactors as a SuccessFactors administrator with admin privileges.
In the Admin Center, select the Manage Employee Central Settings option in the Tool Search as shown in Figure 2.

This directs you to the Admin Center Manage Employee Central Settings as shown in Figure 3.
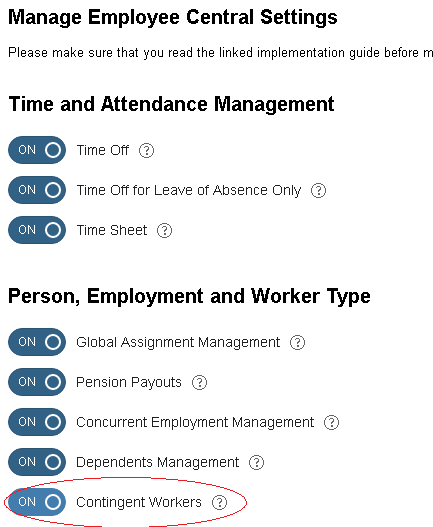
Step 2. Go to the Person, Employment and Worker Type subheading in Figure 3. Select the ON button for Contingent Workers.
Step 3. Click the Save button (not shown) to the save the changes.
Creating Contingent Workers
The contingent workers can be created in the following ways:
- Employee Data Imports
- Contingent Worker wizard
Employee Data Imports
To update SuccessFactors with user data changes, you need to upload a user data file to SuccessFactors. You can upload the file you modified yourself or a file that contains updates from your company’s HRIS database.
You can upload the data file at any time, but if you’re using an HRIS system, you might want to set up a regular schedule that coordinates with your company’s HRIS system updates.
To upload successfully, your file must be formatted correctly and have all the required fields.
Follow this procedure:
Step 1. Go to the Admin Center.
Step 2. In the Tools Search field, type Import Employee Data. This brings up the Import Employee Data page. If you haven’t already downloaded the import template, select the required template from the Download dropdown. Save the template to a location of your choice and update.
Step 3. To upload the file, specify the type of import you’d like to perform.
(Note: If you need to upload several templates, SAP recommends that you compress them and upload them as a zip file. To import the zip file, select the Composite (Zip) Data Upload option.)
Specify whether the upload should overwrite existing records or add to existing records.
In the Real-Time Threshold field, specify the maximum number of records to process in real time. When the number of records in this file exceeds this value, the import process is invoked in the asynchronous mode (as a background process).
Step 4. In the Choose File field, specify the path to the file. In the File Encoding dropdown, select the relevant encoding applicable. From the File Locale dropdown, specify the same locale as the data to import. For example, if the data you are importing is specific to Germany, select German (Germany) from the dropdown.
(Note: In the old releases, you had to change the locale from OptionsChange Language to import language-specific files containing Date, Numbers, and Picklist. As a result, the language of the user interface (UI) components changed depending on your selected language. You can now import any language-specific files without changing the language of the UI components. The locale list that appears in the File Locale dropdown is based on the Language Packs you choose when configuring Employee Central.)
Step 5. Click Validate Import File Data to check the file for errors. If you encounter errors, fix the errors and then validate again.
Step 6. Once the file passes the validation checks, click Import to upload the file and the file is uploaded.
The Add Contingent Worker Wizard
The Add Contingent Worker wizard is similar to the New Hire wizard, although it has been tailored to include only fields and portlets relevant to contingent workers. The New Hire wizard is normally used to hire new permanent employees in Employee Central.
The Add Contingent Worker wizard is the tool to launch Contingent Worker wizard. The Contingent Worker wizard consists of four sections:
- Identity Information
- Personal Information
- Contingent Worker Assignment Information (Job Information)
- Work Order Information
Creating the Groups
You need to create the following permission groups. You separate them in order to distinguish the various types of workers:
- Contingent Workers from Employee Central
- Contingent Workers from Fieldglass (not necessary if you are not using Fieldglass)
- Regular employees
Once you’ve created the different groups, you need to ensure that they have the correct level of access. You control the level of access by creating permission roles and then assigning them to the relevant groups. Once you’ve defined all the permission settings for a permission role, assign the role to the relevant group you created. For example, assign the permission role Contingent Workers from Employee Central to the group of the same name.
(Note: If you have previously assigned contingent workers to any other permission roles, you need to remove them and re-assign them to one of the permission roles above to ensure they have the necessary permission. You don’t need to do this for regular employees.
Populating the Contingent Profile
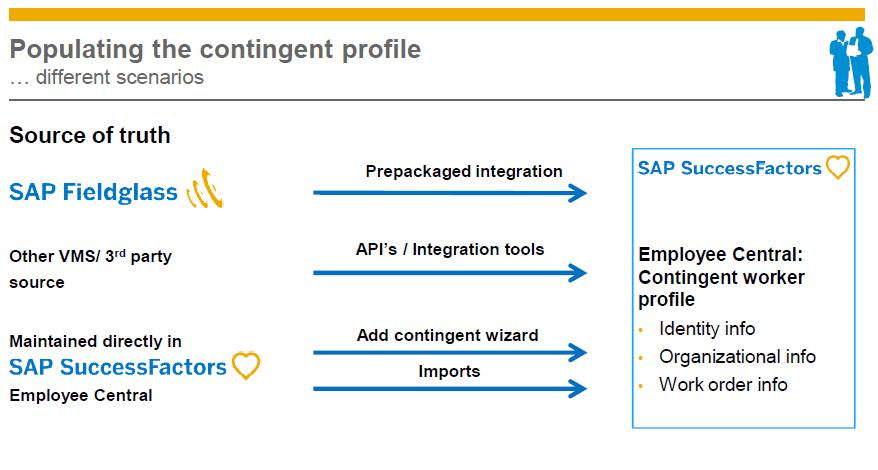
The contingent profile, which consists of identity information, personal information, job information, and work order information, can be populated from different sources, such as SAP Fieldglass, other vendor management systems, and Employee Central directly through APIs or integration tools as shown in Figure 4. These are the possible scenarios. A company may use any one of the sources. SAP provides application interfaces or integration tools to use this functionality.
Setting Up Email Notifications
You can set up notifications to be sent to contingent workers upon hire or rehire. You can send out notifications for the following situations:
- When a contingent worker is hired using Add contingent worker/imports/application programming interfaces (APIs)
- When a contingent worker is rehired as a contingent worker
- When a regular employee is rehired as a contingent worker
You cannot send notifications for the following situations:
- Recipient does not have proper business email address
- Work order dates are modified or extended after the contingent worker is hired
- The contingent worker hired has a work order end date in the past
Learning for Contingent Workers
Some companies require learning for contingent workers as a part of their jobs. Contingent workers can be external learners. You can enable contingent workers to log on to the Learning Management System to access training.
(Note: Single Sign-On (SSO) must be activated for your system. Based on the SSO settings, the contingent workers are routed from Employee Central to the Learning Management System.)
Granting this access requires two main steps:
- Create permission groups for the various different types of workers
- Create and then assigning the necessary permission roles to each permission group
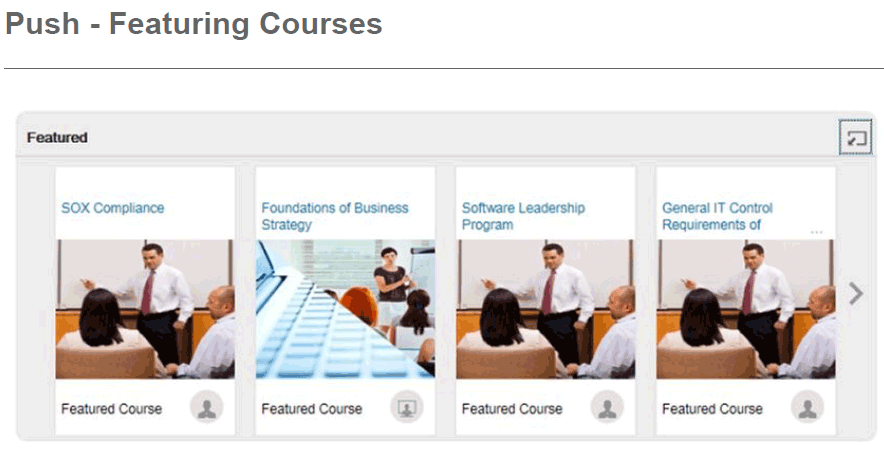
On integration of SuccessFactors Employee Central with the Learning Management System, the Push – Featuring Courses as shown in Figure 5 are the courses that are mandatory to take as a part of the job.
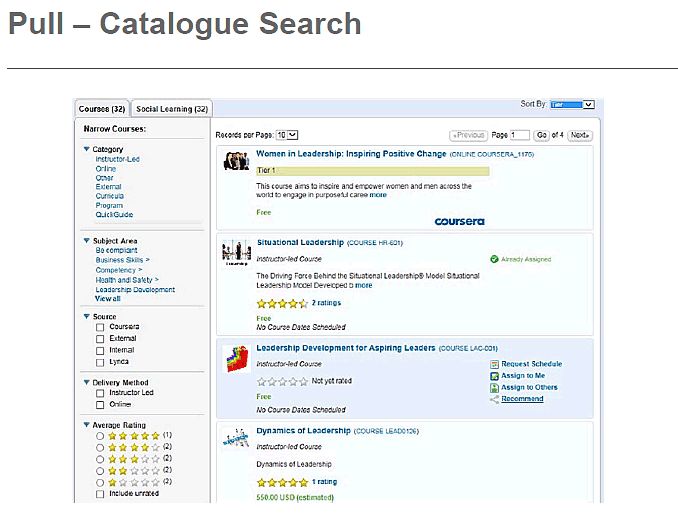
The Pull – Catalogue Search of data is where learners can select courses as shown in Figure 6.
Companies that have a significant number of external learners that will need access to the Learning Management System must have a strategy that safeguards employees’ data, while providing the required level of system access to this user audience.
This requirement impacts the following key areas:
- User registration into the Learning Management System
- User population into the foundation
- Data model
- User ID
- SSO/native login/password management
- Learning assignments
- Application integration and navigation/theming
- Reporting
- Licensing impact and change management
Performance Management for Contingent Workers Features
You can enable contingent workers to log on to Performance Management to access Continuous Performance Management.
On integration of SuccessFactors Employee Central with Performance and Goals Management, Continuous Performance Management for contingent workers can be used as shown in Figure 7.
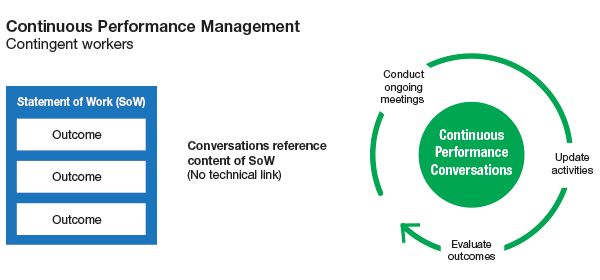
Continuous Performance Management is a simple way to improve employee engagement and performance. It provides more visibility to employee activities and accomplishments, showing how they relate to goals. It consists of these steps:
- The contingent worker defines work activities based on goals after a discussion with the manager
- The contingent worker updates activities related to the goals
- The contingent worker logs achievements
- The manager reviews assessments and recommends improvement plans if any
Disabling Contingent Workers in the Org Chart
By default, contingent workers are displayed in the company org chart. If your company does not want to show contingent workers in the company org chart, you can disable them from appearing. In such cases, you can take the following steps.
Step 1. Log in to SuccessFactors as a SuccessFactors SF administrator with admin privileges. In the Admin Center, enter Org Chart Configuration in the Tool Search, which directs you to Figure 8.
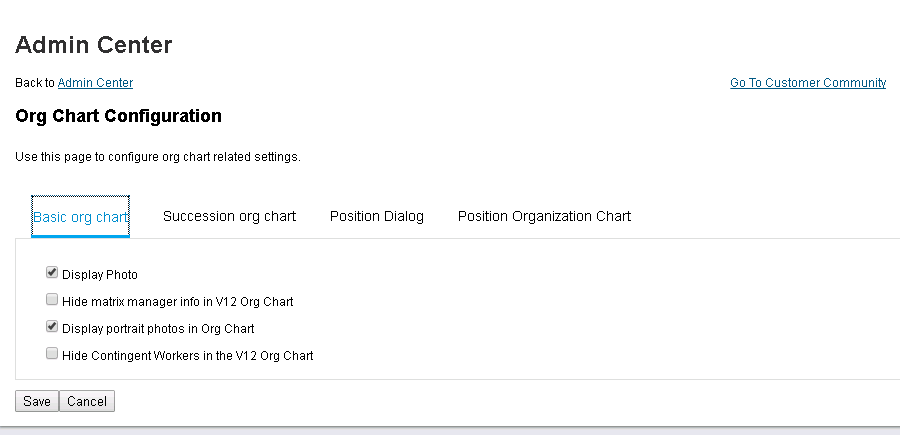
Step 2. Check the Hide Contingent Workers in the V12 Org Chart check box and click the Save button.
Rehiring a Contingent Worker as a Full-Time Employee (Permanent)
If the work order for a contingent worker has expired, you have the option of rehiring the worker as a permanent, full-time employee.
Follow these steps:
Step 1. In the Admin Center, choose Add New Employee.
Step 2. Enter a Hire Date that falls after the end date of the worker’s expired work order.
Step 3. Enter the name and employment information.
Step 4. You’ll get a pop-up telling you that this person already exists in the system. Click the Accept Match button.
Step 5. You’ll get a second pop-up informing you that this person already exists in the system as a contingent worker, and asking you if you want to hire the person as a regular employee. Click the Yes button.
Step 6. Enter the employee with a new username, choose New Hire as the reason, and click the Continue button.
Step 7. If you want, you can change the employee’s biographical and job information.
Step 8. Submit the new employee request.
On the employee’s profile you can see both the new role as a permanent employee and the old role as a contingent worker (including the date on which it ended).
Rehiring a Contingent Worker on a New Work Order
If the work order for a contingent worker has expired, you can rehire the worker on a new work order.
Follow these steps:
Step 1. In the Admin Center, choose Add Contingent Worker.
Step 2. Enter a Start Date that falls after the end date of the current or expired work order.
Step 3. Enter the name and employment information for the contingent worker.
Step 4. You’ll get a pop-up telling you that this worker already exists in the system. Choose Accept Match and then Continue.
Step 5. Enter all the information for the new work order and choose Submit.
Step 6. On the worker’s profile you can verify that the new work order and job profile have been added.


