To demonstrate the value of Strategic Enterprise Management (SEM), you can quickly implement a Management Cockpit by integrating a cockpit with Business Planning and Simulation (BPS) functionality. The cockpit can demonstrate to managers how SEM helps companies plan, illustrate, and communicate executive strategy.
Key Concept
Strategic Enterprise Management (SEM) is based on a Business Information Warehouse (BW) backbone. You can populate an InfoCube (the structure used within BW to store data in a manner that is optimized for reporting efficiency) directly by using SEM-Business Planning and Simulation (BPS) functionality. The InfoCube then serves as the source of data for an SEM Management Cockpit. You can implement Web links to make the distinction between BPS and the Management Cockpit transparent to the end user.
A common question that arises when I demonstrate the functionality of Strategic Enterprise Management (SEM) is, "Where should I start?" This is an important consideration given today's increasing pressure to quickly prove the value of every implementation project. In my opinion, the key is to isolate a quick-hit solution that is simple to implement and immediately draws the attention of a well-positioned audience.
One possibility that provides visibility as well as solid learning opportunities to the implementation team is a performance metric Management Cockpit integrated with Business Planning and Simulation (BPS) functionality as a data input tool. You can implement this functionality as an initial quick-hit project that sets the stage for future enhancements once user acceptance has been established. The cockpit itself serves as a visual control center from which managers can identify critical performance trends and make timely business decisions.
I'm basing this article on the 3.5 version of SEM, although relatively few enhancements were introduced between releases 3.2 and 3.5. Either version requires a compatible underlying installation of Business Information Warehouse (BW), which I'll assume you have for the purposes of this article. Additionally, core BW knowledge, including the ability to write queries in the Business Explorer (BEx) tool, is a prerequisite. While the planning components of this solution will soon be included in a BW installation as part of BW-BPS functionality, the added SEM functionality must be installed to complete the project with a Management Cockpit.
I'll describe each of the following major steps necessary for you to build a cockpit:
- Design a BW InfoCube to store your statistical results using a schema such as the one shown in Table 1.
- Enable BPS functionality as a mechanism for inputting these key figures.
- Create a query to access the data from the BW InfoCube.
- Configure and deliver the Management Cockpit.
| Organization |
0COMP_CODE |
Company code |
| Organization |
0PLANT |
Plant |
| Organization |
0PROFIT_CTR |
Profit center |
| Organization |
0CO_AREA |
Controlling area |
| Version |
0VERSION |
Version (plan/actual) |
| Measure |
0MEASURE |
Key performance indicator |
| Time |
0FISCVARNT |
Fiscal year variant |
| Time |
0FISCPER |
Fiscal period/year |
| Key figure |
0QUANTITY |
Quantity |
| Key figure |
0AMOUNT |
Amount |
|
| Table 1 |
Proposed InfoCube |
With the exception of a few noted tasks that require assistance from BW team members, functional analysts who have the appropriate security and authorizations can complete every step in this project.
Note
When you are creating this new InfoCube, you must designate it as a transactional InfoCube. Despite this rather confusing name, this InfoCube has nothing to do with actual transaction data. This is the only type of InfoCube that allows you to write directly into it — through the use of BPS functionality.
Step 1. Design the InfoCube
The first step in this process is to create the transactional InfoCube that stores your metrics. The BW team creates the actual InfoCube, but you first must define a suitable schema that meets your requirements for storing statistical results. Table 1 contains a sample schema that you could modify to suit your individual business requirements. For example, you may consider changing the organizational characteristics to suit your reporting structure. Remember to ensure that the InfoCube is created with the transactional option selected or you will not be able to access it using BPS tools.
Note
Omeasure is the standard characteristic used for performance measurement. It is integrated into the measure builder, balanced scorecard, and benchmarking functionality. SAP delivers many standard measure values that can be used without modification.
Step 2. Enable Data Entry
Now that you have defined a repository for your data, it is time to build input capabilities so you can update the statistical results each month. The first step is to create a planning area in BPS via transaction BPS0 and menu path Planning> Planning Area>Create. For now, this area will do little more than reference the previously defined InfoCube (Figure 1).

Figure 1
BPS area that references your InfoCube
To limit the scope of data being considered, you must also define a planning level. Planning levels limit the characteristics and key figures for use in BPS. They can also limit the data being acted upon to a specific set of characteristic values. To create a new planning level for your purposes, right-click on the previously defined planning area ZMETRIC in the upper left window and select Create level. For now, select all characteristics and value fields for inclusion in this level. Limit the data by selecting the fiscal periods corresponding to your current year and appropriate key performance indicators (Figure 2). You may return to this level in the future to refine your data limitations once you are comfortable with the functionality.

Figure 2
BPS planning level with time period selected
Now you can define your input format by creating a planning layout. The planning layout configuration determines what the user sees when entering statistical results. Right-click on the planning level name BASIC in the lower left window and choose Create manual planning. The first screen of this layout defines where characteristics appear in the layout. For simplicity, you'll leave only Fiscal Year Variant in the Header, move the Fiscal Year/period into the Data Column, and move all other characteristics into the Lead Column (Figure 3).

Figure 3
Manual planning layout definition used for user entry of statistical results
Select the Continue button to move on within the layout definition and set up columns based upon the quantity and amount value fields. Check the Dyn. boxes to indicate that the fiscal period is dynamic for both of these value fields (Figure 4). Click on Continue once more and save your layout.
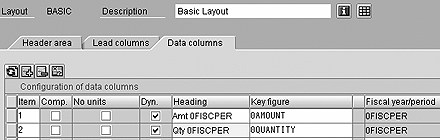
Figure 4
Value field column definition
You can also deliver data input capability through the Web using the Web interface builder. This enables you to expand this functionality to a broader audience and reduce your dependence on SAPGUI. Call transaction BPS_WB and use the wizard dialog  to create a new Web interface. When prompted for objects to include in your application, be sure to include your planning layout. Generate your interface and use transaction BPS_WIF0 to launch this Web interface. Web Application Server enables this Web-based functionality, which is a standard component of the SAP Basis 6.20 layer that underlies BW 3.1. The resulting Web interface looks something like that pictured in Figure 5. You may populate the appropriate characteristics and values by period for each key performance indicator. Save the results directly to InfoCube ZMETRICS by clicking on the Save button.
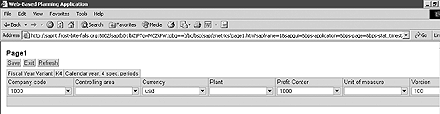
Figure 5
Query to serve as basis for the Management Cockpit
Step 3. Set Up the Query Structure
Once this capability to enter data has been established, define your Management Cockpit. BEx queries are used as the basis for serving data up to the Management Cockpit. Launch the query designer from SAPGUI using transaction RRMX. Figure 6 on the next page shows a sample query structure that I will use in my cockpit example. Note that the Request ID should be restricted to Most Current Data to ensure BPS updates are reflected immediately. The Fiscal Year Variant is also specified in the header, as I am considering it a standard setting throughout the organization. Both Quantity and Amount are available in the columns. For example, this allows me to create graphs by dollars or units sold. Including characteristics in either the Free Characteristics or Rows area enables them to be used in the cockpit definition.
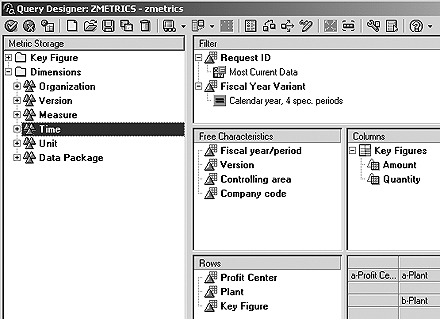
Figure 6
Query to serve as basis for the Management Cockpit
Reusing a single query for multiple cockpit frames (the individual graphs within a cockpit) provides easier maintenance and performance. For example, you may have similar graphs that depict the monthly trend of statistical results that can all be based upon the same underlying query. Note that the query must be released for OLAP processing on the Query Properties screen (Figure 7) by accessing the query properties (by clicking on this icon  ) from within your query designer.
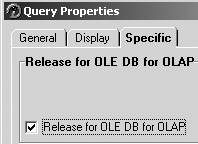
Figure 7
Release query for OLAP interaction
Step 4. Configure and Deliver the Management Cockpit
Call transaction UMC_CPM_MEAS to define a new Management Cockpit. Double-click on the Management Cockpit Design>Management Cockpits item. Choose the New Cockpit icon  and define a cockpit similar to the one shown in Figure 8. Click on Continue twice and then on Save to create your cockpit. At this point, the cockpit is displayed in the left window with a single wall (Figure 9). The wall is the highest-level container within a cockpit. Although this example shows a single wall, you may create up to nine walls in a single cockpit.
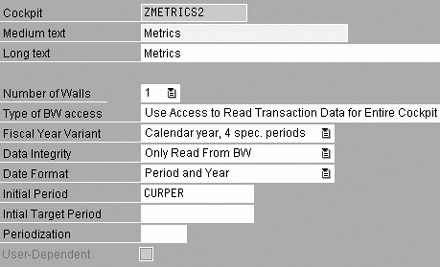
Figure 8
Cockpit definition
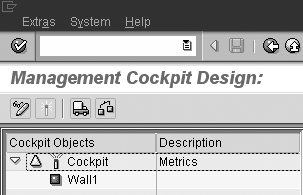
Figure 9
Cockpit with single wall
Double-click on the wall name to define it in more detail. Select the Create option from the resulting dialog box. Define the wall as pictured in Figure 10. Each wall may contain from one up to six logical views. Click on the Continue button to reach the Reports and Links tab and then on the Add URL button. Input the Web site previously generated for BPS entry of key performance indicator results. This allows users to jump directly from their cockpit to the Web site where they maintain values. Click on Continue and then on Save to complete the wall definition.

Figure 10
Wall definition
Logical Views are containers within Walls that in turn contain the individual frames. Double-click on the new Logical View that is created in the left window, select Create, and enter an appropriate name and description. Specify a single frame for now. Each logical view may contain one to six frames. Click on Continue and Save.
Double-click on the frame that is created in the left window. Select the Create option and choose a frame of type Graphic. See Figures 11 through 13 for an example series of inputs used to create a tachometer that compares plan to actual net revenue. Note that you may right- click on the graph in the Select Graphic Type step of the dialog to choose a bar chart, line chart, or some other style of graph. You may skip over the Measure Catalog Connection step by clicking on the Data Source, Measures step directly. Use the delivered Time Variable named Current Period as a selection for fiscal period.

Figure 11
Query to serve as basis for the Management Cockpit
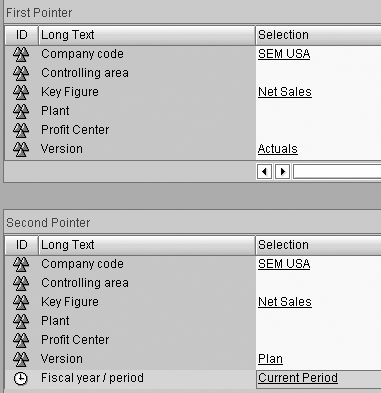
Figure 12
Plan versus actual comparison for the current period
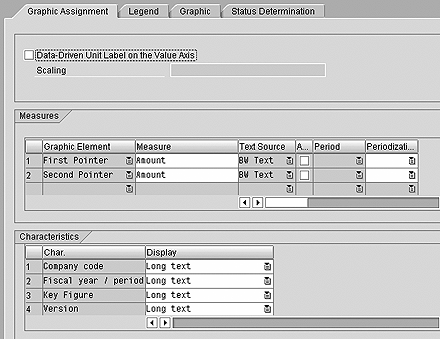
Figure 13
Graphic design for Management Cockpit frame
Finally, activate the cockpit and back out one step where you can drag and drop the cockpit into an appropriate location in the hierarchy of available cockpits.
The Management Cockpit is automatically available to users through your intranet as long as you have the service BC>BSP>SAP>MC activated in transaction SICF. Your Basis team can help to ensure this service is activated. To find the URL for your Management Cockpit, call transaction SE80, select the drop-down item for BSP APPLICATION, and enter MANAGEMENT_COCKPIT. Right-click on the "page with flow logic" named COCKPIT_HIERARCHY.HTM and select the Test option. This launches a Management Cockpit Web site. You can select your cockpit out of the hierarchy and confirm that the appropriate fiscal period is being analyzed. See Figure 14 for a sample cockpit logical view. Remember, you included a link to the BPS Web interface in the wall, so you can jump directly to the BPS Web-based functionality and maintain statistical results (Figure 15).
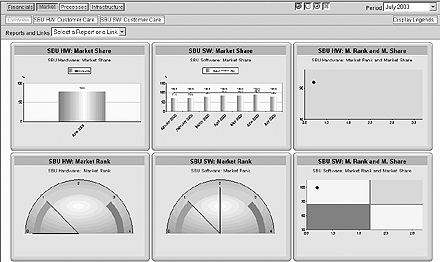
Figure 14
Sample logical view of statistical Management Cockpit
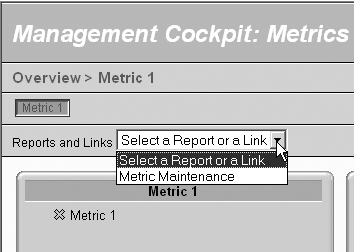
Figure 15
Jump directly to BPS Web interface
Building on the Quick Start
With minimal effort, you have centralized the storage of statistical results related to your corporate key performance indicators and produced a basic Management Cockpit that can be viewed by any user with the right authorizations. You can use this practical project as a catalyst to promote future opportunities for implementation within SEM.
Subsequent steps may include refinement of the BPS data entry layout, use of variables to dynamically select the fiscal periods under consideration within both BPS and the Management Cockpit, formulas within BPS to calculate derived metrics and copy values between periods and versions, automatic status determination for frame results, and inclusion of further content (links to external Web sites or reports) in the Business Planning Web interface.
Your security team may also need to build custom security roles based upon delivered roles such as SAP_SEM_CPM_MC_REPORTING and SAP_SEM_BPS_PLANNING. If you build this solution in a development environment, transport tools are available to systematically move the BW, BPS, and Management Cockpit configuration to testing and production environments. Help on these and other SEM standard tasks can be found at https://help.sap.com under the Documentation>mySAP Business Suite>SAP Strategic Enterprise Management subject area.
Matt Christensen
Matt Christensen is the director of Enterprise Performance Management at PRAGMATEK Consulting Group in Minneapolis. He has more than seven years of experience implementing a broad set of SAP financial modules, including configuration and development in R/3, Business Information Warehouse, and Strategic Enterprise Management. Matt holds an undergraduate degree in computer science and an MBA in finance.
You may contact the author at matt.christensen@pragmatek.com.
If you have comments about this article or publication, or would like to submit an article idea, please contact the editor.