SAP Access Control Implementation: The Myth, Truth, and Tricks (Part 2)
The SAP Access Control system provides many functionalities that can be harnessed to improve the processes around access risk analysis, access request management, business role management, and emergency access management. These capabilities are designed to ensure that there are sufficient controls within an enterprise to forestall fraudulent and malicious practices that can have adverse implications.
Organizations should be interested in optimizing the tool, which can be achieved only by aligning business requirements with an acute understanding of the potentials of the product. This can be challenging as the knowledge gap is commonplace. To close the knowledge gap, I provide use cases and real-life examples on specific configuration settings that can be adopted during an implementation project (or adapted following implementation) to meet specific business requirements.
The article addresses frequently asked questions often encountered during and after implementation of an SAP Access Control system. I intend to simplify a couple of complexities associated with the configuration of the SAP Access Control product by offering tips and tricks to meet specific business requirements.
Explore related questions
In this article I discuss the following topics:
- PFCG user group agent type
- Front-end printing
- Multiple access requests per user per system
- Making changes to access request forms in the approval screen
- Change log activation and reporting
- NetWeaver Business Client (NWBC) launch page
- Ruleset for risk terminator
- Role deletion in the back-end system
- User default settings in the personal object worklist (POWL)
- Risk analysis result screen when no violations exist
PFCG User Group Agent Type
Myth: The SAP Access Control system evaluates only the user group for the authorization check field maintained in the Logon Data tab of the user master data (transaction SU01) when the transaction code PFCG user group agent type is used in the workflow process.
Truth: The SAP Access Control system evaluates both the entries in transaction SU01 Logon Data tab (USR02 table) and user group assignment in transaction SU01 (User group tab).
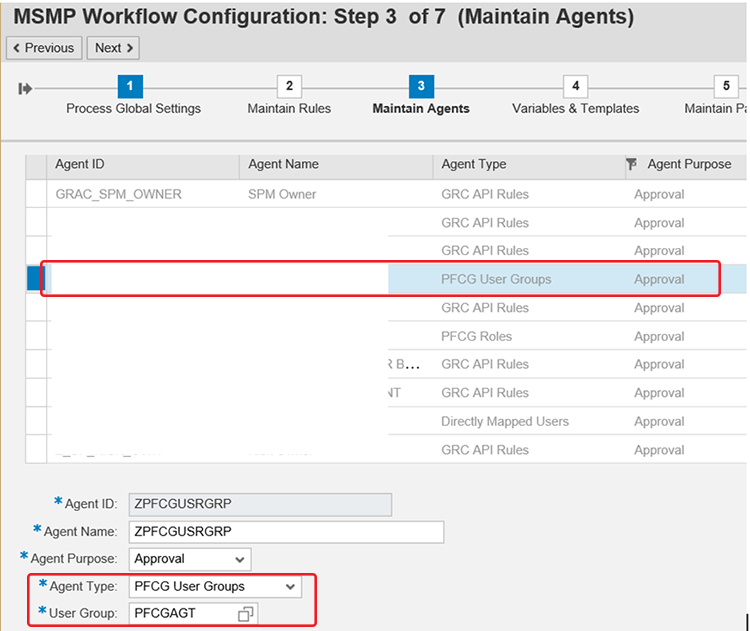
Trick: The PFCG user group is one of the agent types that you can define when maintaining multi-stage multi-path (MSMP) workflow processes in SAP Access Control. Other agent types include directly mapped users, PFCG Roles, and GRC API (Application Programming Interface) Rules, as shown in Figure 1. These agent types can act as notification agents and approval agents.
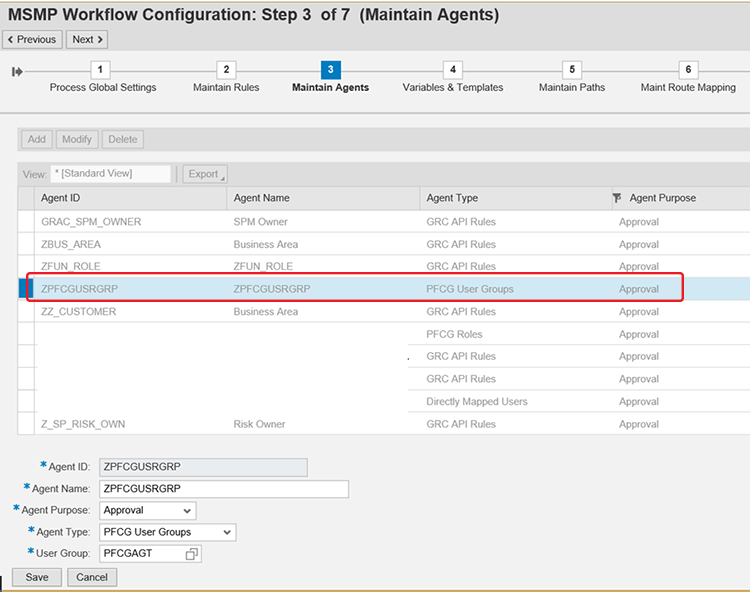
The agent types are defined in the Maintain Agents phase of the MSMP workflow process. Specifically, the PFCG User Groups agent type allows you to define the users assigned to a particular user group as recipients of workflow tasks or events (Figure 2).
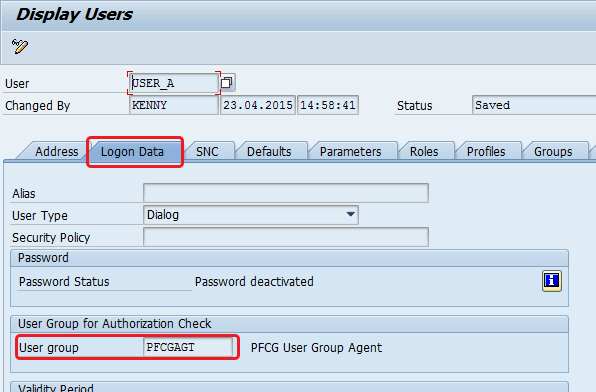
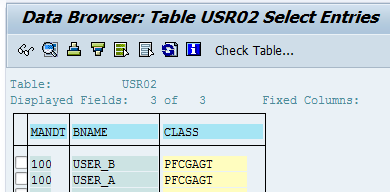
In the User Maintenance transaction (transaction code SU01), the user group can be maintained in the Logon Data tab and in the Groups tab. It is commonplace for users not to get the expected result in terms of the recipients of PFCG user group agent type because of incorrect maintenance or assignment of users to a user group. As it relates to user assignment to user groups, two tables are relevant. The first is table USR02, which stores data about user assignments to user groups in the User Maintenance transaction via the Logon Data tab (Figure 3).
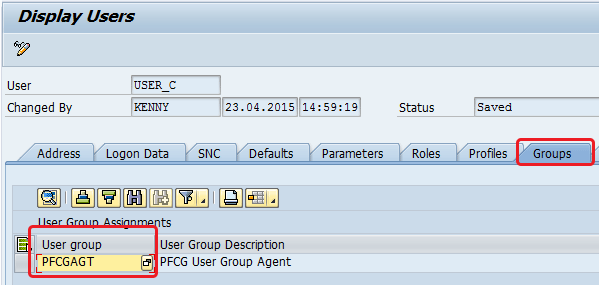
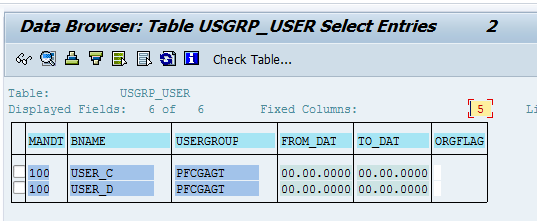
The second table is USGRP_USER. It stores information about user assignments to users in the Groups tab in the User Maintenance transaction (Figure 4).
When the system evaluates the agents associated with a PFCG user group, it first checks the entries in table USR02 and then checks the entries in table USGRP_USER. If entries are found in both tables, the results are returned.
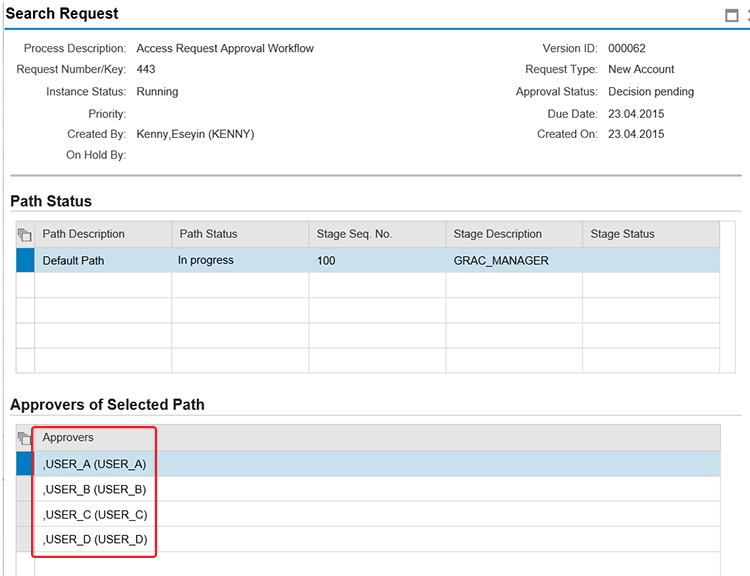
To ensure proper evaluation of the agent when the PFCG user group agent type is used as desired, make sure the definitions in tables USR02 and USGRP_USER contain the right users you want as agents for a workflow process. If this is not ensured, you can end up having wrong users set up as recipients of workflow items. To illustrate this system behavior, I created User_A and User_B and assigned them to user group PFCGAGT only via the Logon Data tab in the User Maintenance transaction (Figure 5).
In like manner, I created User_C and User_D and assigned them to user group PFCGAGT only via the Groups tab in the User Maintenance transaction (Figure 6).
I then created an access request for a user with the agent type configured as PFCG user group – PFCGAGT. Figure 7 shows the list of approvers with whom the access request is pending based on the user group assignment matrix defined above.
Front-End Printing
Myth: Since SAP Access Control is predominantly based on the SAP NetWeaver ABAP stack, there is no need to install the SAP NetWeaver Java stack as part of the systems in the SAP Access Control landscape.
Truth: It depends on what functionality of the SAP Access Control system you want to adopt. For example, if you need to generate PDF reports, then you need to configure Adobe Document Service (ADS), which sits on the SAP NetWeaver Java stack.
Trick: SAP Access Control is delivered as an add-on that is installed on SAP NetWeaver ABAP. The SAP NetWeaver Business Client (NWBC) is the front-end tool for accessing SAP Access Control functionalities. However, front-end printing is only supported for SAP GUI, Java GUI, and SAP GUI for HTML. Therefore, front-end printing from Web Dynpro applications does not work and it is commonplace to convert the data to be printed to PDF format to be able to print. This requires the existence of an ADS instance within the SAP Access Control landscape.
(Note: The instruction on how to configure an ADS is here: https://www.sdn.sap.com/irj/scn/go/portal/prtroot/docs/library/uuid/30a9630b-4f89-2a10-6fab-e311b3ffd9a6?overridelayout=true. You do not need to install a new or dedicated SAP NetWeaver portal for the purpose of setting up of an ADS. If you have an existing portal system with ADS configured, you can use that. However, it is important to ensure that the BI-Java usage type is installed when the SAP NetWeaver Java stack was set up. Otherwise, PDF printing does not work. Depending on the version (for example, SAP NetWeaver Java NetWeaver 740) of your SAP NetWeaver system, one easy way to confirm the presence of the BI-Java component is to follow menu path SAP NetWeaver Administrator > Configuration > Infrastructure > System Information. Filter with BI* on the Name field (Figure 8) and you should get a BI-related component in the filtered result.)
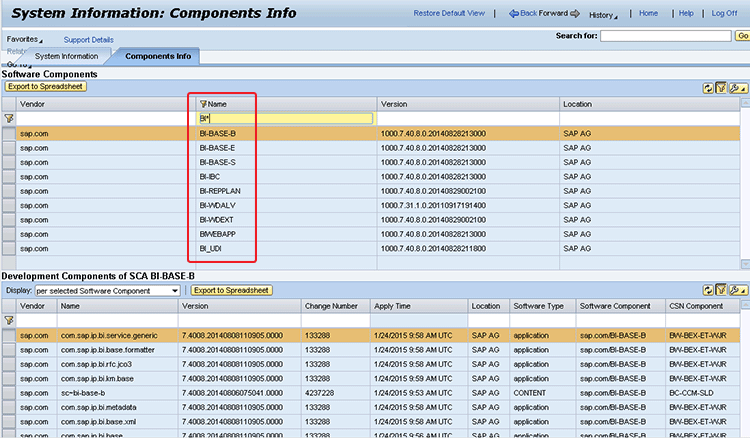
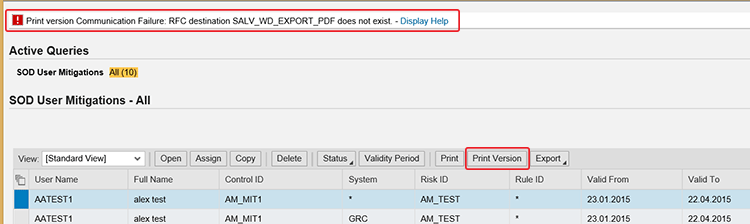
Figure 9 displays with the error message Print version Communication Failure: RFC destination SALV_WD_EXPORT_PDF does not exist when you click the Print Version button on any Web Dynpro screen (for example, mitigated users quicklink) if ADS is not configured.
Multiple Access Requests Per User Per System
Myth: It is impossible to create more than one access request per user for a system at any point in time while an approval decision is pending on an access request.
Truth: You can create more than one access request for a particular user in a system at any point in time by maintaining the appropriate value in the End User Personalization (EUP) settings.
Trick: When the Business Configuration Set (BC Set) GRAC_ACCESS_REQUEST_EUP is activated as part of the post installation activities via transaction code SCPR20, the default EUP 999 is created. Its attributes drive the creation of a standard access request.
You can navigate to the implementation node for the maintenance of EUP settings via menu path SPRO > SAP Customizing Implementation Guide > Governance, Risk and Compliance > Access Control > User Provisioning > Maintain End User Personalization (Figure 10). The field One User per Request per System in the EUP setting controls whether you can create multiple access requests for a user per system or not. The default value of this parameter for the Mandatory attribute is Yes, so users are quick to conclude that it is not possible to have multiple requests per system.

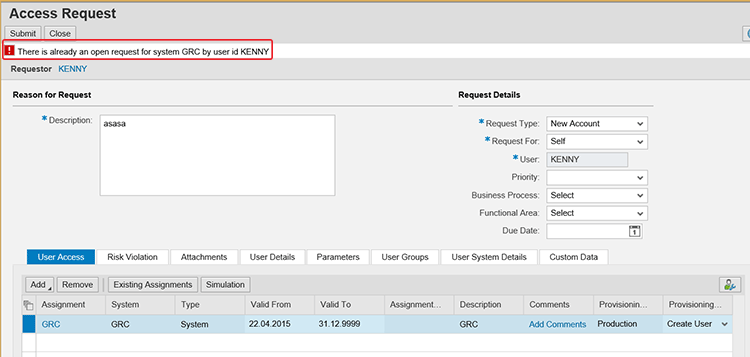
Figure 11 displays with an error message when you attempt to create an access request when there is an existing access request pending an approval decision for a user for a particular system. To allow multiple access requests for a user per system, change the value of the Mandatory attribute to No. For this EUP setting the default value and editable and visible attributes are not modifiable because these attributes are not fields.
I recommend that the default behavior be adopted if there is no pressing business justification. That enforces control in the user access request management process especially as it relates to duplicating a user access request.
Making Changes to Access Request Forms in the Approval Screen
Myth: An approver can remove the role he or she did not add to an access request at the point of approving the access request.
Truth: An approver can only remove the role added to an access request at the point of making an approval decision.
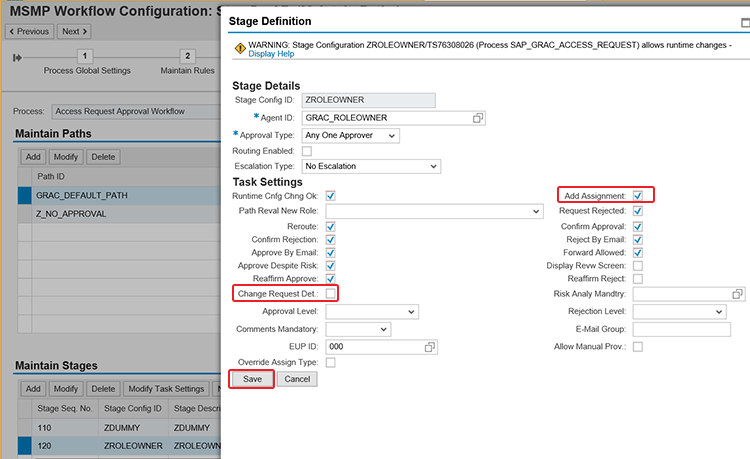
Trick: There are a couple of ways to restrict what an approver can change in an access request pending an approval decision. You have to evaluate your requirement and adopt an approach that suits your business scenario. The stage setting Add Assignment is designed to address repository object (users, roles, and profile) assignments in an access request. (Stage settings are the attributes maintained against a workflow stage.)
This is why when you choose the option Add Assignment, the option Change Request Det: (Change Request Details) has to be chosen, too. Otherwise, you get an error message when you attempt to save the stage task setting as demonstrated below. The Change Request Details setting controls if the approver can make changes to a number of fields such as validity start and end dates. Figure 12 shows the screen to activate or deactivate stage task settings. For my example, I select the check box Add Assignment and leave the check box Change Request Det: unchecked.
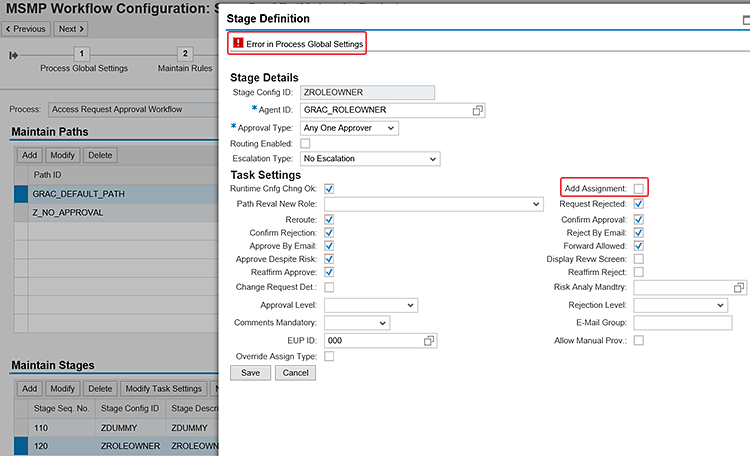
Click the Save button. Figure 13 displays with the error message Error in Process Global Settings. Also, the Add Assignment check box (formerly checked) is unchecked automatically.
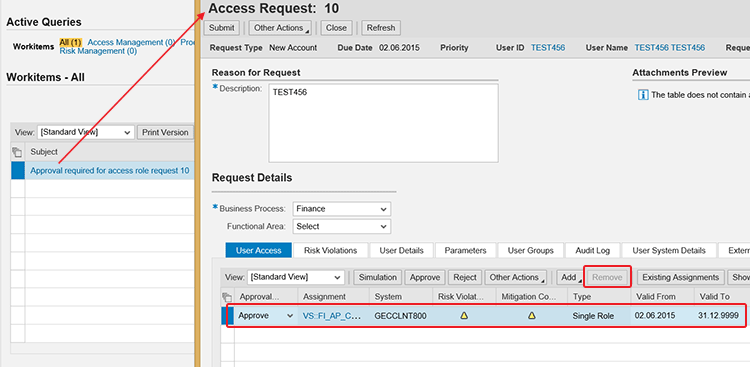
The Add Assignment button allows an approver to be able to add a role to an access request. However, there is no corresponding setting to remove an assignment stage task setting. This technically explains why the Remove button (at the line item level) is grayed out for an approver in the approval screen as shown in Figure 14 when a role that was not added by an approver is highlighted in the approval screen.
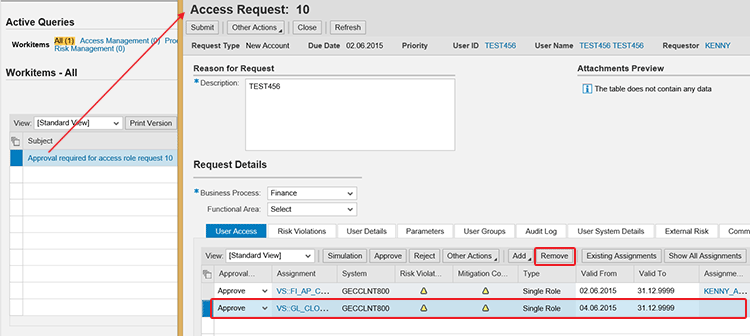
The approver can only remove the role he or she added to the access request at the approval stage and not roles added by the requestor. Roles can be removed only by the requestor before submission of an access request or by the approver (for roles added by him or her) before approval of the access request. Figure 15 shows where the approver added the highlighted role to the request in Figure 14. Observe that the Remove button is now active.
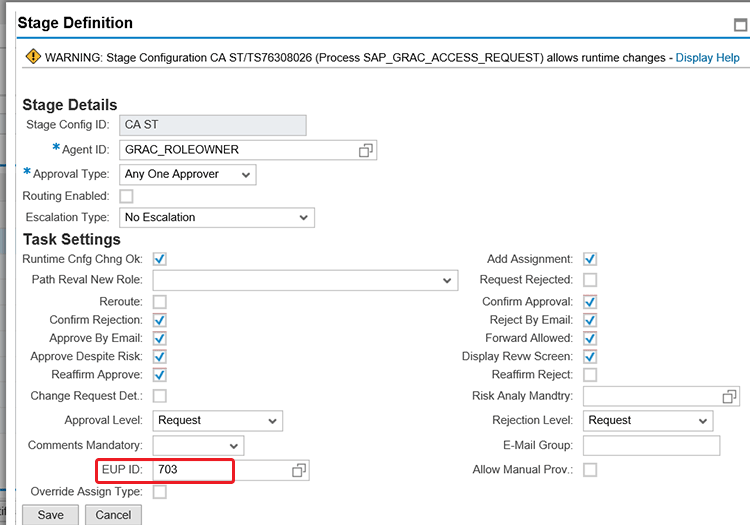
To control what user details an approver can change in the approval screen, the EUP settings can be maintained appropriately. The maintained EUP settings have to be associated with the MSMP stage task settings as shown in Figure 16 for a custom EUP setting 703. The definition in the EUP settings makes fields visible (or invisible), editable (or un-editable), and mandatory (or optional) as the case may be.
Furthermore, you can control the changes that can be made in the approval screen by making changes to the Web Dynpro application GRAC_OIF_REQUEST_APPROVAL in configuration mode via transaction SE80.
Change Log Activation and Reporting
Myth: You can report on changes made to roles and users via the change log report functionality.
Truth: You can report on changes made to roles, but you cannot report on changes made to users via the change log report functionality.
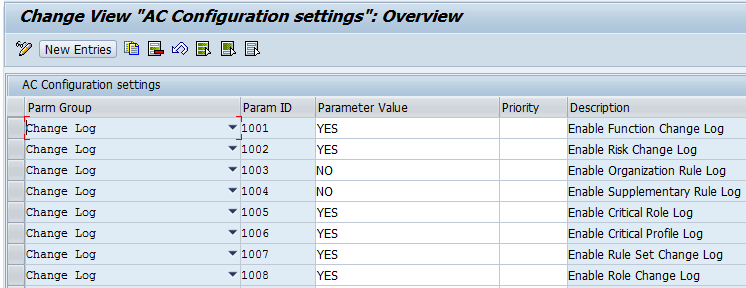
Trick: One of the parameter groups in the Maintain Configuration Settings IMG node is the change log (Figure 17) that you can access via menu path SPRO > SAP Customizing Implementation Guide > Governance, Risk and Compliance > Access Controls > Maintain Configuration Settings. It allows you to activate (or deactivate) change log collection for different objects. The capture of change logs for objects (for example, role) is controlled by parameter 1008 (Enable Role Change Log). This parameter has to be set to Yes to capture changes made to roles.
To further document changes made to roles, especially the authorization data with a reference, configuration parameter 3008 needs to be set to Yes. (A ticket number is required after authorization data changes.) This allows the documentation of a ticket number that can in turn be captured in the change log report against the authorization data changes to provide an audit trail. The ticket number generation window (Figure 18) is triggered any time the button Sync. with PFCG is clicked in the role maintenance window. A change log of roles for authorization data changes is only updated when the button Sync. with PFCG is clicked, unlike role attribute changes such as role description.
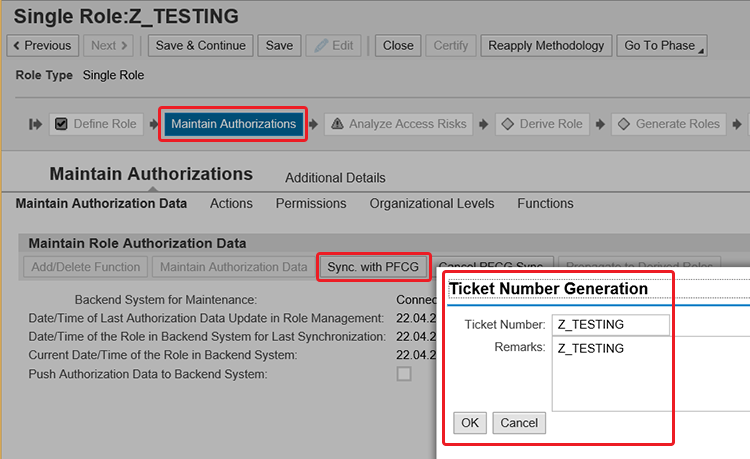
The Sync. with PFCG button is grayed out by default and becomes active when the Maintain Authorization Data button is clicked.
Note that the Ticket Number field is a free text field and no validation is done in relation to the correctness of entered values within the SAP Access Control system. As a matter of fact, the same value that has already been used can be reused as it is not checked for uniqueness. The ticket number specified here can be the support call number necessitating the change to the role master data, for example.
Setting configuration parameter 3008 to Yes triggers ticket generation even though configuration parameter 1008 is deactivated (set to No). However, you are not able to report on the corresponding change log while configuration parameter 1008 is deactivated. Suffice to say that configuration parameter 1008 complements configuration parameter 3008. Activating configuration parameter 3008 alone is not sufficient to generate a change log report for authorization data changes. Figure 19 shows a sample change log report for roles that you can access via the NWBC menu path Reports and Analytics > Audit Reports > Change Log Report.
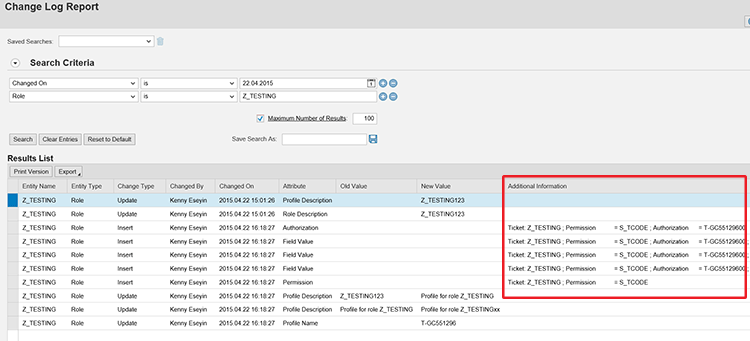
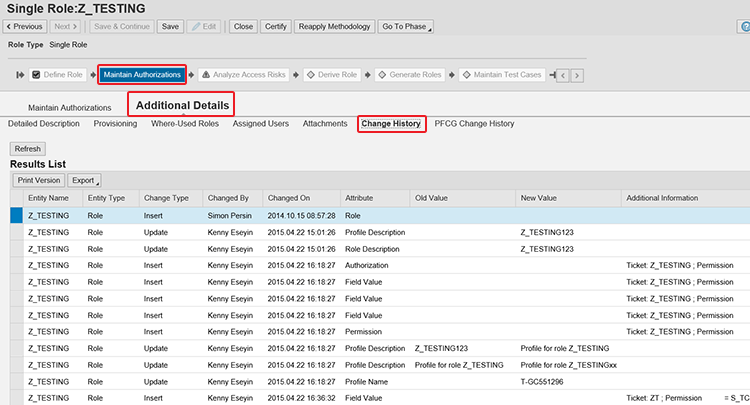
As you can observe in the Additional Information column, the ticket number documented is not associated with non-authorization data changes to roles. The change history tab (which can be accessed via menu path Maintain Authorizations > Additional Details > Change History) on the role master data file also contains logs of the changes made to roles, as shown in Figure 20.
The user ID field, which is part of the selection criteria in the change log report, is not intended to provide a change log report about a particular user in tables GRACUSER or GRACUSERCONN, but as a selection criterion to filter on which user made a change to supported objects in the change log report. Details captured in the audit log or instance status in an access request, for example, or in a provisioning log are not recorded in the change log report.
Access the change log report by following menu path Reports and Analytics > Audit Report > Change Log Report (Figure 21).
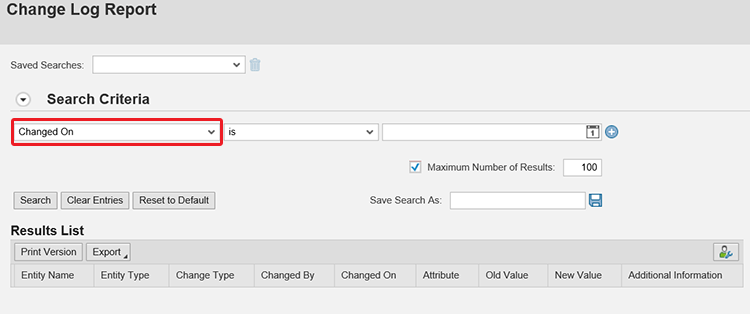
At the minimum, you have to specify two selection criteria. The first mandatory selection criterion that must be defined is the Changed On value (which is displayed by default). Then you can specify other selection criteria, or you receive the error shown in Figure 22.
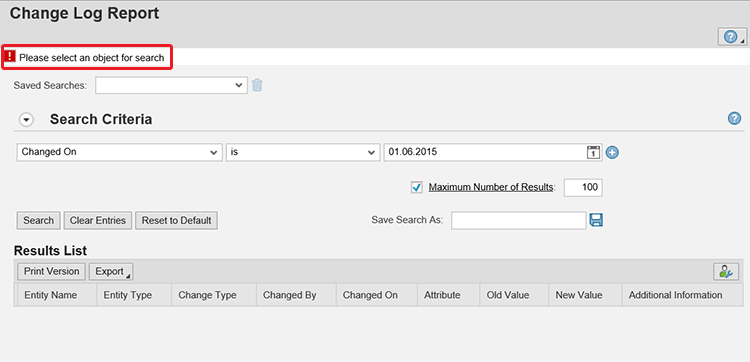
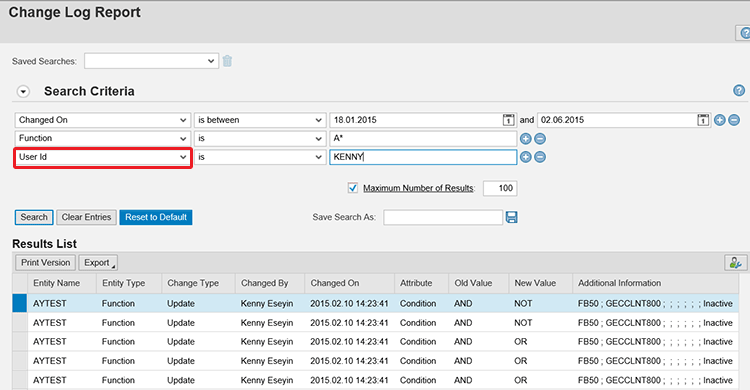
Therefore, it is evident that you cannot run the change log report specifying only the Changed On value. You have to explicitly define the additional selection criteria that are the objects you want to report on to avoid possible performance bottlenecks. Figure 23 shows the output of the change log report for changes performed on supported objects by a specific user (for example, KENNY) and not changes performed on the User id (for example, KENNY).
You can execute a change log report for the following objects: critical profile, critical role, function, organization role, risk, ruleset, supplementary rule, user ID, role, FF owner, Controller reason code, firefighter ID, owner, and firefighter.
There is no support for change log reporting for a mitigation control at the moment. Furthermore, the change log report has a couple of limitations especially as it relates to the workflow process as they are not closely integrated. Activating a change log for function, for example, does not make the approver treating a function or risk-based workflow process see the changes made to the risk or function in the approval screen. The approver needs to go into the change log reports (or drill down to the object) to review what has been changed on the master data.
NWBC Launch Page
Myth: The NWBC launch page shown in Figure 24 always displays when you enter transaction code NWBC in the command line in SAP Easy Access when you launch the SAP Access Control work center.
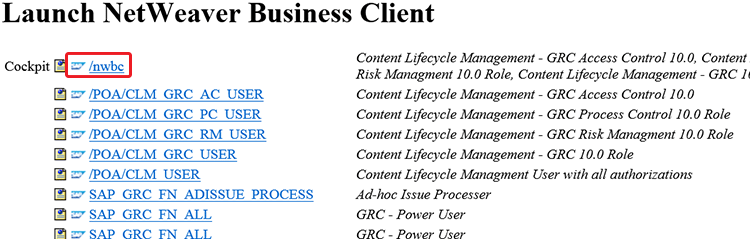
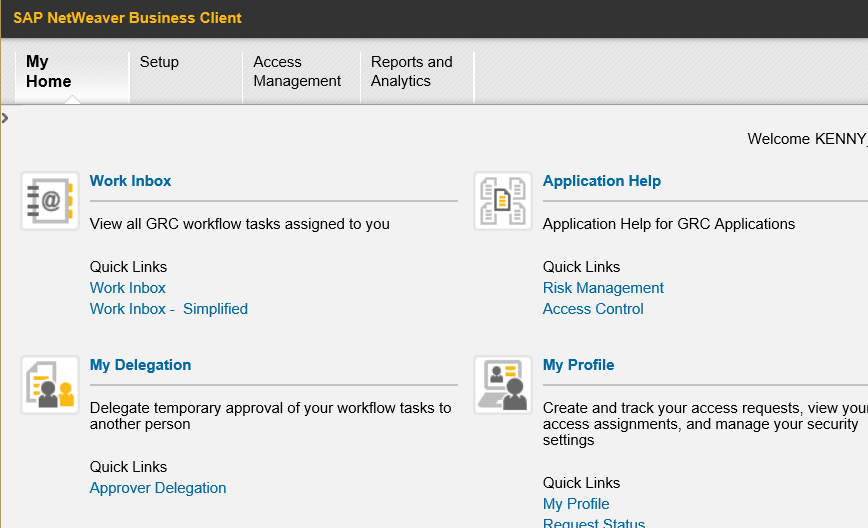
Truth: You can maintain the appropriate Internet Communication Framework (ICF) node so that the launch page is not displayed and users are taken directly to the NWBC for HTML screen shown in Figure 25.
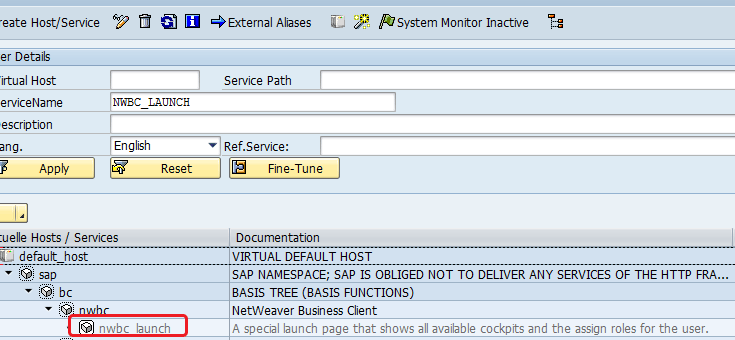
Trick: The ~launch page of NWBC is controlled by the ICF node NWBC_LAUNCH. To ensure that the initial ~launch page is not displayed when you execute transaction NWBC in the command line (SAP Easy Access), the ICF node NWBC_LAUNCH should be disabled via transaction SICF. Figure 26 shows a disabled NWBC_LAUNCH ICF node that can be accessed by following menu path default_host > sap > bc > nwbc > nwbc_launch via transaction SICF.
Deactivating the NWBC_LAUNCH node takes away the additional click effort to choose the /nwbc cockpit before getting to the GRC 10.x work center. This can significantly improve the user experience.
Ruleset for Risk Terminator
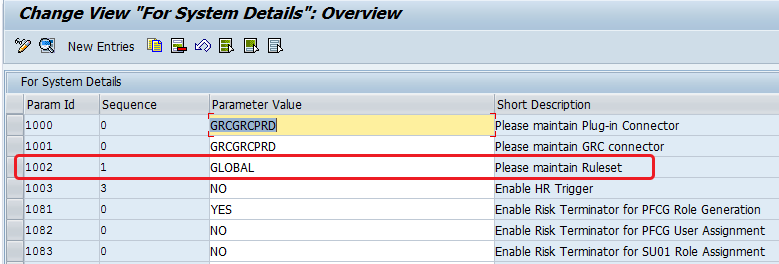
Myth: The value defined for the parameter ID 1002 (Maintain the Ruleset) in the plug-in system overrides the value defined for the parameter 1025 (Default rule set for risk analysis) in the SAP Access Control system when you use the risk terminator functionality.
Truth: The parameter 1025 in the SAP Access Control system is not relevant to the risk terminator functionality.
Trick: Risk terminator allows you to perform risk analysis directly on the plug-in system when objects such as roles, users, and profiles are changed in the back-end system using the ruleset defined in the SAP Access Control system. The parameter 1002 (Maintain the Ruleset) should be set up in the plug-in system in order to define the ruleset that should be used for risk analysis (via the risk terminator) in the plug-in system as shown in Figure 27. You can access it by following menu path SPRO > SAP Customizing Implementation Guide > Governance, Risk and Compliance (Plug-In) > Access Control > Maintain Plug-In Configuration Settings.
Furthermore, an important prerequisite for risk terminator is the post-installation activity associated with the maintenance of user exits in the back-end system (Figure 28). You access it via menu path SPRO > SAP Customizing Implementation Guide > Governance, Risk and Compliance (Plug-In) > Access Control > Maintain User Exits for Plug-In Systems.

Role Deletion in the Back-end System
Myth: When a role is deleted directly in the back-end system, it is no longer possible to report on that role again in SAP Access Control after successfully executing the role synchronization job.
Truth: As long as the role has not been deleted in business role management (BRM), then you can report on the role in the role library, but you can no longer run risk analysis for the role.
Trick: To ensure that you cannot report on an already imported and synced role, you need to delete the role in the front end (BRM) in addition to deleting the role in the back-end system. The implication of deleting the role in the back-end system is that you cannot run a risk analysis report any more but you can still report on it in the role library. To delete a role in BRM and at same time in the back-end system, consider setting the configuration parameter 3009 (Allow Role Deletion from back-end system) to YES (Figure 29) which can be accessed via menu path SPRO > SAP Reference IMG > SAP Customizing Implementation Guide > Governance, Risk and Compliance > Access Control > Maintain Configuration Settings.

When this configuration parameter is set to Yes, you always get a dialog box prompting the confirmation of whether you want to delete the role from only the front end (option No) or both the front end and the back end (option Yes) as shown in Figure 30.
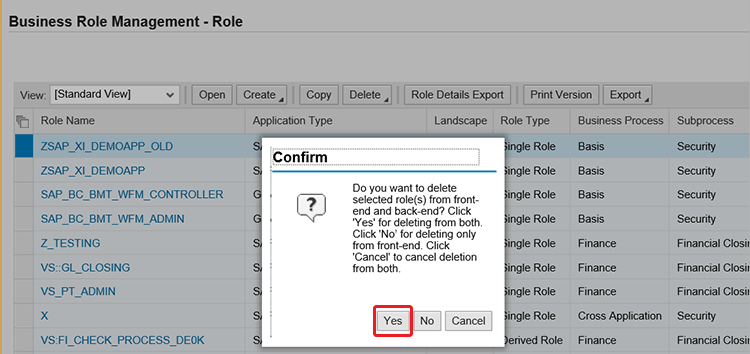
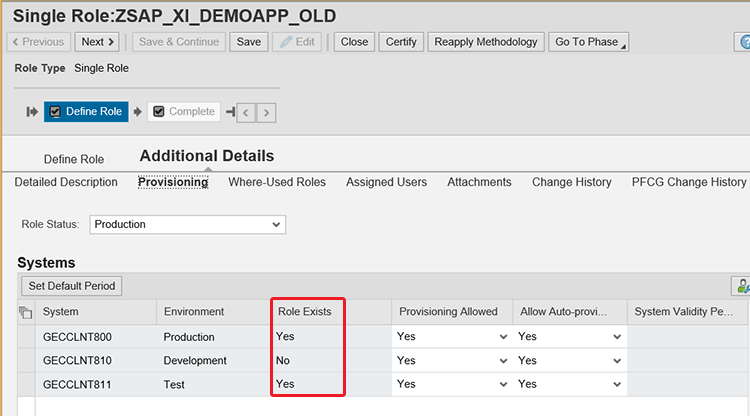
When you choose Yes (delete from both front end and the back end) in the confirmation dialog box, note that the role is deleted directly in all the systems where the role exists. If the role exists in two systems as shown in Figure 31, the role is deleted in the two systems.
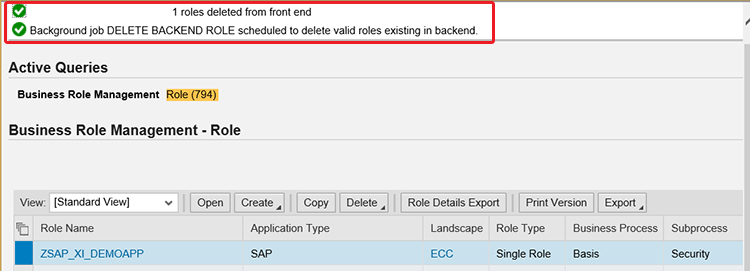
The status message shown in Figure 32 confirms the deletion of the role in the front-end system and the schedule of the background job to delete the role in the back-end system.
The status of the background job can be reviewed by following menu path Access Management > Background Scheduling > Background Jobs (Figure 33).
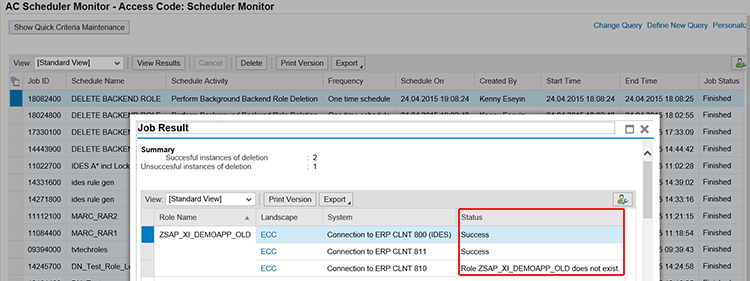
The details of the job log confirm the deletion of the role in the two systems and a reaffirmation that the role does not exist in the third system. Furthermore, this functionality does not provide the luxury for the transport of the deletion activity on the role across the system landscape. Therefore, it is important to assess if that suits the requirement of your business environment, especially as change control is concerned.
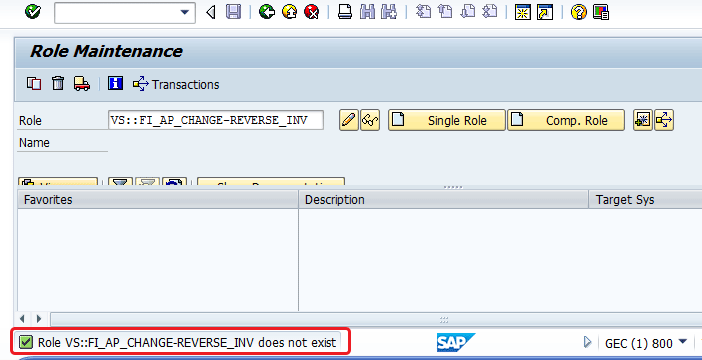
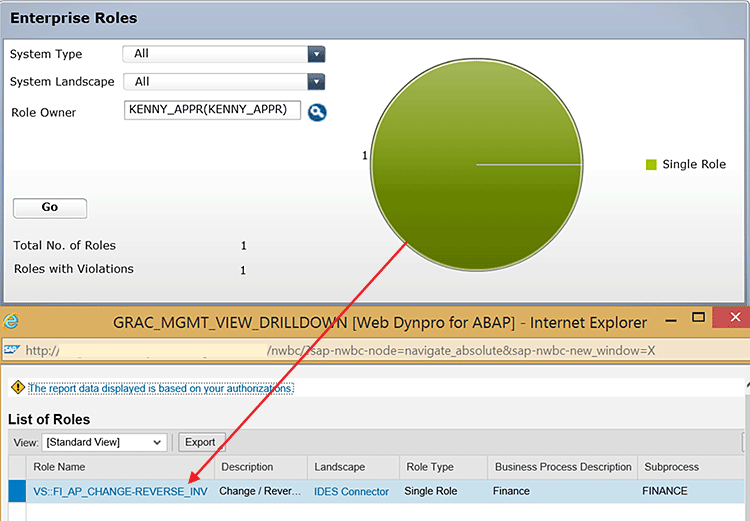
Figures 34 and 35 show the confirmation of a deleted role (VS::FI_AP_CHANGE-REVERSE_INV in my example) in the back-end system that still exists in the role library dashboard report (Figure 36) in the SAP Access Control system.

User Default Settings in the Personal Object Worklist (POWL)
Myth: It is not possible to personalize the display of information such as date format and time zone in the POWL.
Truth: You can personalize the presentation of such data as date format and time zone in the POWL to some extent.
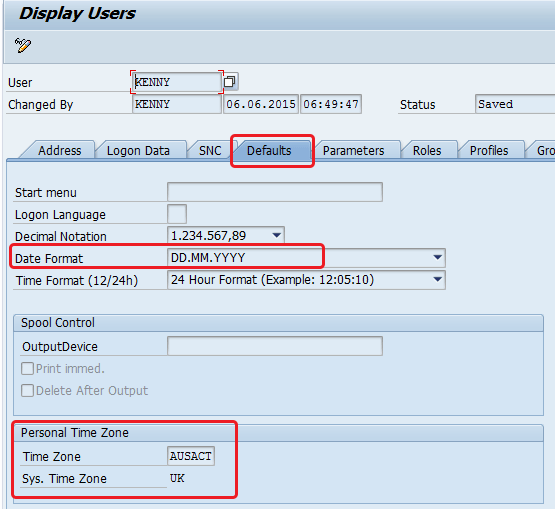
Trick: It commonplace for end users to want to personalize the way information is displayed in POWL. For example, an end user in the US wants to see the date in the format DD/MM/YYYY whereas an end user in the United Kingdom is fine with date displayed in the format DD.MM.YYYY. Figure 37 displays the date format and time zone in POWL for function change, for example.
This display in Figure 37 is a reflection of the user-specific personalization that is maintained in the Defaults tab (Date Format field) in transaction SU01 (Figure 38) where the date format is set to DD.MM.YYYY and the time zone is set to AUSACT. If no user default is maintained for a user, then the information is presented in the time zone of the SAP Access Control server – Sys. Time Zone field.
However, it should be noted that the time zone used to report any role maintenance activity is always the time zone of the SAP Access Control system and not the end user’s default time zone maintained in transaction SU01 (Defaults tab). This is shown by Figure 39, in which the initial screen of role maintenance in BRM shows the Australian time zone (which is the user’s default time zone) with the time 17:07 AUSACT.
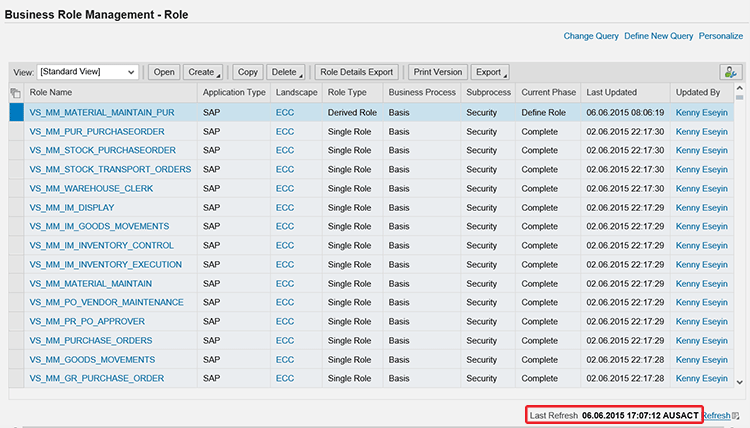
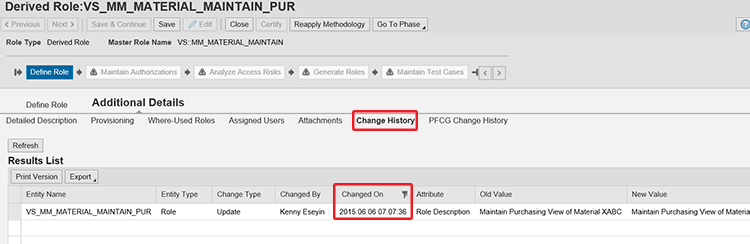
I maintained the role VS_MM_MATERIAL_MAINTAIN_PUR (for example, I changed the name) almost immediately while I had the role maintenance screen open. The Changed On column shown in Figure 40 is reported in the time zone of the SAP Access Control system, which is 07:07 UK. This is 10 hours apart, the same as the Australian time zone is to the UK time zone.
Risk Analysis Result Screen When No Violation Exists
Myth: When you run risk analysis for objects without a violation, you should always get the message No Violations.
Truth: The system can be configured to return an empty screen in the event that no risk is found when risk analysis is performed on objects.
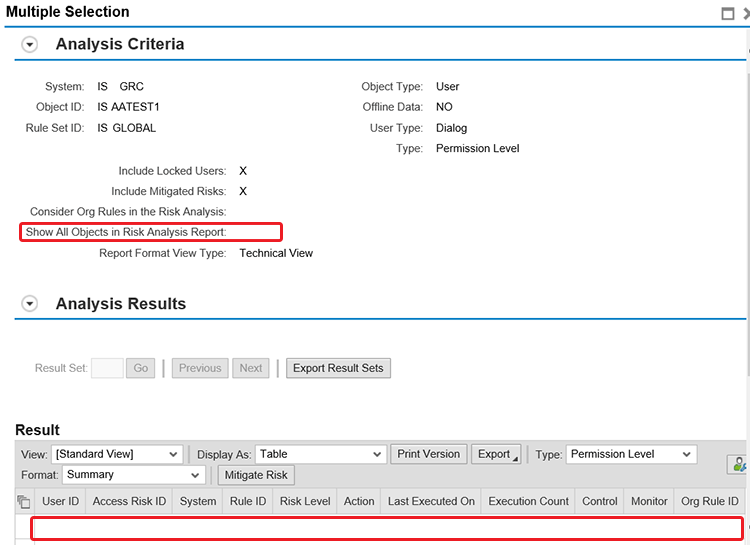
Trick: The behavior of the system as it relates to the risk analysis screen when a risk is not found for objects is controlled by the risk analysis configuration parameter 1036 (Show All Objects). If this parameter is set to YES, you get the message No Violations when no risk violation exists for objects with the selection criteria defined. If this configuration parameter is set to No, you get a blank screen. This should not be perceived as that the risk violation engine is not working correctly. This parameter can also be manually activated or deactivated on the risk analysis screen by checking or unchecking the Show All Objects check box in the selection criteria section as shown in Figure 41.
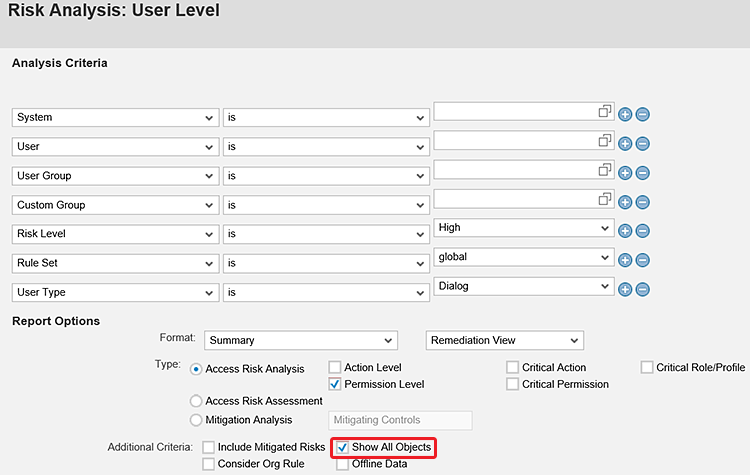
Figure 42 shows the selection criteria definition for when the Show All Objects option is activated and the corresponding risk analysis result screen.
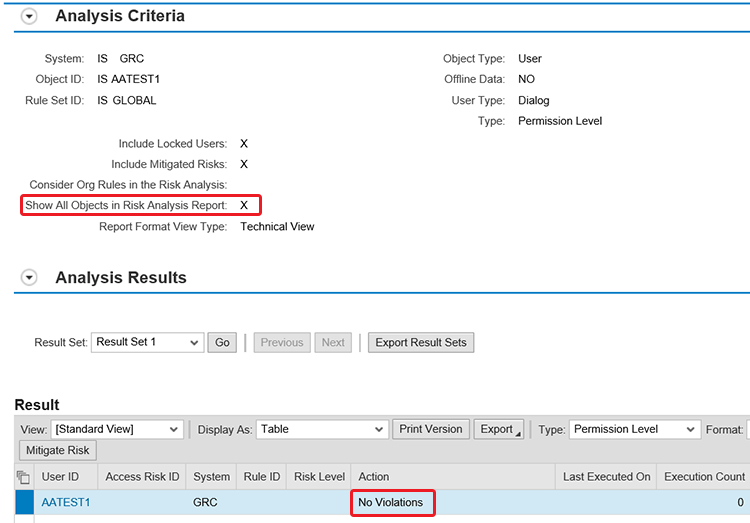
Figure 43 shows the selection criteria when the how All Objects option is deactivated and the corresponding risk analysis screen.