Having to combine data from multiple R/3 sources into one BW table is a common requirement. Fortunately, BW 3.x provides a means - flexible staging - to carry out this requirement. The author shows how to configure flexible staging using an real-world example.
Many of you have faced a business requirement similar to this one: You need to combine customer and contact master data from the enterprise level and sales area in R/3 into one table in BW. This new table then serves as a repository for all data related to a sales area’s customers and contacts. The new master data ODS object contains address information at the customer and contact enterprise level, credit information, and demographic information from the customer and contact sales data.
The challenge of this task is the design of the model and the process to update the data in BW. Designing the model can be challenging due to the different combination of data sets and determination of the key for the resulting data set. The update process can also be complex due to many data sets being combined into one record with a unique key.
To accomplish this, BW needs to denormalize all the R/3 master data. The master data for customer and contact are stored in the following manner in R/3. Each customer number has one unique record in table KNA1, and each contact has one unique record in table KNVK. Each customer can have zero to many contacts. The contact records have a unique key of contact number and have an attribute of customer number.
To denormalize the data, you need to combine the data from the customer with each contact record. If the customer has four contacts, R/3 would have one customer record and four contact records. A denormalized view of the data would have four records, one record for each customer/contact combination. By using the power of flexible staging (introduced in BW 3.0) and return tables in the update rules to an ODS object, you can easily denormalize data in BW.
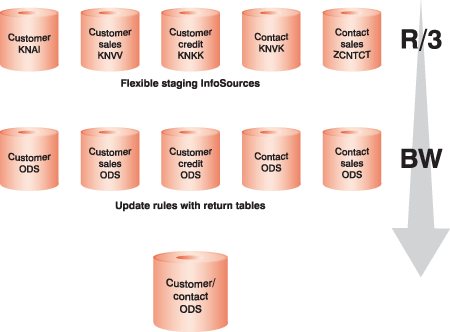
I will explain how to configure flexible staging and return tables to create a detailed repository of customer and contact demographic data (Figure 1). The end result is five new InfoSources, six new ODS objects, and five InfoProviders. Each R/3 master data table has one InfoSource, InfoProvider, and ODS object. The sixth ODS object is for the combined customer and contact master data. The keys to this ODS will be the sales organization, distribution channel, division, customer, and contact fields.

Figure 1
You can create a repository of customer and contact data using flexible staging InfoSources in R/3 and BW’s return tables
The five master data tables are:
- Customer (KNAI)
- Customer sales (KNVV)
- Customer credit (KNKK)
- Contact (KNVK)
- Contact sales (ZCNTCT) — this is a custom table in R/3 that contains contact information specific to a sales area (sales organization, distribution channel, and division).
Let me walk you through the steps for using flexible staging and return tables in the update rules to create a denormalized view of the master data.
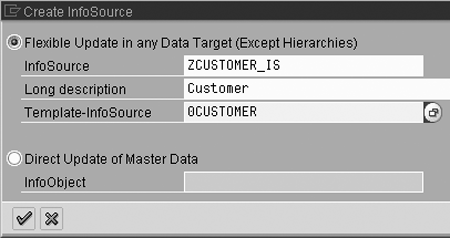
- Create a new InfoSource for customer. Go to the InfoSource tab of Administrator Workbench or use transaction RSA12 and create a new InfoSource, select Flexible Update in Any Data Target, and enter a technical name and description (Figure 2). For the Template-InfoSource, enter 0CUSTOMER. This creates the communication structure. If you don’t enter a template, you need to create the communication structure by hand.

Figure 2
Create a new InfoSource
- Delete the source-system assignment from 0CUSTOMER. Do this by selecting Delete source system assignment from the context menu of the InfoSource. This frees up the 0CUSTOMER_ATTR DataSource to be assigned to the new InfoSource ZCUSTOMER_IS.
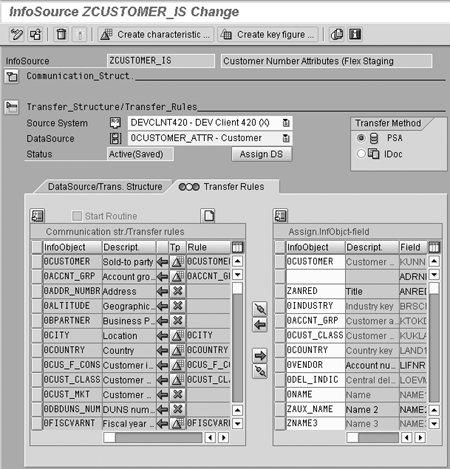
- Assign the DataSource to ZCUSTOMER_IS via the InfoSource context menu. Then activate the transfer rules (Figure 3).

Figure 3
Assign a DataSource to ZCUSTOMER_IS
- Change the InfoObject 0CUSTOMER. Go to the InfoObject tab of the Administrator Workbench or run transaction RSD1. Remove the Application Component and add the InfoArea (Figure 4). This step directs BW to make the InfoObject an InfoProvider versus just an InfoObject with master data. 0CUSTOMER now appears in the InfoProvider tab.

Figure 4
Make the 0Customer InfoObject an InfoProvider
- Create a customer ODS with a key of customer number. Go to the InfoProvider tab of Administrator Workbench or run transaction RSD11 and create a new ODS object. Add customer fields to the ODS for only those that you want to capture deltas. If the customer fields are not in the final customer/contact ODS, don’t include them in the ODS. If you do, more changes are created and loaded into the customer/ contact ODS, causing unnecessary processing. 6.
- Create update rules for 0CUSTOMER from InfoSource ZCUSTOMER_IS. Go to the context menu of the InfoProvider and select Create Update Rules.
Follow the same steps as above to create the other InfoSources and ODS objects. Note that contact, contact sales, and credit are generic DataSources.
- Create the customer/contact ODS object for the denormalized data. This ODS contains all the fields contained in the five ODS objects you created above (Figure 5). Some of the fields that I included are Customer Name, Contact First and Last Name, and Customer Credit Rating. You might notice that some of the field names are shared, and that you must create a few new InfoObjects. The keys to the ODS are sales area (sales organization, distribution channel, and division) customer number, and contact number. A customer in a sales area can have zero to many contacts.

Figure 5
Create a customer/contact ODS object
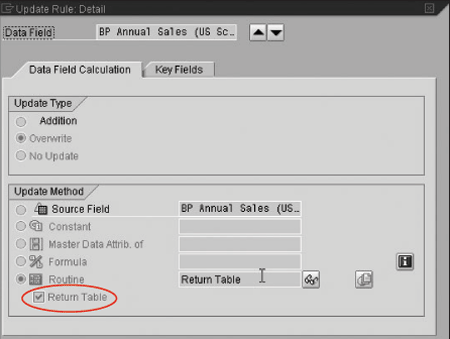
- Create update rules for the denormalized ODS. Go to the context menu of the InfoProvider and select Create Update Rules. Update rules are complex and require an ABAP routine for the return table.1 The return table option in the update rules allows you to create multiple rows in the ODS from one input row. Figure 6 on the next page shows the Return Table checkbox. The return table has the same structure as the ODS table. The goal of the return table procedure is to populate all the fields in the return table one to many times based on the logic you provide.

Figure 6
The Return Table checkbox
For example, say you have a sales area 1000 01 01 that includes customer 300. Customer 300 for sales area 1000 01 01 has contacts of C1 and C2. The return table logic then creates two rows from the input of the customer sales record of 1000 01 01 300. The resulting rows in the return table are 1000 01 01 300 C1 and 1000 01 01 300 C2. The reason the initial load of the ODS is driven from the customer sales records vs. the contact sales record is that a customer may not have a contact. If there is no contact, then a record with the key of 1000 01 01 300 ‘ ’ is created.
In this case, one customer sales record can create one to many sales area, customer, and contact records. The process to populate the return tables is as follows: For every customer sales record, retrieve the customer record and credit record from the master data tables. After you retrieve the customer data, the program needs to loop through the contact sales data records where the contact’s customer number and sales area equals the customer and sales area of the input record. After each contact sales record is selected, retrieve the contact enterprise information. Once all the data is selected and assigned to the return table, the return table is appended with the new data.
The routine for the first data element should call a form to populate the return table as shown in Figure 7. The code for the return table is available for download at this link. This code should be in a form in the Global section of the update rules . The routine for all remaining fields (Figure 8) should be assignments from the return table.
* Load the result table
perForm Load_Int_return_table using COMM_STRUCTURE.
loop at GV_result_table into RESULT_TABLE.
  append RESULT_TABLE.
Endloop.
|
| Figure 7 |
Routine for the first data element |
|
loop at GV_result_table into RESULT_TABLE.
  append RESULT_TABLE.
Endloop.
|
| Figure 8 |
Routine for remaining fields |
|
Create the remaining update rules from the ODS objects to the customer contact ODS (customer, credit, contact, and contact sales). The update rules use return tables, too. A customer can exist in multiple sales areas, and if its address changes, multiple records in the ODS need to be updated. The update rule is simpler than the update rules shown in Figure 8 because you need to change only some fields in the table versus build a new entry. In the example shown in Figure 9, indexes had to be built on the customer/contact ODS to make the delta performance acceptable. Notice that in the update rules for the remaining four ODS objects, you are retrieving the fields from the ODS first and then over-posting them with the changed fields from the communication structure (input record). After all the configuration is complete, it is time to denormalize the data by loading the ODS.
Data:
GV_Result_TABLE like /bic/AZDM_O01500 occurs 0 with header line. * Every instance of the contact needs to be selected and updated. * Loop thru all records in the ODS where the input contact is equal
* to the contact in the ODS. For each selection assign the new contact
* values Form Load_Int_return_table using GV_Comm type /BIC/CS8ZDM_O012. * Reset the table
Clear GV_result_table.
Refresh gv_result_table. * loop thru the contacts and create new records in the table
Select /BIC/ZCONTACT
Salesorg
Division
distr_chan
Customer
from /bic/AZDM_O01500
into corresponding fields of gv_result_table
where /BIC/ZCONTACT = GV_COMM-/BIC/ZCONTACT. if sy-subrc = 0.
* Assign Fields from Comm structure (Contact ODS).
move-corresponding gv_comm to gv_result_table.
append GV_RESULT_TABLE.
endif. endselect.
Endform. “Load_Int_return_table
|
| Figure 9 |
Example of update rules from the other ODS objects |
|
Load the Customer Contact ODS
The initial loading is driven from the customer sales records. All other ODS sources are initialized by a delta simulation. Business rules in R/3 dictate that a customer sales record is created when the customer is created and before there are any contacts. Ongoing updates to the customer/ contact ODS are deltas from the five master data ODS objects.
Note!
If you change an existing InfoObject from direct update master data to flexible staging prior to reassigning the DataSource, you will lose the ability to assign the DataSource to your new InfoSource. You will need to reset the InfoObject back to direct update and delete the source system assignment, and then change the InfoObject again.
Tip!
Maximize code performance by populating the return table once in the Global section of the update rules, and create indexes on your ODS objects to optimize your select statements. The ODS objects at my company had millions of records, and without the indexes on them, our update rules ran poorly.
Rich Oxley
Rich Oxley has more than six years of BW project experience and 15 years of IS experience. He has had many roles in the eight BW implementations he has taken part in, including BW architect (define requirements, design, model, and configure), technical lead (design, configure, and troubleshoot), project lead (project planning, estimation, and resource scheduling), and project team member. Rich works for Kenakore, Inc.
If you have comments about this article or publication, or would like to submit an article idea, please contact the editor.


