Learn how to configure SAP SuccessFactors Position Management and Recruiting integration to create a requisition from the position organizational chart. Integration between Position Management and Recruitment Management provides many benefits, including the ability to create requisitions on the current or a future date.
Key Concept
The SAP SuccessFactors Recruiting Suite is an end-to-end talent-acquisition solution that enables companies to attract and engage top talent. This solution helps select and hire the best-fit candidates. It is commonly referred to as REC.
The integration of SAP SuccessFactors Recruitment Management and Position Management has many benefits. Once in place, a requisition from a position in the position organizational chart can be created on the current date and a job requisition is created immediately in Recruitment Management. If you create a requisition as of a future date, a job-requisition-processing request is created immediately and the SAP SuccessFactors background job (Quartz Job) automatically creates a job requisition in Recruitment Management when the creation date is reached.
The focus of this article is on the step-by-step configuration between SAP SuccessFactors Recruitment Management and Position Management. I show the steps and process to create a requisition from a position organizational chart once the integration configuration between Recruitment Management and Position Management is complete. This article is meant for SuccessFactors Recruiting-certified consultants or Employee Central-certified users who are familiar with configuration of the Metadata Framework (MDF) and business rules.
The Configuration Steps for Integration of Recruitment Management and Position Management
The integration between Recruiting Management and Position Management is a valued opportunity as it provides the ability to create job requisitions from the position organizational chart and it’s an important feature for companies that use both these modules of SAP SuccessFactors. It gives the recruiter visibility to open positions within the organizational chart and a one-click opportunity to create a requisition from the organizational chart itself.
In this section, I walk through the step-by-step configuration process of integrating Recruitment Management and Position Management.
Settings to Enable Recruiting Integration
The first step is to enable the integration. Follow menu path Admin Center > Position Management Settings, and then go to the Integration tab. This action opens the screen in
Figure 1 where you select Yes from the Use Recruiting Integration options and click the Save button.

Figure 1
Enable the Recruiting integration
Create a Rule to Derive the Job Requisition Template
To create a new job requisition from the position organizational chart, a business rule needs to be created. The rule to originate the job requisition template can be created based on the available position attributes.
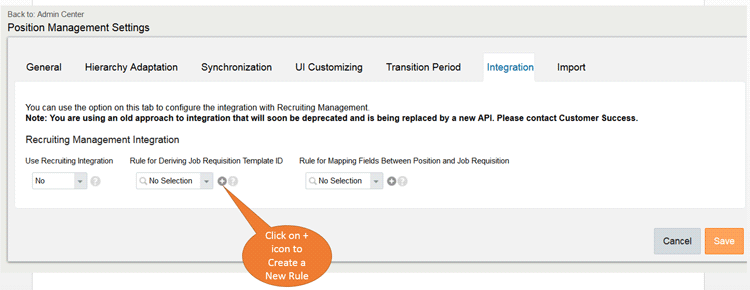
Figure 2
Create a new rule to derive the job requisition template ID
Click the plus-mark icon next to the Rule for Deriving Job Requisition Template ID field to add a new rule. This action opens the screen in
Figure 3. Under Position Management, select the Derive Job Requisition Template in Recruiting Integration template radio button to create the rule.
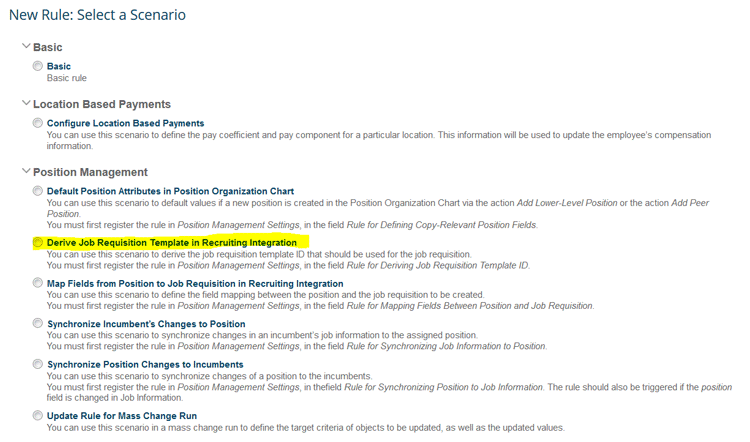
Figure 3
The parameters for the new GetReqTemplateID rule
The new rule screen pops up as shown in
Figure 4. In this example, I have named the rule GetReqTemplateID.

Figure 4
The new rule screen
In the screen in
Figure 4, make the following entries for the GetReqTemplateID rule:
- Rule Name: Enter the new rule’s name (in this example, the name is GetReqTemplateID)
- Rule ID: This field automatically defaults to the new rule name you just entered
- Description: Enter a meaningful description for the new rule
Then click the Continue button. This action saves the settings and displays the rule details in the screen in
Figure 5.

Figure 5
The new GetReqTemplateID rule details
The detailed Business Rule screen, shown in
Figure 5, is used to define the conditions when a requisition can be created from a position in the position organizational chart.
For example, as shown in
Figure 5, this rule is defined so that every time a position is assigned to a valid company, the Create Requisition option is available to create a requisition from a position in the position organizational chart, and the default requisition template is Job Requisition.
Map the Position Fields to Job Requisition Fields
The next step is to create a separate rule to define the field mapping between the position and job requisition objects.
Go to the transaction Configure Business Rules and create a new rule (
Figures 6 and
7).
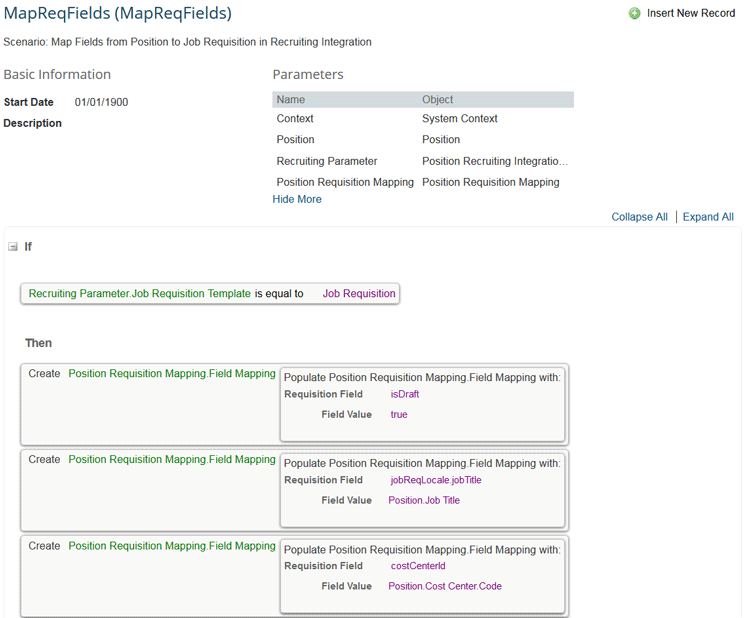
Figure 6
Map the fields between the job requisition and position
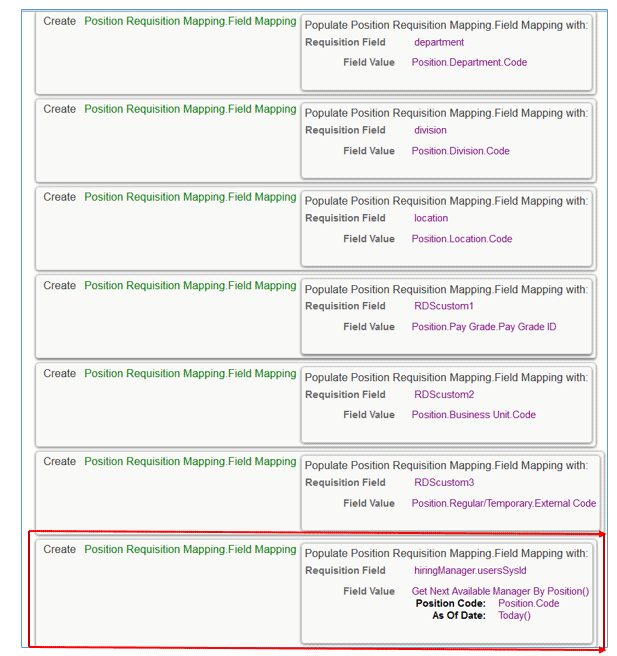
Figure 7
The details for the field mapping between the job requisition and position
In the business rule, you can define the field mappings between the recruiting fields based on the requisition template you created in the first rule earlier and the position attributes.
In this example, I have mapped the jobTitle field in the recruiting requisition template to the Job Title field in position, and the costCenterid field in the recruiting requisition template to the Cost Center Code field in position.
Mapping Details and Instructions
The value in the Requisition field in the mapping object must have the exact name as the corresponding Job Requisition field. The name of the Job Requisition field can be found by following menu path Admin Center > OData API Data Dictionary (
Figure 8).

Figure 8
OData API Data Dictionary field example
If the Requisition field does not refer to a simple data type, such as a string, but instead refers to another object via a navigation path, you need to map those fields in the following format: <fieldNameInJobReq>.<fieldNameInReferringObject>.
For example, the field hiringManager refers to the JobRequisition Operator with the field usersSysId, and it must be mapped like this: hiringManager.usersSysId (as shown in
Figure 7).
If you want to map Boolean- or number-type fields, you need to use the format () function. If you want to map fields of type Country, you need to map the Country Code (two characters) value (for example, US for United States).
Make sure that all required fields of the corresponding Job Requisition Template are mapped with a value. Otherwise, the job requisition cannot be created. If you want to create the job requisition without all the required fields filled in, you need to add more mapping to the rule with Requisition Field = isDraft and Field Value = true.
To map the Foundation Object or Generic Object field types, make the mapping settings as shown in
Figure 9.

Figure 9
The field mapping settings for Foundation Objects or Generic Objects
To map the Date- or Date Time-type fields, the value must be in the format YYYY-MM-DD HH:MM:SS. You can also use the rule function Format Date for Position to Job Requisition Mapping () as shown in
Figure 10.

Figure 10
Mapping settings for the Date field
To map the PicklistOption-type fields, the Field Value must be the optionID of the picklist as shown in
Figure 11.

Figure 11
Mapping settings for foundation objects or generic objects
Assign the Mapping Rules to the Position Management Settings
The next step is to assign the rules you created earlier (GetReqTemplateID and MapReqFields) to Recruiting Management integration in the Position Management Settings. Follow menu path Admin Center > Position Management Settings > Integration and the screen in
Figure 12 opens.
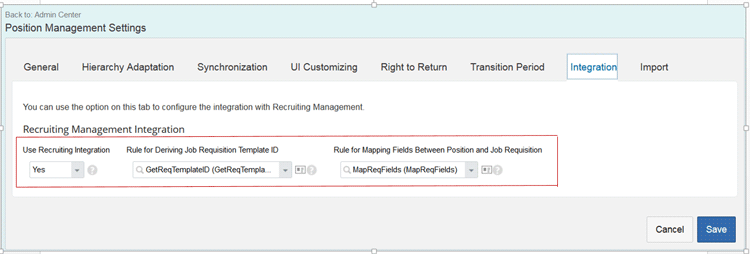
Figure 12
Assign mapping rules to Recruiting Management integration
Here you select Yes in the Use Recruiting Integration field, GetReqTemplateID as the job requisition template rule, MapReqFields as the rule for mapping fields between the position and job requisition, and click the Save button to save your settings.
The following permissions are required for Recruiting and Position management integration and to enable recruiting administration users to be able to create and view requisitions from the Position Organizational Chart. Follow menu path Admin Center > Manage Permission Roles and the screen in
Figure 13 opens. Here you can select the role you want to assign these permissions to manage the position.

Figure 13
Role-based permission settings under Manage Position
In
Figure 13, make sure these three check boxes are selected:
- View Job Requisition in Position Organization Chart
- Create Job Requisition in Position Organization Chart
- Select Job Requisition Template in Position Organization Chart
The Provisioning Settings for a Background Job
To ensure that the requisitions planned for creation in the future are created, you need to schedule a periodic job to take care of this process. To do this, go to Provisioning for the relevant company and choose Manage Scheduled Jobs. In the screen that opens (
Figure 14), select the Create New Job link.

Figure 14
Select Create New Job
In the screen that opens (
Figure 15), enter a Job Name (CreateReq in this example) and Job Owner (Rinky Karthik). (You can enter the job owner’s name in the field if you know, or you can search using the Find User plus-mark button to the right.) The job owner should be an administrative user who is notified when something goes wrong. Select Position Job Requisition Processing as the Job Type and define the Job parameters to ensure that the job runs at least once a day.
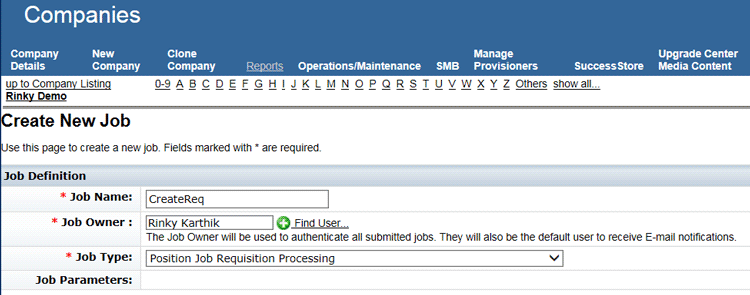
Figure 15
Create a background job with the Position Job Requisition Processing job type
When the job finishes processing, the administrative user is notified about the creation status of the requisitions. If the requisition does not run correctly, an email is sent to the administrator with an error message, as shown in
Figure 16.

Figure 16
Background job-notification message
After the integration settings are complete, the business rules have been created, the proper Role-Based Permission permissions have been assigned, and the integration between Recruitment and Position management is established, you are ready to learn the steps to create and view requisitions from the position organizational chart.
Create/View a Requisition from the Position Organizational Chart
Once the Create Job Requisition in Position Organization Chart permission is assigned to the relevant role, and if the corresponding position does not have a job requisition already in process, the Create Job Requisition option is available in the menu of the position tile. Follow menu path Company Info > Position Org Chart and a screen like the one in
Figure 17 opens.

Figure 17
The new position organizational chart
Select the position from which you want to create a requisition. In this example, I selected the Positions radio button and position HQ04 (President EMEA) from the drop-down options in the box on the left. This opens the HQ04 position tile in the middle of the screen, where you can click the position name (
Figure 18). This action opens the menu icon (the three parallel bars, boxed in red), which, when selected, shows the Create Job Requisition button.
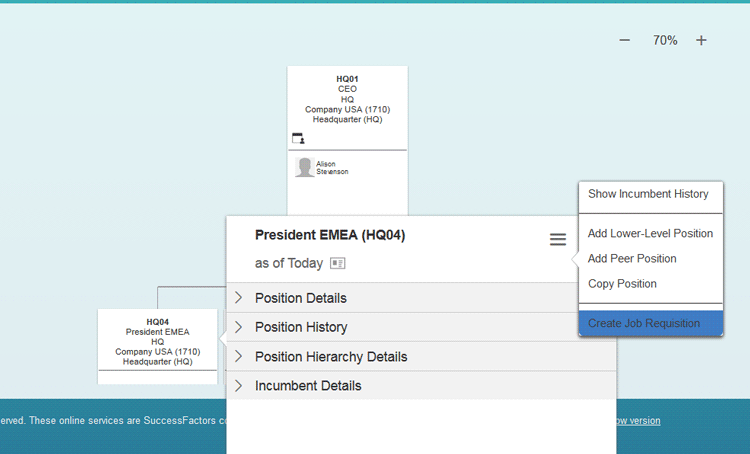
Figure 18
Create a job requisition from the position organizational chart
Click the Create Job Requisition button and a pop-up appears as shown in
Figure 19. Here you can create a new job requisition using the default settings of the Job Requisition template you configured earlier.
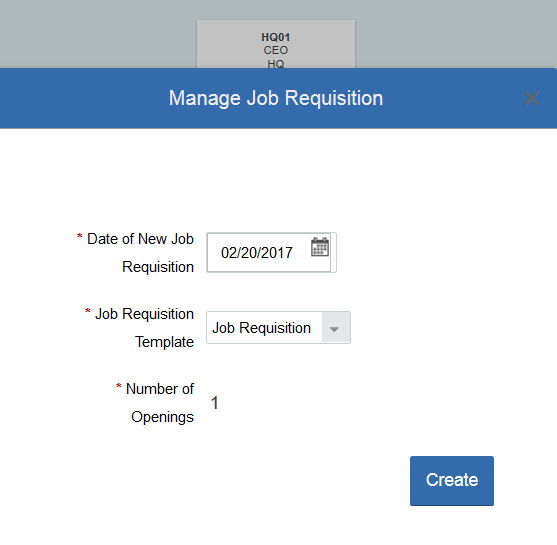
Figure 19
Create a job requisition from the job requisition template
After you check the settings, click the Create button. A new requisition for that position is created immediately, and the screen returns to the position organizational chart with a new header, Job Requisition Details, as shown in
Figure 20.
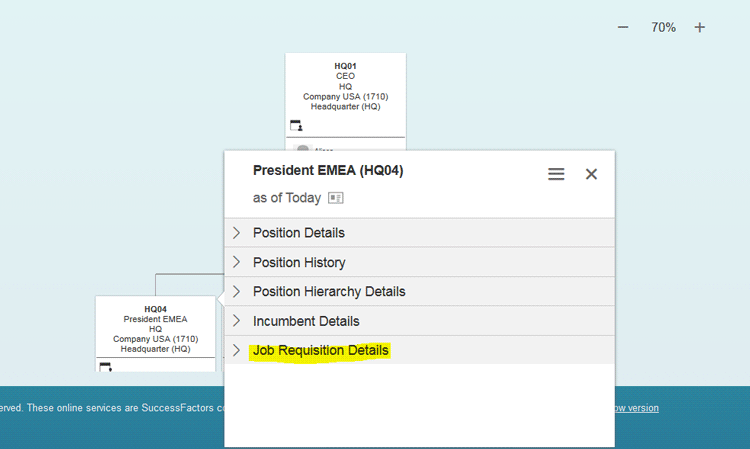
Figure 20
A view of the job requisition details once the requisition is created
Now, when you select the Job Requisition Details button, you can see job requisition details as shown in
Figure 21.
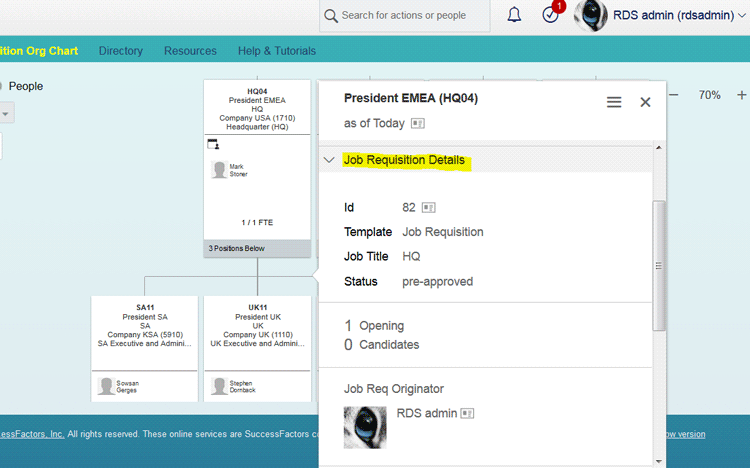
Figure 21
A deeper look at the Job Requisition Details

Rinky Karthik
Rinky Karthik serves as a Project Manager, HCM SuccessFactors, for the People LoB for itelligence and has 16 years of SAP HCM and SuccessFactors experience. This includes many global implementations, including support and upgrade of various SAP on-premise modules and SuccessFactors modules in diverse roles, like Solution Architect, Lead Consultant, and Project/Program Manager. Rinky has an MBA in Human Resources and she comes with a strong project management background; as such, she has managed a variety of global projects for clients in different domains. She has extensive experience with SAP SuccessFactors’ SAP Launch and SAP Activate implementation methodologies, and is a Certified SuccessFactors consultant in Recruitment Management, Recruiting Marketing, Learning Management Solution, and Employee Central. Rinky is a frequent contributor to SAP SuccessFactors blog forums,
HR Expert, and a regular speaker at a variety of SAP/SuccessFactors conferences.
You may contact the author at
rinky.karthik@itelligencegroup.com.
If you have comments about this article or publication, or would like to submit an article idea, please contact the
editor.


