Learn when and how to use Event-Driven Quantity Assignment (EDQA) in SAP Advanced Planning and Optimization (SAP APO) Global Available-to-Promise (Global ATP).
Key Concept
Available-to-Promise (ATP) is an order management business process that attempts to commit and fulfill customer orders on required dates and quantities considering business rules and availability of finished products, components, and resources. Order-processing lead time can be reduced by using advanced system functionalities to dynamically confirm or unconfirm orders based on business rules. These orders can then immediately participate in further activities such as delivery creation without any necessity of manual review or batch rescheduling. Event-Driven Quantity Assignment (EDQA) is functionality available in SAP Advanced Planning and Optimization (SAP APO) Global Available-to-Promise (Global ATP) that aims at improving confirmation of higher-priority orders in a dynamic manner in a constrained supply situation.
Business users continually try to improve customer service by making the supply chain efficient and minimizing order processing times. SAP Advanced Planning and Optimization’s (APO’s) Event-Driven Quantity Assignment (EDQA) functionality can help to fulfill customer orders on time and without manual effort from business users.
ABC Inc. is a global CPG giant with a dynamic supply chain. ABC Inc. continually tries to improve its supply chain process and improve customer service levels.
ABC Inc.’s customers in the Western Europe region place orders with extremely short lead times. The majority of orders are placed a day before the required ship date. ABC Inc.’s smaller customer orders are placed early in the morning while the orders from high-priority customers are placed in the afternoon or early evening. ABC Inc. tries to create a delivery for these orders as early as possible to allow the warehouse to start picking, packing, and shipping activities to meet the customer’s requested delivery date.
For products with a constrained supply situation, low-priority orders placed earlier in the day consume the Global Available-to-Promise (ATP) quantity while the high-priority orders placed in the afternoon remain unconfirmed. Even if the inventory is received for manufacturing plants or other distribution centers, the high-priority customer orders placed later in the day continue to remain unconfirmed. Business users have to manually review these orders each day and assign confirmation to the right orders before a delivery can be created. The manual assignment of confirmed quantities to the orders is time consuming and error prone. It results in a higher order processing time that in turn can result in a late delivery at the customer’s location.
EDQA helps assign newly available quantities to orders with high priority and can also re-assign quantities from low-priority orders to orders with higher priority in real time (Reassignment of Order Confirmation), thereby avoiding any batch processing requirements or manual order touches. All order confirmations in SAP ERP Central Component (ECC) systems are always up to date in real time and overall order processing lead time is reduced.
The Sales Order Process
Customer orders can be placed any time of the day using one or more means such as SAP CRM, EDI, or web portals. Sales orders that are created may not be committed (no or partial confirmation) if sufficient Global ATP quantity is not available. Business users expect sales orders to be confirmed automatically based on priorities if there is any subsequent improvement in the supply situation after order creation (i.e., an increase in Global ATP quantity). Once the sales orders are confirmed, deliveries for such orders can be created and sent to the warehouse for picking and shipping to customers.
Automatic confirmation of a sales order upon an increase in Global ATP quantity can ensure:
- No manual intervention by business users to monitor the Global ATP situation and confirm sales orders
- Background delivery creation jobs can automatically create deliveries for confirmed orders, thereby reducing order processing times
- Business rules to confirm sales orders based on predefined priorities are always respected
- Business users do not have to wait for background rescheduling processes (backorder processing [BOP]) to be executed to view the updated order confirmation
Note
Several configuration steps are required to implement SAP APO Global ATP that are beyond the scope of this article. The reader is advised to follow the SAP Configuration Guide as well as SAP’s online documentation wherever required.
Introduction to the Order Confirmation Process
In this section, I compare an order fulfillment process without EDQA against the process with it.
Typical Order Fulfillment Process Flow Without EDQA
The order creation window for any organization can vary depending on the business requirement, and high-priority orders can be placed any time during the day. Organizations within several industries (e.g., consumer goods, high-tech, pharmaceuticals, wholesale distribution, and retail distribution) expect to ship out the customer orders as soon as possible to provide a high customer service level as well as to effectively use the resources in the warehouse/distribution center and transportation.
Orders may not be confirmed during creation depending on the Global ATP situation irrespective of the priority of the order. In order to ensure that high priority orders are confirmed and that the low-priority orders are cut under a constrained supply situation, the business needs to either manually change the confirmations or run a batch BOP. Both these options are time-consuming and can negatively affect the daily business cycle. If the volume of customer orders is high, the manual assignment of confirmed quantities (sales orders changes or interactive BOP) may not be feasible.
In Figure 1, you see that due to rescheduling of orders using batch processes, crucial time is lost during the daily business cycle. The overall cycle time is delayed due to this, and delivery creation and picking activities cannot start until the BOP run is completed and orders are updated with new confirmation quantities.

Figure 1
Order fulfillment process flow without EDQA
Typical Order Fulfillment Process Flow with EDQA
With the use of EDQA, the need for batch or interactive rescheduling of orders is eliminated. The orders are updated in real time depending on the Global ATP situation and order prioritization.
A high-priority order created later during the day can undergo reassignment of the order confirmation (ROC) process during creation itself and can take away confirmation from a low-priority order. A low-priority order in turn can gain confirmation from an event that adds to the overall increase in Global ATP quantity.
Use of EDQA ensures that the order confirmation situation in the ECC system is always up-to-date based on the business rules of prioritization. Deliveries for these orders can be created as soon as the high-priority orders are received from customers or after the order cut-off time per day, whichever is earlier. As shown in Figure 2, the overall cycle time is reduced, creating a positive impact on customer service levels.

Figure 2
Order fulfillment process flow with EDQA
EDQA Assignment Concept and Setup
Events from ECC systems are triggered depending on the type of transaction and documents processed. These events can then drive the activities in the SCM system to confirm or un-confirm orders based on order priorities.
Orders in the SCM system are updated in an order due list (ODL). In an ODL, the system saves order items that correspond to certain filter criteria. Based on the system settings, the ODL contains fully confirmed, unconfirmed, or partially confirmed orders. These orders in the SCM system react to the changes in the Global ATP situation based on different events triggered in the online transaction processing (OLTP) system.
ODLs
An SAP system offers the flexibility to configure two types of ODLs based on business needs.
The first method is to configure the ODL to select high-priority unconfirmed order items that should get confirmations whenever the availability situation improves. This confirmation can be triggered by one of the following activities. These activities positively impact the Global ATP situation:
- Change in the purchase order
- Quantity release in the sales order
- Change in stock data
- Change in a planned order
The system reads the items in the ODL that require confirmations. The system then performs a BOP run for only selected items from the ODL and provides confirmations based on the newly available quantities. The system updates the items in the ECC system in real time.
The obtained confirmation process is shown in Figure 3 where a new receipt of 500 pieces in stock triggers EDQA and changes the confirmations of the high-priority items in the ODL.

Figure 3
The confirmation process
Using the second method, you configure an ODL to select low-priority orders having confirmations that can lose confirmations to higher-priority orders. EDQA executes a reassignment of order confirmations to take away confirmations from low-priority order items and assign them to high-priority orders.
During the Global ATP check for a sales order, if insufficient quantity is confirmed on the request delivery date, the system performs a rule-based ATP (the rule-based ATP is activated for the check instruction that the sales order follows) to trigger the ROC event. The system reads the items in the “give up confirmation” ODL that can give up confirmations. The system provides a provisional confirmation to the triggering document and transfers the information to the ECC system. The document (order) is saved in the OLTP system. The system performs a BOP run for the items in the ODL and reduces the confirmations in the ODL items in favor of the triggering document. The system posts the confirmed quantity in the ECC system, updates the triggering document, and changes its status.
In Figure 4, a high-priority sales order is created for 1,000 units. Assuming no Global ATP quantity is available, the ROC process is triggered. It identifies orders from Donor ODL, which can lose confirmation for a high-priority order. The ROC results in the confirmation of 900 units on the high-priority order while all the low-priority orders are unconfirmed.

Figure 4
Reassignment of the order confirmation process
Note
You can set up the system to automatically include fully confirmed orders in a give-up confirmation ODL while fully unconfirmed orders obtain a confirmation ODL. Partially confirmed orders can exist in both the ODLs as these orders can either lose or gain confirmations.
Use of the ODL quantity assignment and the reassignment of order confirmations results in more efficient confirmation by ensuring that only selected high-priority orders get newly available stock and only low-priority orders lose confirmations to more important orders.
Use of ODL also reduces the number of items undergoing the batch BOP run, thus improving the speed. However, the frequent running of EDQA can also impact performance of the SCM system. Hence, the scope of EDQA should be carefully balanced.
System Configuration for EDQA
The system configuration required to support EDQA mainly consists of setting up workflow to trigger events and setting up an ODL to obtain or give up confirmations.
Next, I show the configuration steps to enable EDQA to obtain confirmations. These configuration steps are for configuration done with SAP SCM 7.3.
Workflow to Trigger Events
To trigger events that lead to dynamic order confirmation using EDQA, workflow setup is performed in the SAP SCM system. In this section I describe the steps to set up workflow customization.
Step 1. Check the standard workflow settings. Follow SCM menu path Implementation Guide > SAP Web Application Server > Business Management > Business Workflow > Maintain Standard Settings or use transaction code SWU3. In the screen the system displays (Figure 5), run auto-customizing of the workflow. You use auto-customizing to carry out the activities necessary for executing the workflow and to check the current status of workflow customizing. This is required to trigger events in SAP SCM system. You see the error icon  in Figure 5. Click the generate icon
  . This action results in the running of auto-customizing.

Figure 5
Automatic workflow customizing before generation
Once the auto-customizing is successful, the status of the activities with the error (indicated by the error icon) is changed to a no error icon  as shown in Figure 6.

Figure 6
Automatic workflow customizing after generation
Next, you test the event linkages. The Maintain Runtime Environment event linkage must be checked.
This is done to carry out a consistency check for existing event linkages by clicking the Check Event Linkages button highlighted in Figure 7. If the event linkage is not consistent, the changes to transaction data in the ECC system may not trigger an EDQA event in the SCM system, which in turn affects order confirmations.

Figure 7
Click the Check Event Linkages button
Figure 8 appears when you check event linkages. The General checks linkages for Object types and events and for Receiver function module/method should be checked. The checks for workflows consistency should include Linkage and Task Definition. It is important to have the event linkages be consistent. This ensures that event triggers from the ECC system are identified correctly in the SCM system, which in turn triggers EDQA. Click the execute icon to ensure the events are consistent for performing EDQA.

Figure 8
Check that event linkages are consistent
If the event linkage is inconsistent or in error, the output of the consistency check shows the message in Figure 9.

Figure 9
Output of the consistency checks
Step 2. Maintain event linkages for EDQA. In this step, you create a linkage for an EDQA event and assign an EDQA process object type. To complete this step, execute transaction code SWETYPV or follow SCM menu path Tools > ABAP Workbench > Development > SAP Business Workflow > Definition Tools > Events > Event Linkages > Type Linkages (Figure 10).

Figure 10
Set up event linkage for EDQA
Click the New Entries button to display the screen in Figure 11.

Figure 11
Set up parameters for event linkage
In Figure 11, add these details:
- Object Category: CL ABAP Class
- Object Type: /SAPAPO/CL_EDQA_PROCESS
- Event: EDQA
- Receiver Type: WS34500011
- Receiver Call: Function Module
- Receiver Function Module: SWW_WI_CREATE_VIA_EVENT_IBF
Click the save icon  to save your configuration settings.
Note
The Receiver Function Module and Receiver Type shown in Figure 11 are available in a standard SAP system and the values as shown in the figure should be used.
Step 3. Activate event linkages for EDQA. This step enables you to activate event linkages for EDQA. To complete this step, follow SCM menu path Implementation Guide > Advanced Planning and Optimization > Global Available-to-Promise (Global ATP) > Event-Driven Quantity Assignment (EDQA) > Activate or Deactivate Event Linkage or use transaction code /SAPAPO/EDQA_EC.
In the screen that appears click the Deactivated button highlighted in Figure 12 to activate event linkage.

Figure 12
Activate the event linkage
On successful activation, a green status box appears as shown in Figure 13. Event linkage is important to trigger the EDQA event once the workflow is triggered.

Figure 13
The green status box shows that the event linkage is activated
Note the event number WS 34500011 in Figure 13. This is the same as the receiver type entered in the event linkage shown in step 2. This concludes the workflow and event setup required for EDQA. Next, I describe the configuration of ODL and the process categories for EDQA.
ODL Configuration
An ODL is a list of orders stored in the SAP SCM system that should be considered for EDQA. Order items are included in the ODL if the order data (for example, materials, plants, delivery dates, or customer number) qualifies the conditions specified in the filter variant. Orders in the ODL are sorted based on the sort profile assigned to it.
In this section, we specify the configuration to identify which orders should be selected to undergo EDQA processes and how the orders should be ranked or prioritized to obtain confirmation. The order selection can be based on several filtering criteria such as customers, products, and locations while ranking can be based on order delivery priority and delivery date.
Step 1. Create a filter type. In this step, you define the criteria to include different documents to be in scope for EDQA. Based on these settings, the system includes order categories for processing. The order categories can be filtered further based on selection criteria. This should be configured to include the minimum number of documents to meet the business requirements.
To complete this step, follow menu path Implementation Guide > Advanced Planning and Optimization > Global Available-to-Promise (Global ATP) > Event-Driven Quantity Assignment (EDQA) > Maintain Filter Type or use transaction code SPRO. In the screen that appears (Figure 14), click the New Entries button to display the screen in Figure 15.

Figure 14
Maintain the filter type
In Figure 15 you specify the filter type name (in my example, it is Z_EDQA) and press Enter.
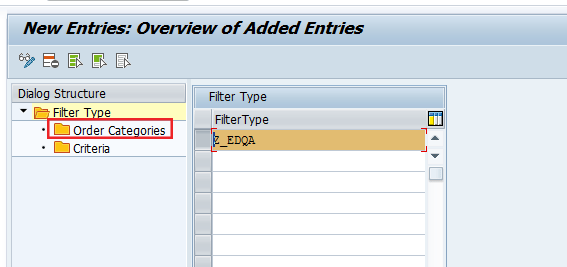
Figure 15
Specify the filter type name
Highlight the Filter Type row and double-click Order Categories in Figure 15 to specify the order categories to be included in the EDQA scope. Figure 16 shows the Sales order and Stock transport order Order Categories included in the filter type.
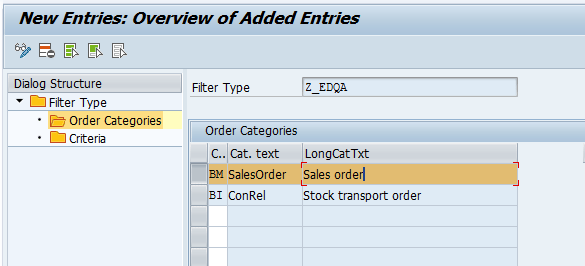
Figure 16
Specify order categories
Next, you need to specify the Criteria for the filter type. Double-click the Criteria folder to display the screen shown in Figure 17.

Figure 17
Double-click the Criteria folder
Specify the criteria to be used for the filter type. This is done by using fields from the drop-down list by pressing the F4 button on your keyboard. This action displays the screen in Figure 18. Double-click the criteria that you want to select.

Figure 18
Choose the criteria for the filter type
Perform the same steps for other filter criteria that you want to include in the filter type. Press the Enter key after selecting all the criteria. This action displays the screen shown in Figure 19. Fields used in filter criteria are used to define the scope of orders included in the ODL. For example, if you want to perform EDQA only for orders for a few customers, specify the customer number as a filter criteria. The ODL in this case includes orders only for the specified customers.
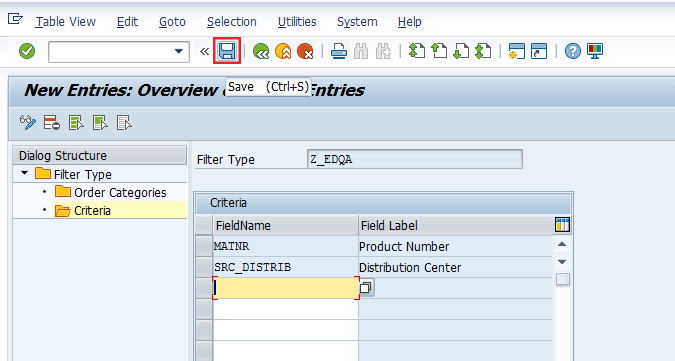
Figure 19
Select the filter criteria
In this example the criteria are Product Number and Distribution Center as shown in Figure 19. Values for order categories and criteria are specified during the setup for the ODL. Save the filter type by clicking the save icon highlighted in Figure 19.
Note
Not all values available as filter criteria can be used in the ODL. The SAP system provides a message as shown in Figure 20 if a filter criteria field is selected that cannot be used in the ODL (e.g., if you try to include MBDAT [Material Availability Date] as a filter criterion for the ODL).
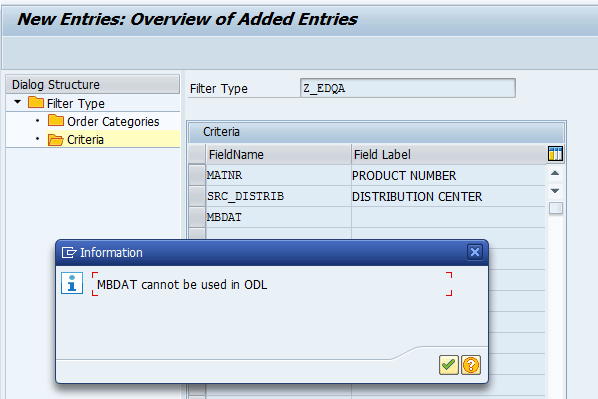
Figure 20
Message displayed if a criterion cannot be used in the ODL
Step 2. Define a sort profile. In this step, you define the criteria to be used for sorting the documents for EDQA. Based on the sort profile, orders are sorted in the ODL and are picked during the EDQA process. To complete this step, follow SCM menu path Implementation Guide > Advanced Planning and Optimization > Global Available-to-Promise (Global ATP) > Event-Driven Quantity Assignment (EDQA) > Define Sort Profile or use transaction code SPRO (Figure 21).
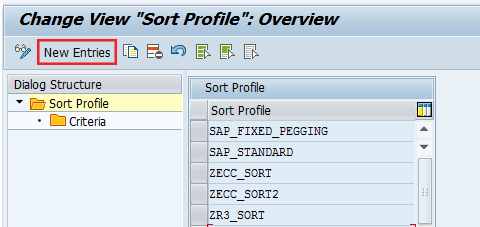
Figure 21
Create the sort profile
Click the New Entries button in Figure 21 to display the screen shown in Figure 22. Enter the Sort Profile name. In this example it is Z_SORT.
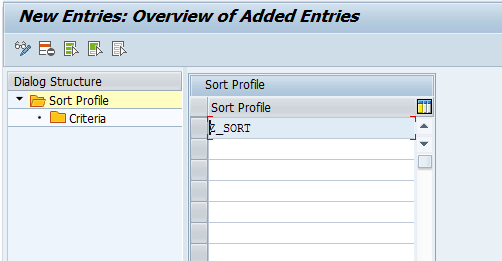
Figure 22
Name the sort profile
Highlight the Sort Profile folder and double-click the Criteria subfolder. This action displays the screen in Figure 23.

Figure 23
Click the New Entries button
Click the New Entries button to go to Figure 24. Select the fields for sorting by selecting list of fields available from the drop-down menu by pressing F4 on the keyboard. If more than one sort criteria exists, select other fields one by one using the same steps.

Figure 24
Select fields for sorting
In Figure 24, Delivery Priority and Delivery Date/Time are two sorting criteria. Sequence 1 for the Delivery Priority field means it will be used as the first sorting criteria while Delivery Date/Time will be used as the second sorting criteria. Sort Ascending specifies that document will be sorted in an ascending sequence of values (i.e., an order with a delivery priority of 10 will be a higher priority in the list compared with an order with a delivery priority of 11. Likewise, an order with the delivery date/time of tomorrow will be a higher priority than an order with the delivery date/time of the day after tomorrow.
Save the sort profile by clicking the save icon highlighted in Figure 24.
Configuration of the filter type and sort profile is required for ODL setup. Next, I describe ODL configuration.
Step 3. Configure the ODL (obtain confirmation). In this step, you create the ODL of the type Quantity Assignment (i.e., receiver ODL). To complete this step, follow SCM menu path Implementation Guide > Advanced Planning and Optimization > Global Available-to-Promise (Global ATP) > Event-Driven Quantity Assignment (EDQA) > Quantity Assignment to Order Due Lists (MAFL) > Configure Order Due Lists (Obtain Confirmation) or use transaction code /SAPAPO/ODLC. This action displays the screen shown in Figure 25.

Figure 25
Click the New Entries button to display the screen to enter details for the new ODL
The filter type and sort the profile created in steps 1 and 2, respectively, are assigned to the ODL in this step. Click the New Entries button to display the screen in Figure 26.

Figure 26
Specify parameters for the new ODL
Enter the sort profile and filter type you previously created along with the ODL name, description, and type (Figure 27).
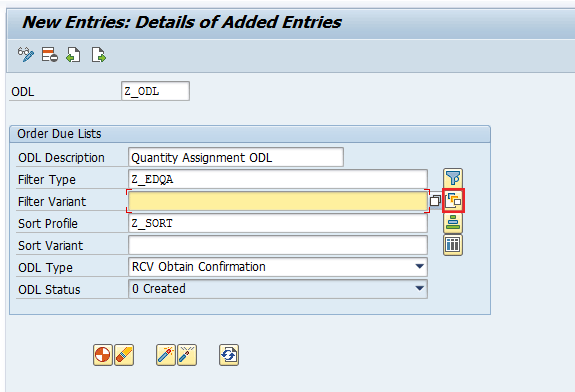
Figure 27
Specify the filter variant for the ODL
In this example, the ODL name is Z_ODL and the description is Quantity Assignment ODL.
Note that the ODL Type selected above is RCV Obtain Confirmation (i.e., the receiver) and the ODL Status is 0 Created. Here 0 specifies as the first status of the ODL after creation. The Sort Variant is optional. Before you save the ODL, specify the values of the filter variant by clicking the maintain variant icon  highlighted in Figure 27. Clicking this icon displays the screen in Figure 28.
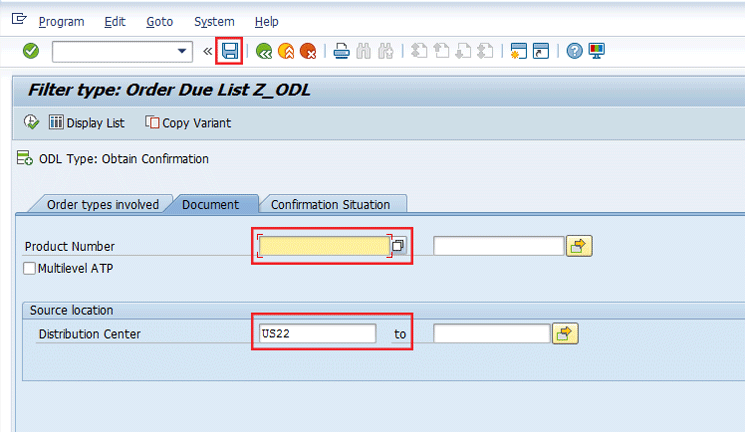
Figure 28
Maintain the filter variant
Figure 28 shows the filter variant setup. The fields shown are the filter criteria configured in the filter type (refer to step 1 in the “ODL Configuration” section). Enter the values for products and distribution center based on business requirements using the drop-down list (press F4). In this example, the product number is blank while the distribution center is US22 highlighted in Figure 28.
Save the ODL by clicking the save icon shown in Figure 28. I saved it as Z_FILTER. The filter variant appears on the ODL screen as shown in Figure 29.
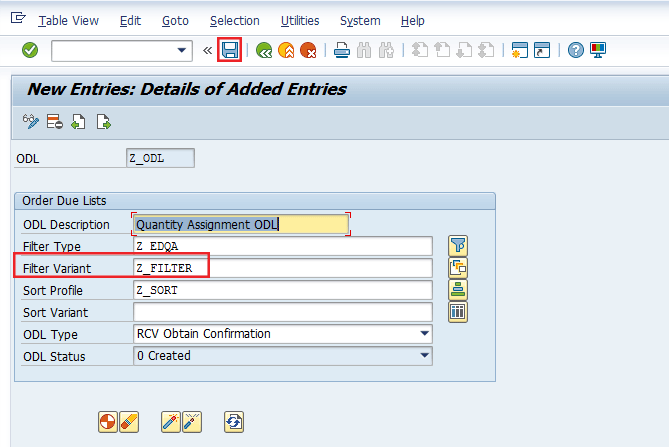
Figure 29
Assignment of the filter variant to the ODL
Once the ODL is saved, you generate the code for the ODL by clicking the generate icon shown in Figure 30.

Figure 30
Click the generate icon to generate code for the ODL
The ODL status 0 Created changes to 10 Generated (Figure 31) after successful generation. ODL generation dynamically generates a program in the SAP SCM system that is needed for updating orders in ODL. The number 10 is the next number to identify the ODL status. The sequence is 0 Created, 10 Generated, and 20 Activated.
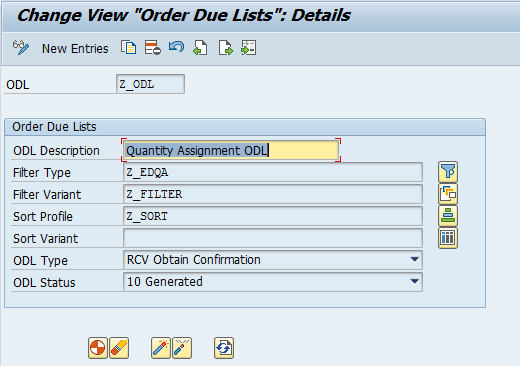
Figure 31
The ODL Status number changes to 10 Generated
After ODL generation, you activate the ODL by clicking the activate icon  in Figure 32 and saving the changes. After successful activation, the ODL status is changed to 20 Activated as shown in Figure 32. An ODL status must be Activated for orders to successfully participate in the EDQA process.

Figure 32
The ODL Status number changes to 20 Activated
Note
Once the ODL is generated, the Filter Type, Filter Variant, Sort Profile, and ODL Type fields are no longer editable. These fields cannot be changed in an ODL that is in generated status. For changing values in these fields, you must click the deactivate ODL icon

and then click the delete ODL icon

, as shown in
Figure 33.
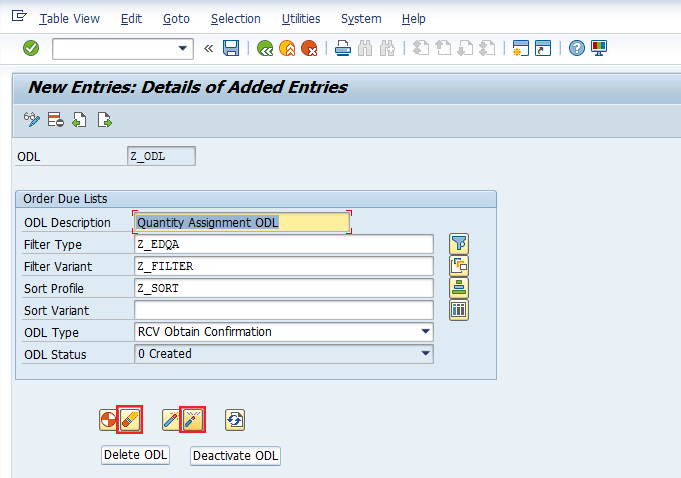
Figure 33
Editable ODL with Created status after deactivation and deletion
The ODL configured in the system is visible in transaction /SAPAPO/ODLC as shown in Figure 34.

Figure 34
List view of ODL with ODL parameters
The last step in ODL setup is organizing entries in the ODL. After the ODL configuration is completed, the ODL is still empty and does not contain any orders. In this step, we perform the task of updating all the orders in the ODL that meet the criteria specified in the filter variant.
Step 4. Reorganize the ODL. In this step, you organize the ODL so that relevant transaction documents are updated in the ODL. Based on values populated in filter variants, open documents in the SCM system are updated in the ODL. To complete this step, follow SCM menu path Advanced Planning and Optimization > Global Available-to-Promise (Global ATP) > Backorder Processing > Event-Driven Quantity Assignment (EDQA) > Complete Order Due Lists or use transaction code /SAPAPO/ODLR. The system then displays the screen shown in Figure 35.

Figure 35
Specify the ODL name for reorganization
Data inconsistency between SAP APO liveCache and ODL can be corrected by reorganizing the ODL. Figure 35 shows the screen for ODL reorganization. Enter the ODL name and click the execute icon.
Transaction documents updated in the ODL can be viewed using transaction /SAPAPO/ODL and entering the ODL name as shown in Figure 36.
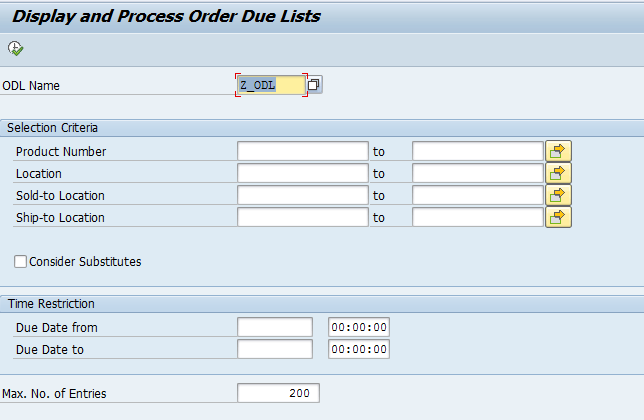
Figure 36
Enter the name of an ODL to display
Enter the ODL name and click the execute icon or press F8 on your keyboard. The records in the ODL are then displayed as shown in Figure 37.

Figure 37
View orders included in the ODL
This completes configuration and setup of the ODL. I now look at the configuration of the process category for EDQA.
Process Category Configuration
Using the process category, you specify all the parameters relevant for the business that will lead to triggering of the event. This includes configuration of the condition profile, process categories, events for process categories, and activities. You specify all the parameters that lead to the triggering of a specific event.
Step 1. Create the condition profile. To complete this step, follow SCM menu path Implementation Guide > Advanced Planning and Optimization > Global Available-to-Promise (Global ATP) > Event-Driven Quantity Assignment (EDQA) > Quantity Assignment to Order Due Lists (MAFL) > Define Process Category for Quantity Assignment to Order Due Lists (QODL). The system then displays the screen shown in Figure 38.
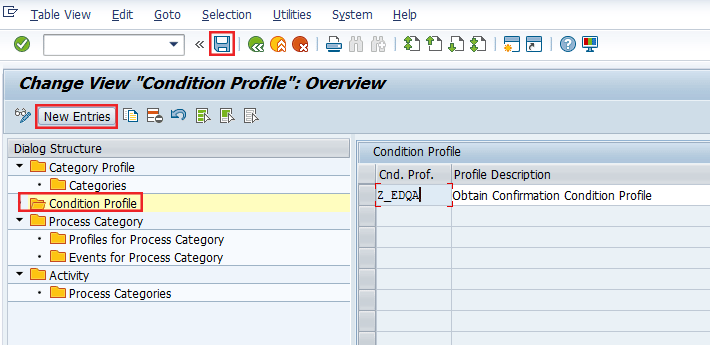
Figure 38
Create a new condition profile
When this event is activated, items that are to obtain a confirmation automatically participate in EDQA. Since these items participate in EDQA, their quantities are more likely to be confirmed.
Note
Removing of quantities of low-priority orders to confirm a high-priority one is part of the reassignment of order confirmation (ROC) process. All ROC-related configuration is not part of the scope of this article. The system configuration scope of this document is limited to Obtain Confirmation, which is widely used. I describe Obtain Confirmation configuration in the “System Configuration for EDQA” and “Process Category Configuration” sections.
Double-click the Condition Profile folder on the left of Figure 38. Click the New Entries button and enter the Cnd. Prof. name and Profile Description. Save the condition profile by clicking the save icon highlighted in Figure 38. This condition profile is used in the next setup.
Step 2. Edit the Condition Profile. In this step, you assign parameter values to the condition profile created above. To complete this step, follow SCM Menu path Advanced Planning and Optimization > Global Available-to-Promise (Global ATP) > Backorder Processing > Event-Driven Quantity Assignment (EDQA) > Edit Condition Profile or in SAP command field enter transaction /SAPAPO/EDQA_PPN.
In the screen that appears, enter the condition values for the parameters as shown in Figure 39. Save the condition profile by clicking the save icon. In this example, only plant US22 is added manually as a condition value. Other condition values can be added manually by navigating to the different tabs highlighted in Figure 39.

Figure 39
Specify the parameters in the condition profile
Step 3. Create the Process Category. In this step you create a process category and assign a condition profile leading to the triggering of an event. To complete this step, follow SCM menu path Implementation Guide > Advanced Planning and Optimization > Global Available-to-Promise (Global ATP) > Event-Driven Quantity Assignment (EDQA) > Quantity Assignment to Order Due Lists (MAFL) > Define Process Category for Quantity Assignment to Order Due Lists (QODL). The system then displays the screen shown in Figure 40.

Figure 40
Create a new process category
Double-click the Process Category folder on the left and then click the New Entries button as shown in Figure 40. Enter the Process Category name and description. Save the entry by clicking the save icon.
Select the Process Category folder and double-click the Profiles for Process Category folder as shown in Figure 41.
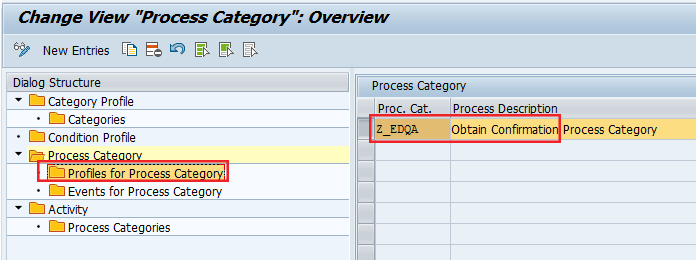
Figure 41
Double-click the Profiles for Process Category folder
This action takes you to the screen in Figure 42 in which you enter the value of the condition profile as shown. This is the same condition profile created in Step 1. Assignment of condition profile to process category ensures that EDQA is triggered only for the parameters specified in condition profile (in our case Plant US22).
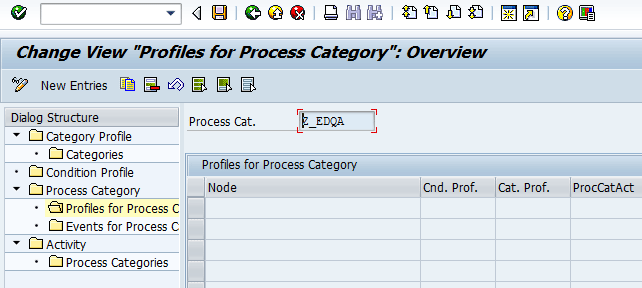
Figure 42
Enter the value for the condition profile
Click the New Entries button in Figure 42 to go to Figure 43. Here you specify the condition profile and activate the process category. Note the ProcCatAct check box is selected. This ensures that the process type is active. Only active process types are considered while checking for the validity of the condition profile. Set the node as B-Input/output node. Save the entries by clicking the save icon.

Figure 43
Assign a condition profile and activate the process category
Next, you set up the events for the process category. Double-click the Events for Process Category folder in Figure 44 and then click the New Entries button in Figure 45.

Figure 44
Double-click the Events for Process Category folder
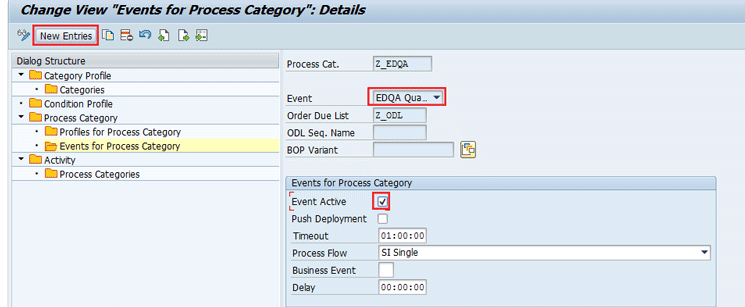
Figure 45
Click the New Entries button to display the details view for the Events for Process Category
Enter the values as shown in Figure 45. The event selected is EDQA – Quantity assignment to ODL. This specifies that the quantity assignment event should be triggered for the Z_EDQA process category using Order Due List Z_ODL entered in Figure 45.
Select the Event Active check box. This means that specified event EDQA- Quantity assignment to ODL is active for Process Cat. Z_EDQA. A timeout setting specifies the maximum time span between the process start and finish. The system automatically terminates the process if the time span exceeds the value mentioned in the timeout setting.
Use the default value SI Single for Process Flow and 00:00:00 for Delay. These values should be adjusted based on system performance and the approximate number of orders items undergoing EDQA process. Save the entry by clicking the save icon.
The last step in configuration is the assignment of process categories to activities.
Step 4. Configure Activity for the Event Trigger. To complete this step, follow SCM menu path Implementation Guide > Advanced Planning and Optimization > Global Available-to-Promise (Global ATP) > Event-Driven Quantity Assignment (EDQA) > Quantity Assignment to Order Due Lists (MAFL) > Define Process Category for Quantity Assignment to Order Due Lists (QODL). The system then displays the screen shown in Figure 46.
Double-click the Activity folder in Figure 46 and click the New Entries button.
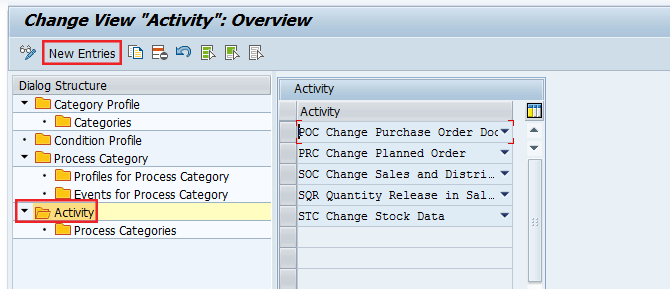
Figure 46
List of activities for quantity assignment
This action displays the screen in Figure 47. Now select the activities that are relevant for Global ATP quantity changes by using the drop-down list as shown in Figure 47. SAP SCM provides a list of activities that are relevant for positive change in Global ATP quantity (e.g., Change in stock data or Quantity release from Sales Order). Based on business scenarios, one or more activities can be relevant. Select an activity from the drop-down list as shown in Figure 47. SAP SCM provides a list of activities that are relevant for positive change in Global ATP quantity (e.g., Change in stock data or Quantity release from Sales Order). Based on business scenarios, one or more activities can be relevant. Select an activity from the drop-down list as shown in Figure 47.
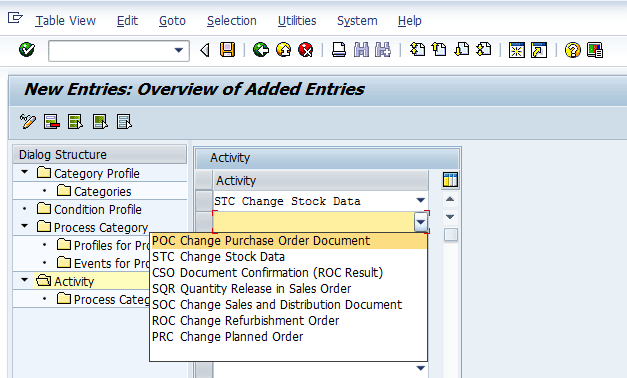
Figure 47
Select an activity for process category assignment
Highlight an activity as shown in Figure 48 and double-click the Process Categories folder as shown in Figure 49.

Figure 48
Double-click the Activity folder
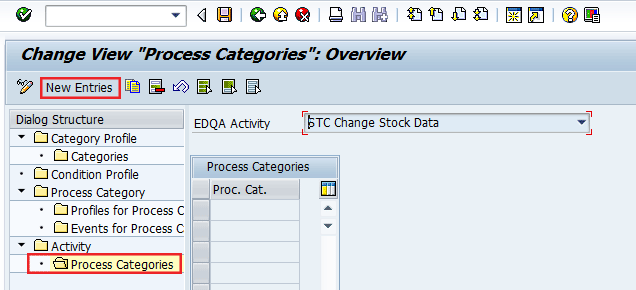
Figure 49
Assign a new process category to an activity
Click the New Entries button and enter the name of the Process Category you created earlier. The assignment of the process category to an activity ensures that events specified for the process category are triggered only when an activity that includes the respective process category is triggered in the ECC system. For example, if process category Z_EDQA is assigned only to Change Stock Data, EDQA will be triggered for plant US22 only when there is a change in stock data in the ECC system.
Save the entries by clicking the save icon highlighted in Figure 50.
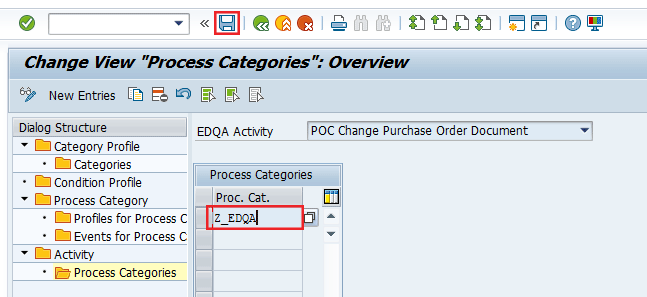
Figure 50
Process category assigned to an activity
Repeat the steps of the process category assignment for all the activities set up in Figure 47.
This completes the basic configuration required to use the obtain confirmation ODL. Orders that qualify for the filter criteria should now be visible in the ODL. These orders can now be confirmed automatically whenever an event is triggered that improves the Global ATP quantity.
This article contains general information only and Deloitte is not, by means of its publication, rendering accounting, business, financial, investment, legal, tax, or other professional advice or services. This article is not a substitute for such professional advice or services, nor should it be used as a basis for any decision or action that may affect your business. Before making any decision or taking any action that may affect your business, you should consult a qualified professional advisor.
Deloitte shall not be responsible for any loss sustained by any person who relies on this article.
As used in this document, "Deloitte" means Deloitte Consulting LLP, a subsidiary of Deloitte LLP. Please see
www.deloitte.com/us/about for a detailed description of the legal structure of Deloitte LLP and its subsidiaries. Certain services may not be available to attest clients under the rules and regulations of public accounting.
Copyright © 2017 Deloitte Development LLC. All rights reserved.
Shishir Kumar Dwivedi
Shishir Kumar Dwivedi (B.E., MBA) is an SAP APO consultant at Deloitte Consulting LLP. He has more than 10 years of supply chain and enterprise consulting experience. He specializes in consulting and service offerings in the SAP SCM and Order Fulfillment space.
You may contact the author at shidwivedi@deloitte.com.
If you have comments about this article or publication, or would like to submit an article idea, please contact the editor.


