Integrating data from third-party systems into BW is a complex and often frustrating process. The authors developed a custom delta load system at their company based on removing data through a systematic deletion process. Sample code is included.
Every BW team knows that implementing effective delta mechanisms is an important part of a smoothly running system. We created an alternative solution for a specific delta load at our company based on removing data via a systematic deletion process. While our solution is not applicable to all non-R/3 source applications, it is well suited for those instances where users are not allowed to change data after a certain period and the data volume loaded into BW is not very large.
First, you should know more about our system before we discuss our alternative delta load. One of the custom-built BW applications developed for our IT landscape uses an Oracle database as a source system. We bring the Oracle data into BW using flat files rather than using DB Connect because the data is further formulated using SQL functions at the time it is written into the files. The files in BW are used as a data source for an InfoPackage.
When loading data, the challenge our team faced was how to bring it in on a routine basis without performing full data loads. It was a complicated problem because in BW the data needs to be stored at a higher level of aggregation than in our source application. To make matters worse, the source application does not keep a history of changes.
Figure 1 displays star schema for the underlying InfoCube. It was developed to load data from the source application, which tracks shop floor activities in a plant, while the InfoCube stores production counts.

Figure 1
Star schema underlying the InfoCube developed to store manufacturing counts
To get a clearer picture of the problem, consider the following scenario involving purchasing documents. A custom source application stores data at the purchasing document item level, and allows changes to vendor or materials in the purchasing documents but does not keep a history of the changes. The BW application, however, is designed to store vendor and calendar month data at a summarized level, making it impossible to extract changes in data from the source system for delta loads.
Adding change history functionality in the source application demanded significant development in an implemented application, so it really was not an option. We decided to approach the problem from the BW side so it would only get the latest gross data from source application.
There were various ways to address the problem, but most have distinct drawbacks. Each time the data needed to be refreshed in BW, for example, a full-blown data load could have been initiated with all the work and costs that accompany a full load. Another solution would be to use an ODS as an intermediate data store. After overwriting only the modified records in the ODS, it could be used to refresh data in the InfoCube. That was not a solution for us because the data in the ODS had to be stored at the same detail level as the source application. Even though only a small portion of the source data changed, in our landscape it could still potentially consume a lot of disk space.
After exhausting many of the more conventional methods, we began considering alternatives. One solution involved reversing old values in the InfoCube after loading new values. This approach allowed the processing to be included as part of the update rules for the InfoCube, where both old records and the new records are accessible. Although it worked, it was not an elegant solution and required a number of steps to reverse values after the delta load was performed. This complexity pushed us to another alternative, which we decided to implement.
Delete Then Refresh
Our non-R/3 source application keeps data for the past several months, but only data within the last 10 weeks gets changed. Older data is maintained in the source application mainly for transactional reporting. We reasoned that for delta loads, we would bring over weekly data for the past 10 weeks and overlay it into the InfoCube. This approach preserves the data in the InfoCube that is older than 10 weeks, while refreshing data for the past 10 weeks.
Note
The number of weeks can be changed to meet your demands. In a sales application, for example, sales data for year 2003 is unlikely to change after the first quarter of 2004 has passed. Data for the years 2003 and 2004 would need to be overlaid until first quarter of 2004, but from then on it would be safe to overlay data for only year 2004.
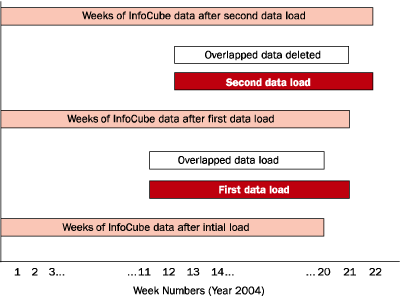
The following the scenario is presented in Figure 2, and represents how our approach works. An initial load is performed at end of week 20, and the first delta load commences at the end of week 21. The first delta load contains data ranging from week 12 through week 21. The delta processing requires that data for week 12 through week 20 first be deleted from the InfoCube, and then refreshed with the latest data for weeks 12 through 21. After the first delta load, the InfoCube contains data for week 1 through week 21. The delta load process is repeated on a weekly basis.

Figure 2
Delta load refreshing the past 10 weeks of data while retaining older data
The key to accomplishing these weekly delta loads was to first delete the data from the InfoCube for the past 10 weeks. To build an effective delta mechanism, this deletion needed to be automated as part of the new data load process. Our team had to learn how to delete the data automatically and where to implement this delete logic in order to successfully deploy our alternative delta load.
Automating the Deletion
This approach is built around a standard Time dimension. In our BW application, we have two characteristics, Calendar Month and Calendar Week as part of the Time dimension. The deletion criteria for the data subset in the InfoCube are based on a range for each of the two time characteristics. Because we receive separate flat files for each plant, we also included Plant characteristics of plant dimension as part of the deletion criteria.
To delete data from the InfoCube, we first call the SAP-supplied function module RSDRD_SEL_DELETION, which supplies the appropriate parameters. Here, we populate the import parameter I_DATATARGET with the name of the target InfoCube and import parameter I_THX_SEL with all deletion criteria.
Tip!
I_THX_SEL is an internal table, and the number of rows that must be populated depends on the deletion criteria. The name of the InfoObject and values of each selection option must to be filled in each row of this parameter.
To see how BW passes parameters when calling the RSDRD_SEL_DELETION function module, go through the following steps:
- Go to Administrator Workbench: Modeling.
- Select Modeling and then InfoProvider from the left pane.
- Expand your InfoArea in the right pane.
- Right-click on your InfoCube, and select Manage to open the Manage Data Target screen.
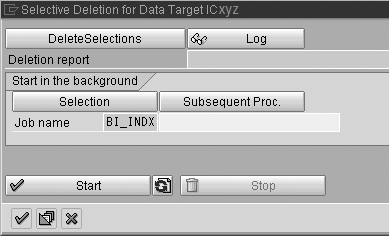
- Select the Contents tab, and click on Selective Deletion, which opens Selective Deletion for Data Target ICxyz. (Figure 3).
- Click on DeleteSelections. This opens the Delete selected entries from the data target ICxyz screen.
- Enter your deletion criteria here, and check the Display generated report check box under the Options group. Then click on the execute icon.

Figure 3
Selective Deletion for Data Target ICxyz screen
This displays a small amount of ABAP code, which BW executes to delete data from the InfoCube. The ABAP code does not describe how to pass the deletion criteria, however, because it is done internally.
Integrating the Delete Logic
Integrating the deletion process requires adding custom logic as part of the new data load. All of the custom code we added to automate the process is available to download by clicking this link.
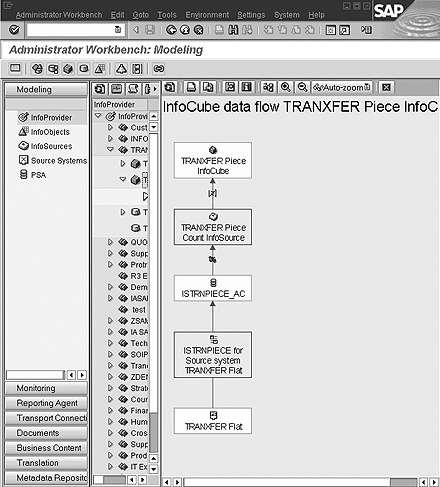
Figure 4 shows the data flow for updating the InfoCube. When creating an InfoPackage for the InfoCube, we selected the PSA and then Data Targets (Package by Package) option in Processing tab. The start routines of the update rules are executed after performing all the transfer rules and just before updating data into the InfoCube, so we decided to implement the deletion logic in the start routine.

Figure 4
How data is updated in the InfoCube
Note that we use presorted flat files of ascending order for calendar month and calendar week, which determine the deletion criteria from the first row of the first data package. The advantage of this arrangement is that the program does not need to loop through all records. It also provides the flexibility to change the period of the data to be included in the flat file, and you can use the same InfoPackage for a full load as well as delta load.
Data deletion happens after successfully performing the data cleansing and transformation. The start routine is executed for each data package, which means the code surrounding the call to the function module must be added so it is executed only for the first data package of each data request. Once the deletion process is complete, the data is updated in the InfoCube.
Adrian Gawdiak
Adrian Gawdiak is a manager for the Global Data Warehouse Bath and Kitchen team at American Standard Companies, Inc. Adrian has extensive experience in the development of manufacturing applications and database administration.
You may contact the author at gawdiaka@amstd.com.
If you have comments about this article or publication, or would like to submit an article idea, please contact the editor.
Nilesh Mehta
Nilesh Mehta is a senior developer/analyst with the Global Data Warehouse, Bath and Kitchen team at American Standard Companies, Inc. Nilesh has over 10 years of experience with application development in the field of IT.
You may contact the author at mehtan@amstd.com.
If you have comments about this article or publication, or would like to submit an article idea, please contact the editor.


