Learn the process flow of how product allocation can be used in SAP Advanced Planning and Optimization (SAP APO) Global available-to-promise (Global ATP) to meet customer requirements by managing the supply of scarce products. The system can perform availability checks in conjunction with product allocation checks.
Key Concept
Availability checks, also known as available-to-promise (ATP), are used to check if the requested product can be delivered to the customer in the requested quantity and within the requested time. Product allocation is one of the availability check methods provided by SAP Advanced Planning and Optimization (SAP APO). Product allocation gives businesses the flexibility to manage the supply of scarce products so that you avoid allocating all the supply to one customer or region. Instead, you can do an allocation so that each customer or region receives an allocated amount.
SAP Advanced Planning and Optimization (SAP APO) provides multiple methods that can be used to carry out an available-to-promise (ATP) check. Each of the methods is used per the particular business requirement. An availability check using product allocation provides the flexibility to allocate products using any criteria. The availability check is only successful if there is a product allocation for this transaction in the relevant period and this product allocation has not yet been consumed by other requirements. Product allocation is used when is there is any constraint in the business process—for example, a scarcity in the availability of critical components or a bottleneck in the production line.
This article includes the following sections:
- An overview of product availability check – product allocation
- A business scenario
- Configuration steps in Global ATP to configure an ATP check
- Configuration steps specific to product allocation
- Configuration objects needed in Demand Planning (DP) to use product allocation
- Linking a DP object with Global ATP
- ATP simulation in SAP APO to interpret single-level product allocation results
- Configuration to create a multi-level product allocation procedure
- ATP simulation in SAP APO to interpret multi-level product allocation results and interpret differences with single level
An Overview of Product Availability Check – Product Allocation
Figure 1 shows the classification of availability check methods in SAP APO. In this article, I focus on product allocation.

Figure 1
Availability check methods in SAP APO
A Business Scenario
Consider an example of a simple supply chain network of a manufacturer consisting of a single plant and sales organization. Figure 2 diagrams the supply chain network for this scenario. PLANT1 manufactures two products, FG01 and FG02, both of which are very scarce and therefore in large demand. CUST1 and CUST2 are two large customers being served by the manufacturer, and they purchase both the products being produced. Since there is a bottleneck on the amount of products of each type that can be produced, you need to carry out some sort of product allocation to ensure that both the customers get some fixed allocated quantity of each product. Without product allocation, only one of the customers would exhaust the entire inventory, thereby making the other customer get zero quantity. For example, since there is constraint on the quantity of products that can be manufactured, the customers who order first (e.g., CUST1) have the entire inventory of product available to them and thus can order in large quantity leading to a stock out. This outcome is not desirable.

Figure 2
A business scenario
Configuration Steps in Global ATP to Configure an ATP Check
To use product allocation in SAP APO, you need to first configure objects related to an ATP check. This process requires you to complete five steps as shown in Figure 3.

Figure 3
Steps for configuration of an ATP check in SAP APO
Step 1. Create a Business Event
Business Events are defined in the SAP ERP Central Component (ECC) system and are used in SAP APO. Business Events are used to identify the type of transactions that initiate the ATP check, such as sales orders and production orders. For discussion in this article, I created a new Business Event in SAP APO. To create a new Business Event in SAP APO, execute transaction code SPRO and follow menu path Advanced Planning and Optimization > Global Available-to-Promise (Global ATP) > General Settings. Expand the General Settings node and click Maintain Business Event.
In the screen that appears (Figure 4), click the New Entries button.

Figure 4
New entries for a Business Event
In the next screen (Figure 5), enter the name of the Business Event (e.g., 04) and a text description (e.g., Test Rule). Click the save icon.
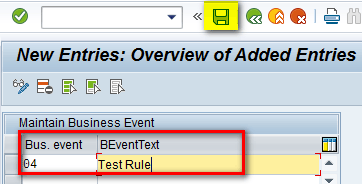
Figure 5
Maintain the Business Event
Step 2. Create a Check Mode
Check Mode in SAP APO corresponds to a requirement type with a requirement class in ECC. It is transferred from ECC via the Core Interface (CIF). For discussion in this article, I created a new Check Mode in SAP APO. To create a Check Mode, execute transaction code SPRO and follow menu path Advanced Planning and Optimization > Global Available-to-Promise (Global ATP) > General Settings > General Settings. Expand the General Settings node and click Maintain Check Mode.
In the next screen, click the New Entries button as shown in Figure 6.

Figure 6
New entries for a Check Mode
In the next screen (Figure 7), enter the name of the Check Mode (e.g., Y50). In the Assignment Mode field, select Assign customer requirements to planning with assembly from the drop-down list of options. In the Check Mode Text field enter Warehouse consumption, and in the Production Type field, select Standard from the drop-down list of options. After you make these selections, click the save icon.
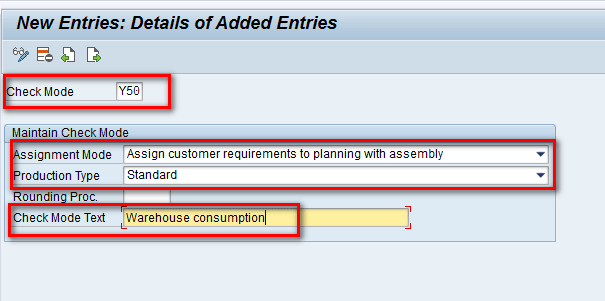
Figure 7
Maintain the Check Mode
Step 3. Define Check Instructions
Check Instructions are used to determine the type and scope of an availability check. Business Event and Check Mode together determine the Check Instructions to be used. To define Check Instructions, execute transaction code SPRO and follow menu path Advanced Planning and Optimization > Global Available-to-Promise (Global ATP) > General Settings. Expand the General Settings node and click Maintain Check Instructions.
In the next screen (Figure 8), click the New Entries button.

Figure 8
New entries for Check Instructions
This action opens the screen shown in Figure 9. Enter data in the Check Mode and Business Event fields (e.g., Y50 and 04, respectively). The Check Mode and Business Event were created in steps 1 and 2. In the Product Alloc. field, select First step from the drop-down list of options and click the save icon. In the Forecast field, do not change the default No Check option.
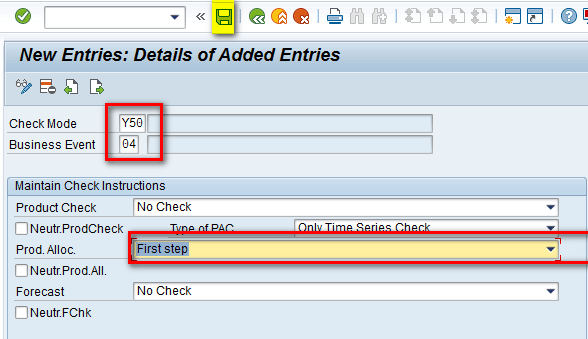
Figure 9
Maintain Check Instructions
Step 4. Define an ATP Group
An ATP Group is used to define grouping at the product level. An ATP Group corresponds to a checking group in ECC. To define a new ATP Group in SAP APO, execute transaction code SPRO and follow menu path Advanced Planning and Optimization > Global Available-to-Promise (Global ATP) > Product Availability Check. Expand the Product Availability Check node and click Maintain ATP Group.
In the screen that opens, click the New Entries button (not shown here, but it is shown in steps 1, 2, and 3). In the next screen (Figure 10) enter a name in the ATP Group field (e.g., T1). In the Maintain ATP Group section, populate the fields and select the options as shown in Figure 10. Then click the save icon.

Figure 10
Maintain the ATP Group
Step 5. Define a New Check Control
The Business Event defined in step 1 and the ATP Group defined in step 4 together determine the Check Control. To define a new Check Control in SAP APO, execute transaction code SPRO and follow menu path Advanced Planning and Optimization > Global Available-to-Promise (Global ATP) > Product Availability Check. Expand the Product Availability Check node and click Maintain Check Control.
In the next screen (not shown), click the New Entries button, as shown in steps 1, 2, and 3. This action opens the screen shown in Figure 11. Enter values in the ATP Group and Business Event fields (e.g., T1 and 04, respectively). In the ATP Check Control: General section, select the three check boxes at the top of this section (No subloc.check, No Version Chk, and No Char. Check). In the Consider CH, Rcpts fr. past, and Consider Pegging fields, select No Checking Horizon, Consider past receipts, and Neither manually nor Automatically Fixed Pegging, respectively, from the drop-down menu options shown in Figure 11 and then click the save icon.
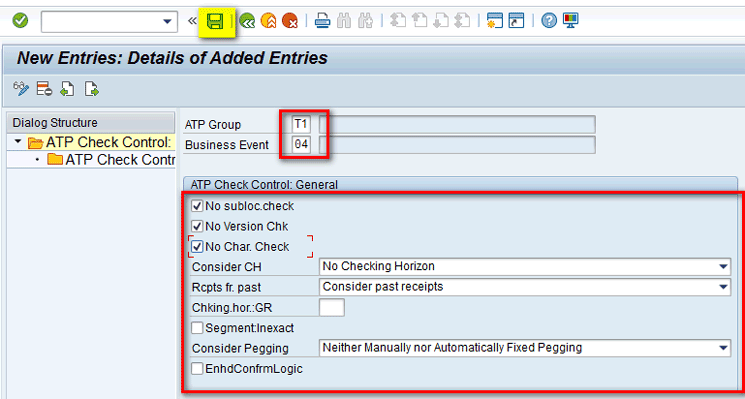
Figure 11
Define a Check Control
Configuration Steps Specific to Product Allocation
To use product allocation in SAP APO, you need to define multiple objects sequentially as defined in the four steps in this section as shown in Figure 12.

Figure 12
Configuration steps for product allocation in SAP APO
To define the objects and configurations, execute transaction code SPRO and follow menu path Advanced Planning and Optimization > Global Available-to-Promise (Global ATP) > Product Allocation. For each of the steps that you need to complete for product allocation, you expand the Product Allocation node and click one of the subnodes as shown in Figure 13.

Figure 13
Configuration steps for product allocation
Step 1. Maintain the Field Catalog
The Field Catalog is used to maintain the fields that can be used during the availability check. This is generally pre-defined and contains standard SAP characteristics that can be used during an ATP check. To view the Field catalog fields that you need to use in this article, click Maintain Field Catalog (Figure 13). This action opens the screen shown in Figure 14 in which you can see important fields (the fields used in this article have been highlighted).

Figure 14
The Field Catalog
Step 2. Define a New Product Allocation Object
The Product Allocation Object is used to define the bottleneck in the order development process. To define a new Product Allocation Object, click Maintain Product Allocation Object (Figure 13), and in the next screen, click the New Entries button as shown in Figure 15.

Figure 15
New entries for the Product Allocation Object
This action opens the screen shown in Figure 16. In the field under the Object column, enter the name of the object (e.g., ZPAO). In the Object Description field, enter a text description (e.g., Product Allocation Object). Click the save icon to save your data.

Figure 16
Maintain the Product Allocation Object
Step 3. Product Allocation Group
The Product Allocation Group is used to define a set of characteristics that can be used for product allocation quantities. To define a new Product Allocation Group, click Maintain Product Allocation Group (Figure 13). In the next screen, click the New Entries button as shown in Figure 17.

Figure 17
New entries for the Product Allocation Group
In the Prod. Alloc. Grp (product allocation group) field of the next screen, enter a name (e.g., ZPAG). In the Comm.structure field, enter MCVBEP, and in the Check Date field, enter MBDAT (material availability date). In the Time bkts profile (time buckets profile) field select Month from the drop-down list of options and then click Characteristics as shown in Figure 18.
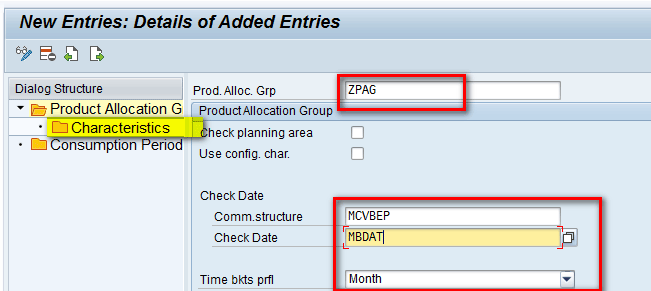
Figure 18
Enter details for the Product Allocation Group
In the next screen (Figure 19), click the New Entries button and add rows for characteristics KUNNR, MATNR, and VKORG. Click the Consumption Period folder as shown in Figure 19. (Row 1 [KONOB/Product Allocation Object] is automatically populated when you click the New Entries button and is always the first row.)

Figure 19
Add characteristics to the Product Allocation Group
In the next screen (Figure 20), define the settings as shown and click the save icon. (The Fwd Consumption period here is 3 months.)

Figure 20
Maintain the Product Allocation Group
Step 4. Define a Product Allocation Procedure
A Product Allocation Procedure can be formed containing multiple steps of the Product Allocation Group. To define a new Product Allocation Procedure, select Maintain Product Allocation Procedure (Figure 13). In the next screen (Figure 21), enter a name in the field under Prod. Alloc. (Product Allocation) Procedure (e.g., ZPAP). In the field under Procedure name, enter a text description. Select the Cumulative check box and then click the Step Sequence folder.

Figure 21
Maintain the Product Allocation Procedure
In the next screen (Figure 22), enter a name of the step in the field under Step name (e.g., First Step). Under Product Allocation Group enter a name (e.g., ZPAG), and under Wild., enter a symbol (e.g., #). Now click the Control folder as shown in Figure 22.

Figure 22
Product Allocation Procedure – step sequence
This action opens the Change View “Control”: Overscreen screen (Figure 23). Under Valid to enter a valid to date (e.g., 03/31/2016), under Object, enter a name (e.g., ZPAO), and select the Prod… (Product Indicator) check box. Under Factor enter a value (e.g., 1,000) and then click the save icon to save your entries.

Figure 23
Maintain the Product Allocation Procedure
Configuration Objects Needed in DP to Use Product Allocation
To use product allocation in SAP APO, you need to set up basic master data objects in DP and configure them to be used in product allocation. This process requires you to complete four steps as shown in Figure 24.

Figure 24
Configuration steps in DP to use product allocation
Note
I assume readers know how master data objects are set up in SAP APO DP. For discussion in this article, I show the screenprints of the DP-specific master data objects created.
Step 1. Create a Master Planning Object Structure (MPOS)
An MPOS is used to define characteristics that can be used for planning. To create an MPOS (e.g., ZATP), execute transaction code /SAPAPO/MSDP_ADMIN. This action opens the screen shown in Figure 25. An MPOS contains four characteristics. These four characteristics (highlighted in Figure 25) are used in product allocation and are the same four objects that were defined in the product allocation group in step 3.
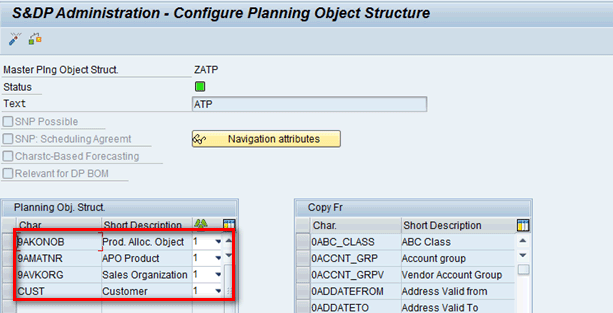
Figure 25
Create an MPOS
Step 2. Create a Planning Area
A Planning Area defines the area in which most of the planning activities take place. It groups both characteristics and key figures under a single domain. To create a Planning Area, execute transaction code /SAPAPO/MSDP_ADMIN. This action opens a screen that contains two key figures: Future5 and Future6 (Figure 26). These two key figures are used to store Incoming Orders Quantity and Product Allocated Quantity, respectively.

Figure 26
The Planning Area
Step 3. Create a Planning Book
A Planning Book describes the layout of the interactive planning screen and is one of the important tools used by planners. To create a Planning Book, execute transaction code /SAPAPO/SDP8B. I have created a Planning Book (e.g., ZATP) based on the Planning Area (e.g., ZATP). This Planning Book contains the key figures Future5 and Future6 as shown in Figure 27.
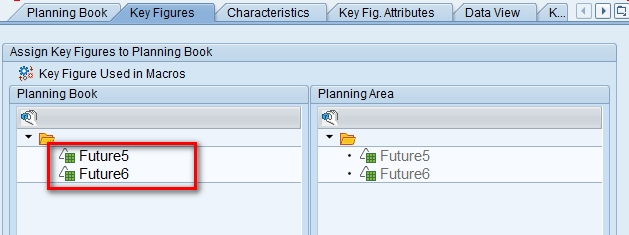
Figure 27
A Planning Book
Step 4. Maintain Product Allocation in the Planning Book
To maintain the product allocation quantity in the Planning Book, execute transaction /SAPAPO/SDP94. This action opens a screen in which you maintain product allocation quantities for different products and customers in different time periods (for example, between December 2015 and March 2016) as shown in Figure 28.

Figure 28
Product allocation quantities in the Planning Book
Link a DP Object with Global ATP
In the last two sections (“Configuration Objects Needed in Demand Planning to Use Product Allocation” and “Configuration Steps Specific to Product Allocation”), I created objects specific to Global ATP and DP to use them in product allocation. In this section, I explain how to define the linkages between them. This process requires you to complete four steps as shown in Figure 29.

Figure 29
Steps for linkage of DP with product allocation
Step 1. Connect the Planning Area with the Product Allocation Group
To define the connection between the Planning Area and Product Allocation Group, execute transaction code SPRO and follow menu path Advanced Planning and Optimization > Global Available-to-Promise (Global ATP) > Product Allocation > Maintain Connection to Planning Area. In the screen that the system displays (Figure 30), enter names under Product Allocation Group (e.g., ZPAG), Planning Area (e.g., ZATP), Plng (Planning) Version (e.g., 000), and Time buckets (e.g., M for months). After you populate these fields, click the Characteristics folder.

Figure 30
The Planning Area with the Product Allocation Group
In the next screen, assign the characteristics to InfoObjects in the Planning Area and then click the Key Figure folder as shown in Figure 31.

Figure 31
Planning Area with Product Allocation Group – characteristic assignment
In the next screen, assign key figures Future5 (ZKUT5) and Future6 (ZKFUT6) to the key figure from the Product Allocation Group. Click the save icon as shown in Figure 32.

Figure 32
Maintain the Planning Area with the Product Allocation Group
Step 2. Transfer the Characteristic Value Combinations (CVCs) from the Planning Area to the Product Allocation Group
To view the CVCs present in the MPOS, execute transaction code /SAPAPO/MC62. This action opens the screen shown in which you enter the name of the MPOS (e.g., ZATP) in the Master Planning Object Structure field and then click the Display Characteristic Combinations button (Figure 33).
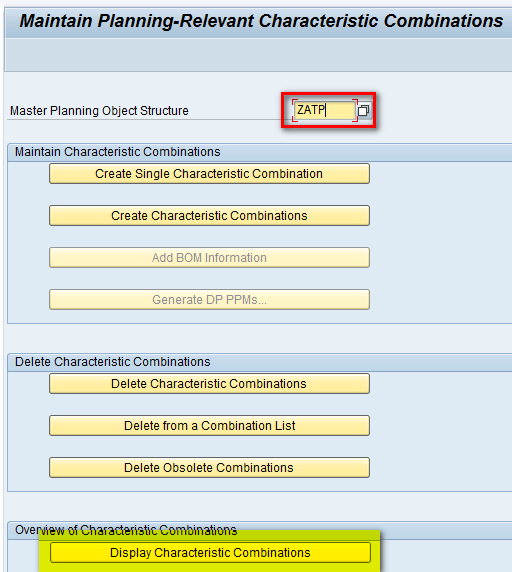
Figure 33
Display the CVCs
In the next screen (Figure 34), you see that four characteristic combinations are present.
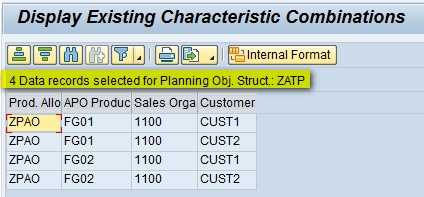
Figure 34
List of CVCs
To transfer these combinations to the Product Allocation Group, execute transaction code /SAPAPO/ATPQ_PAREA_K. In the screen that the system displays (Figure 35), enter names in the Planning Area (e.g., ZATP) and Product Alloc. Grp fields (e.g., ZPAG). In the Char. Combination section, enter parameters as shown in Figure 35 and then click the execute icon. After you execute the program, a message appears on the bottom of the screen showing that four combinations were adopted.

Figure 35
Transfer the CVCs from the Planning Area to the Product Allocation Group
Step 3. Transfer Product Allocation Quantities from the Planning Area to the Product Allocation Group
To transfer the quantities defined in the Planning Book in Figure 28 to the Product Allocation Group, execute transaction /SAPAPO/ATPQ_PAREA_R. In the Planning Area, Planning Version, and Prod. Alloc. Grp fields in the screen that appears (Figure 36), enter ZATP, 000, and ZPAG, respectively. In the Period section make the time horizon from 12/01/2015 to 03/31/2016 and then click the execute icon.
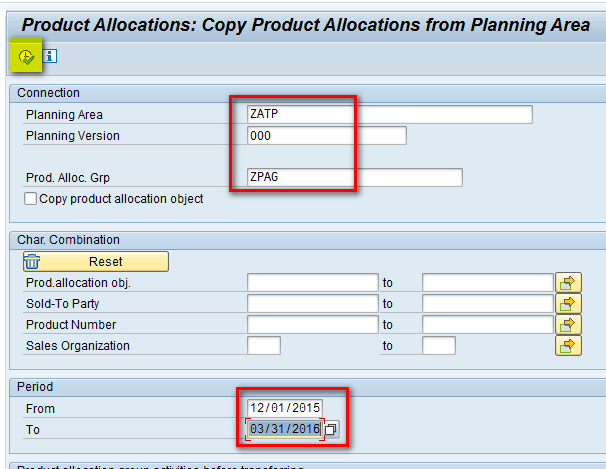
Figure 36
Product allocation quantities transferred to the Product Allocation Group
Step 4. Assign an ATP Parameter to the Product Master
To complete this step, execute transaction code /SAPAPO/MAT1. In the screen that the system displays, select the Product radio button and enter the name of product (e.g., FG-01). In the View section, select the Location radio button and select the name of the plant from the options provided (e.g., PLANT1). Click the Change button as shown in Figure 37.

Figure 37
The Product Master
In the next screen under the ATP tab, enter a name in the Loc-Dep. Proc. field (e.g., ZPAP). Populate the Check Mode and ATP Group fields as shown in Figure 38 and then click the save icon.
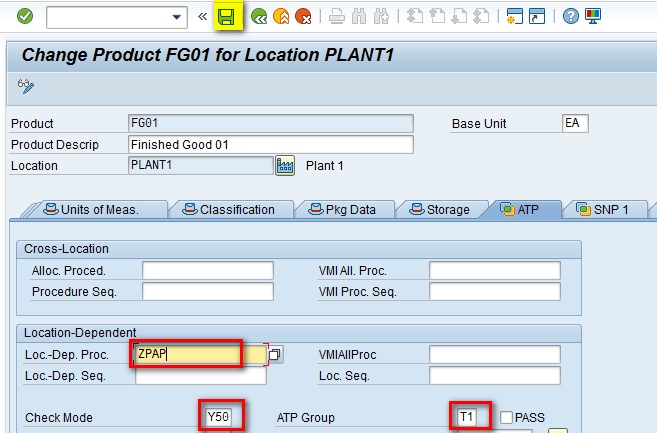
Figure 38
Product master - saved
Now follow the instructions in step 4 again to assign the parameters in the ATP tab for product FG02 in PLANT1.
ATP Simulation in SAP APO to Interpret Single-Level Product Allocation Results
After configuration of the above steps, you can see the product allocation for different product or customer combinations. To view the report, execute transaction code /SAPAPO/AC42. In the screen that opens, enter the parameters for the different sections as highlighted in red in Figure 39. Click the Product Allocation Time series button.

Figure 39
The product allocation report
In the next screen (Figure 40), you can see that quantity in each month from December 2015 to March 2016 is 50, which is the same quantity that was assigned in the Planning Book to product FG01 and customer CUST1 in Figure 28.
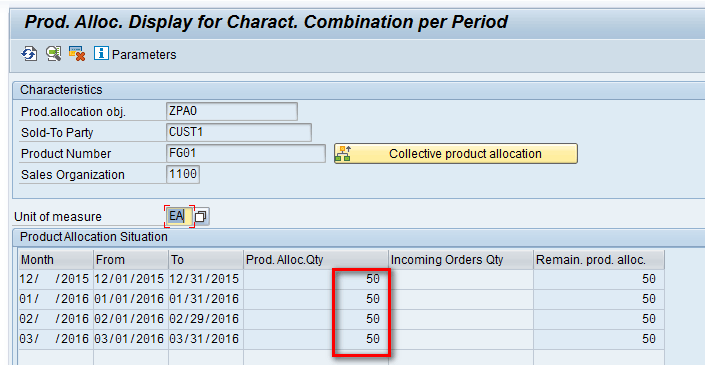
Figure 40
The product allocation report for FG01 and CUST1
Similarly, if you repeat the above step for a different product and customer (e.g. FG02 and customer – CUST2), then the report shows a quantity of 10 in each month (Figure 41). This quantity is also the same as the quantity in the Planning Book in Figure 28.

Figure 41
The product allocation report for FG02 and CUST2
To carry out ATP simulation, execute transaction code /SAPAPO/AC04. In the screen that appears (Figure 42), enter parameters in the following fields:
- Product: FG01
- Location: PLANT1
- Check Mode: Y50
- Business Event: 04
- Date: 12/10/2015 (Select the Material Availability Date radio button)
- Requirement Quantity: 200 (In the Unit field, enter EA for each)

Figure 42
ATP simulation parameters for FG01
Now click the execute icon.
In the pop-up screen, enter parameters for the characteristics, as shown in Figure 43, and click the execute icon.

Figure 43
Characteristic parameters for ATP simulation for FG01
In the next screen (Figure 44), you can see that entire quantity of 200 is confirmed and the maximum allocation in each month is 50, which is what was defined in the Planning Book in Figure 28.
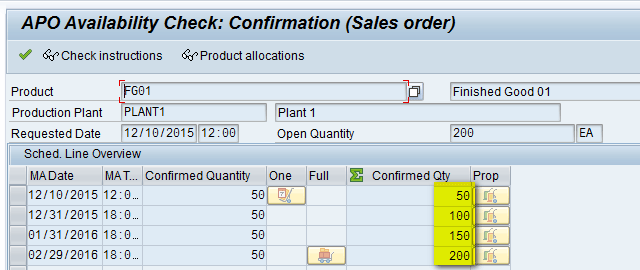
Figure 44
ATP simulation result for FG01 and CUST1
Similarly, repeat the above step for product FG02 and customer CUST1, as shown in Figure 45, and then click the execute icon.
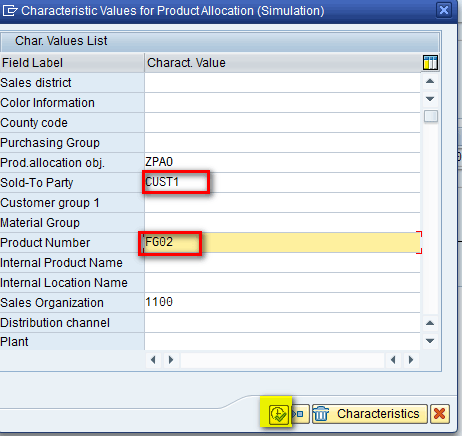
Figure 45
Characteristic parameters for ATP simulation for FG02
In the next screen (Figure 46) you can see that even though the requirement was for a quantity of 200, only a quantity of 80 (20 in each month) was allocated to CUST1 for FG02 as this was the maximum allocation defined for this combination in Figure 28.
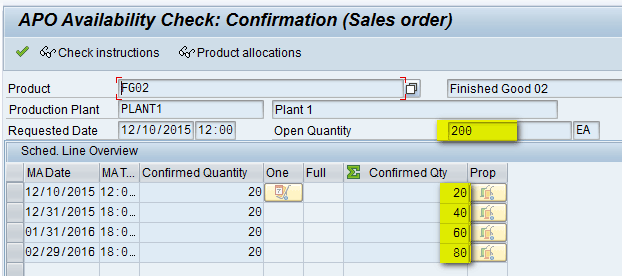
Figure 46
ATP simulation result for FG02 and CUST1
This shows how product allocation can be used to restrict the quantities being allocated to different customers as per allocation criteria.
Configuration to Create a Multi-level Product Allocation Procedure
In the previous section (“ATP Simulation in SAP APO to Interpret Single-Level Product Allocation Results”), I created one Product Allocation Group and assigned it to a Product Allocation Procedure that was used to carry out an ATP simulation and availability check. However, you also can create more than one Product Allocation Group and assign them to the same Product Allocation Procedure. During an ATP check, all the steps in the product allocation procedure are evaluated sequentially, and the final result is calculated by the logical AND offered by each of the product allocation groups. This is explained later in the article. To use a Multilevel Product Allocation Procedure, you need to define few more of the same objects using the same steps as defined in sections on “Configuration Steps Specific to Product Allocation,” “Configuration Objects Needed in DP to Use Product Allocation,” and “Link a DP Object with GATP.”
Product Allocation Object
A new Product Allocation Object ZPAO1 has been created as shown in Figure 47.

Figure 47
Create a Product Allocation Object
Product Allocation Group
A new Product Allocation Group (ZPAG1) has been created containing the characteristics Product Number and Plant as shown in Figure 48.

Figure 48
A Product Allocation Group
Note
Product Allocation Object KONOB is shown by default and is always the first entry in any Product Allocation Group.
Product Allocation Procedure
The same Product Allocation Procedure that was defined in the above section (ZPAP) is used. The second step is defined in the ZPAP Product Allocation Procedure containing the new Product Allocation Group (ZPAG1) as shown in Figure 49.

Figure 49
The new Product Allocation Procedure
Also the new Product Allocation Object ZPAO1 is assigned to the second step (i.e., the new Product Allocation Group) as shown in Figure 50.

Figure 50
Maintain the Product Allocation Procedure
MPOS
A new MPOS is created (e.g., ZATP1) containing characteristics Product Allocation Object, APO Location, and Product as shown in Figure 51.
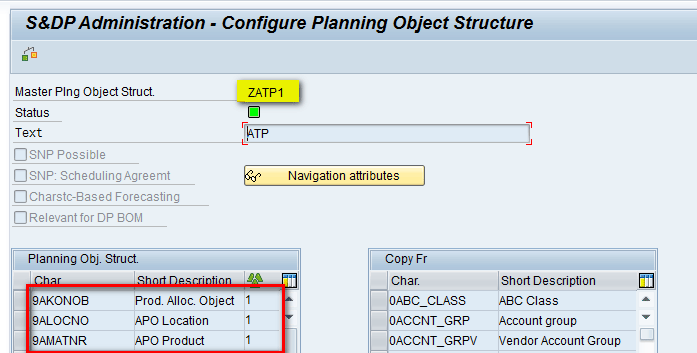
Figure 51
Create a new MPOS
Planning Area
A new Planning Area is created containing two key figures: Future3 and Future4 as shown in Figure 52.
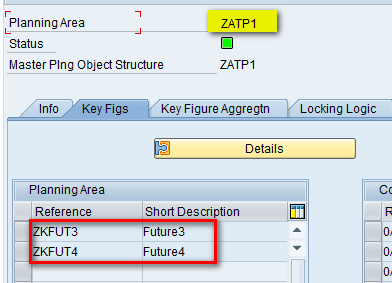
Figure 52
The Planning Area
Maintain Product Allocation in the Planning Book
To maintain the product allocation quantity in the Planning Book, execute transaction code /SAPAPO/SDP94. In the screen that the system displays (Figure 53), you maintain product allocation quantities for different products in different time periods between December 2015 and March 2016.
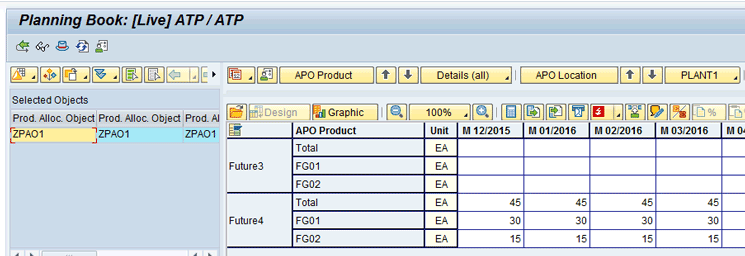
Figure 53
Product allocation quantities in the Planning Book
Connect the Planning Area with the Product Allocation Group
Follow the same steps as defined in the above section to connect the Planning Area to the Product Allocation Group and characteristics and key figures are assigned as shown in Figures 54 and 55.

Figure 54
Characteristic assignments between the Product Allocation Group and the Planning Area

Figure 55
Key figure assignments between the Product Allocation Group and the Planning Area
Transfer CVCs from the Planning Area to the Product Allocation Group
To view the CVCs present in Planning Area ZATP1, execute transaction code /SAPAPO/MC62. In the screen that appears (Figure 56), you can see a list of the CVCs.
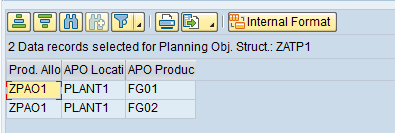
Figure 56
CVCs in the new MPOS
These two CVCs are transferred to Product Allocation Group ZPAG1 as shown in Figure 57.

Figure 57
CVC transfer from the Planning Area to the Product Allocation Group
Transfer Product Allocation Quantities from the Planning Area to the Product Allocation Group
Product allocation quantities are transferred to Product Allocation Group ZPAG1 as shown in Figure 58.

Figure 58
Product allocation quantities transfer from the Planning Area to the Product Allocation Group
ATP Simulation in SAP APO to Interpret Multi-level Product Allocation Results
After completing these configuration steps, you can see the product allocation for different product or customer combinations. To carry out an ATP simulation, execute transaction code /SAPAPO/AC04. In the screen that appears (Figure 59), enter parameters in the following fields:
- Product: FG01
- Location: PLANT1
- Check Mode: Y50
- Business Event: 04
- Date: 12/12/2015 (Select the Material Availability Date radio button)
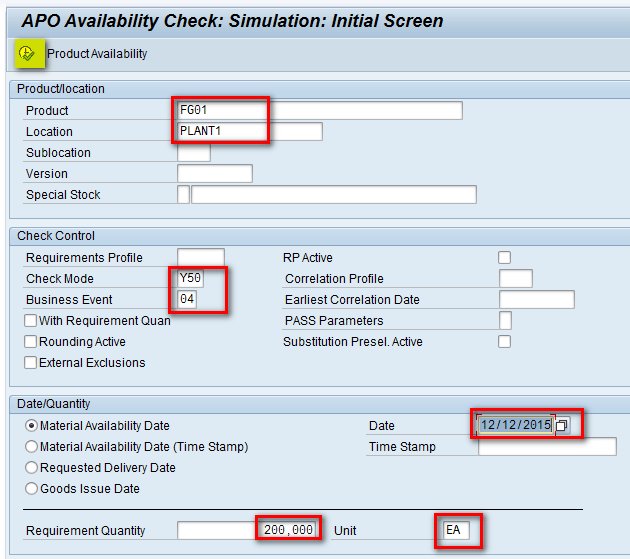
Figure 59
ATP simulation for product FG01
Requirement Quantity: 200 (Enter EA in the Unit field for each.)
Now click the execute icon.
In the pop-up screen, enter the parameters highlighted in the red boxes in Figure 60 and click the execute icon.
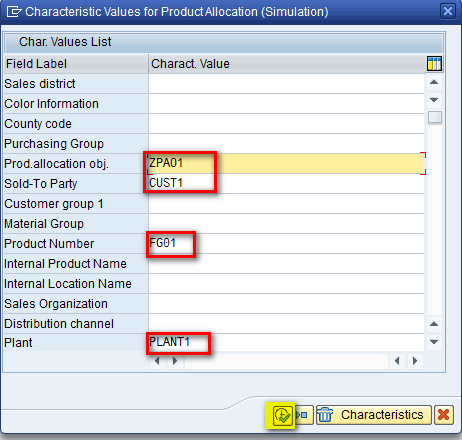
Figure 60
Characteristic assignments for products FG01 and CUST1
In the next screen, you can see result of the ATP simulation. For a requirement of 200 of FG01 for CUST1, only a total 120 is confirmed with 30 in each period. This data can be interpreted by comparing the quantities allocated to FG01 and CUST1 in Figure 28 (this quantity is 50) and to FG01 in Figure 53 (this quantity is 30). Since you defined two steps in the Product Allocation Procedure, the first step resulted in an ATP check of 50, the second step resulted in an ATP check of 30, and the final result is a logical AND of both the steps (i.e., 30 in each month) that is shown in Figure 61.
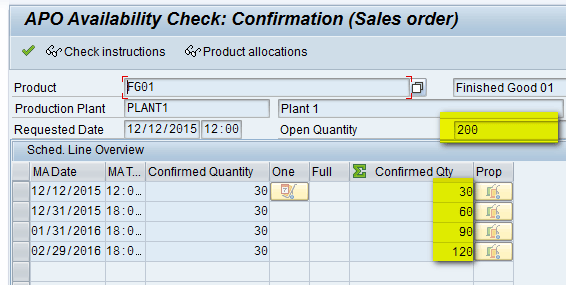
Figure 61
ATP simulation result for FG01 and CUST1
Now let’s try to see the behavior of ATP simulation on product FG02 on both customers. In the same screen as in transaction code /SAPAPO/AC04, enter parameters as shown in Figure 62 and click the execute icon.
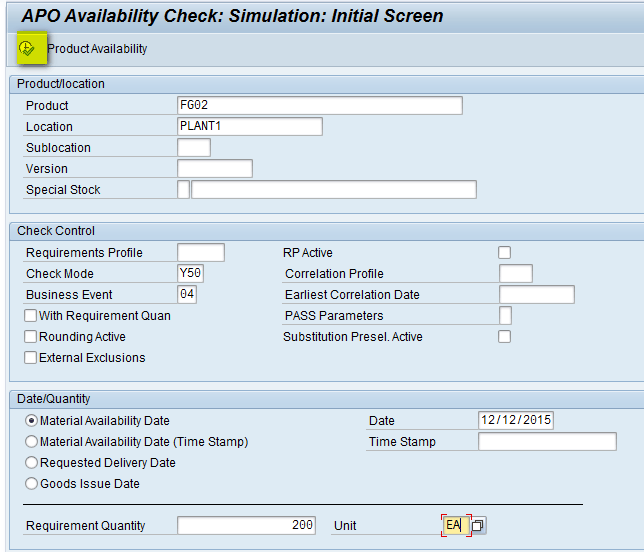
Figure 62
ATP simulation for product FG02
In the next pop-up screen, enter the parameters for Customer CUST1 and product FG02 and then click the execute icon as shown in Figure 63.

Figure 63
Characteristic assignments for product FG02 and CUST1
In the next screen, you can see result of the ATP simulation. For a requirement of 200 of FG02 for CUST1, only a total 60 is confirmed with 15 in each period. The reason is the same as explained in the above section. The quantity allocated to FG02 and CUST1 in Figure 28 is 20 and to FG02 in Figure 53 is 15. Since you defined two steps in the Product Allocation Procedure, the first step resulted in an ATP check of 20, the second step resulted in an ATP check of 15, and the final result is a logical AND of both the steps (i.e., 15 in each month) as shown in Figure 64.

Figure 64
ATP simulation result for FG02 and CUST1
Similarly, run an ATP simulation for product FG02 for Customer CUST2 as shown in Figure 65.

Figure 65
Characteristic assignments for product FG02 and CUST2
In the next screen (Figure 66), you can see result of the ATP simulation. It also follows the same explanation as above. The quantity allocated to FG02 and CUST2 in Figure 28 is 10, and the quantity allocate to FG02 in Figure 53 is 15. Since you defined two steps in the Product Allocation Procedure, the first step resulted in an ATP check of 10, the second step resulted in an ATP check of 15, and the final result is a logical AND of both the steps (i.e., 10 in each month) as shown in Figure 66.

Figure 66
ATP simulation result for FG02 and CUST2
While working with product allocations, sometimes there is inconsistency between the Live cache and a database. To resolve this issue, you can access standard reports via menu path APO > Global ATP > Environment > Product Allocations. These reports are highlighted in yellow in Figure 67.
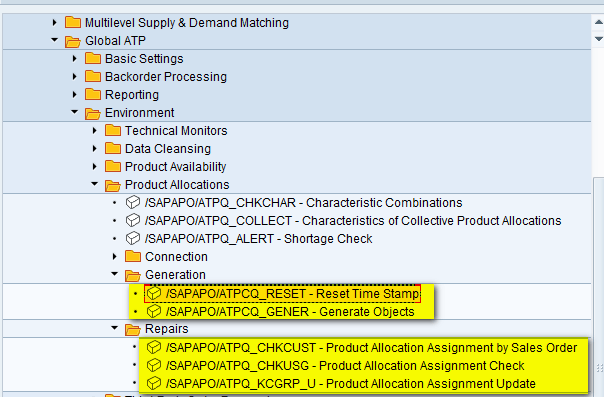
Figure 67
Product allocation consistency check reports
When you do the configuration for the first time in the system, saving the changes requires a customizing transport request that can be used to move the changes from the development to the production system. Each time any change is made it requires a transport request that is used to collect the changes and move from the source to the destination system.
Alok Jaiswal
Alok Jaiswal is a consultant at Infosys Limited.
He has more than six years of experience in IT and ERP consulting and in supply chain management (SCM). He has worked on various SAP Advanced Planning and Optimization (APO) modules such as Demand Planning (DP), Production Planning/Detailed Scheduling (PP/DS), Supply Network Planning (SNP), and Core Interface (CIF) at various stages of the project life cycle.
He is also an APICS-certified CSCP (Certified Supply Chain Planner) consultant, with exposure in functional areas of demand planning, lean management, value stream mapping, and inventory management across manufacturing, healthcare, and textile sectors.
If you have comments about this article or publication, or would like to submit an article idea, please contact the editor.


