The data back-up component of Advanced Planning and Optimization 4.1 supports a full extraction of data from the planning area, which is taxing on your storage space. See a step-by-step procedure to develop a delta-capable DataSource from the planning area. It allows you to extract only new or changed data, which takes up less storage space.
Key Concept
In the extraction process, a delta-capable DataSource signifies that each extraction by this DataSource fetches only new or changed records from the source system to a target system. It uses an operational data store object in the data staging area before loading the data to an InfoCube.
To avoid overloading your DP system, you need to monitor the planning process. In DP, you can monitor and improve
the planning process by tracking and using planning numbers for analysis. To do this, you need to extract planning data
from the planning area. It is best to capture planning figures and compare them with actual data — for instance to
monitor how actual sales compare to forecasted figures and where the deviation between forecast and actual sales occurs.
In doing so, you must ensure that you optimize the technical parameters of your system, such as storage space in
your Business Information Warehouse (BW) system. One way to do this is to refine the way you retrieve data. By using a
delta-capable DataSource to collect only new or changed records from your source system, you can avoid taxing your system
with a full data extraction each time you need to look at data.
I developed a nine-step process for creating a delta-capable DataSource from the planning area. The process uses an
operational data store (ODS) object. While this procedure is designed for an SCM person, basic SAP BW configuration
expertise is a prerequisite. Advanced Planning and Optimization (APO) 4.1 includes SAP BW 3.5, so this procedure is
specifically applicable for those versions of APO and BW, though the general concept is applicable across versions. This
step-by-step process helps those who do not have a deep understanding of the ODS object. However, depending on your level
of expertise you may want to enlist a BW expert.
Note
Beginning with SAP NetWeaver 2004s, ODS objects are referred to as DataStore objects. Because I am using a release prior to SAP NetWeaver 2004s, I’m going to use the terminology as it appears on my example screenprints — ODS object.
The process contains the following steps:
Step 1. Create an export DataSource for the planning area
Step 2. Replicate metadata
Step 3. Create an InfoSource and assign the source system and DataSource
Step 4. Maintain the transfer structure and communication structure
Step 5. Create an ODS object in the APO system
Step 6. Create update rules for extraction to the ODS object
Step 7. Generate an export DataSource from the ODS object and create an InfoSource
Step 8. Maintain the transfer rules and communication structure
Step 9. Create an InfoCube with the necessary update rules
I explain steps 1-5 in detail and give a brief explanation of steps 6-9 because they are typical to any BW
configuration of an ODS object and an InfoCube.
DataSource, InfoSource, and ODS Object Creation
The first five steps take you from the point when you create a DataSource to use in the planning area to the
creation of an ODS object in APO.
Step 1. Create an export DataSource for the planning area. The first step of the procedure to
extract the data from the planning area is the creation of an export DataSource. An export DataSource relates to the
DataSource that exports the data from the planning area. It is not delta capable. Follow menu path Demand
Planning>Planning>Environment>Administration of Demand Planning and Supply Network Planning. Right-click
on the planning area and using the context menu select Change. In the screen that appears, click on
Edit>Data Extraction tools.
In the planning area screen, select Extras>Data Extraction Tools to bring up the DP/SNP
Data Extraction screen in Figure 1. Click on the Generate DataSource button.
The system names the DataSource and begins the name with 9A as that is the default naming convention.

Figure 1
Select the Generate DataSource button to generate an export DataSource
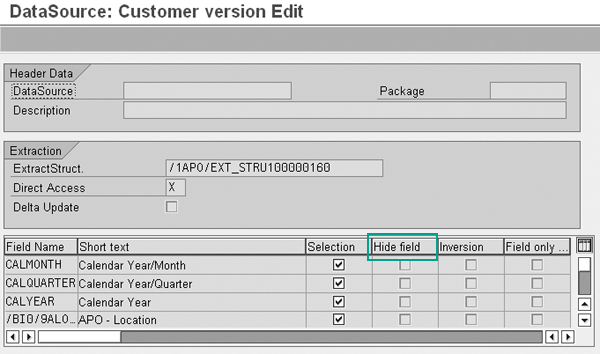
In the DataSource: Customer version Edit screen that appears, specify which fields you
want the system to use as the selection fields in the InfoPackage, or which fields you want the system to exclude in the
extraction and later for reporting purposes (Figure 2).

Figure 2
Maintain the generated export DataSource
Some of your planning versions may not benefit from monitoring the forecast accuracy. By choosing
/BI0/9AVERSION as the selection field from the Field Name column, you can filter out the
records pertaining to the versions that you do not need to export. This step enables you to limit a query to specific
objects or ranges of objects. What you select here does not affect which fields are included in the export DataSource.
Select Hide field for the fields (InfoObjects) that you do not want to transfer, such as
fields in the planning area that you do not want to export. The number of fields you transfer directly affects
performance. Therefore, you should only transfer those fields that you require for reporting purposes. After you edit the
DataSource, click on DataSource>Generate to generate the export DataSource.
Step 2. Replicate metadata. After generating the export DataSource, you must replicate the
metadata to create a replica for data transfer. This replicates the DataSource in the logical system of SCM client source
system under the data mart DataSources in the Administrator Workbench (Figure 3). To do so, click on
Replicate DataSources in Figure 3. Note that in this case the system in which you are operating is DP.
The technical name of the source system is based on the client. For example, if you are planning in system APO client 002,
the technical name of the source system is APOCLNT002.

Figure 3
Source system overview in which the export DataSources are under the data mart component hierarchy
When the system messages at the bottom of your screen cease, the system triggers a background job that
finishes the replication process by creating the necessary changes in the system for data transfer from the DataSource to
the logical SCM client. Check in the job overview (transaction SM37) that this job has finished before
proceeding to the next step.
Step 3. Create an InfoSource and assign the source system and DataSource. Follow menu path
Demand Planning>Planning>Environment> Administrator Workbench. Click on the
Modeling tab on the left side of the screen, and then select Source Systems (Figure 3).
Right-click on Logical System of SCM Client and select DataSource Overview in the
context menu. Note that you need to choose settings such as Show generated objects in the
Settings menu in the Administrator Workbench. You should choose this setting because the default setting
is that generated objects within the client are not visible — you need to set them to visible to use them. Generally
the default setting is Hide generated Objects and thus the generated DataSource may not be directly
visible.
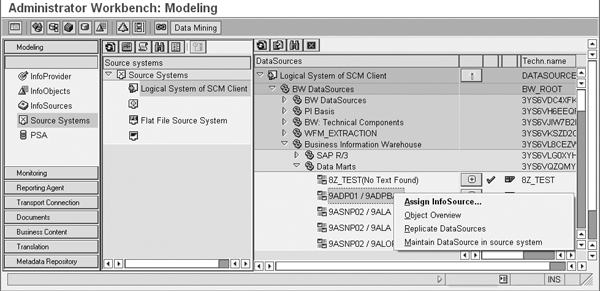
Now you need to assign your DataSource to an InfoSource to pass the data. In the DataSource
Overview, select your DataSource under the data mart component with the name that starts with
9A, in this example 9ADP01, and in the context menu choose Assign
InfoSource… (Figure 4).

Figure 4
Choose Assign InfoSource… for DataSource 9ADP01
In the dialog box that follows (Figure 5), enter the same name of the DataSource
(9ADP01) in the Applictn Proposal field and click on the transfer icon  . In the dialog box that appears, click on Yes to confirm the
DataSource. After the system creates the InfoSource, choose Enter. In the screen that follows, click on
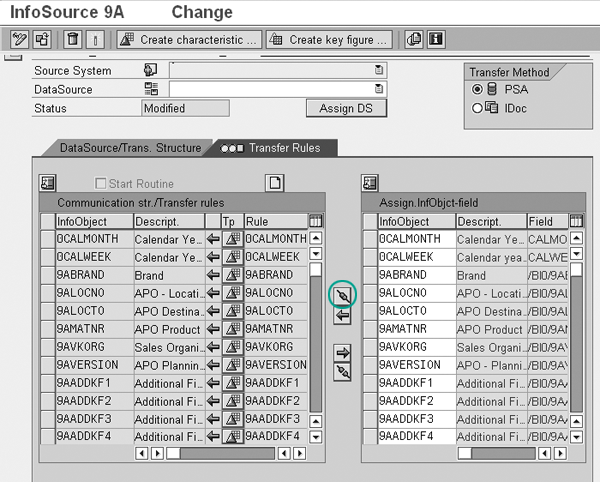
the propose transfer rules icon
  (Figure 6). By choosing this
icon, the system proposes the transfer rules based on the metadata of the objects. Otherwise you need to map each of the
InfoObjects and create the transfer rules. Then click on the activate icon
  to activate the InfoSource and generate the transfer structure.

Figure 5
Enter the name of the DataSource in the Applictn Proposal field

Figure 6
Click on the propose transfer rules icon
Step 4. Maintain the transfer structure and communication structure. The definition screen
you use to assign the InfoSource to the transfer structure appears when the system maintains the transfer structure. As
the name indicates, the InfoSource acts as a pipe that controls the transfer of data from the transfer structure over to
the data target such as an InfoCube. You see the InfoSource in the upper half of the screen and the transfer structure in
the lower half.
Define the InfoSource assignment to the transfer structure (Figure 7). Enter the source
system and the DataSource for the transfer structure, in my example, APOCLNT800 and
9ADP01. On the Trans. structure tab, copy the transfer structure fields from the DataSource to
the transfer structure (from right to left).

Figure 7
Maintain the transfer rules
Click on the propose transfer rules icon and the system proposes some of the assignment information, such
as the mapping. You must fill in the missing information, such as how you want to map some fields. You also can adjust the
proposed mapping based on your individual needs. This is another opportunity to filter unwanted fields from the
communication structure, similar to step 3. In this case, you are filtering to avoid duplicating data that you may have
backed up in different containers.
Next, click on the Transfer Rules tab. Check where the system did not propose an
assignment of transfer structure fields to communication structure InfoObjects. As mentioned earlier, the mapping happens
based on the metadata of the objects, but when the system does not map them, you need to do it manually. Where the system
has not proposed an assignment, include new InfoObjects in the communication structure in the upper half of the screen. In
the lower half of the screen, select the new InfoObjects in the communication structure on the left and copy them to the
appropriate fields based on your needs in the transfer structure on the right. Then click on the activate icon.
Step 5. Create an ODS object in the APO system. Now you need to create an ODS object,
which stores the data from the planning area. This ODS object receives data in full update mode from the planning area. It
then exports only changed or newly created data from its change log, a table that keeps track of changes in the ODS
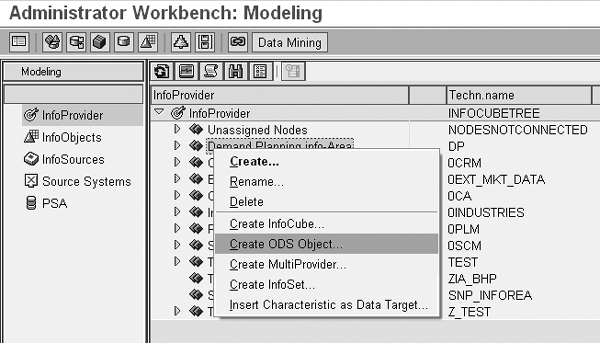
object, to the InfoCube that you’ll create in step 9. Follow menu path Demand
Planning>Planning>Environment>Administrator Workbench. Click on the Modeling tab on the
left panel of the screen and select InfoProvider in the right panel (Figure 8). Right-
click on the specific InfoArea in which you wish to create the ODS object, in this case Demand Planning info-
Area, and select Create ODS Object… from the context menu.

Figure 8
Create the ODS object
Use the InfoSource you created in step 3 as the source template to copy characteristics or key figures to
the ODS object. Also, the system transfers the InfoObject 0RECORDMODE as default, which is visible only
in the table view of the ODS object.
While creating this ODS object, keep the following settings in mind.
- Set quality status to OK automatically so that each request received from the planning
area extraction acquires this status when data is correctly loaded to the ODS object.
- Activate ODS object data automatically so that the system activates each request with the status
OK as soon as it is loaded to the ODS object.
- Set the indicator for update data targets from ODS object automatically to ensure export of new or
changed records directly to the InfoCube you create in step 9 later.
Create and Maintain Update Rules
The processes for steps 6-9 are fairly standard and easily available on help.sap.com. Refer to https://help.sap.com/saphelp_scm40/ helpdata/en/e0/9088392b385f6be10000000a11402f/content.htm. Here is
a brief description of what you need to do to finish the process.
Step 6. Create update rules for extraction to the ODS object. From the Modeling
tab, select InfoProvider and then right-click on the ODS object you created in step 5. On the context
menu, choose Create Update Rule and provide the InfoSource you created in step 3.
I recommend that you create update rules so that only aggregated information is updated in the ODS object. For
example, if the data in the planning area is by day and the analyst requires reports monthly, then you can use update rule
to aggregate data from the planning area to be updated monthly in the ODS object.
Step 7. Generate an export DataSource from the ODS object and create an InfoSource. From the
Modeling tab, right-click on the ODS object you created in step 5 and in the context menu choose
Generate Export DataSource.
The system generates the InfoSource automatically and makes it available in the data mart component in the logical
source system for the client and has a naming convention starting with 8 followed by the technical name of the ODS object.
For example, if you have created the ODS object with the technical name of ZDPODS, then the DataSource
would have the technical name 8ZDPODS. The system also automatically assigns the DataSource to a
generated InfoSource with the same technical name. This saves you time as you create an InfoSource, and then assign the
DataSource. After this step, the DataSource has a plus icon  next to it
indicating that the DataSource is assigned to an InfoSource.
Step 8. Maintain the transfer rules and communication structure. From the
Modeling tab, select InfoProvider and then select the specific InfoArea in which you
wish to create the ODS object, such as DP shown in Figure 8.
You need to maintain the transfer rules so you can manipulate the data the system extracts from the ODS object, or
the system proposes one-to-one mapping. You can filter superfluous information flowing from the ODS object to the
InfoCube. Maintain the transfer rules for data from the ODS object to the communication structure.
Step 9. Create an InfoCube with the necessary update rules. From the Modeling
tab, select InfoProvider and then the specific InfoArea in which you wish to create the InfoCube. Create
the InfoCube and choose BW Object in the pop-up selection screen by using the InfoObjects from the
InfoSource you created as the template.
Then create update rules for this InfoCube from the InfoSource you created. Later, you will be able to create an
InfoPackage to load delta data transferred from the ODS object to this InfoCube. While the InfoPackage for the data load
from the planning area to the ODS object has only full mode, the data extracted to the InfoCube is limited only to delta
data.
Shreekant W. Shiralkar
Shreekant W. Shiralkar is a senior management professional with experience on leading and managing business functions as well as technology consulting. He has authored best selling books and published many white papers on technology. He also holds patents for innovations. Presently he is global head of the SAP Analytics Centre of Excellence at Tata Consultancy.
You may contact the author at s-shiralkar@yahoo.com.
If you have comments about this article or publication, or would like to submit an article idea, please contact the editor.


