Discover how to use the top-down distribution functionality in account-based profitability analysis (CO-PA) so that you can review reports on a more granular level — for example by customer, product, sales region, and so on. This is particularly useful where the original posting cannot be made at that level of detail. With this functionality, you can view a complete income statement (or at least contribution margin) by any reporting attribute that you require, without losing the connection to the account postings in the general ledger.
Key Concept
Top-down distribution is a functionality that allows you to allocate values from higher-level profitability analysis (CO-PA) characteristics (for example, Division) to lower-level characteristics (for example, Products) based on a specified reference base (for example, Total Quantity).
Top-down distribution is typically thought to be a functionality that is available only with costing-based CO-PA. This is actually a misconception, as top-down distribution has been available for both types of CO-PA since release 4.7. In account-based CO-PA, top-down distribution works a little differently from costing-based CO-PA because it does not use value fields as a reference base. Instead, it uses cost elements. For more information about account-based CO-PA, refer to my article “Things to Consider Before Activating Account-Based CO-PA.”
I always like to describe top-down distribution as the profitability analysis (CO-PA) answer to an assessment cycle. For those (and there shouldn’t be many) people who do not know what an assessment cycle is, it is the method of allocating costs from one cost center (or group) to another, based on some method of apportionment (for example, fixed percentages, fixed portions, variable portions, or fixed amounts). There are assessment cycles in CO-PA that are defined using transaction KEU1 and executed using transaction KEU5. However, these can only allocate costs from cost centers to CO-PA profitability segments, and not from one profitability segment to another.
With top-down distribution, you can allocate costs from one profitability segment (higher-level characteristics) to another (lower-level characteristics). The purpose of this is to ensure that a CO-PA report can be viewed on a granular level (for example, by product) even though the original posting was not made at that level of detail.
This quick guide helps show you how to set up top-down distribution in account-based CO-PA so that it works exactly the same way as in costing-based CO-PA.
Differences between Top-Down Distribution in Costing- and Account-Based CO-PA
You can access top-down distribution for both types of CO-PA by using the same transaction code (KE28). The only difference is that you first have to set the type of CO-PA that you intend to use. To do this step, execute transaction code KEBC and choose the relevant option in Figure 1.

Figure 1
Choose a type of CO-PA
You can then execute transaction code KE28 and go to the selection screen for top-down distribution using costing-based CO-PA as shown in Figure 2.

Figure 2
Top-down distribution in costing-based CO-PA
To see the screen using account-based CO-PA, execute transaction code KEBC again and select the account-based profitability analysis option. Now execute transaction code KE28. The selection screen for top-down distribution using account-based CO-PA appears (Figure 3).

Figure 3
Top-down distribution in account-based CO-PA
By comparing both screens, you should be able to spot the following differences:
- Costing-based CO-PA uses record types for Actual Data and Reference Data. However, account-based CO-PA does not use record types. Note that record types are used to indicate where the source of the data update to CO-PA comes from. Because account-based CO-PA is based purely on cost elements, record types are not needed.
- Costing-based CO-PA allows you to choose which valuation view you are using, while account-based CO-PA does not show this. Valuation views allow you to store product costs in up to three views: legal, group, and profit center valuation. The cost of sales can be valuated on this basis. In account-based CO-PA, only the legal view is used because this is the only view that is updated with the typical general ledger postings. If you click the drop-down button of the Value Field reference base field in costing-based CO-PA, you see the available value fields as shown in Figure 4.

Figure 4
A drop-down list in costing-based CO-PA value fields
If you click the drop-down button of the Value Field reference base field in account-based CO-PA you see the available value fields displayed under the Field Name column shown in Figure 5.

Figure 5
A drop-down list in account-based CO-PA value fields
First of all, the term value field in account-based CO-PA is misleading (and confusing) because there shouldn’t be any value fields in account-based CO-PA. Also, at first glance, it looks as if there are only three fields that could be used in account-based CO-PA versus the numerous fields that can be used in costing-based CO-PA. There are a couple of reasons (along with the fact that there are no clear instructions on how to use this transaction) why users become confused when they try to set up top-down distribution in account-based CO-PA. To clear up this confusion, you should note that in account based CO-PA, these three fields shown can be combined with any cost elements that you choose in the Processing instructions screen. Therefore, you are not just restricted to the three fields because each field (e.g., Val/COARea Crcy) can be combined with several cost elements (e.g., payroll, salary, or depreciation).
I now show you how to use top-down distribution in account-based CO-PA with the option to use various reference bases (allocation base) to allocate values from higher-level to lower-level characteristics.
Note
If you are using top-down distribution in account-based CO-PA for the first time, you need to run program RKTKA04C using transaction code SE38. You then need to create a number range interval for number range object KTDA (using transaction code KANK).
How Top-Down Distribution Can Be Used to Allocate Values from Higher-to Lower-Level Characteristics
In this example, I use two materials, 1300-1400 (MSI 1200 cc Tourin) and 1300-1401(MSI 750 cc Touring), both of which belong to division 02 (Motorcycles). As shown in Figure 6, these materials have quantities of 4 and 8 pieces posted in account 470000 in period 3.

Figure 6
Display of posting for two materials with quantities
For simplicity’s sake, assume that these are the only two postings that take place for these materials in this account in period 3.
In period 4, a posting of $150 was made to account 464100. However in the Profitability Segment field, only the division (02) was known at the time. Therefore, this was the only profitability segment entered, as shown in Figure 7.

Figure 7
Display of profitability segment posting for the Division characteristic
If you do not perform top-down distribution in period 4, then a CO-PA report reflecting the posting only shows the division (02) as a reporting characteristic. If you do perform top-down distribution in period 4, you can distribute the posting in division 02 according to the products that were posted in period 3 (Figure 6).
To do this, execute transaction code KE28 and choose account-based in the Type of Profit. Analysis section (shown in Figure 1). This action opens the screen shown in Figure 8.

Figure 8
The initial screen of top-down distribution for account-based CO-PA
Note that I have used Total Quantity as the basis for distributing the actual costs posted in period 4. Now you can select the fields that are used for the distribution posting. To do this, click the Processing instructions button at the top of the screen to open the screen shown in Figure 9.

Figure 9
The Processing Instructions screen for top-down distribution
I now explain the logic for making the selection options shown in Figure 9:
- DLvl: This is the Distribution Level, and it indicates the characteristics to which I want to distribute. In this case I want to distribute to the Product characteristic.
- Cpy: This indicates the characteristics that are copied from the original document and are not changed. In this case, I want to retain the Division from the original document. Note that, the Company Code and Business Area options should always be selected.
- Sum: This is for characteristics that are summarized. Therefore, if these characteristics did not exist in the original document, they are not to be populated in the new document unless they are being re-derived.
- Ref: This indicates the characteristic whose values can be used to link the source data to the reference data. In this case I want to use the reference cost element 470000 (posted in Figure 6) as a basis for distributing the costs in source cost element 464100 (posted in Figure 7).
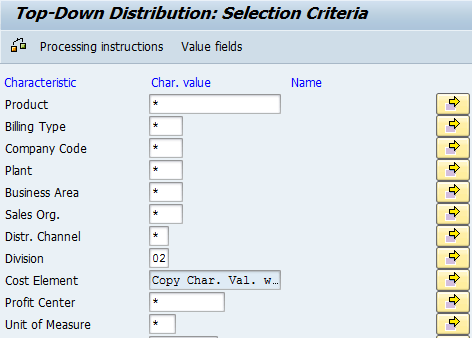
Next, you can enter the specific selection criteria that allow the system to filter the documents to be considered for top-down distribution. To do this, click the Selection criteria button at the top of the screen shown in Figure 9. This action opens the screen shown in Figure 10.

Figure 10
Selection criteria for top-down distribution
As shown in Figure 10, two characteristics have been further specified so that the system only considers these specific values. The first is Division (02), which means that the system only considers postings that have been made to this division. The second is Cost Element, and you see that this field has Copy Char. Val. defaulted in it. This is because you selected the Ref option for the Cost Element characteristic (as shown in Figure 9).
You can then click the selection options icon to the right side of the Cost Element characteristic to get to the screen shown in Figure 11.

Figure 11
Selection Criteria for top-down distribution
In Figure 11, I have entered account 464100 as the Source Data, as this is where the data I want to distribute has been posted. In the Reference base field I have entered account 470000, as this is the account with the data that I want to use as a distribution factor (Total Quantity). You can press Enter to accept these values and go back to the original screen.
You can now click the Value fields button at the top of Figure 10 to select the relevant fields that are to be distributed, as shown in Figure 12.

Figure 12
Value field selection in top-down distribution
I only need the value field Val/COArea Crcy (which stands for Value in Controlling Area Currency), so this is the only one that I have selected.
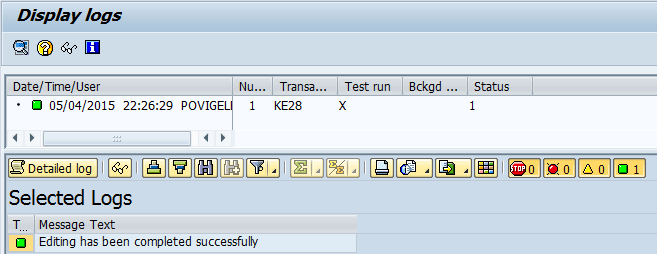
Now click the execute icon to display the log shown in Figure 13.

Figure 13
Log displayed after executing top-down distribution
By clicking the Detailed log button in the Display logs screen and then the Line items button in the next screen (not shown), you can see the postings that occurred, as shown in Figure 14.

Figure 14
Result of top-down distribution posting
You see from Figure 14 that the $150 that was made in the original posting to Division 02 (shown in Figure 7) has been distributed to the two products 1300-1400 and 1300-1401 according to the quantities posted (shown in Figure 6).
Paul Ovigele
Paul Ovigele is the founder of ERPfixers, an online micro-consulting platform (https://www.erpfixers.com). He has worked as an ERP financials consultant since 1997 in both North America and Europe, specializing in implementing the FI and CO modules along with their integrated areas for companies in industries such as consumer goods, chemicals, logistics, pharmaceuticals, apparel and entertainment. Paul has delivered numerous training sessions to finance professionals at both the functional and managerial levels, and he has presented at various SAP financials conferences around the world.
You may contact the author at paul@ovigele.com.
If you have comments about this article or publication, or would like to submit an article idea, please contact the editor.


