Implementing a kitting process in a discrete manufacturing environment allows you group items that are part of the same assembly into kits, which you can then track together. Find out about the functionality in R/3 that supports this process.
Key Concept
A kit contains a group of individual parts that may come from the same vendor. When an item is in a kit, you do not track it individually — you only keep track of the kit. You can build kits in- house or have a third-party vendor build the kits for you (external kitting). You can have a dormant kit, which is an inactivated kit, or an invoked kit, which is active.
In procurement, for example, kits reduce the number of purchase orders for the individual components that you
purchase from the same vendor. In the warehouse, kitting improves efficiency because you have a single kit box versus lots
of individual component parts. You goods receipt a single “part” in the form of a kit, then put it away and
pick it for production. This reduces the probability of an incorrect pick because you pick a single kit, compared to
multiple individual components.
On the shop floor, using kits improves the assembly process efficiency because you can arrange the kit components
in a logical order in the kit box, which avoids wasting time to search for the correct component. It also allows the
operator to determine quickly if the assembly is correct by looking at the number of leftover parts.
However, many are not familiar with the kitting process. I’ll show you best practices for implementing a
kitting process using standard R/3 with minimal configuration. I’ll provide an overview of when to use a kit and the
typical kit life cycle. Then I’ll discuss how you can manage kits in R/3, including both in-house kits and kits that
a third-party vendor produces for you.
The technical prerequisites for implementing a kitting process in R/3 are that you have implemented the Production
Planning (PP) and Materials Management (MM) modules. In the example scenario, I used R/3 Release 4.7 as the demonstration
system. You can implement kitting in all recent versions of R/3. It is core PP functionality, so it should also work in
SAP ERP Central Component (ECC).
Kit Decision-Making Process
To determine whether or not to create a kit, compare the components you have in your assemblies. You could either
assess this manually or with a custom report — no functionality exists in SAP that allows you to compare more than
two bills of materials (BOMs).
A kit consists of a number of common components across different BOM variants or assemblies. These components do
not necessarily have to match each other on a quantity basis. You may have a case in which a component is a low-value item
in an assembly, such as a bolt, in which the component quantities differ. If the benefits of including this bolt in the
kit outweigh the financial impact of discarding the surplus bolts, then it makes sense to kit this item. If the component
is a high-value item, such as a piston, then you would not consider including this part in a kit.
To illustrate this concept look at the scenario shown in Table 1. Assemblies 3 and 4 contain
components B, C, and D in the same quantity, so they could represent a kit. Depending on the financial value of component
C, you also may decide to use a kit for assembly 2 and discard the two extra C components.
|
1
|
2
|
2
|
1
|
|
0
|
1
|
1
|
1
|
|
0
|
1
|
3
|
3
|
|
3
|
3
|
3
|
3
|
|
| Table 1 |
Components that are candidates for a kit |
The Kit Life Cycle
The kit life cycle consists of three stages: individual components, in-house kitting, and external
kitting. Some companies may only use the first and last stages. In companies that use all three stages, the purpose of in-
house kitting is to test the process in the warehouse prior to outsourcing this to a vendor. Sometimes this in-house phase
is skipped and you move from individual components to external kits. This would apply when you have an existing
relationship with a vendor.
Prior to creating a kit, you have component parts that you manage individually in procurement, in the
warehouse, and on the shop floor. This is stage 1 (Figure 1).

Figure 1
The kit life cycle
You then decide to kit some of the components based on their commonality across assemblies. You include
these components in a separate BOM with the kit part as the BOM header — this is the kit BOM that forms part of the
assembly BOM (Figure 2). At this point, the kit BOM is in a dormant state because you have not activated
it in the system. If you created a production order for assembly 1 at this stage, the system would ignore the kit BOM.
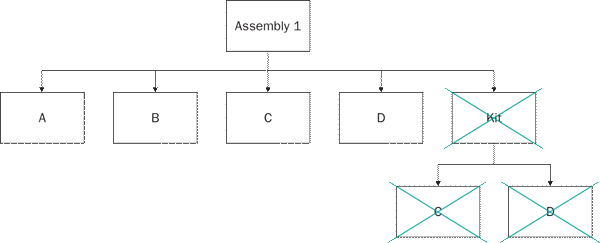
Figure 2
A dormant kit in an assembly BOM
Now you have two options. You can either pack the kit boxes in-house (stage 2) or outsource this activity
to a vendor (stage 3). With external kitting, you can bypass the in-house kit stage. For example, if you have an
established relationship with a third-party kit vendor, you would use external kitting. In this case, you wouldn’t
need to test in-house kitting as you would move directly to the external kit stage.
When you move from individual components to the in-house kit, you have to turn off the assembly components
contained in the kit and turn on (invoke) the kit BOM in the system (Figure 3). This is a manual process.
If you were to create a production order for assembly 1 now, it would contain components A and B as well as the kit. The
system suppresses components C and D because the kit contains them. When you move to external kitting in stage 3, the
system ignores the BOM components in the kit. This is because you are now treating the kit as a purchased part.
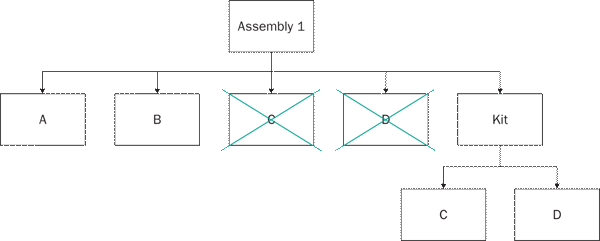
Figure 3
An invoked kit in an assembly BOM
Kit Management in SAP
You manage kits in R/3 using functionality available in PP and MM, as well as Engineering Change
Management (ECM), which is available under the logistics general menu path. The key functionality used is the BOM in PP.
Here you control whether or not kits are invoked or dormant by making the settings for production and costing relevance in
the BOM Item Status, which I discuss in detail in the section “Individual Components to In-House
Kits.” You control the timing for these settings using ECM. This allows you to schedule these changes to the BOM,
because the change only becomes effective on a key date. For more information on how to schedule the changes, refer to https://help.sap.com/saphelp_di46c2/helpdata/EN/d8/731fda4b7511d1894b0000e8323c4f/content.htm.
First, I’ll go over how you set up in-house kits in R/3, and then I will explain how to set up the
external kits. When the responsible department, for example, the procurement department, decides to buy the kit, moving
from in-house kitting to external kitting, it uses production quota arrangements (algorithms) that change the kit from in-
house (production order) to externally procured (purchase order). This transition is timed according to the date the
department wants to execute this change.
A quota arrangement consists of records that identify the quota source — such as a vendor or an
internal plant — as well as the validity period and the quota. The benefits of using ECM and quota arrangements for
this process are that it allows you to phase in the changes, giving the material requirements planning (MRP) department
time to plan for this.
For example, when you move from make to buy, the quota arrangement prevents MRP from planning the
procurement of the kit components as of a certain date, which improves the inventory management of these parts. This means
that you can buy the kit rather than buying the parts that make up the kit. ECM allows you to control the move from
dormant to invoked kits with the same benefits for planning (i.e., it allows you to phase in the invoked kit).
Individual Components to In-House Kits
In this example, I have a BOM for a normal assembly that contains three component parts
(MDG_PART30, MDG_PART31, and MDG_PART32) and a kit
(MDG_KIT90). The responsible department in logistics wants to invoke (activate) the kit on March 1,
2007.
In transaction MM02 (change material), access the kit material master in the MRP2 view.
Enter X for the Procurement type to allow both in-house manufacture, by means of production
orders, and external procurement, by means of purchase orders or schedule agreements. The X setting
allows you to make or buy the kit. Use a quota arrangement to control the timing of internal and external procurement. Set
the quota arrangement usage (Quota arr. usage) to 4 to allow for the use of production quota
arrangements. This allows you to plan the move from in-house to external procurement by MRP in R/3.
Next, go to transaction CS02 (change material BOM). In my example, the BOM for
MDG_ASSY20 contains the dormant kit MDG_KIT90 (Figure 4).
MDG_ASSY20 in this case is the assembly BOM that contains MDG_KIT90 as a component with
its own BOM. At this stage, the kit is dormant because it is neither costing nor production relevant. In other words, you
are still in the individual components phase (stage 1).
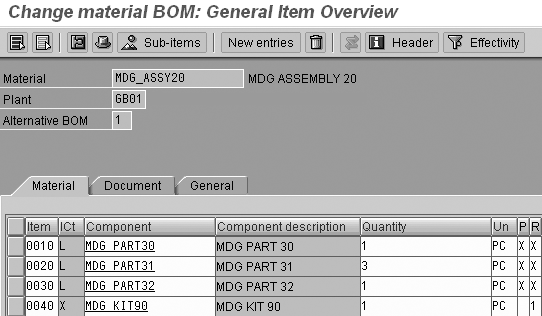
Figure 4
The assembly BOM showing the dormant kit
If you look at Figure 4, item 0040 is the kit part in the assembly BOM. The
P column (production relevancy) is blank, which means that the production relevance of this item is
switched off. This indicates that this part is neither planned by MRP nor contained as a BOM item in the production order.
Be aware that this screen shows the summary of the settings made for each BOM component. Figure 5 shows
the detail screen in which you adjust the settings.

Figure 5
Item status settings for components in assembly BOM containing a dormant kit
In Figure 4, the R column (costing relevancy) is set to 1, which means
that the system won’t incorporate the component into the cost rollup for that assembly. To avoid double-counting the
value of the components, you do not want to cost the kit along with components in the assembly BOM contained in the kit.
The value 1 in this case is the same as leaving the setting blank in the standard R/3 system. This
configuration was created specifically for this company because using a blank value clashed with some of its other
configuration.
The assembly components are always engineering and design relevant because they relate to the engineering
BOM, which in turn relates to an engineering drawing (Figure 5). The kit does not relate to such a drawing because it is a
collection of parts, so neither the kit nor its components are engineering and design relevant. The relevance of this
engineering/design flag is that if you wish to look at the engineering BOM, you can filter components based on this
setting and display the engineering BOM.
For the kit, I marked the item category (ICt) field as X, which acts as
a flag to report on kits included in assemblies in R/3 using some of the standard reports available. This setting,
X, is an exact copy of the standard configuration for item category L. Item category
L is set up as configuration and is used in R/3 when a component is kept as a stock item. It renders the
component accessible to other functionality such as MRP. You enter X when you first assign the kit component to the
assembly BOM.
Double-click on an item number in Figure 4 to access each item’s settings. The Item
status settings for the components are shown Figure 5. The Item status settings for the dormant
kit are shown in Figure 6. The settings for production and costing relevancy in these sub-screens are
reflect-ed in columns P and R in Figure 4. The 1 for CostingRelevncy
indicates that the kit is not relevant.

Figure 6
Item status settings for the dormant kit in an assembly BOM
The BOM for the kit is shown in Figure 7 with its components set as costing and
production relevant. This is not to be confused with the assembly BOM, as this is the BOM that makes up the kit. This kit
is included in the assembly BOM, which is shown in Figure 4.
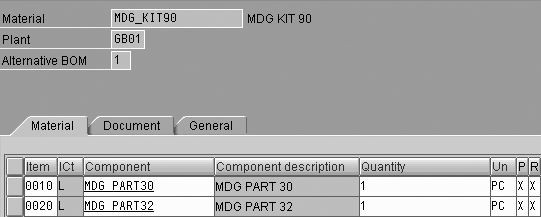
Figure 7
The kit BOM showing the kit components
Remember that you have two BOMs in this process — one for the assembly (Figure 4) and one for the
kit (Figure 7). When you invoke the kit, you switch off the components in the assembly BOM (which are contained in the
kit) and switch on the kit component in the assembly BOM. What you see in Figure 7 are the components in the kit BOM. In
this screen you leave the settings as is because you control whether or not the assembly BOM invokes the kit.
In Figure 8, if you look at the item status of one of the kit’s components, you can
see that I selected both the production and costing relevant check boxes. These settings are identical for all kit
components. This may seem contradictory because the kit is dormant. The user in the assembly BOM switched the kit off,
which breaks the link between the kit components and the assembly. If you create a production order for the assembly, and
the kit in this assembly is dormant, the system does not create any requirements for the component parts.

Figure 8
The item status of a component contained within the kit
Recall that the logistics team decided to invoke the kit on March 1, 2007 (01.03.2007), which is the date
you can begin to use the kit in the production process. The date has to be in the future, which was the case at the time I
wrote this article. To initiate this status change from dormant to invoked, raise an Engineering Change Order (ECO) with
an effective date of 01.03.2007 by using transaction CC01 (create change master)
(Figure 9). In this screen, enter the date you want the status to change in the Valid From field.

Figure 9
Change header for ECO created to invoke the kit
When you save your changes, the system generates the ECO number, in my example
500000000085. In transaction CS02 (change material BOM), the responsible user enters
this number in the Change Number field (Figure 10), which is used to update the assembly
BOM.

Figure 10
Making a change to the assembly BOM with an ECO
The responsible user also changes the item status for the kit component in the assembly BOM to costing and
production relevant (Figure 7). The components in the assembly BOM contained in the kit BOM are no longer production and
costing relevant. The components in the assembly BOM that are not included in the kit remain unchanged. The item status
for MDG_PART30 and MDG_PART32 changes to non-costing and non-production relevant because
these components are contained within the kit MDG_KIT90 (Figure 11).
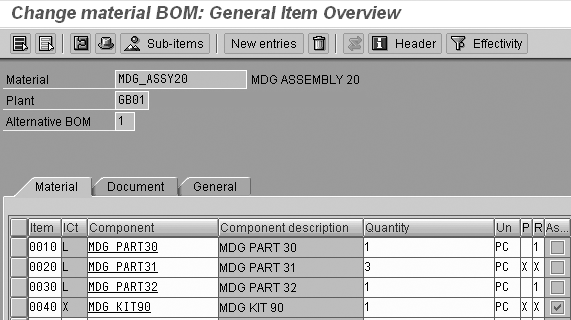
Figure 11
The assembly BOM with the kit in an invoked state
If the production scheduler creates a production order for MDG_ASSY20 after March 1,
2007, the BOM would contain components MDG_PART31 and MDG_KIT90.
In Figure 11, double-click on the item number and maintain its settings as follows:
- For components in the assembly BOM that are included in the kit, uncheck Production
relevant, enter 1 for CostingRelevncy, and leave Engineering/design selected,
as this should be set when the assembly BOM is first created (Figure 12)
- For the kit in the assembly BOM, select Production relevant and enter X for
CostingRelevncy (Figure 13)
- For components in the assembly that are not included in the kit BOM, leave the settings as shown in
Figure 14

Figure 12
Item status settings for the components in the assembly BOM that are included in the kit
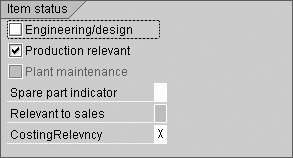
Figure 13
Item status settings of the kit in the assembly BOM
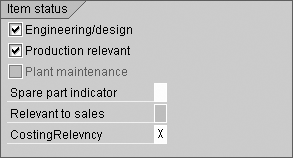
Figure 14
Item status settings for the components in the assembly that are not included in the kit
You now have an invoked kit that you can manufacture in-house using a production order. At some point, you
may decide that you want to outsource the kitting process. To do this, you need to raise a purchase order on the selected
vendor.
In-House Kits to External Kits
You control this process by using the quota arrangement functionality in MM. This allows you to stipulate
the time period over which you want to manufacture the kit, and then transition to buying it. In my example, I want to
start purchasing MDG_KIT90 after July 1, 2007, from vendor B0076. Up to this date, you use procurement
type E (in-house production), as shown in Figure 15. When you run MRP for this item and
demand exists for it, the system creates a planned order, which you then convert to a production order.
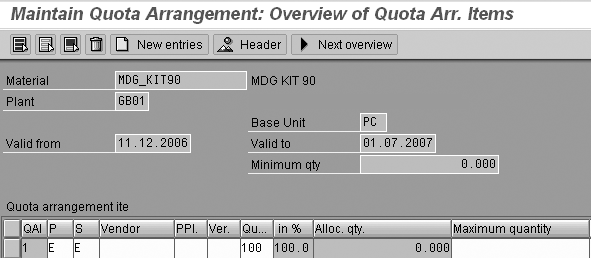
Figure 15
Quota arrangement item for the in-house manufacture of the kit
After this date, the purchasing department purchases the kit from vendor B0076, typically, by setting the
procurement type to F (external procurement) as shown in Figure 16. MRP creates the
purchase requisitions for any requirements for this kit. All the other purchasing data objects also need to be in place to
purchase this kit.

Figure 16
Quota arrangement item for the external procurement of the kit
Once you reach this stage, you continue to purchase the kit from your vendor. The demand for the assembly
eventually decreases as the product moves into the mature phase of its life cycle. It may no longer be cost effective to
continue to purchase the kit from your vendor. In this case you would want to go back to individual components or,
possibly, in-house kitting. If you wanted to return to in-house kitting, you would have to create a quota arrangement to
set the kit back to in-house production, as shown in Figure 15. The Valid from date, in this case, is the
date on which you wish to return to in-house production.
If you want to return to individual components, an ECO, as shown in Figure 10, is required with a
Valid From date reflecting the date you want to return to managing individual components. You must set
the item status for the kit component in the assembly BOM (production and costing relevance), as shown in Figure 6. Then
reset the item status for the components in the assembly BOM that are not contained in the kit, as shown in Figure 14. You
can then manage these components individually with respect to procurement, inventory management, and warehousing as of the
key date you entered in the ECO.
Mark Guy
Mark Guy has 10 years of experience as a PP and QM consultant and currently is a solution architect at Morse. Morse is an international consulting company offering clients specialist business and IT advice and helping them execute for maximum benefit. Mark lives in Ascot, Berkshire, England.
You may contact the author at editor@SCMExpertOnline.com.
If you have comments about this article or publication, or would like to submit an article idea, please contact the editor.