Find out how you can create a wait process type to handle dependencies across process chains. When combined with the standard start process type, the wait process type ensures that only one dependent program runs at a given time, which prevents conflicting processes from running.
Key Concept
A process type determines how events in a process chain run. For example, you could use the standard process type “and” to permit two programs to run at the same time. Other standard process types include “or,” “interrupt,” and “start.”
When designing data models, I often encounter conflicts during a load. For example, I may need to load the same object — such as a DataStore object (formerly operational data store [ODS] object), InfoCube, or master data — from multiple sources. I cannot control the order in which these objects load. Other times, when an attribute change runs, I need to sequence an event-driven transaction data load manually.
To address these situations you could use an independent third-party job scheduler to define and control job streams. However, these tools are not available in all installations. They also might not be cost-effective if the benefits for your company are limited to a select few cases that need special handling.
For these situations, I use what I call a “wait” process type. This is a custom process type that you can implement using ABAP objects. It simplifies the design of data models and the corresponding load process chains. This allows you to develop and deploy process chains that have dependencies between nodes either in the same chain or in multiple chains in the BW system.
You can implement this process type using a custom ABAP object-oriented (OO) class. This functionality applies to any BW version starting with 3.0, including SAP NetWeaver BI 7.0. You can also expand the concept to meet specific business requirements. To implement the wait process type, you need some familiarity with ABAP development. In addition, you need a developer key to create the report and custom class I use in my example.
I’ll explain the concept behind the wait process type and provide three example scenarios in which you could use it. Then, I’ll describe the four-step process to set up the wait process type and show you how to test it.
What Is the Wait Process Type?
The basic idea behind the wait process type is very simple. You define an event that has two possible statuses: Wait (custom) and Start (standard). At any given time when the event is in progress — such as when the load runs or Data-Store object activation occurs — the status is Wait. This causes any other conflicting process that uses the same event to wait for the first process to complete. When the first process finishes, the wait process type changes the status to Start, which allows the next process to take over and lock the event.
By allowing the user to define the event, you can sequence multiple processes. For example, you can use the same event to sequence two loads into a DataStore object and its activation. Then the system creates a read from that DataStore object that is available in different process chains. You maintain the data about the event and its current status in a custom table that you can update using simple ABAP code. The event and statuses then become variants for this program.
Possible Implementation Situations
Here are three scenarios in which the wait process type can be useful.
Example 1. Say you need to load data from SAP ERP Central Component (ECC) and a legacy system into the same BW object. You need to ensure that the system updates the BW object frequently, with minimal lag time between each update. Scheduling by time is inadequate because it results in inefficiencies when neither load is running. The wait process type allows you to schedule these processes simultaneously and ensures that the loads do not conflict.
Example 2. You are required to implement a dependency between different process chains that access the same object in a simple and flexible manner. You have data from three different sources that you want to combine into a single DataStore object. You load the three sources using independent process chains, but it is difficult to establish a dependency among them on the basis of time alone. By using the wait process type, you can define and schedule the three process chains independently. The wait process type ensures that the Data-Store object loads and activations do not run simultaneously.
Example 3. You need to ensure that master and transactional data loads do not occur at the same time. This can be difficult to implement if you have multiple transaction loads running frequently for different amounts of time, thus causing possible conflicts with master data loads that are scheduled on a time basis. The wait process type ensures that process chains that are scheduled very frequently — say every hour — do not start new loads until the previous loads complete.
The Process
Now let me show you the process to create the wait process type. The steps are:
Step 1. Create the custom table in transaction SE11
Step 2. Create an ABAP program and a simple screen to maintain entries in the custom table
Step 3. Implement the ABAP OO class using the necessary interfaces
Step 4. Create the new wait process type defined by the ABAP OO class
Let's take a look at the steps in detail.
Step 1. Create the custom table in transaction SE11. Select Database table and enter a name for it, such as ZWAITSTATUS. Click on the Create button.
In the Dictionary: Maintain Table screen that appears, define the table fields and activate the table (Figure 1). For my example, I used the following fields:
- MANDT: the system client ID
- Z_WAIT_EVENT: the event name, which forms the table key with the client ID
- Z_STATUS: the current event status
- Z_EVNT_DESC: a descriptive name for the event
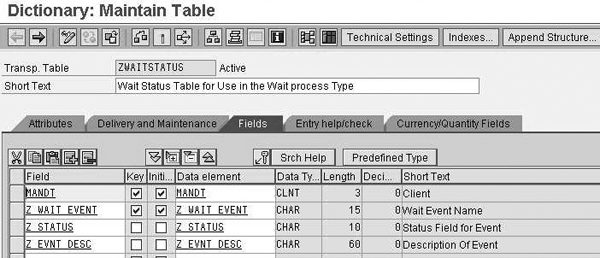
Figure 1
Define the fields for the custom table ZWAITSTATUS
Step 2. Create an ABAP program and a simple screen to maintain entries in the custom table. The ABAP program allows you to maintain the variants — event name, status, and event description — for the wait process type. The system calls this program whenever it invokes the variant maintenance screen for the wait process type.
To create the ABAP program, use transaction SE80 so you have access to the graphical layout editor. This allows you to visually place elements on the screen — a more efficient process than specifying the elements’ coordinates to position them on the screen. From the drop-down menu in the middle of the screen, select Program. Provide a name for your program, such as Z_WAITSTATUS_MAINTAIN, and press Enter. A pop-up screen appears that asks you if you would like to create the object. Click on the Yes button and continue.
In the Create Program screen that appears next, uncheck With Top Include and continue. Figure 2 shows the next screen. Choose Executable program from the drop-down menu for the Type. Then, select an appropriate Status, in my example, a Customer Production Program. Finally, select Business Information Warehouse for the Application and save your work.
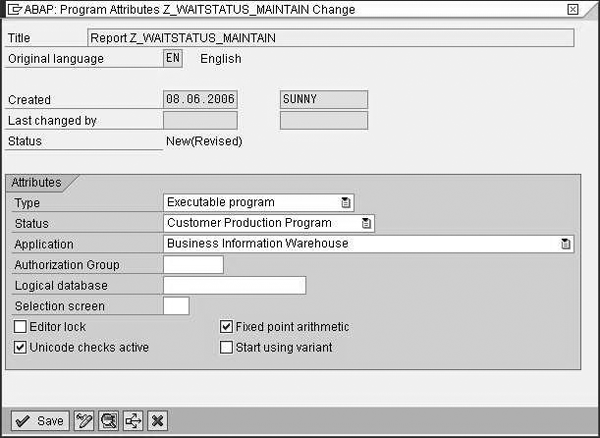
Figure 2
Set the attributes for the custom program Z_WAITSTATUS_MAINTAIN
In the transfer window that appears, choose the correct package. If you are not ready to transport it, you can save it as a local object (package = $TMP). I chose the local object because I did not want to transport it to another system. You can assign the transport package as $TMP while you implement and test the program. When you are ready to transport the package, you can change this setting.
Now you are ready to create the program. In the ABAP Editor screen shown in Figure 3, double-click on the object name Z_WAITSTATUS_MAINTAIN to enter the editing screen of the program. Next, on the right side of the screen, enter the code in Figure 4 under the coding line REPORT Z_WAITSTATUS_MAINTAIN.
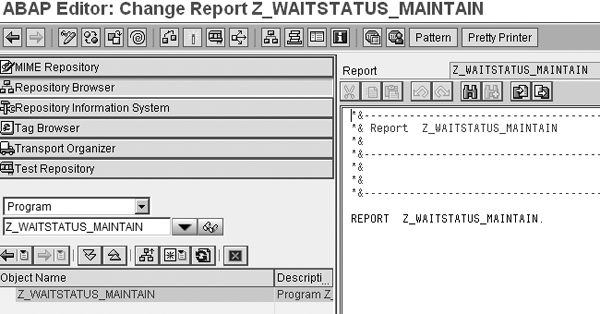
Figure 3
Create the Z_WAITSTATUS_MAINTAIN program in ABAP Editor
REPORT Z_WAITSTATUS_MAINTAIN.
CONSTANTS: c_wait_event(12) TYPE c VALUE ‘Z_WAIT_EVENT’,
           c_status(8) TYPE c VALUE ‘Z_STATUS’.
TABLES: ZWAITSTATUS.
|
| Figure 4 |
Enter these lines of code under REPORT Z_WAITSTATUS_MAINTAIN |
These statements define the tables and constants that the program accesses and make their structures accessible for looping constructs. Next, right-click on the object name Z_WAITSTATUS_MAINTAIN and choose Create>Screen from the context menu. In the Create Screen window that appears, enter 1 in the Screen number field (Figure 5). Then enter a short description, such as Screen to Maintain Event Variants. In the Screen type section, select Subscreen. In the Other attributes section, change the columns of the screen to 76. Leave the rows at the default 27.

Figure 5
Set up the attributes for the Z_WAITSTATUS_MAINTAIN program screen
Next, click on Utilities>Settings in the menu bar. Go to the Screen Painter tab and make sure that the Graphical layout editor check box is selected. Click on the OK button to leave this screen. When you return to the main screen, click on the Layout button to access Screen Painter. Select Goto>Secondary Window>Dictionary/Program Fields. Enter ZWAITSTATUS in the Table/Field Name field and click on the Get from Dictionary button (Figure 6).

Figure 6
Use Screen Painter to design the screen for Z_WAITSTATUS_MAINTAIN
Select all the lines except the MANDT line and click on the OK button. Position the three fields on the screen using drag and drop. Next, add text labels for these fields. Click on the T  icon on the left side of the screen to create a text label next to a field. Then double-click on the text field.
In the pop-up window that appears, enter WAIT_EVENT for the Name, Wait_Event for the Text, and Wait_Event_Name for the Tooltip. Next, create text fields for the other two text boxes and name them Status and Event Desc, respectively. Ignore the warning about the screen collision. Save your work and exit. This returns you to the screen shown in Figure 5.
Click on the Flow logic tab. The first step is to build the Process Before Output (PBO) module. Here you create an instance of the program variant using SAP-provided interfaces. Uncomment the lines that contain the text MODULE by removing the asterisk (*) at the beginning of the line.
Next, double-click on STATUS_0001, and then click on Yes to create the object (Figure 7). This creates the module STATUS_0001 and identifies that this module is for screen 1 that you just created. Choose the Main Program line to return to the ABAP Editor.
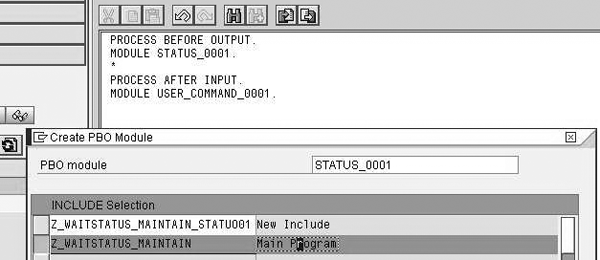
Figure 7
Create the module STATUS_0001
Download the code files available via this link. Open the PBO-Module file and insert the code under the line MODULE STATUS_0001 OUTPUT and before ENDMODULE. Save your work. This builds your PBO module.
The next step is to build the Process After Input (PAI) module. This module allows the program to accept input from the user that saves a new variant or changes an existing variant. Double-click on the screen number on the left side of the screen to re-enter the Flow logic screen.
Uncomment the USER_COMMAND_001 line and double-click on it. Click on the Yes button in the next screen to create the object. Choose Main Program. From the files you downloaded, open the PAI-Module file and insert the code provided under the line MODULE USER_COMMAND_0001 INPUT. Save your program.
Then double-click on the SAVE form inside the code. Click on the Yes button to create the object and choose the line Main Program. This creates the code that the system executes when the user clicks on the Save button. From the files you downloaded, open the Form-Save file. Insert code in the Form Save section under the FORM line and save. Repeat this process with the code provided in the Form- Changed file, entering the code provided for Form Changed section. Your maintenance routine is now ready. Save and activate this program by right-clicking on the program name Z_WAITSTATUS_ MAINTAIN and choosing Activate.
Step 3. Implement the ABAP OO class using the necessary interfaces. Now let’s create the ABAP class that defines and executes the actual process type. This class contains the methods to maintain and create the variants. It also contains the execute method that reads the variants and checks the ZWAITSTATUS table to determine the current status of the event.
First, create the class for the process type in transaction SE24. Name the class ZCL_WAIT_STATUS and click on the Create button. In the screen that appears, enter the description and choose the default options (Figure 8). Click on the Save button to access the Class Builder screen.

Figure 8
Select the default options for the ZCL_WAIT_STATUS class
Click on the Interfaces tab and add the following under the Interface column:
- IF_RSPC_MAINTAIN
- IF_RSPC_EXECUTE
- IF_RSPC_GET_VARIANT
These are standard SAP interfaces that allow you to embed custom logic that you can access from a process chain.
When you’re finished, click on the Methods tab. Double-click on the method IF_RSPC_MAINTAIN~MAINTAIN and add the code for this method available in the downloaded file if_rspc_maintain__maintain. Then add the code for the following methods from the code available in the respective files available for download via this link:
- IF_RSPC_MAINTAIN~GET_HEADER
- IF_RSPC_GET_VARIANT~GET_VARIANT
- IF_RSPC_GET_VARIANT~WILDCARD_ENABLED
- IF_RSPC_GET_VARIANT~EXISTS
- IF_RSPC_GET_LOG~GET_LOG
- IF_RSPC_EXECUTE~EXECUTE
When you’re finished, activate the class by clicking on the activate icon.
These methods check the current status of an event and make sure that any conflicting processes wait until the present process is completed. They also maintain the link between the Z_WAITSTATUS_MAINTAIN program and the process chain.
Step 4. Create the new wait process type defined by the ABAP OO class. Go to transaction RSPC. Click on Create new process chain. When you are in the Define Process Chain window, click on Settings>Maintain Process Types.
In the screen that appears, click on the New Entries button to create a new process type Z_W_EVENT — this should be the same as mentioned in the ABAP OO class, which you can check in the method IF_RSPC_MAINTAIN~MAINTAIN. Then set up this process type with the following settings, as shown in Figure 9:
- ObjectTypeName: Enter the name of the ABAP OO class, ZCL_WAIT_STATUS in my example
- Object Type: Select ABAP OO Class from the drop-down menu
- Possible Events: Select Process ends “successful” or “incorrect” and make sure that you select the Repeatable check box. This allows you to repeat the process in case of failure.
- ID: Choose an icon by using the F4 value help and make sure you select the Internal Name check box. Select an icon that is not already available in the process chain screen to avoid confusion.
- Process Category: Choose a category in which you want to find your process type later in the process chain maintenance. The 05 in this case refers to general services.
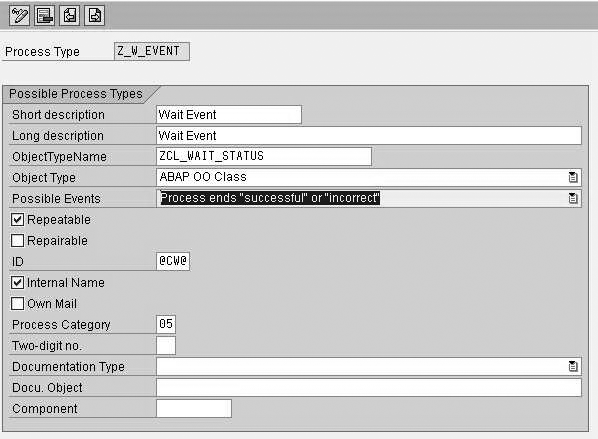
Figure 9
Enter the settings for the wait process type
Your new wait process type is ready. Next, perform a simple test to check it.
Test the Wait Process Type
Let’s use an example that involves two loads into DataStore object ZTST_O01. These loads are in two different process chains ZPC1 and ZPC2, which the system triggers based on an event. I use the wait process type to ensure that the two loads are sequenced and do not run concurrently. Follow these six steps:
Step 1. Create the two process chains ZPC1 and ZPC2
Step 2. Add the newly created wait event process type in the process chain maintenance screen for ZPC1
Step 3. Add the process step before the load to DataStore object ZTST_O01 starts
Step 4. Add one more instance of the newly created process type
Step 5. Edit the process chain ZPC2
Step 6. Trigger both of the chains simultaneously
Step 1. Create the two process chains ZPC1 and ZPC2. These are simple process chains that load the DataStore object ZTST_O01. If you run them simultaneously, one process fails because the other locks the DataStore object. Using the wait process type ensures that this does not happen.
Go to transaction RSPC and click on Create Process Chain. Enter the technical name ZPC1 in the Process Chain field, and then enter the description Test Wait process chain 1 in the Long description field. Click on the check mark icon to move to the process chain maintenance screen.
Next, add nodes to the process chain that loads the DataStore object ZTST_O01. Drag and drop the following nodes from the left side of screen, as shown in Figure 10:
- Start node
- Load of DataStore object ZTST_O01 through an InfoPackage
- DataStore object activation

Figure 10
Add the wait process type to the process chain
Step 2. Add the wait event process type in the process chain maintenance screen for ZPC1. Drag the wait process type icon into the process chain, then click on the create new variant icon to call up the variant maintenance screen. Enter ZTST_O01_WAIT for the technical name and Wait variant for DataStore object Load ZTST_O01 for the description.
Click on the check mark icon to access wait type process maintenance screen (Figure 11).
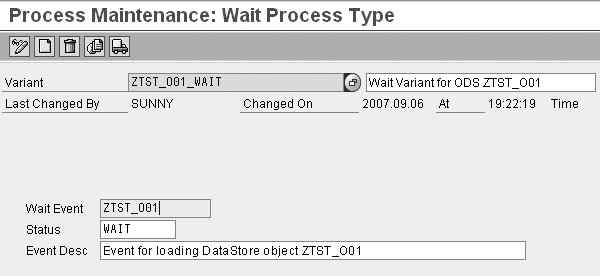
Figure 11
Enter the information for the wait process type
Enter the following and save:
Wait Event: ZTST_O01
Status: WAIT
Event Desc: Event for Loading DataStore object ZTST_O01
Step 3. Add the process step before the load to DataStore object ZTST_O01 starts. This sets the status of the ZTST_O01 event to Wait when the system reaches this part of the process chain.
Step 4. Add one more instance of the wait process type. After the ZTST_O01 load completes, you need to set the value of the event back to Start. This allows the next event to start. Add the same process type into your process chain and create the START variant for the event ZTST_O01. Save the instance and add the node after the DataStore object activation (Figure 12). Then save and activate the process chain.

Figure 12
Completed process chain with wait process type
Wait Event: ZTST_O01
Status: START
Event Desc: Event for Loading DataStore Object ZTST_O01
Step 5. Edit the process chain ZPC2. Add the two nodes for the wait process type with the same variants as you did for ZPC1. Save and activate the chain.
Step 6. Trigger both of the chains simultaneously. One load kicks off while the second one waits for the DataStore object activation from the first load to complete. You can check the load status by looking at the values of the status in the ZWAITSTATUS table.
Known Issue
Consider the scenario in which you have three concurrent loads that the system sequences using this event. Assume that one load is running and has set the event status to Wait. The other two loads are looping, awaiting a change in status. If the first load completes and the two other loads query the ZWAITSTATUS table at the same time, they read the same value of Start. Both begin simultaneously, possibly causing locking issues. The solution to this is to lock the row in the table while reading it to ensure that only one process chain (or instance of the class) can read the Start status at a time.
Shailesh Unny
Shailesh Unny is a technology architect with more than eight years of BI experience, primarily focusing on translating business requirements into effective functional and technical specifications. He has extensive experience in data modeling, design, configuration, and performance tuning of BI systems. He has also helped adapt SAP’s standard offerings to implement several specific customer requirements. Shailesh is currently involved with working on BI-Integrated Planning and SAP BusinessObjects Planning and Consolidation solutions in the SAP NetWeaver BW 7.0 environment.
You may contact the author at shailesh.unny@bearingpoint.com.
If you have comments about this article or publication, or would like to submit an article idea, please contact the editor.