Have you ever asked yourself, "How can I create an easy report with only the fields I want to see on it?" The author suggests you try the SAP Query.
Have you ever asked yourself, "How can I create an easy report with only the fields I want to see on it?" A few examples are a simple customer listing with specific fields, a general ledger account history, or an accounts payable open-invoice report. R/3 delivers reports in these areas, but they are crowded with information and can be difficult to read. SAP Query gives you the ability to create such reports. A lot of people don’t even know that the SAP Query exists. I’ve had clients tell me that R/3 doesn’t have a query tool. In early releases, SAP Query was called ABAP Query. ABAP Query was not a graphical tool like SAP Query, so the creation and execution of queries was less user friendly.
This article is a "get-your-feet-wet" introduction to the SAP Query. I’ll discuss terminology and show you how to create a query. The query will have drill-down capability to the transaction code for changing a document. Drill-down makes navigation from the query to other queries, transactions, or ABAP programs easy, and it is a time saver. You don’t have to open a new session and go to the change document transaction. You just double-click on the document and you’re there.
SAP Query Components and Terminology
SAP Queries are organized in two areas: global and standard. All R/3-delivered queries are in the global area. These queries are all client independent, meaning they can be used in all clients in the system. Queries built in the standard area are client dependent and can only be used in the client they were created in. I recommend that you stay in the global area unless you have multiple clients in your productive environment and need to keep queries separate. This way you don’t have to transport the queries from client to client in your test systems.
SAP Query has three main components:
- InfoSets (called "functional areas" prior to R/3 Release 4.6) contain the fields from specific tables available to be queried on. InfoSets may call R/3 tables directly or call predefined tables, otherwise known as logical databases, which have selection criteria variables that are ready to be used when creating a query.
- A user group is a list of users. These are normally set up as departments, such as the accounting department or tax department. InfoSets and queries are assigned to user groups. Users have access only to InfoSets and queries assigned to their user groups.
- Queries are the reports that we, as finance professionals, devise, run, and rely on.
The key to SAP Query is knowing the fields that are needed for queries and creating the InfoSet correctly. The person responsible for creating InfoSets needs to be familiar with the table structures and fields. I recommend that this be a centralized function performed by a technical team member. Queries can be performance nightmares if your InfoSets are not created properly. The first query I wrote ran for three hours and timed out. I am a functional person with technical skills, but I am not an expert programmer. I had added additional fields to my InfoSet to total an amount in a material requirements planning table and was reading the table over and over in a loop. An ABAP programmer fixed the code I had added to the InfoSet, and the query ran in seconds—quite an improvement!
These are the main steps for creating a query:
- Create a user group and attach the InfoSet to the user group. (This can be done in user group maintenance or InfoSet maintenance.)
Business Issue Requiring a New Query
In my example, an accounting department needs a new report for a simple general ledger history listing with a few specific fields. The report should total the document amount on account number and company code with a counter for the number of postings to each account. From the listing, accounting wants drill-down capability to transactions for general ledger account maintenance and document change.
This example is built in R/3 Enterprise 4.70. In Release 4.6, a new graphical interface similar to SAP BW was added to SAP Query. Although the screens look different than in earlier releases, the functionality is similar.
The following example is very simple and could be done by either a functional or technical person. If you are creating more complex queries that require adding fields, code, or tables, I recommend that a technical person create the InfoSet. This is where a functional person can create technical or performance problems. Once the InfoSet is created, the functional person can take over and create the query.
Note
SAP Query is a listing tool and should not be used for complex reports such as balance sheets and income statements. Financial team members may need to work with a technical team member to build complex queries.
Creating an InfoSet
The InfoSet has to contain the fields you want to include in the query. If a field is not in an InfoSet, then it cannot be queried on. I’m going to include the company code, account, document amount, document number, posting date, and account description.
I’ll walk you through the steps for adding these fields to an InfoSet. Follow the menu path Information Systems>Ad Hoc Reports>SAP Query>Environment>InfoSets. (See Figure 1.)
- Enter InfoSet name Accounting and select Create.
- Give the InfoSet a Description as shown in Figure 1.
- Enter Logical database SDF. (See Figure 2.) This is the R/3-delivered logical database for general ledger (G/L) accounts and documents.
- Click the green check icon.
Then a pop-up box lists the tables and structure for the logical database SDF.
- Select the tables you will use in your InfoSet. (See Figure 3.) In my example, those are the G/L Account Master Record (Chart of Accounts), G/L Account Master Record (Company Code), and Accounting: Secondary Index for G/L Accounts.
- Click on the green check icon.
You are now at the main screen for configuring the InfoSet. (See Figure 4.) This screen has three main sections.
1. The left section is a list of the tables and fields in the logical database SDF.
2. In the top-right section is a list of field groups. These field groups match the tables you selected in Figure 3. To make a field available for queries, assign the field to a field group. If a field is not assigned to a field group, you cannot query on it.
3. In the bottom-left section, you can change a field description for queries. Double-click on the field in the left section and it appears in this section for modifying.
- Click on the Field Group G/L Account Master Record (Chart of Accounts) in the top-right section.
- Open the G/L Account Master Record (Chart of Accounts) folder in the left section by clicking on the arrow to the left of the folder. This opens to a list of the fields in this table.
- Select the field G/L Account Number by clicking once on the field in the left section.
- Click on the Insert field(s) button. This moves the G/L Account Number field into the highlighted field group to the right.
- Enter the following fields into the appropriate field groups following the same four steps. Make sure you enter the fields into the correct field group.
- From Folder: G/L Account Master Record (Chart of Accounts)
- From Folder: G/L Account Master Record (Company Code)
- From Folder: Accounting: Secondary Index for G/L Accounts
- Accounting Document Number
- Number of Line Item in the Accounting Document
- Posting Date in Document
- Amount in Local Currency
- Cost Center
- You may be prompted for a development class/transport request at this time. If you do not know what to enter, contact your technical team.
- Generate the InfoSet by clicking on the generate button.
- Click the back-arrow button to the main SAP Query screen.

Figure 1
Initial InfoSet screen

Figure 2
Selecting a logical database

Figure 3
Table selection

Figure 4
Main InfoSet configuration screen
Creating a User Group
User groups control access to InfoSets and queries. InfoSets and users are assigned to user groups. When users go to SAP Query to create a query, the user group they are in determines the InfoSets to which they have access.
In my example of a G/L history report, the user group would include members of the accounting department. You could extend this to other departments that need G/L history information for functions such as reconciling month-end statements.
Follow the menu path Environment>User Groups from the main SAP Query screen.
The screen in Figure 5 is for maintaining user groups and assigning InfoSets to user groups.
- Enter User Group Accounting.
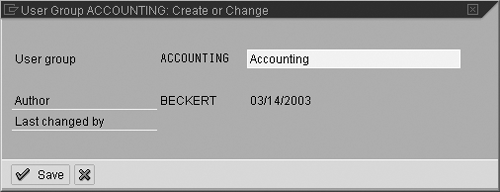
- Enter a description for the user group (Figure 6).
- Click on the Save button. You may be prompted for a development class/transport request at this time. If you do not know what to enter, contact your technical team.
- Once you have entered the text, you go back to the screen shown in Figure 5. Click the Assign users and InfoSets button.
- Enter the users that belong to the accounting department.
- Click on the Save button.
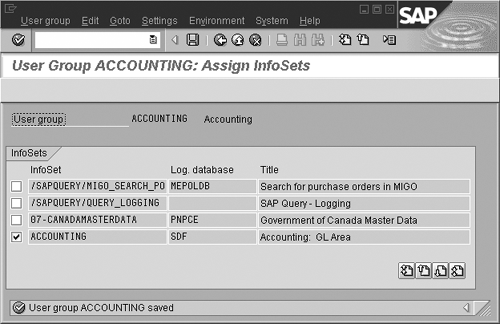
- Click on the Assign InfoSets button (Figure 7).
- Every InfoSet delivered by R/3 and created by the customer is listed. Scroll to the bottom of the list to find the customer InfoSets (Figure 8).
- Select the Accounting InfoSet.
- Click on the Save button.

Figure 5
Maintenance of user groups screen

Figure 6
User group description

Figure 7
Assigning users

Figure 8
Selecting InfoSets
Creating a Query
You now have the InfoSet and user group in place. The next step is to create the SAP Query. You include the fields from the InfoSet, set up sort fields and totals, put in a counter for the number of documents found, and add drill-down capability.
To access queries, follow the menu path Information System>Ad Hoc Reports>SAP Query. The transaction code is SQ01.
Verify that the user group at the top of the screen is Accounting. If not, click the Other User Group button (first button on the left under the screen title in Figure 9).
- Click on the Create button. If the wrong user group comes up, change it via Edit>Other User Group or by hitting the Other User Group button.
If the user group contains queries, they are listed on the screen. A user can execute any query in his user group if he has the proper authorization.
A list of the InfoSets available for your user group will come up (Figure 10). Only one InfoSet can be selected for a query. This means that all the fields you would like to include in your query must be in one InfoSet. Double-click on InfoSet Accounting to select it.
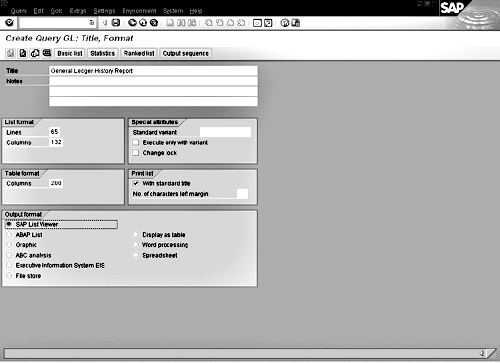
The report title appears on the title bar when the query is executed. This title does not print when the query is printed unless the Print list - with standard title button is on. (See the Print list section in Figure 11.)
The list format must match an existing print format in spool administration or the query does not print. The most common formats are 65x132 and 65x80.
- Enter the description General Ledger History Report as shown in Figure 11.
- Enter a List format of 65 Lines and 132 Columns.
- Click on the Basic list button at the top of the screen.
This brings up the graphical screen to build the query as shown in Figure 12. The entire query is built from this screen using drag-and-drop functionality.
The possible fields for the query are listed by table on the left side of the screen shown in Figure 12.
- Expand each section on the left side to show all the fields you included in the InfoSet.
- Select fields G/L Account Number, Text: G/L Account Number, Company Code, Amount, Posting Date, and Accounting Document Number. To select the fields, click the button in the List Fields column next to each data field.
- Click on the Selection Field button next to the Accounting Document number. This is the second column of check boxes on the left side of the screen. Some fields, such as G/L Account Number, are checked and grayed out. This means the field is pre-selected as a selection field in the logical database. You are prompted for all selection fields when executing the query.
As you select the fields in the List fields column, they appear at the top right side of the screen. This is the order they are displayed in unless you drag and drop the fields in another order.
- To have totals on the Account and Company code fields, click on the Account Value field in the query layout section. In Figure 12, the value is 15032. Drag the field to the Sort fields box and let go. Follow the same procedure with the Company code value.
- Follow menu path Tools>Counting Fields on/off. A new toolbox appears for counting. Counting totals the number of records by the fields you place in the counting toolbox. In my query, this totals the number of G/L documents posted to each account and company code.
- To have counting on the account and company code fields, click the Account Number field in the query layout section on the right side of the screen. Drag the field to the Counting fields box and let go. Follow the same procedure with the Company Code value.
- To change the text for a total line or a header line, click on the line. This takes you into edit mode. Notice that on your screen it says Sum of G/L Account Number. In Figure 12, I have changed the text to say Total for Account Number xxxxx. To make these cosmetic changes, click on the text in the screen and type over the default text.
- Change the header text to G/L Account Description. The default text reads G/L Account Number. Click on the field description to go into change mode. Type over the default text.
- Headers are important in a query. You can add variables such as date and time. Click the Insert Header button at the top of the screen.
- In the top line, enter General Ledger History.
- Add three lines to the header by simply double-clicking on the first header line where you entered General Ledger History. Additional lines are inserted.
- Add the date and time stamps on each line. The variable is entered as &%DATE and &%TIME.
- Click on the green arrow to go back one screen.

Figure 9
Initial query screen

Figure 10
List of InfoSets

Tami Becker
Tami has been working with SAP R/3 for about eight years and really enjoys the software and its constant challenges. Her focus has been with reporting, FI, SPL, SAP Enhancements, Euro, DART, Conversions, and now Contract Accounting. There’s never a dull moment with each new release — she hopes you find it as interesting as she does!
If you have comments about this article or publication, or would like to submit an article idea, please contact the editor.


