SAP Lumira and SAP Lumira Cloud are SAP’s offerings focused on business analysts and enabling them to create their own reports and analytics. In this article, learn how to use SAP Lumira and SAP Lumira Cloud in combination with data from SAP NetWeaver BW and SAP NetWeaver BW on SAP HANA.
Key Concept
SAP Lumira allows you to connect to your SAP NetWeaver BW system by using a relational Universe (UNX). SAP Lumira is able to leverage the generated SAP HANA models when using SAP NetWeaver BW on SAP HANA.
Sample Data
For the exercises in this article, I am using the SAP NetWeaver demo model. You can find details about the SAP NetWeaver demo model by following this link:
https://scn.sap.com/docs/DOC-33313.
SAP Lumira and SAP NetWeaver BW Data Connectivity
In two of my previous BI Expert articles (“Using SAP Lumira with Your SAP ERP Data” and “Discover Your SAP ERP and SAP BW Data Using SAP Lumira and SAP Lumira Cloud”), I reviewed the different data connectivity options for SAP Lumira with SAP ERP and SAP NetWeaver BW and offered details about the connectivity for SAP ERP. In this article I cover the details of the connectivity of SAP Lumira to SAP BW and SAP BW on SAP HANA.
The first step is to review your connectivity options, starting with the option for connecting SAP Lumira to SAP NetWeaver BW without using SAP NetWeaver BW on SAP HANA (Figure 1).

Figure 1
Data connectivity for SAP NetWeaver BW on SAP HANA
Figure 1 shows the current option, using the SAP BusinessObjects BI 4.x relational Universe (UNX) based on the SAP NetWeaver BW InfoProvider for SAP Lumira.
Note
Note that at this point in time (April 2014) SAP Lumira does not connect to an SAP BusinessExplorer (BEx) query from SAP NetWeaver BW, but instead connects to SAP NetWeaver BW using the relational Universe.
Table 1 shows the main limitations for the relational Universe in combination with SAP NetWeaver BW. As you can see, the relational Universe is not able to provide the information that is typically created in the BEx query, such as a calculated or restricted key figure. In other words, the relational Universe is providing you with the bare minimum of metadata from the InfoProvider.
| BEx query element |
Relational Universe |
| Calculated key figures |
No |
| Restricted key figures |
No |
| Variables |
No |
| Conditions |
No |
| Unit/Currency conversion |
No |
| Display attributes |
Yes |
| Hierarchies |
No |
| Custom structures |
No |
| BI authorizations (security) |
Yes |
| Time-dependent objects |
No |
Table 1
Relational Universe limitations
Note
For data connectivity to SAP NetWeaver BW on SAP HANA via the relational Universe licensing requirements and information users should talk to their account executive.
SAP Lumira and SAP NetWeaver BW on SAP HANA Data Connectivity
In addition to the option to use the relational Universe to connect to SAP NetWeaver BW, SAP Lumira is also able to use the integration with SAP HANA in cases in which you are running SAP NetWeaver BW on SAP HANA.
Figure 2 shows the unique integration for SAP NetWeaver BW on SAP HANA with SAP Lumira. In cases in which you are using SAP NetWeaver BW on SAP HANA, your underlying SAP HANA system has a set of tables managed by SAP NetWeaver BW and a set of tables managed by SAP HANA. With SAP NetWeaver BW on SAP HANA, you also have the ability to generate an SAP HANA model based on your existing assets from SAP NetWeaver BW, which can be an InfoProvider or a BEx query. After the model has been generated in SAP HANA you can then connect SAP Lumira to the new model and analyze the data from SAP NetWeaver BW on SAP HANA.

Figure 2
Data connectivity for SAP NetWeaver BW on SAP HANA
Creating the Relational Universe on SAP NetWeaver BW
In these next steps, I show how to set up a relational Universe based on the SAP NetWeaver demo model so that it can be used with SAP Lumira.
Start the Information Design tool by following menu path Start > Programs > SAP Business Intelligence > SAP BusinessObjects BI Platform Client Tools > Information Design Tool. Select the menu File > New > Project to create a new project for your Universe. Enter BW_UNIVERSE as the name for the new project and click the Finish button.
In the screen that appears (not shown), select your new project from the list of Local Projects. Select the Menu option and make sure the Repository Resources are shown (Figure 3). From the context menu select the Insert Session option to establish a session to your SAP BusinessObjects system.

Figure 3
Repository resources
Next, log on to your SAP BusinessObjects BI server using your SAP credentials and click the OK button (Figure 4).

Figure 4
Relational connection
Tip!
The logon dialog does not provide separate entries for the SAP System ID and the client number; because of this, you need to enter those details as part of the user name following the syntax: <System ID>~<Client>/<User Name>. In my example it’s IH1~001/DEMO.
Open the context menu of your established server connection in the Connections folder, and select the Insert Relational Connection option (Figure 4).
Tip!
To establish a relational connection towards the SAP NetWeaver BW connection, you need to first establish a session towards the SAP BusinessObjects system. Then create a connection starting with the repository of your SAP BusinessObjects system, which is slightly different from the usual workflow.
In the screen that appears, enter a name for the connection—BW_RELATIONAL_CONNECTION in my example—and click the Next button. In the screen that appears, select the SAP Java Connector connection type in the SAP NETWEAVER BW category, and click Next. This opens the screen in Figure 5, where you enter the required details for your SAP NetWeaver BW system.

Figure 5
Connection details
Tip!
You can set the Authentication Mode field to Use Single-Sign On (Figure 5), but this requires your SAP BusinessObjects Enterprise system to be configured with SAP Authentication.
Select the Save Language check box if you want to save your settings as configured in the relational connection. In you don’t check this check box, users have the option to change the language by setting the user preferences in the BI Launchpad. Next, click the details icon  to the right of the InfoProvider field to see a list of possible InfoProviders (Figure 6).
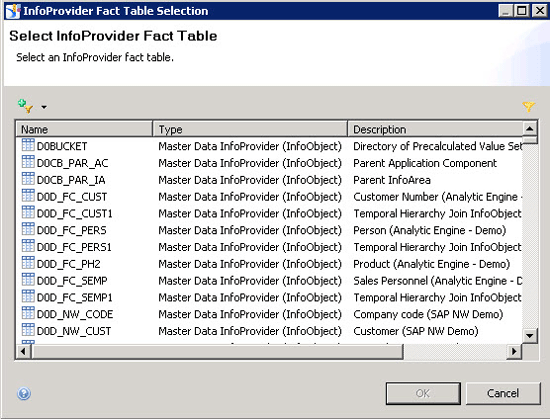
Figure 6
InfoProvider listing
You can use the filter icon (the funnel icon at the top left of Figure 6) as part of the screen to limit the list of InfoProviders based on the type of InfoProvider. For example:
IOBJ = InfoObject
CUBE = InfoCube
ODSO = Operational Data Store
MRPO = MultiProvider
VIRT = Virtual InfoProvider
In this example, I am using the MultiProvider 0D_NW_M01 from the SAP NetWeaver demo model. The entries have the letter I in front of the technical names. When you have finished making your entries, click the OK and then the Finish buttons. The system asks if you would like to create a shortcut for your connection. Click Yes, and select your local project as the location for the shortcut. Click the OK button and then the Close button.
Now that you’ve created the connection towards SAP NetWeaver BW, I show how to set up the relational Universe. Follow these 13 steps:
1. In the Information Design Tool select your local project.
2. Follow menu path File > New > Data Foundation.
3. In the screen that results, enter BW_DATA_FOUNDATION as the name for the Data Foundation.
4. Click the Next button, which opens the screen in Figure 7.
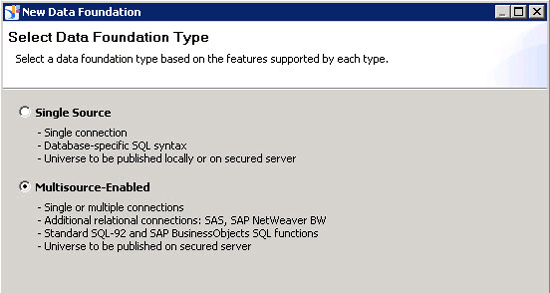
Figure 7
Select the new data foundation
5. Select the Multisource-Enabled radio button. The connection towards SAP NetWeaver BW is not available when using the Single Source option.
6. Click the Next button.
7. You are asked to log on to your SAP BusinessObjects Enterprise system. Your credentials should already be entered.
8. Click Next.
9. Select the shortcut that you created previously.
10. Click Next.
11. Click Advanced.
12. In the screen that results (Figure 8) make sure that the Automatically create tables and joins (recommended) check box is selected.

Figure 8
The new data foundation
13. Click the Finish button.
This presents a default-generated star schema for the selected InfoProvider; now you can create the business layer for your Universe. Follow these nine steps:
1. Follow menu path File > New > Business Layer.
2. Select the Relational Data Source entry.
3. Click Next.
4. Enter BW_BusinessLayer as the name for the business layer.
5. Click Next.
6. In the screen that results (Figure 9), select the newly created data foundation—BW_DATA_FOUNDATION.

Figure 9
The new business layer
7. Click OK.
8. Check to make sure the option Automatically create folders and objects for SAP NetWeaver BW connections (recommended) check box is activated.
9. Click Finish.
Next you are presented with a list of classes, dimensions, and measures that have been generated based on the information retrieved from SAP NetWeaver BW. Because the relational Universe has been built with the actual dimension objects representing the key values of the InfoObjects from SAP NetWeaver BW, I want to make a set of changes in the relational Universe before using it for reporting.
In the following steps I show how to:
- Add a detail object to show the key values for the characteristics in the relational Universe
- Change the definition of the dimension object so that it shows the text value of the characteristics
- Make formatting changes to the Calendar Year and Calendar Month entries
Follow these 15 steps:
1. Open the newly created business layer (Figure 10).

Figure 10
The generated business layer
2. Navigate to the class Country Key.
3. Navigate to the dimension Country (SAP NW Demo). Notice that there is no entry for the key value of the dimension. The key value is what is used to create the dimension object.
4. Right-click the dimension Country (SAP NW Demo).
5. In the context menu select New > Attribute.
6. Enter Country Key as the Name for the new attribute.
8. Now select the dimension object Country (SAP NW Demo).
9. Select the complete syntax from the SELECT box and copy it to the clipboard.
9. Navigate back to the newly created attribute Country Key.
10. Paste the copied syntax into the SELECT box for the newly created attribute Country Key.
11. Now select the attribute Country Heading (SAP NW Demo).
12. Select the complete syntax from the SELECT box and copy it to the clipboard.
13. Navigate back to the dimension object Country (SAP NW Demo).
15. Paste the copied syntax into the SELECT box for the dimension object Country (SAP NW Demo).
What is the purpose of these 15 steps? The relational Universe was created with the key value for the underlying characteristics representing the dimension objects for the Universe and without the changes made with these steps, you would only see the key values without the descriptions for the characteristics in SAP Lumira or any other reporting tool. When you want to leverage the Universe for reporting and not just to follow the steps in this article, you would also make the changes that are outlined above for the characteristic Country for the other objects in the Universe.
Adjust Calendar Year and Month Dimensions
After you complete these steps above, it’s time to make some adjustments to the Calendar Year and Calendar Month dimensions. To make your changes, follow these 25 steps:
1. Navigate to the dimension Calendar Year in the class Time and select the dimension object in the business layer.
2. Navigate to the Advanced tab (Figure 11).
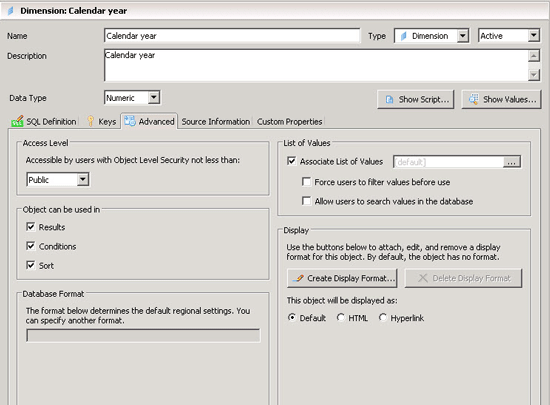
Figure 11
Advanced options
3. From the drop-down options in the Data Type field, select Numeric and click the Create Display Format…. button.
4. In the screen that appears (not shown) select the Numeric option.
5. Click the Custom Format button; this opens the screen in Figure 12.
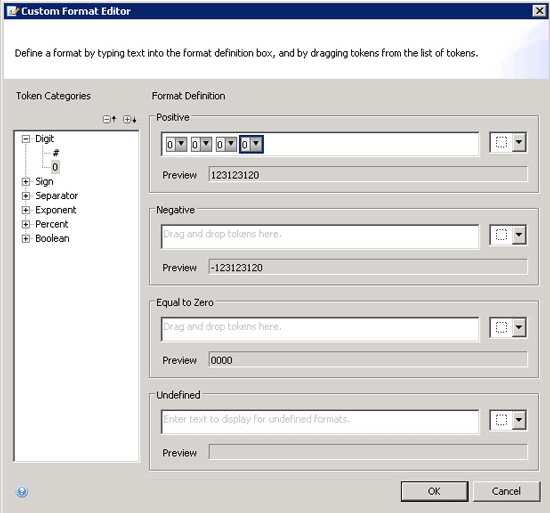
Figure 12
Custom format
6. Select the 0 option under Digit and, using the + sign icon, add the 0 item four times.
7. Click OK.
8. Click OK.
9. Navigate to the dimension Calendar Year/Month.
10. Navigate to the Advanced tab.
11. Click the Create Display Format… button.
12. Select the Numeric option.
13. Click the Custom Format… button.
14. Create a custom calendar year/month format (like 0000/00).
15. Click OK.
16. Click OK.
17. Follow menu path File > Save All.
18. Right-click the newly generated business layer entry as part of your local project.
19. Follow menu path Publish > To a Repository.
20. Select the integrity checks you would like to perform.
21. Click Next.
22. Select a folder for the relational Universe.
23. Click Finish.
24. Click Close.
25. Close the Information Design Tool.
At this point, you have created a relational Universe based on your SAP BW InfoProvider. Now you can use SAP Lumira to connect to SAP NetWeaver BW. Later on in this article I show how to use SAP Lumira with this newly created Universe, but first I show how to generate an SAP HANA model based on your SAP NetWeaver BW InfoProvider.
Generating an SAP HANA Model Based on SAP NetWeaver BW Assets
If you are using SAP NetWeaver BW on SAP HANA you also have the option to generate an SAP HANA model based on your existing assets in SAP NetWeaver BW. You can directly import an SAP HANA-optimized InfoCube and DSO object and you have the option to create a snapshot based on a BEx query. In this example I discuss the option of directly importing an SAP HANA-optimized InfoCube. Follow these 21 steps:
1. Start SAP HANA Studio by following the menu Start > All Programs > SAP HANA > SAP HANA Studio.
2. Select the entry for your SAP HANA system. If you don’t have a system entry yet you can right-click in the Administration Console and use the context menu Add System option to create a new system entry.
3. Follow menu path File > Import (Figure 13).
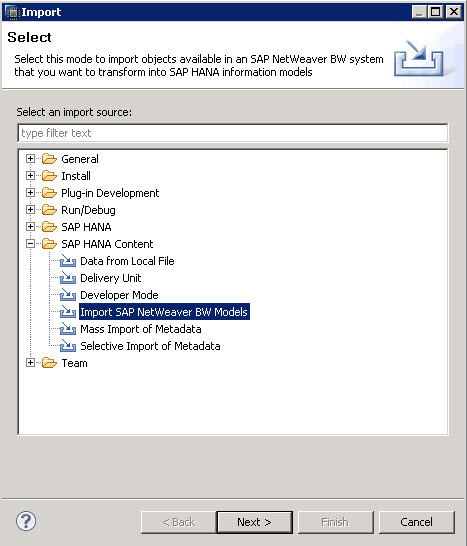
Figure 13
Import SAP NetWeaver BW models
4. Open the Folder SAP HANA Content.
5. Select the Import SAP NetWeaver BW Models option.
6. Click Next (Figure 14).
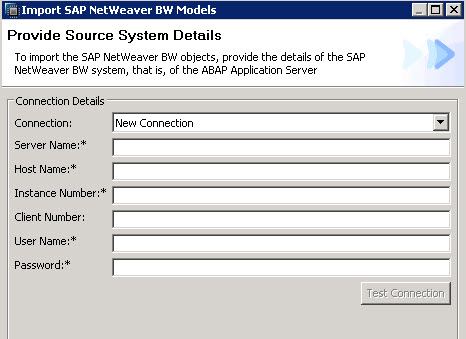
Figure 14
Connection details
7. Enter the SAP NetWeaver BW server details.
8. Click the Test Connection button.
9. Click OK.
10. Click Next.
11. In the screen that opens (not shown), select the SAP HANA System entry that you would like to use for the import.
12. Click Next, which opens the screen in Figure 15.

Figure 15
Import details
13. Open the InfoArea for the SAP NetWeaver demo model.
14. Select the InfoCube 0D_NW_C01 (on the left).
15. Click Add.
16. Select the Include Display Attributes check box.
17. Select the Overwrite existing objects check box.
18. Click the Browse… button next to the Package field and select a package for the model as part of your SAP HANA system.
19. Click OK.
20. Click Finish.
21. After the import has been successfully finished, navigate to the package and, using the Data Preview context menu (right-click), check to see if the model has been imported.
Now I show how to generate an Analytical View and Calculation View in SAP HANA, and use the models in SAP HANA and the previously created relational Universe with SAP Lumira.
Using SAP Lumira With a Relational Universe for SAP NetWeaver BW
Follow these 14 steps to create your first data discovery content using SAP Lumira based on the relational Universe for SAP NetWeaver BW.
1. Navigate to menu path Start > Programs > SAP Business Intelligence > SAP Lumira > SAP Lumira.
2. Select File > New.
3. Select the Download from a Universe option (Figure 16).

Figure 16
Connect to a Universe to download dataset
4. Click Next.
5. In the screen that opens (not shown) enter the details to log on to your SAP BusinessObjects BI server.
6. Click Connect.
7. You are now presented with the list of available Universes (Figure 17). Select the newly created Universe connecting to your SAP NetWeaver BW system (BW_BusinessLayer.unx).

Figure 17
New dataset
8. Click Next, which opens the screen in Figure 18.
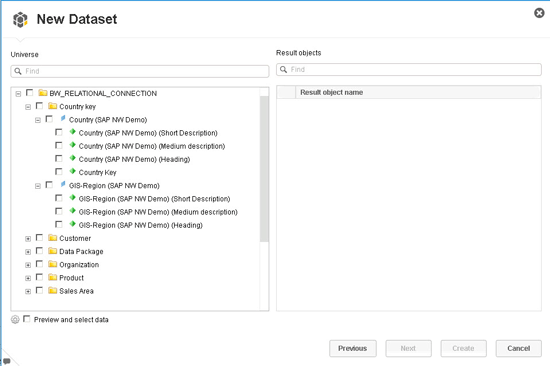
Figure 18
List of fields
9. The list of fields from the Universe is shown in Figure 18.
10. Select the fields that you would like to leverage with SAP Lumira from the list.
11. Note that SAP Lumira does not have a concept of a key and description field for a single dimension yet. As a result, if you do select, for example, the Country Key and Country Description fields, SAP Lumira displays two separate fields.
12. Activate the Preview and select data check box.
13. Click Next, which opens the screen shown in Figure 19.
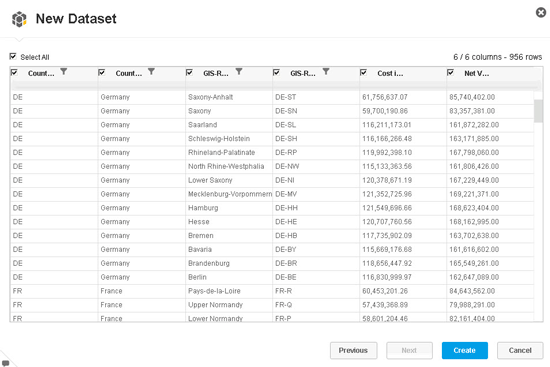
Figure 19
Data preview
Data Preview shows all the columns and, most importantly, you are presented with the option to pre-define filter values before the data is requested from your SAP NetWeaver BW system. In this manner, you can avoid a situation in which you would inadvertently download all the data from the InfoCube to your client system.
14. Click the Create button, which opens the screen shown in Figure 20.
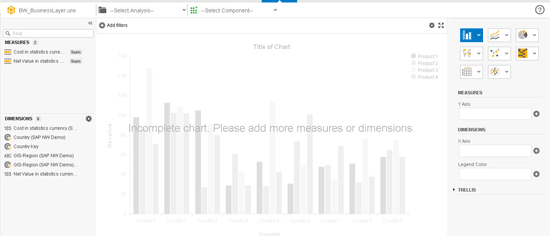
Figure 20
SAP Lumira
You can now use the data from your SAP NetWeaver BW system with SAP Lumira.
Using SAP Lumira with an SAP HANA Model Based on SAP NetWeaver BW
Previously I showed how to connect SAP Lumira using the relational Universe. Now I show how to connect SAP Lumira to the generated model based on your SAP NetWeaver BW InfoProvider. Follow these eight steps:
1. Navigate to menu path Start > Programs > SAP Business Intelligence > SAP Lumira > SAP Lumira.
2. Select the menu File > New, which opens the screen shown in Figure 21.
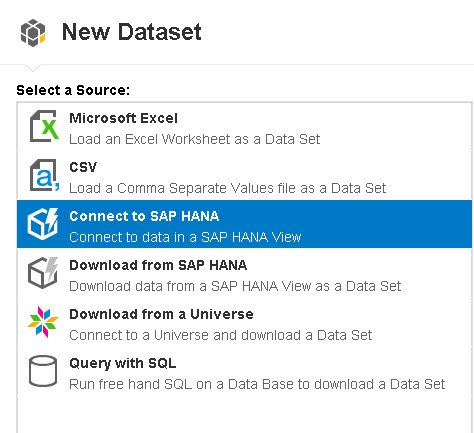
Figure 21
New dataset
3. Select the Connect to SAP HANA option.
4. Click Next.
5. Enter the details to logon to your SAP HANA system.
6. Click Connect.
7. This results in a list of available analytical models (Figure 22). In this example I select the Analytical view created for the SAP NetWeaver Demo model InfoProvider.
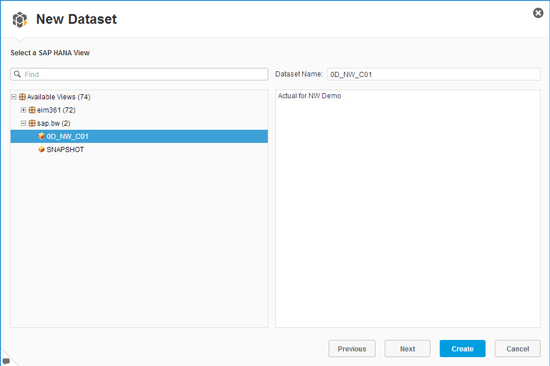
Figure 22
New dataset
8. Click Create, which opens the screen in Figure 23.
Figure 23
SAP Lumira
Now you have successfully published the data model from your existing SAP NetWeaver BW InfoProvider towards SAP HANA and you generated an analytical mode in SAP HANA. You are now able to connect to the model using SAP Lumira. Note that one limitation in SAP Lumira at this point (as of April 2014) is the fact that SAP Lumira does not recognize so-called Label Columns from the HANA model. That means that, unless you manually adjust the HANA model, SAP Lumira only shows the key columns of the characteristics without the description values.
Product Roadmap Disclaimer
The descriptions in this article of future functionality are the author’s interpretation of the publicly available product integration roadmap. These items are subject to change at any time without any notice, and the author is not providing any warranty on these statements.

Ingo Hilgefort
Ingo Hilgefort started his career in 1999 with Seagate Software/Crystal Decisions as a trainer and consultant. He moved to Walldorf for Crystal Decisions at the end of 2000, and worked with the SAP NetWeaver BW development team integrating Crystal Reports with SAP NetWeaver BW. He then relocated to Vancouver in 2004, and worked as a product manager/program manager (in engineering) on the integration of BusinessObjects products with SAP products. Ingo's focus is now on the integration of the SAP BusinessObjects BI suite with SAP landscapes, such as SAP BW and SAP BW on SAP HANA, focusing on end-to-end integration scenarios. In addition to his experience as a product manager and in his engineering roles, Ingo has been involved in architecting and delivering deployments of SAP BusinessObjects software in combination with SAP software for a number of global customers, and has been recognized by the SAP Community as an SAP Mentor for SAP BusinessObjects- and SAP integration-related topics. Currently, Ingo is the Vice President of Product Management and Product Strategy at Visual BI Solutions, working on extensions to SAP’s product offering such as SAP BusinessObjects Design Studio and SAP Lumira. You may follow him on Twitter at @ihilgefort.
You may contact the author at Ingo@visualbi.com.
If you have comments about this article or publication, or would like to submit an article idea, please contact the editor.