Learn how to configure SAP’s Business Planning and Consolidation (BPC) 10.1, version for NetWeaver with SAP HANA for planning using any SAP or non-SAP data as reference data for BPC planning functions in real time, without any data duplication or replication.
Key Concept
The SAP HANA system handles data such as local tables on the database. Using automatic data type conversion, you can map data types from databases connected via SAP HANA Smart Data Access to SAP HANA data types.
SAP’s Business Planning and Consolidation (BPC), version for NetWeaver 10.1 became generally available in Q2 2014. With this release of BPC, SAP offers two model types, standard and embedded, that can be deployed to meet your business needs.
The architecture and functionality of the standard model type is very similar to BPC 10.0, version for NetWeaver, whereas the embedded model type is similar to the modeling paradigm of SAP BW Integrated Planning (BW-IP) and Planning Applications Kit (PAK) where master and transactional data from the entire host EDW environment is accessible by the application.
The embedded model allows easy access to all data within the host BW, as well as other data sources accessible by SAP BW, including big data. The embedded model in BPC 10.1, version for NetWeaver uses SAP HANA as the primary database and therefore can easily leverage the features and functions of SAP HANA to extend the scope of planning functionality offered by BPC. I explain how you can use the embedded model to easily access the non-BW data within the SAP HANA database, as well as go beyond data contained within SAP HANA by leveraging the Smart Data Access (SDA) feature of SAP HANA to use external data in planning applications within BPC 10.1, version for NetWeaver.
This is a potential game changer in more ways than one. First, users can easily extend their reach to any internal or external, SAP or non-SAP data accessible by SDA, to use it in the embedded planning models. Second, this data is real-time data and therefore increases the agility of the planning application. Third, all this data management can be done without any data duplication or replication since SDA creates only virtual tables without storing any physical data.
Features of the BPC 10.1, Version for NetWeaver Embedded Model
Both standard and embedded models can be used in the SAP Enterprise Performance Management (EPM) web client, EPM web reporting, and mobile reporting in similar ways. Both models make use of business process flows, work status, process chains, and granular transports in similar ways. Both support SAP NetWeaver authorizations and customizing using ABAP.
However, the embedded model is more suitable where centralized (IT) governance is more important. The embedded model provides complete EDW integration, leverages SAP BW content, makes use of the SAP Business Explorer (SAP BEx) Analyzer, and uses FoxScript. The SAP BW layer provides a wide variety of delivered integration content that simplifies access to SAP and non-SAP systems. Through the use of MultiProviders and virtual InfoProviders, the embedded model of BPC 10.1, version for NetWeaver is in the best position to consume information directly stored within SAP HANA. SAP HANA provides a wide variety of techniques to efficiently process BPC or SAP BW information (i.e., predictive functions generating BPC forecasts).
Data from external sources can be easily accessed using SAP SDA, SAP Data Services, and SAP Landscape Transformation (SLT) processes. This information can be virtualized into BPC or SAP BW for consumption in the planning functions. I show the details for how to access the external data through SDA and how to consume the external data in the planning functions of BPC 10.1. I explain how to access only the transactional data using SDA. A similar approach can be adopted for accessing external master data as well, but that topic is beyond the scope of this article.
Configuring SDA to Access an External Database
Before configuring SDA, ensure that all the prerequisites are met. The detailed prerequisites for realizing SDA can be found here: https://help.sap.com/saphelp_nw74/helpdata/en/bb/df686dc0d94f779b5c11d06753da95/content.htm.
Once the prerequisites are met, you can log on to SAP HANA studio and complete the following steps to configure the external database:
- Select the remote source
- Define the properties of the remote source
- Test the connection
I cover each step in more detail in the following sections.
Select the Remote Source
From the SAP HANA studio main menu go to the Provisioning node to select the remote source. Open the Provisioning node, select the Remote Source folder, right-click, and select the New Remote Source… option from the context menu. This opens the screen shown in Figure 1.

Figure 1
Select the adapter for the remote source
Define the Properties of the Remote Source
Next, you need to define the properties of the remote source. In the screen in Figure 1 enter the name of the source and select the adapter you want to use depending on the remote source database. Enter the properties of the remote source as shown in Figure 2 (an expanded view of part of the screen in Figure 1). In the Connection Properties section of Figure 2, enter the details for the Server and Port. In the Credentials section, enter the User Name and Password that are used to access the remote source. Note that only the data that is accessible by the user name that you enter in this step is available for you to use in the rest of the steps outlined in the following sections. Therefore, it is important to make sure that the user name entered here has the requisite authorization for the data that you want to use in your planning application.

Figure 2
Define the properties of the remote source
Test the Connection
After you enter the properties of the remote source, click the test the connection icon (highlighted in the upper right of Figure 3). If the remote source connection works, you receive a confirmation message like the one shown in Figure 4.
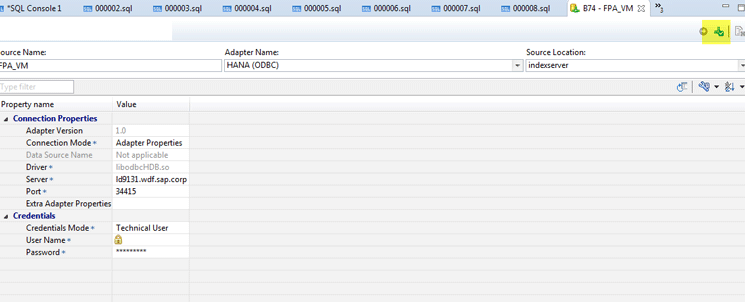
Figure 3
Test the connection

Figure 4
The remote source is connected properly
On the left side of the screen (Figure 5), open the Remote Sources folder. Refresh the screen by pressing F5. Now, on the left side of the screen, you can see that the remote source is added to the list of remote sources available to you (Figure 6). Within those remote sources, you can check the tables that you want to use in the planning applications as shown in Figure 6. In my example, I use table PR_REV_BY_CNTRY in the planning application. This table is stored in the external database, but is accessible through the remote source defined in the SDA.

Figure 5
Check the remote sources
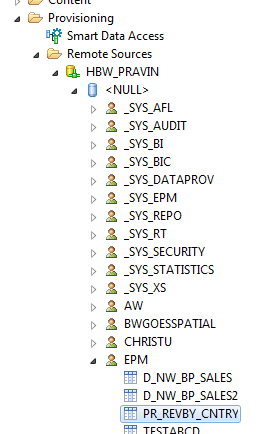
Figure 6
Ensure that the tables from the remote source are added to the list of remote sources
Configure the Virtual Table
Next you need to create a virtual table to avoid data duplication and read values from the physical table in real time.
Create a Virtual Table
After you ensure that you can access the required table from the remote source, select the table (e.g., PR_REVBY_CNTRY), right-click it, and select Add as virtual table from the context menu. This action opens the screen in which you create a virtual table for the physical table in the remote source (Figure 7). In the Table Name field, enter a name for the virtual table (e.g., HBW_VIRTUAL_PR_REVBY_CNTRY). When you create the virtual table , the schema is populated by the schema for which you have authorization. If you are authorized for more than one schema, then you may have to select the schema where you want this virtual table to be created from the drop-down list of options in the Schema field. After you populate the Table Name and Schema fields, click the Create button to generate the virtual table. Once generated you see a confirmation message like the one shown in Figure 8. Click the OK button to proceed.
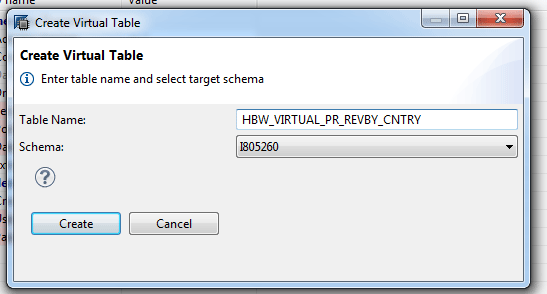
Figure 7
Create the virtual table

Figure 8
Confirmation message that the virtual table has been created
Check the Virtual Table
To check the virtual table that you just created, navigate to your schema by opening the Catalog folder on the left side of your screen (Figure 9) and opening the Tables folder to see the virtual table.
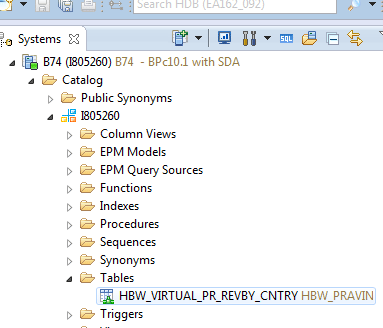
Figure 9
Check the virtual table
Preview the Data from the Virtual Table
To preview the virtual table, select the table name, right-click it, and choose Open Data Preview from the list of options in the context menu. The data in the remote table is displayed as shown on the right in Figure 10.

Figure 10
Open data preview
Create a Calculation View
To create a calculation view for the virtual table you created, either select an existing package or create a new package. To create a new package, navigate to the Content folder, right-click it, and select New and then Package from the context-menu options. In the screen that opens (Figure 11), you are prompted to enter a Name and Description for the new package. After populating these fields, click the OK button. The other fields are populated by default.
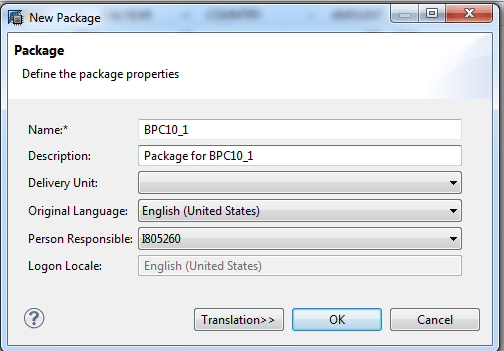
Figure 11
Define the package
This action opens the screen shown in Figure 12. Navigate to the left side of the screen and open the Content folder. Select the new package you created (e.g., BPC10_1) and right-click it to open the context menu. Then select New and Calculation View… from the options as shown in Figure 12.

Figure 12
Create a calculation view
In the screen that opens (Figure 13), define the calculation view. Enter the name and a description for the calculation view in the Name and Label fields, respectively. Accept all other defaults and click the Finish button.

Figure 13
Define the new calculation view
In the edit screen that opens (Figure 14), configure the calculation view. Locate the virtual table you created earlier and drag and drop it in the Aggregation area in the right pane.

Figure 14
Configure the calculation view
This action opens a screen (Figure 15) that displays all the fields available in the virtual table. Select from the table (highlighted by the red box) the fields that you want to have in your planning applications, right-click, and select Add to Output. In my example, I select all the fields from the table.
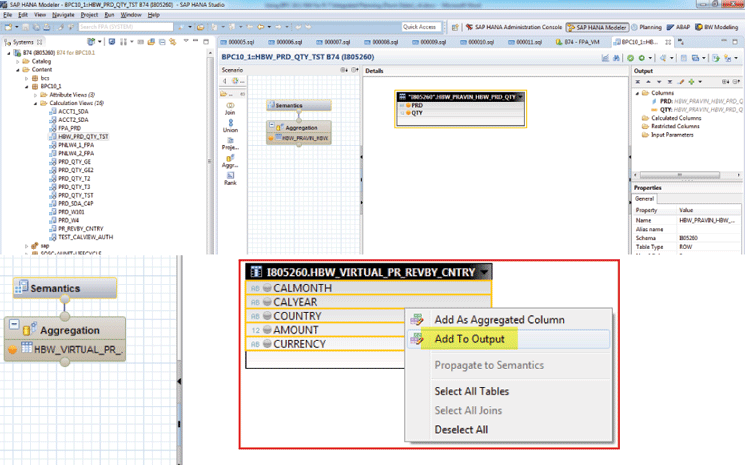
Figure 15
Add fields to output
Activate the Calculation View
To activate the calculation view, click the Save and Activate button in the edit screen (Figure 16).
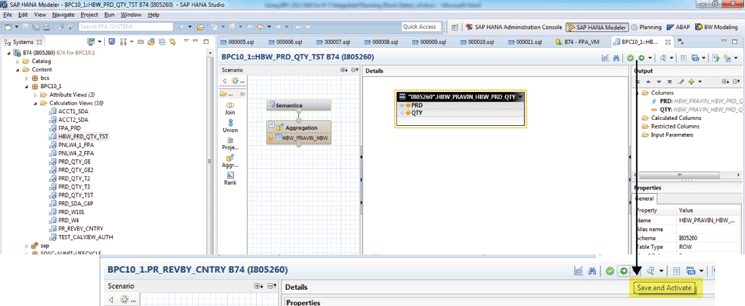
Figure 16
Save and activate the calculation view
Preview the Data from the Calculation View
After activating, you can preview the data from the calculation view by right-clicking the calculation view (PR_REV_BY_CNTRY) from the list and selecting the Data Preview option from the context menu (Figure 17). In the data preview screen that opens (at the bottom of Figure 17), you can see the data under the Raw Data tab. The data that you see in this preview is now available for planning. This step completes the configuration steps required within SAP HANA studio.
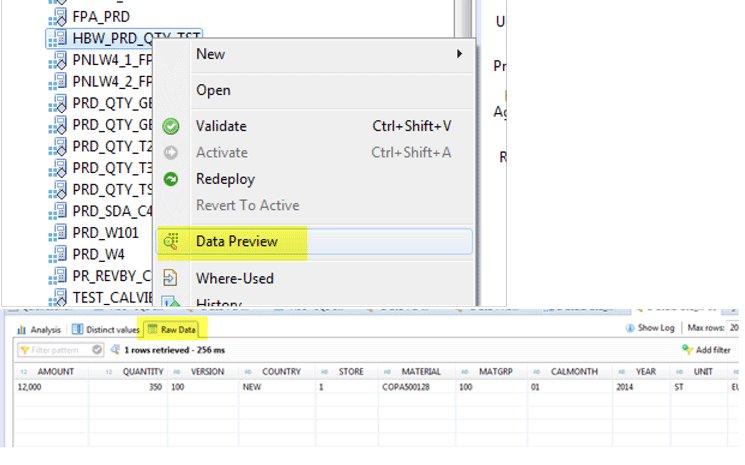
Figure 17
Preview the data from the calculation view
Configure BW to Consume External Data in Planning Applications
After you create an active calculation view, you can proceed with the configuration of SAP BW and BPC 10.1, version for NetWeaver to use this data in planning applications. Up to this point, there is no data duplication or replication and all the changes to the data in the remote source are available in the calculation view in real time.
First, log on to the BPC 10.1, version for NetWeaver system with your User Name and Password (Figure 18), and then access the data warehousing workbench by executing transaction code rsa1.
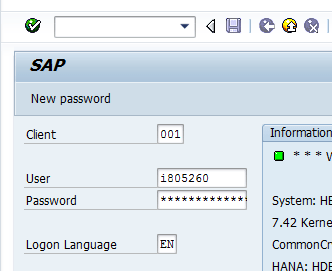
Figure 18
Log on to the BPC 10.1, version for NetWeaver system
In the screen that opens (Figure 19), create a virtual InfoProvider that is linked to the calculation view you created in the previous section. Within the data warehousing workbench, select the information area in which you want to create the virtual InfoProvider. Select InfoProvider in the Modeling list and right-click. Select Unassigned Nodes, and in the Change context menu, choose Create VirtualProvider… . This action opens the screen shown in Figure 20 in which you link to the SAP HANA model.
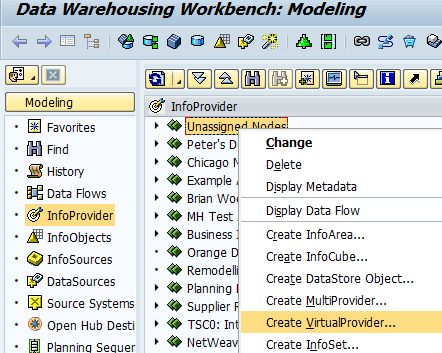
Figure 19
Create the virtual InfoProvider
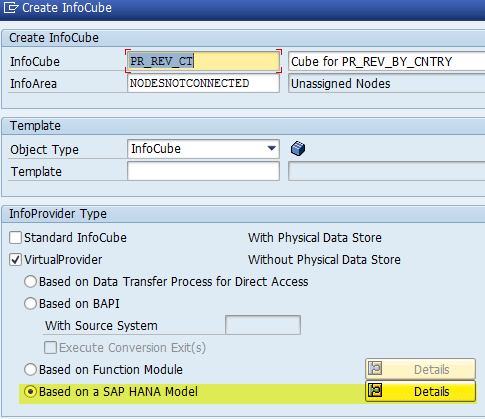
Figure 20
Link the virtual InfoProvider to the SAP HANA model
Enter the virtual InfoProvider name, description, and InfoArea in which this needs to be created. Then select the VirtualProvider check box, the Based on a SAP HANA Model radio button, and click the Details button.
Next, you need to select the package. After you click the Details button, the screen in Figure 21 opens. In this screen enter the package (that you created previously) in the HANA Information Model field. Then click the green checkmark icon to create the virtual InfoProvider. In the next screen that opens (Figure 22) you can enter the InfoObjects for the virtual InfoProvider directly.

Figure 21
Enter the SAP HANA package name

Figure 22
InfoObject direct input
In the screen in Figure 22 you enter the InfoObjects for the table fields in the virtual table you created in SAP HANA. One way to enter InfoObjects is to use the direct input as shown in Figure 22 by simply right-clicking the dimension and selecting InfoObject Direct Input from the context-menu options.
Once entered, the InfoObjects show up in the definition of the virtual InfoProvider. In this example, you can enter the InfoObjects for the table fields as shown in Figure 23. Note that 0AMOUNT is a key figure and the rest are characteristics.
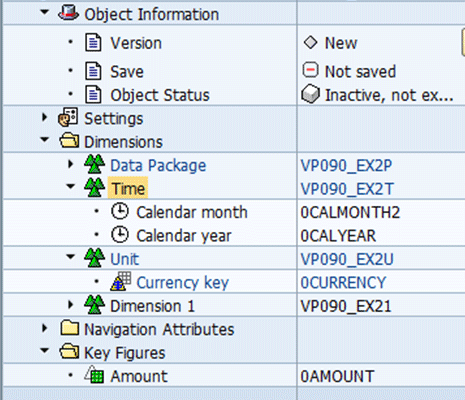
Figure 23
InfoObjects in the virtual InfoProvider
To map each characteristic and key figure to the SAP HANA table fields, select each characteristic and key figure and right-click them to open the Provider-Specific Properties context menu (Figure 24). In my example, I open the properties for the Amount key figure. This action opens the screen in Figure 25 in which you select the table field Amount from the Attribute Name drop-down options.

Figure 24
Open the Provider-Specific Properties menu options

Figure 25
Map table attributes to InfoObjects
Note
Mapping table attributes to InfoObjects enables you to connect the data
coming from SDA with the existing master data where appropriate.
Finally, save and activate the virtual InfoProvider by clicking the activate icon (not shown). In the pop-up screen that opens (Figure 26), acknowledge any warning messages by clicking the Yes button.

Figure 26
Save the activated virtual InfoProvider
Next, in the screen that opens (not shown) you need to verify the data in the virtual InfoProvider. Right-click the virtual InfoProvider name (VP090_EX2 in this case) and, in the Display context menu that opens, choose Display Data. This action opens a screen where you select the key figures and characteristics (Figure 27). After you have made your selections, click the execute icon. This results in a screen with all the data in the virtual InfoProvider (Figure 28).
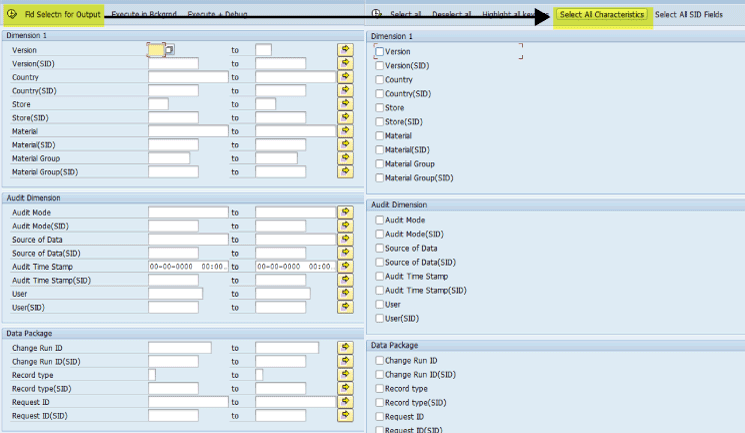
Figure 27
Select the key figures and characteristics fields for displaying data
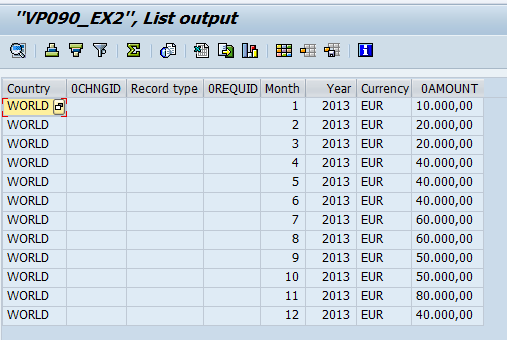
Figure 28
The output of all the data in the virtual InfoProvider
Consuming the Data by a Planning Application
By this point you have verified that the data from the external source is contained in the virtual InfoProvider. This virtual InfoProvider can now be included in a MultiProvider along with the BPC 10.1, version for NetWeaver plan cube. The data from the BPC 10.1, version for NetWeaver virtual InfoProvider can be used in the planning applications using planning functions, as shown in Figure 29.
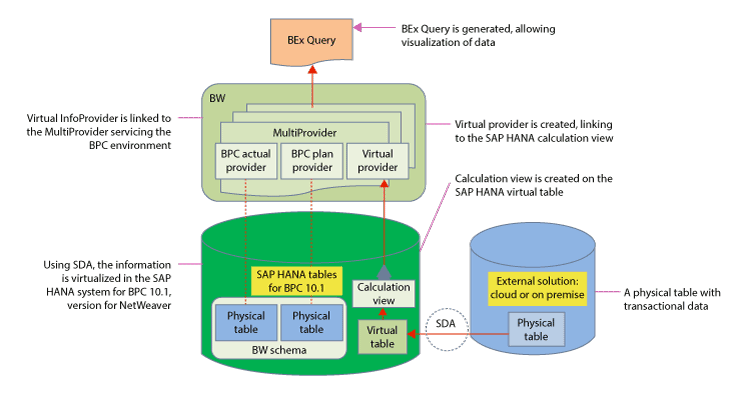
Figure 29
Consuming the data from the virtual InfoProvider into the planning applications
The data you have virtualized to be used in the planning application is the real-time data from the external system without any data replication anywhere. Whenever the data changes in the physical table in the external system without any data duplication, that change is available in your virtual InfoProvider instantaneously and can be consumed in the planning applications at any time.
Pravin Datar
Pravin Datar works as director in the Enterprise Performance Management (EPM) Solution Management team at the SAP BusinessObjects Division. He has more than 20 years of business experience that includes management consultancy, ERP project management, and SAP SEM, BPC RIG, and EPM solution management. He holds a master’s degree in industrial engineering and an MBA from University of California.
You may contact the author at editor@BI-expertOnline.com.
If you have comments about this article or publication, or would like to submit an article idea, please contact the editor.


