See how to apply campaign discounts during overall pricing in SAP CRM. Learn about the settings required to configure campaign discounts in both SAP ERP Central Component (SAP ECC) and SAP CRM, and how to prepare a high-level design to set up campaign discount functionality.
Key Concept
Campaign discount functionality in SAP CRM is often used as a sales incentive and to introduce new products to the marketplace. This process cuts across marketing, sales, and e-commerce scenarios.
Companies have traditionally used discount campaigns to stimulate sales. Many people and roles within an organization are involved in campaign processing across many different channels of sales, and with the number of sales on e-commerce and mobile channels increasing, campaigns must be accessible online and via mobile by customers as well as by sales reps. It is also important that discounts flow to the back-end SAP ERP Central Component (SAP ECC) system to be processed with minimal manual intervention, and, in cases in which there are multiple valid campaign codes, that campaign codes are able to be changed after the order is placed.
Campaign Code in Sales Orders: Process View
Figure 1 shows an overview of the campaign processing steps.
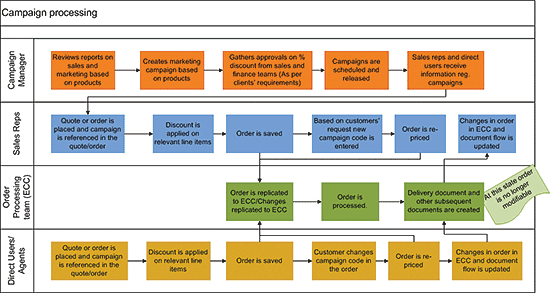
Figure 1
Campaign discount processing steps
Case Study
A company releases a new television. To promote this product the company is offering a 2 percent discount. It sells the TV through various channels – interaction center agents, direct sales reps, and a Web channel (e-commerce) business-to-consumer portal. Because the company uses multi-channel and multi-wave campaigns, it is possible for some customers to get multiple valid campaign codes. As a result, campaign codes referenced in the order may change. Based on the campaign code referenced in the sales order, the discount should be calculated and deducted from the price of the product.
Setting Up a Campaign
We explain the process of setting up a campaign in SAP CRM.
Step 1. Log on to the campaign manager role.
Step 2. Click Marketing > Campaigns on the left navigation bar (Figure 2).
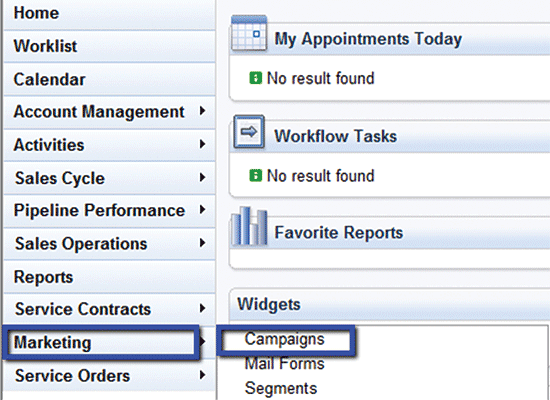
Figure 2
Navigate to the campaign screen from the campaign manager role
Step 3. Click the New button to create a new campaign (Figure 3). This takes you to the screen depicted in Figure 4.
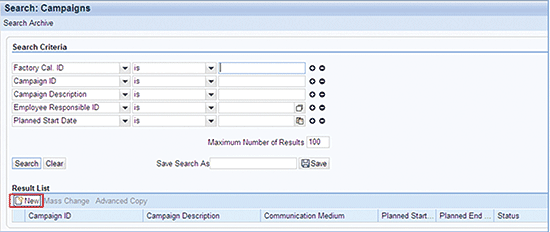
Figure 3
The New button, used to create a new campaign
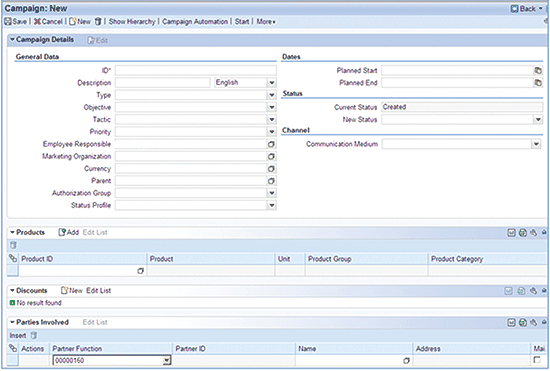
Figure 4
Input the details for the new campaign
Step 4. In the screen in Figure 4, enter the required campaign details (Description, Planned Start date, and Planned End date).
Step 5. Scroll down to the Products assignment block and maintain the product for which the discount is being offered as part of the campaign (Figure 5). The product ID can be typed in the highlighted box or searched for using the paper icon in the corner.

Figure 5
The Products assignment block
Step 6. Scroll down to the Parties Involved assignment block and click Edit List (Figure 6) to enable editing and maintaining information in this assignment block.

Figure 6
Parties Involved assignment block
Step 7. Change the status of the campaign to In Process (see the Status section of Figure 4). Set the Status to To Be Approved if approval is required before the campaign is released. Set the Status of the campaign to Released to execute the campaign.
Sales Reps
When customers or dealers call sales reps and reference the campaign code, sales reps create quotes or sales orders and enter them using the WebClient UI.
Step 1. Log on to the sales representative role. This takes you to the screen depicted in Figure 7.
Step 2. From the left navigation bar on the WebClient UI screen, click Sales Cycle and select Quotations (Figure 7).
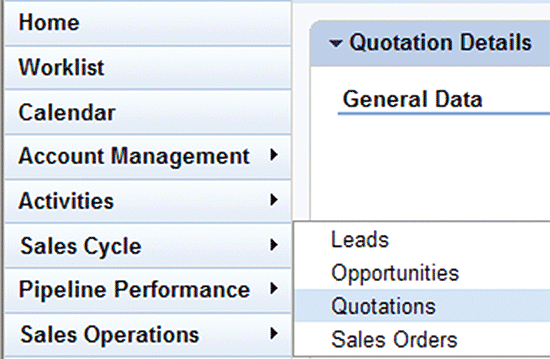
Figure 7
Sales representative: Sales cycle work center
Step 3. On the next screen, click the New button to create a new quote.
Step 4. Enter Sold-To-Party, validity dates, and campaign code information (Figure 8).
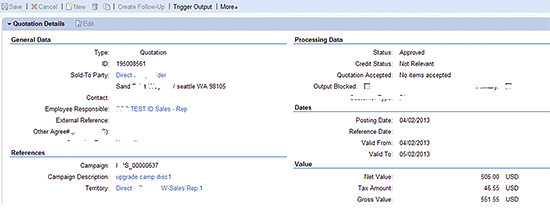
Figure 8
Quote create screen
Step 5. Scroll down and enter the product and quantity in the Items block (Figure 9).

Figure 9
Enter product and quantity data for a sales order in the Items block
Step 6. Scroll down to the Price Details block to check the prices and ensure that the prices and campaign discounts are applied correctly (Figure 10). Save the order by clicking the save icon (not shown).
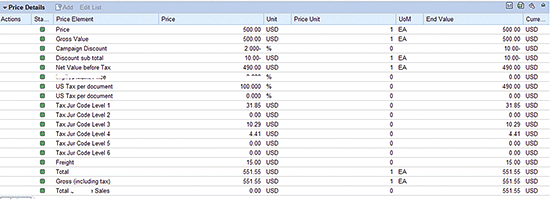
Figure 10
Price Details assignment block
Step 7. Scroll down to the Status block and set the status of the quote to Released (Figure 11).
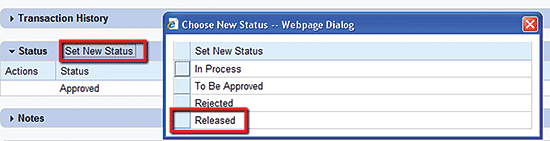
Figure 11
Status assignment block
Direct Customers or Agents Placing Orders via Business to Consumer Online Store
Direct customers can take advantage of the campaign and reference campaign codes in sales orders during checkout using a standard business-to-consumer online shopping interface (Figure 12).
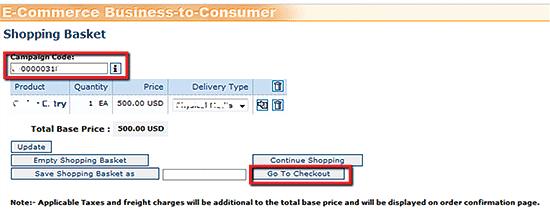
Figure 12
Consumers enter campaign codes when making purchases online
Sales Orders Processing
Quotes can be replicated to SAP ECC from SAP CRM, and sales orders can be created in SAP ECC as a follow-up to the quote using the following procedure.
Step 1. Access the quote in SAP ECC using transaction code VA23 (Figure 13). Use the quote number in SAP CRM to search for the quote in SAP ECC.
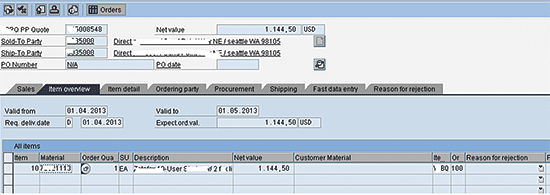
Figure 13
Use the quote number in SAP CRM to locate it in SAP ECC
Step 2. Create a sales order by clicking Sales document > Create subsequent order (Figure 14).
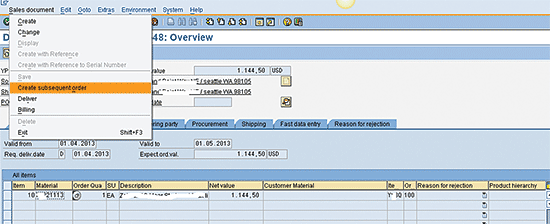
Figure 14
Create a sales order as a follow-up to a quote
Sales orders can also be created in SAP CRM and replicated to SAP ECC.
Change Campaign Codes Across Various Channels
Due to multiple active campaigns being available simultaneously, as in the case study example presented above, changes in the campaign code after placing the order are very common. This functionality needs customization.
Suppose that an alternate campaign exists with a 20 percent discount and the customer wants to use this campaign instead of the earlier one.
Step 1. Click Marketing > Campaigns in the left navigation bar (Figure 15). This takes you to Figure 16.
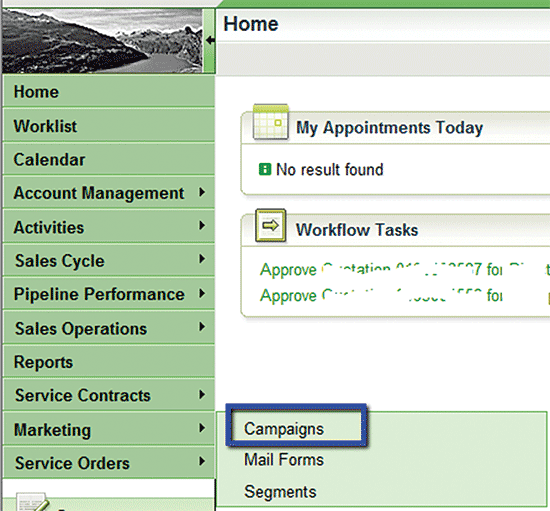
Figure 15
Click Campaigns to create a new campaign
Step 2. Create a new campaign with the 20 percent discount for the same products (Figure 16).
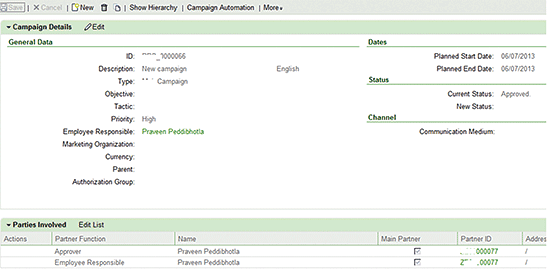
Figure 16
Create campaign screen
Step 3. Edit the previously created quote by clicking the Edit button on the previously created quotation (Figure 17), and change the campaign code by entering the newly created campaign code in the campaign code field. To get to the screen in Figure 17, log on to the sales representative role. From the left navigation bar on the WebClient UI screen, click Sales Cycle and select Quotations. On the next screen, enter the Quote number and search for the quote by clicking the Search button. Click on the hyperlink in the results list to go to the quote.
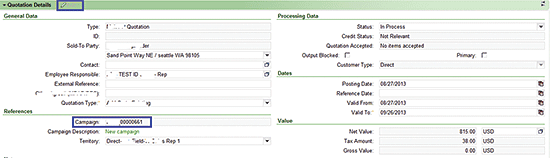
Figure 17
Using an alternate campaign on pre-existing quote
Step 4. Check the campaign discount in the Price Details block by scrolling down and expanding the pricing detail block (Figure 18). Note the change in discount percentage and value.
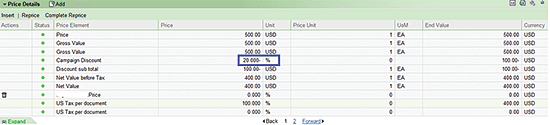
Figure 18
Campaign discount applied on quote
Functional Configuration of Campaign Discounts in ECC and CRM
The following are the settings required to configure campaign discounts in both SAP ECC and SAP CRM. You create the condition type for campaign code (CMP), which is assigned to pricing procedure YS00 in SAP ECC. An SAP CRM functional or technical user, not the end user, configures the pricing procedure. To verify that the SAP ECC pricing procedure is properly downloaded to SAP CRM, follow IMG menu path Customer Relationship Management > Basic Functions > Pricing > Define Settings for Pricing > Create Pricing Procedure (Figure 19).
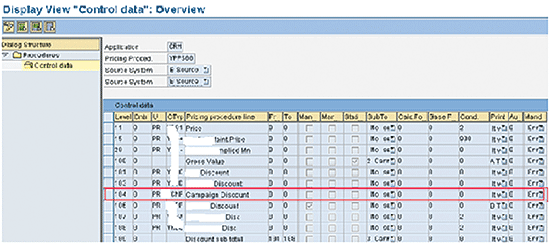
Figure 19
View of pricing procedure in SAP CRM GUI
An SAP CRM functional or technical user, not the end user, checks the campaign condition Type. To verify that the campaign condition type is properly downloaded to SAP CRM, follow IMG menu path Customer Relationship Management > Basic Functions > Pricing > Define Settings for Pricing > Create Condition type (Figure 20).
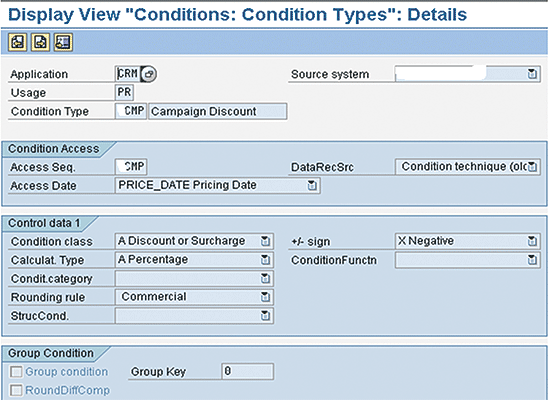
Figure 20
Verify that the campaign condition type has been properly downloaded to SAP CRM
The user has assigned campaign condition type CMP to the access sequence as CMP, which is mapped to standard table SAP12130. The user then assigns the access sequence to the campaign condition type CMP (Figures 21 to 24).
Standard table SAP12130 has two fields associated with it: CAMPAIGN_GUID (CRMT_ACS_H_SEL) and PRODUCT (CRMT_ACS_I_SEL). In the IMG, follow menu path Customer Relationship Management > Basic Functions > Pricing > Define Settings for Pricing > Create the access sequence (Figure 21). Go to change mode by clicking Display > change icon  and click the New Entries button on the application toolbar. Enter CMP in the Acc… column and Campaign discount access in the Descript. column, and click the Save button (not shown).

Figure 21
Access sequence for CMP
Select the CMP access sequence and click the Accesses folder in the dialog structure, as seen on left side of Figure 22.

Figure 22
Accesses sequence for CMP
Go to change mode by clicking Display > change icon and click the New Entries button, which is next to it on the application toolbar (Figure 23). Enter the access sequence value as 10, SAP12130 in the Table column, select the check box in the E column box, and click the Save button.
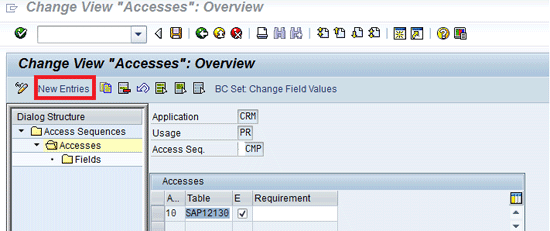
Figure 23
CMP condition type mapped to standard table SAP12130
To make the campaign discount work based on the campaign_guid and the product entered on transaction, click the Fields folder and click the New Entries button on the application toolbar. Enter CAMPAIGN_GUID in the Target Field Name column, CRMT_ACS_H_SEL as the Source Structure, CAMPAIGN_GUID as the Source field, and then PRODUCT in the next line of the Target Field Name column, CRMT_ACS_I_SEL as the Source Structure, and PRODUCT as the Source field (Figure 24). Click the Save button.
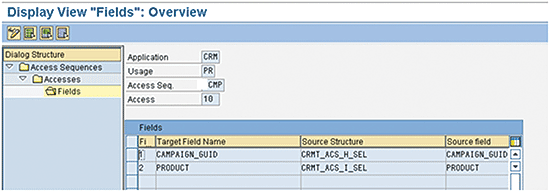
Figure 24
Table SAP12130 field assignment CAMPAIGN_GUID and product
You also need to define the settings that the system uses for generating conditions. Follow IMG menu path Customer Relationship Management > Trade Promotion Management > Trade Promotion > Condition Maintenance > Define Condition Generation (Figure 25). Here, assign a condition generation type to the condition technique, in this case CMP. Click the New Entries icon on the application toolbar and enter CD in the Cond. Gen. Type column and Campaign determination in the Cond. Generation Type column. Click the Save button.

Figure 25
Condition generation type created
Select the CD Cond. Gen. Type (Figure 26) and then click the Condition Tables folder in the Condition Generation Types folder. Click the New Entries button. Enter CRM in the Ap… column, CD in the U… column, CMP in the Conditio… column, 01 Account in the Acc. Type column, PR Product in the Product Level column, and CUS00003 in the second Condition… column. Click the Save button.
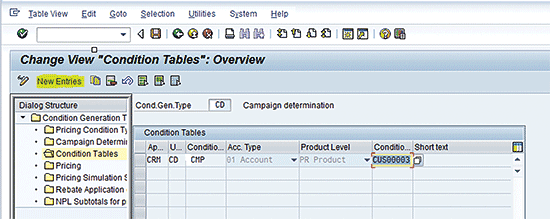
Figure 26
Assign condition generation type CD to CMP
Click the Campaign Determination folder in the Condition Generation Types folder (Figure 27). Click the New Entries button. Enter CMP as the Condition Type and 01 as the Conflict Resolut. value, and click the Save button.

Figure 27
Assign campaign determination condition type CD to CMP
The condition maintenance group bundles condition tables and types for condition maintenance. Create a new condition maintenance group CAM and enter the details of the condition table and condition type that you are using for the campaign. Follow IMG menu path CRM > Master Data > Conditions and Condition technique > Condition technique: Basics > Create Maintenance Group (Figure 28). Assign the maintenance group CAM to condition type CMP (Figure 29). Click the New Entries button and enter CAM as the new maintenance group and Campaign discount as the new Description. Click the Save button.
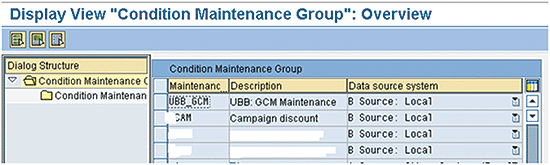
Figure 28
Create a maintenance group
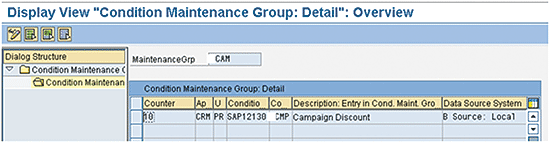
Figure 29
Assign the maintenance group CAM to condition type CMP
To configure settings to enable the campaign discount, use transaction code SPRO, which takes you to Customizing. Click the SAP Reference IMG button on the application toolbar and follow IMG menu path CRM > Master Data > Conditions and Condition technique > Condition technique: Basics > Define Maintenance Groups for context (Figure 30). Enter CAMPAIGN as your Maintenance context. This takes you to the screen in Figure 31, where you create a new entry as CAM. Click the New Entries button, enter Cam as the Group value and Campaign discount as the Description. Click the Save button.

Figure 30
Define maintenance context
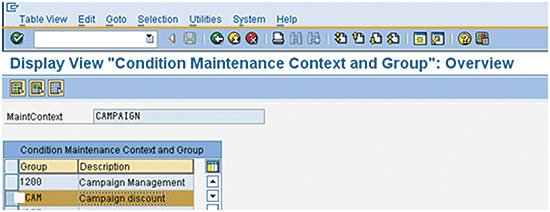
Figure 31
Create a new condition, CAM, and assign it to campaign maintenance context
You also need to assign a condition maintenance group to the application using the condition technique. To define the condition records for the CMP condition type from the WebClient UI, follow IMG menu path Customer Relationship Management > Trade Promotion Management > Trade Promotion > Condition Maintenance > Assign Condition Maintenance Groups (Figure 32). Click the New Entries button and enter CRM in the Appl. Column, Sales/Service in the Description column, CAM as the MaintainanceGrp, and Campaign discount as the Description. Click the Save button.
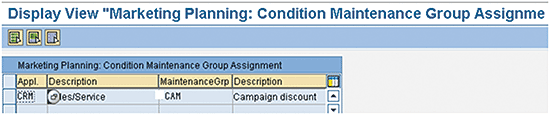
Figure 32
Assign a condition maintenance group to the application using the condition technique
Configuration of CRM Middleware
To trigger a transfer of the campaign condition from SAP CRM to SAP ECC, create a subscription for the publication conditions (campaign MSEG) in transaction code SMOEAC. Select the Object Type as Subscription and click the display objects icon (Figure 33). Add the subscription for campaign by clicking the create icon and using the Subscription Wizard (Figures 34 and 35). Subscription Name = Campaign(MSEG) and Publication name = MKTPL_MKTELEM.
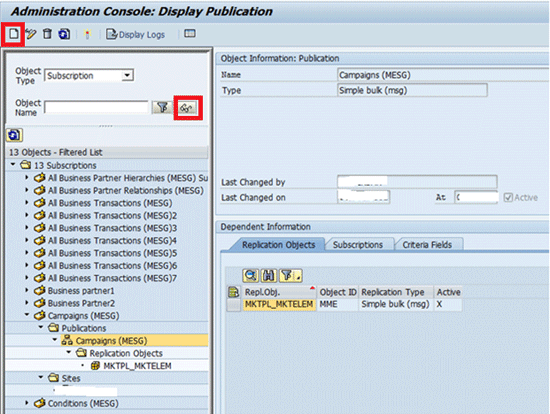
Figure 33
Campaign subscriptions to trigger a transfer of the campaign condition from SAP CRM to SAP ECC
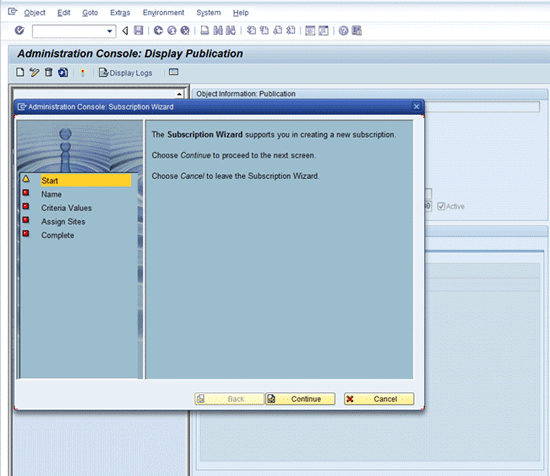
Figure 34
Create a campaign using the Subscription Wizard
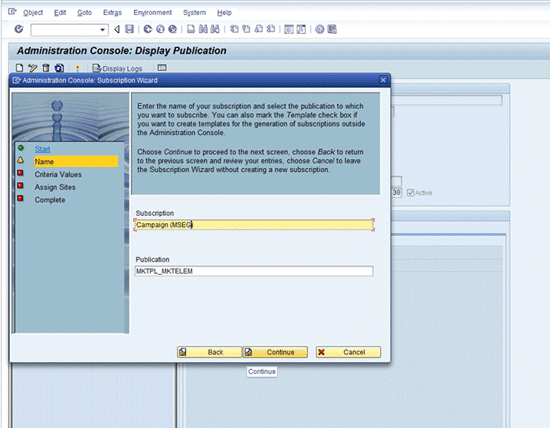
Figure 35
Enter the Subscription Name as Campaign(MSEG) and the Publication as MKTPL_MKTELEM
Enhancements
Even with the configuration settings described above, the correct campaign discount is not picked up or updated when changing the campaign discount code on one order object. Campaigns can be populated to items only when the items are newly created, not for existing items. The campaign code is not copied to the previous line items if the campaign code is entered later on an order or quotation. If header campaigns are populated to items, you must maintain the header campaign first, and then create new items.
Enter transaction code SE38 (Figure 36), enter LPRC_INTF42 as the Program name, and click the Display button. In display mode, follow menu path Edit > Enhancement Operations > Create Implementation. Create a spot to enhance the code inside the standard program LPRC_INTF42 (Figure 37).
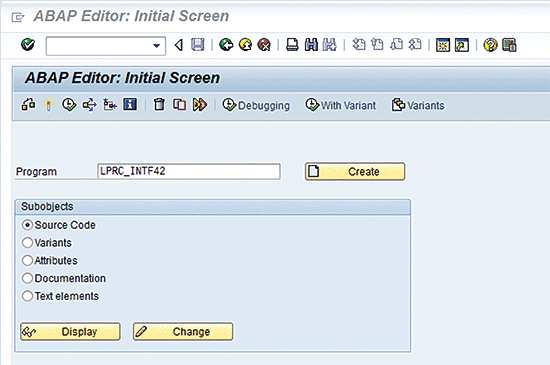
Figure 36
Program display
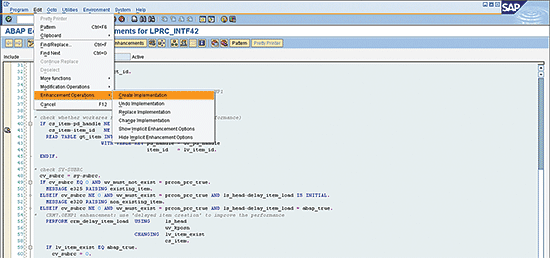
Figure 37
Create an enhancement spot inside the standard program LPRC_INTF42
To enhance the code, complete the following steps:
Step 1. Get the Header GUID of the transaction by reading internal table GT_HEAD.
Step 2. Extract the campaign GUID from ET_DOC_FLOW, which is the returning parameter in FM CRM_ORDER_READ. It gives the campaign GUID by using FM CRM_ORDER_READ.
Step 3. Read the ET_DOC_FLOW for which OBJTYPE_A = BUS2010020, OBJTYPE_B = BUS2000111, REF_GUID = Header Guid, OBJKEY_B = Header Guid, and BREL_KIND = A. Store the value in local variable L_CMP_GUID.
Step 4. Check for Sy-Subrc value. When condition is TRUE, process the code by doing the following:
- Read table GT_ITEM, for which PD_HANDLE = UV_PD_HANDLE and ITEM_ID = UV_KPOSN.
- Read table CS_ITEM-WRK_DATA-ITEM_ATTRIBUTE, for which ATTR_NAME = 'CAMPAIGN_GUID'. Store the value in local variable L_CMP_GUID1.
- If the L_CMP_GUID is NE L_CMP_GUID1, then replace the value with the actual campaign GUID extracted from step 4.
- If the campaign code is removed, then also update the internal table GT_ITEM-WRK_DATA-ITEM_ATTRIBUTE with the initial value of the campaign code.
Step 5. When condition is FALSE, Process the code by doing the following:
- The value of local variable L_CMP_GUID initial condition is FALSE.
- Read table GT_ITEM, for which PD_HANDLE = UV_PD_HANDLE and ITEM_ID = UV_KPOSN.
- Read table CS_ITEM-WRK_DATA-ITEM_ATTRIBUTE for which, ATTR_NAME = CAMPAIGN_GUID. Store the value in local variable L_CMP_GUID1.
- Replace the value with the actual campaign GUID extracted from step 5. Therefore, when campaign code f is removed, update the internal table GT_ITEM-WRK_DATA-ITEM_ATTRIBUTE with the initial value.
Praveen Peddibhotla
Praveen Peddibhotla is a certified SAP CRM professional with over 14 years of experience. He spent seven years in enterprise application implementations across multiple industries and is currently working with Infosys Management’s consulting services unit as a principal consultant. Praveen’s core expertise is in leading and deploying transformation-based SAP CRM solutions across the retail, consumer products, and healthcare industries. He also has experience in sales in the petro-chemical industry.
You may contact the author at praveen.peddibhotla@gmail.com.
If you have comments about this article or publication, or would like to submit an article idea, please contact the editor.

Anand Agarwal
Anand Agarwal has 10+ years of experience in SAP Consulting and Implementation with over seven years in SAP CRM and three years on multi-dimensional platforms of SAP, including R/3 (4.6, 4.7, ECC), SAP CRM, SAP SRM, and SAP-APO. He has worked on four end-to-end implementation projects, two upgrade projects, and two support projects in SAP releases 4.6B, 4.6C, 4.7, ECC 6.0, and SAP CRM 5.0, 6.0, 7.0, and 7.0 with Enhancement Package 2 support package. Anand is an SAP-trained CRM 7.0 consultant on Base Customization and in the roles of Technical Lead and Technical Architect. His core competencies include Business Process Analysis, Package implementations, CRM product development, and Prototyping SAP solutions for complex business requirements. His SAP experience includes in SAP CRM 7.0 (Sales, Marketing , Service Module, E-Commerce, Pricing), WEB-UI, CRM-Middleware, E-Commerce, SAP-APO, SAP-R/3 (4.6C, 4.7, ECC) in Sales & Distribution, Material Management, Finance, CRM Middleware, Transaction Billing in Healthcare and Pharmaceuticals, and the FMCG industry.
You may contact the author at Anand_Agarwal@infosys.com.
If you have comments about this article or publication, or would like to submit an article idea, please contact the editor.

Raghurama Gurrala
Raghurama Gurrala is an SAP CRM professional with more than 16 years of industry experience and eight years of SAP CRM experience. He has worked on various SAP CRM projects, including green field implementations, upgrades, enhancements, and steady state support projects. He has rich process experience across many industry verticals, including retail, high-tech, utilities, and pharmaceuticals. He is currently working with Infosys as Lead Consultant. You may contact Raghurama via email at gurralaraghu@gmail.com.
If you have comments about this article or publication, or would like to submit an article idea, please contact the editor.