See how to create due date analysis reports for vendors and customers using Report Painter. Understand how to design and create a form and a report, and see the available options to download the due date report.
Key Concept
Although SAP has provided due date analysis reports, mostly they fail to meet reporting requirements because they have a cumbersome format or are not flexible enough. Instead you can use Report Painter, which is provided by SAP, to meet various reporting requirements. Using Report Painter, due date analysis reports for customers and vendors can be designed effortlessly. These reports are still able to provide the drilldown to the line-item level from aggregated totals.
Based on my experience with clients, I believe accounts payable (AP) and accounts receivable (AR) departments always struggle to get a report that provides them with a comfort level for analyzing due dates for business partners. SAP standard reports in this area do not suffice to meet user requirements because they are not in a reportable format. Many reasons why SAP standard reports fail as a reportable format are:
- The reports are not in SAP List (ALV) grid format
- The standard due date analysis reports are rigid, and they can showcase no more than two due dates at a time
- These reports contain the header and address of the business partner, which do not serve any meaningful purpose, as the SAP standard report cannot provide a snapshot of all the items in a single screen. The line of the due items is under the header and address, which means that when downloaded into Excel, the report looks clumsy and the figures are scattered for each vendor.
Users are expected to do a lot of manual work to convert these reports into a reportable format. Furthermore, standard SAP due date analysis reports provide selection criteria only for entering two due dates. If a business intends to analyze the outstanding items by a number of due dates, you have to execute the standard reports numerous times. It is impossible to group these separately executed reports into a single report because at one point only two due dates can be entered in the selection criteria.
The reports come as business partner header and then line of the dues. Refer to SAP Standard Report S_ALR_87012084 - Open Items - Vendor Due Date Forecast.This is one of the frequently used SAP standard reports that are available on the initial easy access screen. If they are to be grouped, an enormous amount of manual Excel work needs to be done. When you consider all these constraints from the standard due date analysis reports, you realize that you need Report Painter to help your business consolidate these reports.
Overview of Report Painter
Report Painter allows you to define a report on a form that displays the rows and columns as they appear in the report format. This is also called What You See Is What You Get (WYSIWYG). You can perform all actions needed to define the reports from this form.
There are two steps in the process:
- Create the form. This is the layout of the report format. You decide on the look of the report output.
- Create the report with reference to the form created in step 1.
SAP has provided a number of transaction codes that you can use to create, change, or display the form and reports in the area of vendors, customers, classical GL, and the SAP General Ledger. These transactions are handy to create the Report Painter reports. The logic for creating forms and reports is valid in creating Report Painter reports across Accounts Payable (AP), Accounts Receivable (AR), and General Ledger (GL) areas.
Table 1 shows that the naming convention of these transaction codes is based on account type. K is for vendors, D for customers, S for the classical General Ledger, and G for the SAP General Ledger.
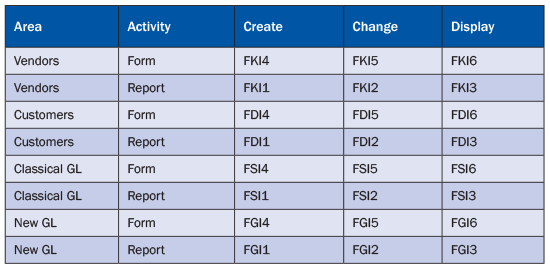
Table 1
Transaction codes for FI Report Painter reports
In the following example, I show you how you can create the form required for due date analysis of vendors. If you want to create due date analysis reports for customers, you follow the same steps. Only the transaction codes differ, as specified in Table 1.
Create a Form
To create the vendor-related form use transaction code FKI4. Select the form type as RFRRK20 line-item analysis. This step is important for receiving the right set of characteristics. Give the form a uniquely identifiable name and description. The report that you are going to create is a two-axes report, as you want to see the vendors on the lead column and the number of due days on the data columns. Click the Create button to create the form for due date analysis (Figure 1).
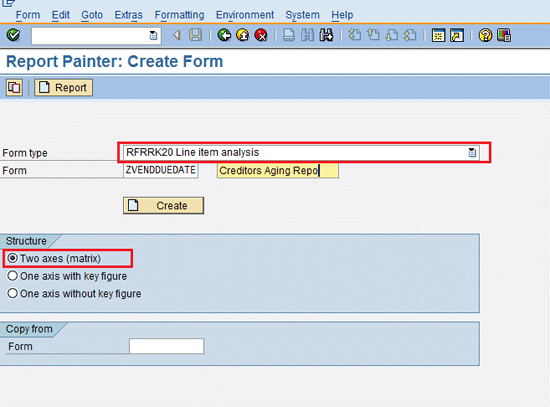
Figure 1
The initial Report Painter screen to create a form
Once you click the create button as shown in Figure 1, the following skeleton form screen appears (Figure 2).

Figure 2
Skeleton body of the Report Painter form
In my example I intend to put vendors in the lead column and due dates on the data column. Click the first row (Row 1) of the lead column in Figure 2. In the pop-up screen that appears (Figure 3) select the Characteristics radio button and click the enter icon (the green check mark).
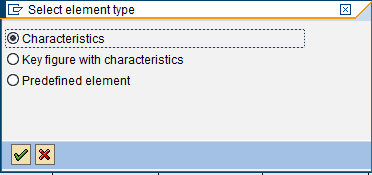
Figure 3
Select an element type
In the next screen that appears (Figure 4) move the vendor characteristics from Available characteristics to Selected characteristics. To complete this step, select the same items listed under the Available characteristics panel as shown in Figure 4.
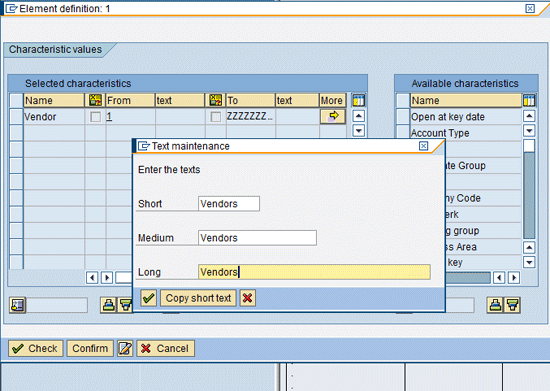
Figure 4
Add characteristics and description to the lead column
After you click this icon  to move the selected item to left, the selected characteristics appear in the left side. Enter From and To values of the vendor from 1 to ZZZZZZZZ, which covers all the vendors in the organization. To maintain the short, medium, and long texts, click the change icon
  . After you click the create icon, a screen with a skeleton body of the form appears.
In the data columns various periodic silos are maintained to summarize the due items for that particular time frame. Superusers who have designed this form maintain these silos. Formulas are also used to total various time frames to show the total of all due items. Another column has been created to total all the open items through a formula that adds items not due and total due items (Figure 5).

Figure 5
A sample due date analysis form
For further clarification, the report shown in Figure 5 is created in an easily understandable format shown in Figure 6. The report shown in Figure 6 is created on an Excel sheet to provide an overview of the formula that I have used in the Report Painter form in Figure 5.

Figure 6
Explanation of the Due Date Analysis Form in a logical way
If the vendors are entered as a characteristic in the first column, then a vendor is not available as a selection criterion on the initial screen of the report. This is an inherent design of the report. Therefore, it is up to you to decide whether to include vendors in the first column or not. If I include the vendors in the lead column with vendors from 1 to ZZZZZZZ, then the report is generated for all the vendors. Users do not have the option to select specific vendors.
Whether they intend or not, the report is generated for all the vendors. If they do not give the vendors in the lead column of the form, they are available as selection criteria and can be executed for a specific vendor. The columns (I) and (J) are based on formulas. The properties of each column are the most important design element. In the next section, I provide you with a good idea of how you can design them.
Items Not Due
To create a report for items not due, click the dotted area shown in Figure 2 to add a new column. The screen shown in Figure 7 appears.
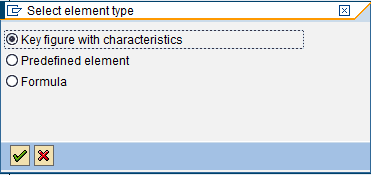
Figure 7
Element types
Select the Key figure with characteristics option and click the confirm (enter) icon. A number of characteristics are available on the Available characteristics context menu on the right side. Drag the required fields to the Selected characteristics context menu on the left side by clicking this  icon. The values 1 and 2 are automatically available in the drop-down list (Figure 8). Note that 1 is for due items and 2 is for items that are not due. For the Items Not Due column select 2 as an option (Figure 8).
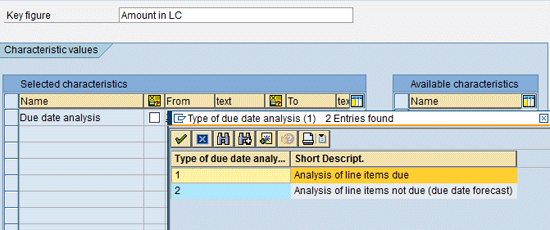
Figure 8
Properties of the Items Not Due column
Items Due
To make a report for items due, you manually create different columns for different time intervals – for example, 31-60 days, 61-90 days , 91-120 days, and so on (Figure 9). The number of time intervals is flexible, and you can create them depending on your business requirements.
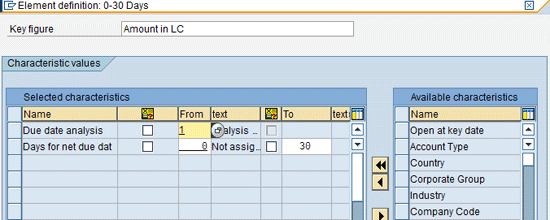
Figure 9
Properties of the items due elements (example 0-30 days)
Total Due Items
When creating a report for total due items, you use the Formula Editor. Return to the screen shown in Figure 2. Double-click the dotted row shown in Figure 2. In the screen that appears (refer back to Figure 7) select the formula option. The formula table appears (Figure 10).

Figure 10
Properties of the Total Due Items column
In all other cases, you need to create columns as a Key Figure with a Characteristic. Wherever there is no formula, you need to create columns as a Key Figure with a Characteristic. In the example shown in Figure 9, the formula has been used to total up all due items in different time intervals.
Total Open Items
To obtain the Total Open Items, you again use the formula to total the not due items and total due items (Figure 11). You have already obtained the Total Due Items as per Figure 10.
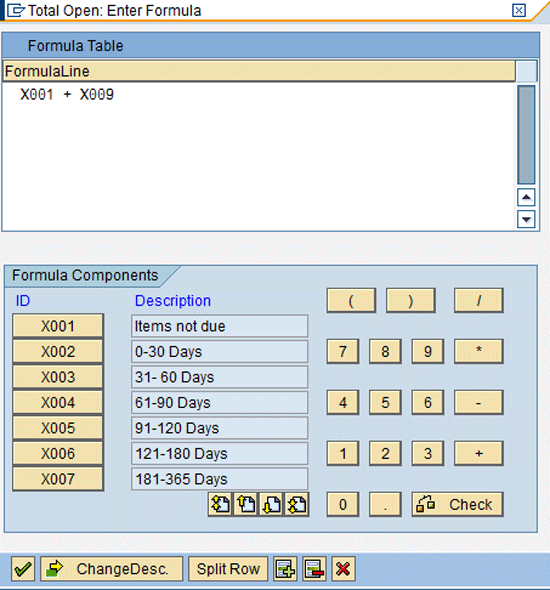
Figure 11
Properties of Total Open Items (not due + total due items)
Click the save icon  to save the form. Now click the Report button to create the report and link it to the form (Figure 12).
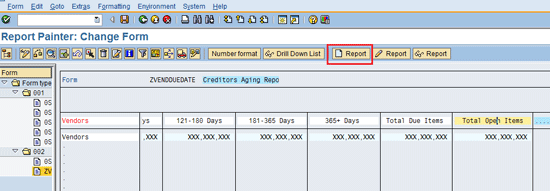
Figure 12
Create a report with reference to a form
Now you link the form and report. Figure 13 shows how the report can be created with refererence to a form. Select the report type from the list of options in the drop-down menu. Enter the name of the report and its description. The form that I created earlier is linked with the report, and a linkage is established. When the report is executed, the data is populated into the form against the characteristics maintained in the report.

Figure 13
The initial screen to create a report with reference to a form
You select the Report Type as RFRRK20 Line item analysis and assign a uniquely identifiable report name and description. In due date analysis, you can go to line-item drill-down level. It is the reason I selected report type RFRRK20. Usually, the form name is defaulted when it comes from the Form screen to the Report screen.
After you click the Create button in Figure 13, a screen appears that lists the properties of the report (Figure 14).
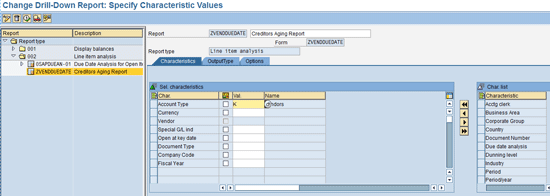
Figure 14
Properties of the report – Characteristics tab
You can drag the available characteristics such as country or business area from the Characteristic list on the right context menu to the left side to make them available. If you add these characteristics, you can use them to analyze the data based on these characteristics in addition to the analysis done on the basis of the selected vendors. Enter K for the Account Type if you want to restrict the report only to the vendor. Only add the characteristic if it is really required for analysis purposes. Adding too many characteristics hampers the performance of the report. Click the OutputType tab.
SAP provides a number of output types. You can select the required output type areas and HTML template to meet your requirements. Some of output areas also give the due date totals in graphs. However, in my opinion, these graphs are not user friendly. Users can download the report and if graphs are required, you can create them in Excel based on the totals.
You have other options such as Headers and Footers if you want any of the details on the header and footer to be printed on the report. When you select the Headers and Footers buttons shown in Figure 15, a new pop-up window appears in which you can maintain the header and footer text. After you enter the relevant header and footer text, select the respective check box. This would be printed on the report header and footer when printed.

Figure 15
Properties of Report – OutputType tab
Click the save icon to save the report. Click the execute icon. In the next screen enter the selection screen values and then click the execute icon again to generate the report and show the output (Figure 16).
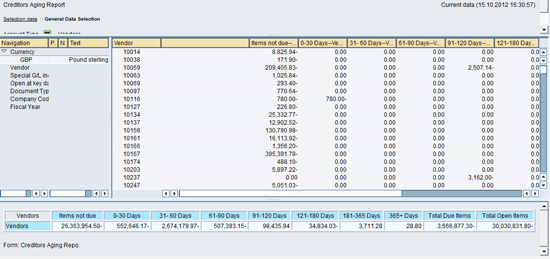
Figure 16
Report of vendor due date analysis
Note that the characteristics that you selected on the report are now available on the left context menu. These characteristics can be used as a perspective to analyze the figures shown on the right side screen. Accordingly, the key figures are analyzed based on these characteristics.
It is also worth double-checking the totals of this report created with FS10N of all control accounts (reconciliation accounts) for the vendors or customers. The grand total shown in this report is nothing but the total of all vendors. All vendors are represented by control accounts, which are called reconciliations accounts in General Ledger Accounting. Any posting made to the accounts payable sub-ledger will also be posted to control accounts in general ledger accounting. FS10N is a report for showing the total of general ledger accounts. You can take the totals of respective control accounts vendors and total them to match with the grand total of this generated report through Report Painter. This is how you can ensure that the report tallies with the control account totals.
In the preceding report I removed the description of the vendors. However, you also see the vendor number names and the totals for each period in question. Various options are available to the user to download, drill down, format, and rank as noted below:
Export:
- Copy Report to XXL
- Copy Page to XXL
- Object List
Analysis:
- Cumulative Curve
- ABC Analysis
- Classification
Ranking List:
- Top N...
- Top %...
- Last N...
- Last %...
Go To:
Settings:
- Currency
- Number Format
- Characteristics Display
- Totals Row
- Percentage / Absolute
- Zeros on/off
You can execute this report directly from transaction FKI3 for vendors or transaction FDI3 for customers. Users are restricted through authorizations. The authorization object relevant for this purpose is K_KA_RPT. Alternatively; the report can be created as a separate transaction code. In that case, you can execute the report from that separate transaction code. To create a separate transaction code, help from your ABAP team would be useful.
Ravisankar Venna
Ravi Venna is SAP certified in FI/CO (4.6C), SEM (3.5), BW (3.0), Solution Manager (4.0), and SAP NetWeaver – Security (WEB AS 6.40) and FI (SAP ECC 6.0) Ravi is an associate member of the Institute of Cost and Works Accountants of India (ICWAI). He received a Final Pass Certificate from the Institute of Company Secretaries of India (ICSI). Ravi has also passed the Certified Information Systems Auditor (CISA) examination from the Information Systems Audit and Control Association. Ravi has more than 12 years of experience in the Finance and Controlling modules. Additionally, Ravi has worked extensively on both SAP R/3 and BW authorisations and in the use of the SAP testing tool e-CATT, Business Intelligence-Integrated Planning (BI-IP), and SAP BW-BPS. Ravi has taken part in a number of implementation projects in the UK. His further interest areas are SAP BPC and FSCM. For more than eight years, he has been working with Logica in different modules of SAP.
You may contact the author at ravisankar.venna@logica.com.
If you have comments about this article or publication, or would like to submit an article idea, please contact the editor.