Create BW hierarchies to track products sourced from merging suppliers, and avoid the inaccuracies that can result when your supply partners buy (or are bought by) other firms. With an example based on a fictitious international company, the author demonstrates how to assign purchase orders correctly via a real-time hierarchy with user exits or BAdIs.
Global companies often purchase raw materials and services independently at different sites. The suppliers often belong to international companies as well. For pricing negotiations, it is essential to know how much of a certain product has been purchased from each supplier. To get this figure, the individual suppliers are merged into one group using BW hierarchies. The problem is that the suppliers are a dynamic group. They acquire or are acquired by other suppliers. Information on such acquisitions or sales might reach the customer at a later stage. Thus, purchase orders (POs) that were processed between the time when the supplier got a new owner and when the customer receives this piece of information are assigned to the old owner.
I will show you how to assign all purchase orders correctly. The result will be a real-time hierarchy mapping all transactions to the supplier group they belong to, no matter when information about merger and acquisitions are maintained. At the same time, you will learn how to apply real-time hierarchies to other types of situations.
My example uses an international company, Dragon Computers, which sells computers. It operates from three countries: the United States, Germany, and Singapore. Dragon has production facilities at one or more plants in each country. The raw materials they all must purchase include CPUs, graphics adapters, DVD drives, and CD drives. Dragon Computers uses one global purchasing system.
The Supplier Structure
CPUs are provided by two international companies, Fast Processors and Magic Processors, each with various entities that do business with at least one of Dragon’s plants. Figure 1 illustrates the company structure. The nodes on the third level indicate the suppliers. The rest are hierarchical nodes reflecting the internal structure of the two companies.

Figure 1
Structure of the two companies supplying CPUs
Fast Processors has a total turnover with Dragon Computers of $10 million USD. The Johannesburg branch contributes $1.1 million USD to this figure. To be precise, $500,000 USD are invoiced in the first quarter, $550,000 USD in the second, and $50,000 in the third quarter. Fast Processors sells this site to Magic Processors at the end of the first quarter of 2002. Dragon Computers gets this information three months later, at the end of the second quarter.
Management’s requirement at Dragon is to map all POs from the beginning of the second quarter to Magic Processors — for example, assign $500,000 to Fast Processors and $600,000 USD to Magic Processors. The BW team discusses how this can be managed within BW.
The most obvious way to do this is to create a time-independent hierarchy on the vendor InfoObject, as illustrated in Figure 2. However, moving Fast Processors South Africa to the Magic Processors subtree at a certain time allocates the complete turnover of this site to the new owner; $1,100,000 USD show up under Fast Processors. I call this the “current view.” This method obviously does not match the requirement.
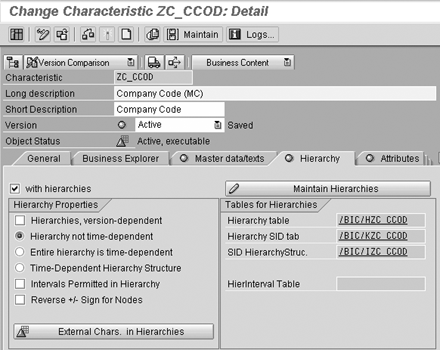
Figure 2
Configuration for a time-independent hierarchy
The next step may be to make the hierarchy time-dependent. The problem with this feature is that you have to choose a fixed version of the hierarchy by entering a certain date in the query definition. During execution, BW looks up the hierarchy valid for this date and maps the POs accordingly. In my example, entering the actual acquisition date leads to the same result as using the time-independent hierarchy. It assigns every transaction between Dragon and the South African branch to the old owner.
Another approach for implementing hierarchies in BW is to use characteristics. In this case, each level of the hierarchy is represented by a separate InfoObject. These may be navigation attributes to the InfoObject for which you want to build the hierarchy. In this scenario, this would be the vendor characteristic. From the definition of the navigation attribute, it follows that this method again implements a current view, which does not satisfy your needs.
Fortunately, you can add your new InfoObjects to a Data Target. They then can be filled during extraction or in the update rules with the use of an extra table holding the hierarchy information. This table contains two entries for the South African entity of Fast Processors. One assigns it to the “rest of the world” region, valid for the first and second quarter of 2002. (Remember that Dragon gets the information on this acquisition at the end of the second quarter.) The second entry, which is valid from the third quarter, maps this site to the structure of the new owner. The system maps that a PO occurred in the first two quarters to Fast Processors, and any order after this point in time is credited to the new owner. I call this the “maintenance view,” because transactions are mapped to the new owner as soon as the information is maintained in the system.
Even though this view is already more accurate, it does not fulfill the requirement. The problem is that for the time range between the day when the acquisition becomes effective and the day when Dragon receives this information (and maintains it in the system), all POs are mapped to Fast Processors and not to Magic as requested.
The fact that BW does not offer any means to change the wrongly booked records led me to read this information from the table during query execution. This guarantees that I can always take its actual version into account, even if the validity of an entry is changed for the past — i.e., if the validity of the second entry of Fast Processors South Africa is changed from the third to the second quarter. I call this the “realistic view,” because it assigns the values to exactly where they belong.
Figure 3 shows all three views and their impact on the figures for Fast Processors and Magic Processors. Table 1 shows which approach may be used for implementing any of the discussed types.
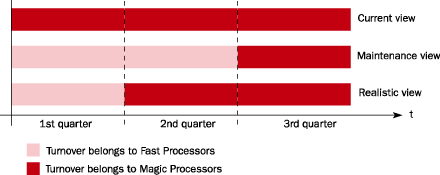
Figure 3
How each view assigns transactions
| Approach |
Current view |
Maintenance view |
Realistic view |
| Time-independent hierarchy based on InfoObject |
x |
|
|
| Navigational attribute hierarchy |
x |
|
|
| Characteristic-based hierarchy populated during ETL process |
|
x |
|
| Characteristic-based hierarchy populated during query execution |
|
|
x |
|
| Table 1 |
Approach used for each type of view |
|
Building the Data Model
To use the realistic approach, you first must set up your data model. For this example, assume that the transaction data is delivered through a flat file. In the first instance, the flat file is transferred to an ODS. This is a one-to-one transfer without any transformations. Finally, the data ends up in the supplier hierarchy InfoCube (ZXWLMC09). This is the InfoCube for which you implement the user exit. Each characteristic that is read or filled within the exit has to be part of its definition. In this example, you want to fill two supplier hierarchy levels. Thus, the InfoCube contains two characteristics: ZC_SUPPH1 and ZC_SUPPH2. Figure 4 illustrates the definition of InfoCube ZXWLMC09. You may leave the two virtual characteristics blank in the corresponding update rules (Figure 5). If you don’t, they will be overridden later.

Figure 4
InfoCube ZXWLMC09 definition

Figure 5
Leave the virtual characteristics blank in the update rules
You also need a table where the supplier hierarchy is stored. To keep things simple, create a flat table using transaction SE11. In the start screen, enter the table name, ZXWLMV_SUPPH, and click on the Create button. This table consists of five fields. Before you enter data into the fields, enter the technical settings by clicking on the Technical Settings button (Figure 6). Choose APPL0 as the Data Class and 0 as Site Category. Save the settings and go back to the previous screen. Branch into the Delivery and Maintenance tab and set the Delivery Class to A to allow maintenance of the table.

Figure 6
Definition for the Supplier Hierarchy table
Now you are ready to define the structure of the table itself. It contains five fields: VALID_UNTIL, VALID_FROM, SUPPLIER, SUPPH1, and SUPPH2. These fields are sufficient to reflect the customer hierarchy. The first three are key fields. Figure 6 shows the table definition. Finally, save and activate the table.
Before you can populate the table with data, you must generate a maintenance dialog. To do so, click on the Utilities Dialog tab and choose Table Maintenance Generator. After a successful generation, you can maintain data with the help of transaction SM30.
At this point, you have set up the basic scenario: You have InfoCube ZXWLMC09 with the transactional data and table ZXWLMC_SUPPH with the hierarchy information. The next step is to link this information to the data in the InfoCube. I will introduce two different approaches. The first applies a user exit for virtual characteristics and key figures, and the second makes use of Business Add-ins (BAdIs). BAdIs are the object-oriented approach to implement customer-specific needs. They are more flexible than user exits because they allow country- and industry-specific implementations of extensions. (For background information on BAdIs, refer to Frank Bulacher’s article, “What’s a BADI, and What Can It Do That a User Exit Can’t?” published in the September 2003 issue of BW/BI Expert.)
Real-Time Hierarchies with User Exits
Call transaction CMOD and enter RSR00002 as the name of the project (Figure 7). Then click on the Create button. Now you have to assign the appropriate set of user exits to this project by choosing the Enhancement assignment option. The enhancement you want is called RSR00002 (Virtual characteristics and key figures in Reporting).
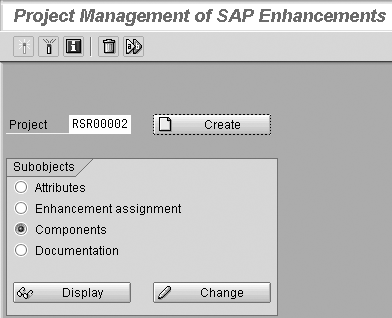
Figure 7
Enter the name of the project
The enhancement itself comes with two function modules: EXIT_SAPMRSRU_001 and EXIT_SAPMRSRU_999. The latter is not relevant for this implementation. Your code has be posted in three different includes, which you may have to create. You may edit them using transaction SE38. The includes are:
- ZXRSRU02
- ZXRSRTOP
- ZXRSRZZZ
ZXRSRU02 specifies which characteristics and key figures for each InfoCube are used in the exit. This information is stored in list E_T_CHANM for characteristics and list E_T_KEYFNM for key figures. Two fields, CHANM and MODE, are relevant for characteristics. CHANM contains the name of the characteristic, and MODE holds the access mode. This can be either RRKE_C_MODE_READ for read-only characteristics or RRKE_C_MODE_NO_SELECTION for write-only characteristics.
For this example, you need characteristics 0CALMONTH and ZC_SUPP to access your table to determine the upper nodes in the supplier hierarchy. Therefore, you need to list them and set them to RRKE_C_MODE_READ. You also have to set characteristics ZC_SUPPH1 and ZC_SUPPH2
to RRKE_C_MODE_NO_SELECTION, as they must be calculated.
The process for key figures is simpler. Just add the name of the key figure to be processed. Figure 8 shows the coding for this scenario. Include ZXRSRU02 is called during query generation.
CASE I_S_RKB1D-INFOCUBE.
WHEN ‘ZXWLMC09’.
IF l_subrc1 = 0.
L_S_CHANM-CHANM = ‘ZC_SUPP’.
L_S_CHANM-MODE = RRKE_C_MODE-READ.
APPEND L_S_CHANM TO E_T_CHANM.
L_S_CHANM-CHANM = ‘0CALMONTH’.
L_S_CHANM-MODE = RRKE_C_MODE-READ.
APPEND L_S_CHANM TO E_T_CHANM.
L_S_CHANM-CHANM = ‘ZC_SUPPH1’.
L_S_CHANM-MODE = RRKE_C_MODE-NO_SELECTION.
APPEND L_S_CHANM TO E_T_CHANM.
L_S_CHANM-CHANM = ‘ZC_SUPPH2’.
L_S_CHANM-MODE = RRKE_C_MODE-NO_SELECTION.
APPEND L_S_CHANM TO E_T_CHANM.
ENDIF.
ENDCASE. |
| Figure 8 |
User exit code to specify characteristics and key figures |
|
For include ZXRSRTOP, you must define a global variable for each characteristic and key figure you use for each InfoCube. Therefore, any characteristic or key figure built in two InfoCubes and always being processed via this user exit has to be declared twice. The variable names have to follow a certain naming convention, which is:
G_POS_<technical InfoCube name>_<technical InfoObject name>
All variables have to be type I. Figure 9 shows sample coding for this include.
DATA: G_POS_ZXWLMC09_ZC_SUPP TYPE I.
DATA: G_POS_ZXWLMC09_0CALMONTH TYPE I.
DATA: G_POS_ZXWLMC09_ZC_SUPPH1 TYPE I.
DATA: G_POS_ZXWLMC09_ZC_SUPPH2 TYPE I. |
| Figure 9 |
Sample code for include ZXRSRTOP
|
|
To implement the last include, ZXRSZZZ, post the calculation logic for your two characteristics, ZC_SUPPH1 and SUPPH2. The logic is located in an InfoCube-specific form routine. The naming convention for this routine is:
USER_<technical InfoCube name>
The name in this example is USER_ZXWLMC09. For each InfoObject used, add a field symbol to the routine. It is followed by an ASSIGN COMPONENT statement, which has to be carried out for each InfoObject as well. Having done these declarations, you can concentrate on your logic. The strategy is simple: Retrieve the values for ZC_SUPPH1 and ZC_SUPPH2 from table ZXWLMC_SUPPH.
To access the table, apply ZC_SUPPH and 0CALYEAR as key characteristics. Both fields are passed to routine USER_ZXWLMC09. Convert 0CALYEAR to a date by mapping it to the first day of the month. Figure 10 shows the coding for this include.
FORM USER_ZXWLMC09
USING
I_S_RKB1D TYPE RSR_S_RKB1D
CHANGING
C_S_DATA TYPE ANY.
FIELD-SYMBOLS .
FIELD-SYMBOLS .
FIELD-SYMBOLS .
FIELD-SYMBOLS .
ASSIGN COMPONENT G_POS_ZXWLMC09_ZC_SUPP
OF STRUCTURE C_S_DATA TO .
ASSIGN COMPONENT G_POS_ZXWLMC09_0CALMONTH
OF STRUCTURE C_S_DATA TO .
ASSIGN COMPONENT G_POS_ZXWLMC09_ZC_SUPPH1
OF STRUCTURE C_S_DATA TO .
ASSIGN COMPONENT G_POS_ZXWLMC09_ZC_SUPPH2
OF STRUCTURE C_S_DATA TO .
DATA date like sy-datum.
DATA first(2) VALUE ‘01’.
data supph1 like zxwlmc_supph-supph1.
data supph2 like zxwlmc_supph-supph2.
break-point.
CONCATENATE first INTO date.
select single supph1 supph2
into (supph1, supph2)
from zxwlmc_supph
where valid_from <= date and
valid_until >= date and
supplier = .
if sy-subrc = 0.
= supph1.
= supph2.
endif.
ENDFORM. |
| Figure 10 |
Code for include ZXRSZZZ |
|
Do not forget to save and activate the includes and the RSR00002 project. Before you can use the query ZXWLMC09, you must regenerate it to make the changes effective. To do so, use transaction RSRT. Enter the name of the query and click on the Generate Report button for the query (Figure 11).
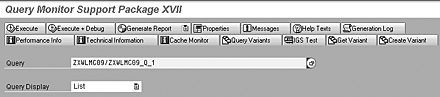
Figure 11
Enter the query name and click on Generate Report
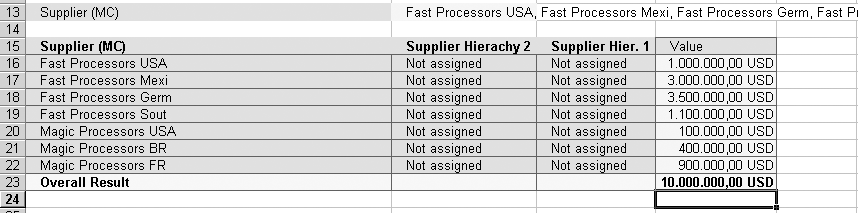
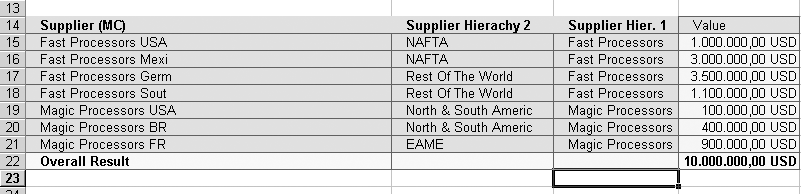
Figures 12, 13, and 14 show the same query in three different states. Figure 12 shows the query without the user exit. No values are assigned to the Supplier Hierarchy characteristics. Figure 13 shows it after the implementing the user exit, but without the sale of Fast Processors South Africa to Magic Processors. After this piece of information is maintained in table ZXWLMC_SUPPH, the query delivers the results listed in Figure 14. To debug include ZXRSRU02, set a breakpoint within it and the system will stop there when executing the Generate Report command. If you wish to debug include ZXRSRZZZ, define a breakpoint in it and choose the Execute & Debug button in transaction RSRT.

Real-Time Hierarchies Using BAdIs
RSR_OLAP_BADIDEFINECOMPUTEYou implement BAdIs using transaction SE19. After keying in a name for your implementation, ZXWLM_SUPPH_BADI in this case, and pressing the Create button, choose the template, which is RSR_OLAP_BADI.
In the Attributes tab, specify for which InfoProviders the BAdI should work — InfoCube ZXWLMC09 in this case (Figure 15).

Figure 15
Specify the InfoProviders for which the BAdI should work
Now you start the implemenation. To minimize the effort, you can deploy sample code provided by SAP. In the menu, choose Goto>Sample Code>Copy. The system then copies sample code into the various functions of the BAdI.
Your BAdI implementation now contains a class called ZCL_IM_XWLMC_SUPPH_BADI, which you can see in the Interface tab. If you double-click on this class, the class builder pops up and displays its elements. The class data elements are called attributes and can be found in the tab with the same name. Here, you add an element for each characteristic of your InfoCube that you want to use. These are the same four used in the use exit method: ZC_SUPP, ZC_SUPPH1, ZC_SUPPH2, and 0CALMONTH. The corresponding attribute’s name has to start with P_CHA_ followed by the characteristic’s name. For all attributes, set the Level to Instance Attribute, Visibility to Public, and Associated Type to I (Figure 16).

Figure 16
Attribute settings
Now switch to the Methods tab. The system lists three methods: INITIALIZE, DEFINE, and COMPUTE. Their bodies are empty. Your task is to create logic for two of them. For method INITIALIZE, no action is necessary.
Double-clicking on method DEFINE puts you into the editor. DEFINE’s task is similar to the ZXRSRU02 include used in the user exit. Here, you specify the InfoObjects you want to use. The same rules as in include ZXRSRU02 apply, so the code for this method (Figure 17) is similar. It is called during query generation.
METHOD IF_EX_RSR_OLAP_BADI~DEFINE .
DATA: l_s_chanm TYPE rrke_s_chanm,
l_s_chanm_used type rschanm,
l_kyfnm TYPE rsd_kyfnm.
FIELD-SYMBOLS:
TYPE rrke_s_chanm.
case i_s_rkb1d-infocube.
when ‘ZXWLMC09’.
loop at i_th_chanm_used into l_s_chanm_used.
case l_s_chanm_used.
when ‘ZC_SUPP’.
l_s_chanm-chanm = ‘ZC_SUPP’.
l_s_chanm-mode = rrke_c_mode-read.
append l_s_chanm to c_t_chanm.
when ‘ZC_SUPPH1’.
l_s_chanm-chanm = ‘ZC_SUPPH1’.
l_s_chanm-mode = rrke_c_mode-no_selection.
append l_s_chanm to c_t_chanm.
when ‘ZC_SUPPH2’.
l_s_chanm-chanm = ‘ZC_SUPPH2’.
l_s_chanm-mode = rrke_c_mode-no_selection.
append l_s_chanm to c_t_chanm.
when ‘0CALMONTH’.
l_s_chanm-chanm = ‘0CALMONTH’.
l_s_chanm-mode = rrke_c_mode-read.
append l_s_chanm to c_t_chanm.
when others.
endcase.
endloop.
endcase.
ENDMETHOD. “if_ex_rsr_olap_badi~define
| Figure 17 |
Code for method DEFINE |
|
The COMPUTE method contains the query calculation logic, which is processed during query execution. Its implementation is similar to the one for include ZXRSRZZZ of the user exit (Figure 18).
METHOD IF_EX_RSR_OLAP_BADI~COMPUTE .
field-symbols: type any.
field-symbols: type any.
field-symbols: type any.
field-symbols: type any.
if not p_cha_zc_supp is initial.
assign component p_cha_zc_supp of structure c_s_data to .
endif.
if not p_cha_zc_supph1 is initial.
assign component p_cha_zc_supph1 of structure c_s_data to
.
endif.
if not p_cha_zc_supph2 is initial.
assign component p_cha_zc_supph2 of structure c_s_data to
.
endif.
break-point.
if not p_cha_0calmonth is initial.
assign component p_cha_0calmonth of structure c_s_data to
.
DATA date like sy-datum.
DATA first(2) VALUE ‘01’.
data supph1(10).
data supph2(10).
CONCATENATE first INTO date.
select single supph1 supph2
into (supph1, supph2)
from zxwlmc_supph
where valid_from <= date and
valid_until >= date and
supplier = .
if sy-subrc = 0.
= supph1.
= supph2.
endif.
endif.
ENDMETHOD. “IF_EX_RSR_OLAP_BADI~COMPUTE
| Figure 18 |
Code for method COMPUTE |
|
Mark Reimer Caroli
Mark R. Caroli is a BW consultant for BASF IT Services, located in Ludwigshafen, Germany. He has over five years of experience in the field of Data Warehousing with a focus in SAP BW since 2000. In prior positions, he implemented global Data Warehouses and built up knowledge in the R/3 modules SD and CO-PA. Mark is a graduate of the University of Bonn with a major in Informatics.
You may contact the author at mark-reimer.caroli@basf-it-services.com.
If you have comments about this article or publication, or would like to submit an article idea, please contact the editor.