Learn how to load sequential files with multiple source structures using the Legacy System Migration Workbench by following an example of uploading journal entries.
Key Concept
When using Legacy System Migration Workbench, you may need to load data with multiple source and target structures. Your source structures may be a set of journal entries in which the fields in the header record are obviously different from the fields in the different line items. You need a method to identify the different types of records in the multiple structure (sequential) file so they are mapped correctly to the target structures. Using the STYPE field enables you to identify the different records in the source file and thus enable correct mapping between the source and target structures.
One of the basic steps in an SAP implementation is data migration. Legacy System Migration Workbench (LSMW) is often the tool of choice for loading legacy data into the SAP system. On occasion you may be required to load data with a master and detail structure — for example, journal entries that are composed of header and line items or asset master data with corresponding transactions.
Assuming that most of you know how to use LSMW, I’ll focus on the key issues required in LSMW setup when loading a file of this type, which I learned through my own experience. I’ll do this by providing an example of loading a journal entry using a sequential input file with the SAP program RFBIBL00.
Load a Journal Entry with RFBIBL00
Call up transaction LSMW and create a new project. The system displays the LSM Workbench view with the standard list of steps that I’ll show you now.
Step 1. Maintain object attributes. In this example, I’m using the direct input program RFBIBL00, which allows you to load financial documents (Figure 1). The screen comes up blank and you can fill it in with your specifications. In my example, I filled in 0100 in the Object field for financial documents, 0000 in the Method field, RFBIBL00 in the Program name field, and D , for direct input, in the Program type field.

Figure 1
Load financial documents with RFBIBL00
Step 2. Maintain source structures. Define the source structures that participate in the data load. Structures BBKPF and BBSEG represent the document header and lines respectively and are used by RFBIBL00 (Figure 2).
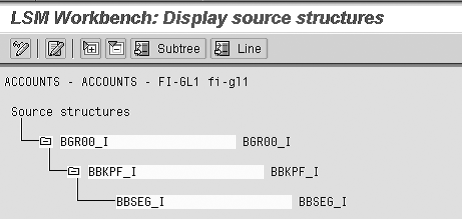
Figure 2
Define source structures
Press Ctrl+F1 or click on the Change button. Then press Ctrl+F4 or click on the Create structure button. Create three subsequently subordinated source structures:
- BGR00_I (Batch input structure for session data)
- BBKPF_I (Document header for accounting document)
- BBSEG_I (Accounting document segment)
Press Ctrl+S or click on the Save button to save the data. Press F3 or click on the green back arrow icon to return to the main LSMW screen.
Step 3. Maintain source fields. Define the source fields for the source structures that you defined in step 2. You then indicate the different record types in the source structure by entering a default value in the STYPE field.
To do this, press Ctrl+F1 or click on the Change button. Position the cursor on the structure name and press Ctrl+F8 or click on the Copy fields button. Choose option Copy from Data Repository and press Enter to proceed. For each source structure, choose structures BGR00, BBKPF, and BBSEG (Figure 3). You can obtain the available structures by reading the documentation for RFBIBL00.
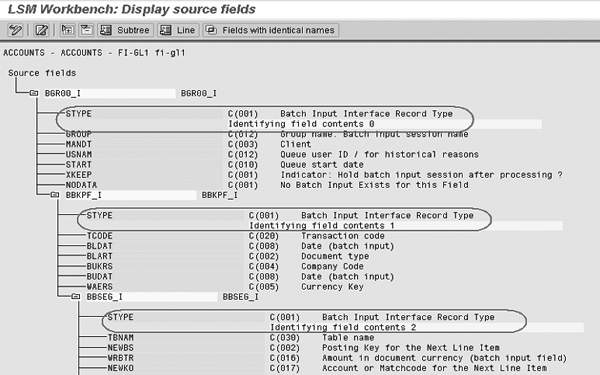
Figure 3
Choose source fields for the source structures
In this example, I deleted some of the fields that I don’t plan to use in source structures BBKPF_I and BBSEG_I. I retained the fields that are required to create a journal entry such as company code, document type, G/L account, and amount.
The next step is to enter the values required in the STYPE field, which you use to identify the different record types in the input file (Figure 4). Do this by double-clicking on the field and entering a value in the Identifying field value field. I’ll show you the relationship between the structure of the source file and how the system uses the STYPE field to identify each record within the file in step 7.

Figure 4
Enter the value in the STYPE field
In this example, I maintained field STYPE in the source structure by entering 0 in BGR00_I, 1 in BBKPF_I, and 2 in BBSEG_I.
Step 4. Maintain structure relations. Define the relationship between the corresponding source structures and target structures (Figure 5). You need to do this for all the source structures that you use. In this example, I relate the three source structures that I previously defined to the three target structures used by RFBIBL00.

Figure 5
Define the relationship between source structures and target structures
Step 5. Maintain field mapping and conversion rules. You need to assign source fields defined in step 3 to the corresponding input structure fields. Because this is a standard LSMW step, I won’t discuss it in detail. Note, however, that the STYPE field receives the default value defined in step 3.
Step 6. Specify files. Specify the file that you plan to load (Figure 6). Press Ctrl+F1 or click on the Change button. Position the cursor on the Legacy data On the P/C (front-end) line and press Ctrl+F2 or click on the Create entry button. In the displayed view, specify the file path and description. In the File contents section, choose option Data for several source structures (seq. file). In the File structure section, check the Order of fields as in source structure definition check box. To finish working with this view, press Enter. Press Ctrl+S or click on the Save button to save the data. Press F3 or click on the green back arrow to return to the main LSMW screen.

Figure 6
Specify files
Step 7. Prepare the source file. Create a Microsoft Excel file and save it as a *.csv (comma delimited) file (Figure 7). Ensure that you create the structure of this file according to the source structure fields defined in step 3. The first column of your Excel file corresponds to the STYPE field. In this example, the record starting with 0 corresponds to the source structure BGR00_I, records starting with 1 correspond to structure BBKPF_I, and records starting with 2 correspond to structure BBSEG_I.

Figure 7
Create a comma delimited file
Step 8. Assign files. Now you need to assign the source file specification that you created in step 6 to source structures (Figure 8). Press Ctrl+F1 or click on the Change button. Position the cursor on the source structure and press Ctrl+F2 or click on the Assign file button. Repeat the file assignment for all source structures that you created. Press Ctrl+S or click on the Save button to save the data. Press F3 or click on the green back arrow icon to return to the main LSMW screen.

Figure 8
Assign files to source structures
Steps 9-11. Read, display, and convert the data. In these standard LSMW steps, you read the source file, display the loaded data, and afterwards convert the data. These are standard LSMW steps so I won’t discuss them further.
Step 12. Display converted data. After you have read and converted the data, validate it (Figure 9). As you can see, the system displays the data in hierarchical form. Every level is marked with its own color and corresponds to a separate structure.
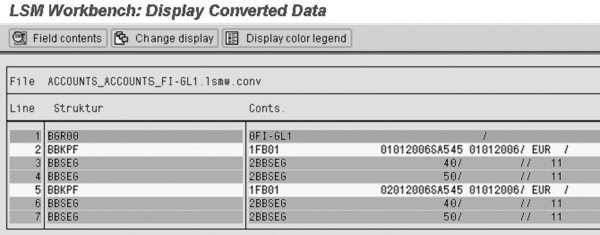
Figure 9
The system displays the data hierarchically
Step 13. Start the direct input program. After running the direct input program, create the journal shown in Figure 10.
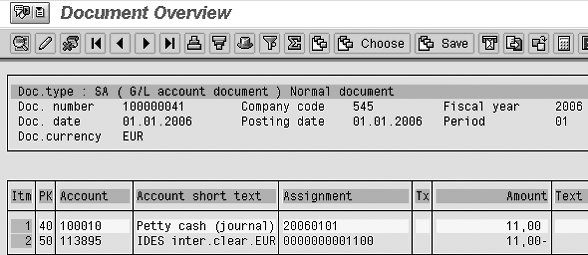
Figure 10
Example of journal created
Note
Yuval would like to acknowledge Anastasiya Tkach, ERP Consultant at TLR Tech, for her contribution in the preparation of this article.
Yuval Nir
Yuval Nir is managing director of financial systems consulting at TLR Tech Ltd. He has more than 15 years of global financial systems expertise focusing on the SAP Financial and Treasury modules. He holds a bachelor of science degree in economics, a master of science degree in accounting, and a CPA license.
You may contact the author at ynir@thelogicalroute.com.
If you have comments about this article or publication, or would like to submit an article idea, please contact the editor.