Learn how to use email forms in the Email Response Management System to reply to customer queries and complaints. Find out how to monitor those responses more efficiently via tracking text, which enables email linking to the appropriate service transaction.
Key Concept
The Email Response Management System (ERMS) is a tool that provides functionalities to efficiently manage a large volume of email traffic and related responses. Using ERMS, organizations can effectively automate the entire process of routing, monitoring, and response. Additionally, ERMS facilitates email association with follow-up service transactions, which reduces manual intervention for a large queue of emails.
One of the key features of SAP CRM Service Management is the Email Response Management System (ERMS), which has the ability to manage bulk emails coming into the system from your external stakeholders. ERMS provides various functionalities, including:
- Rule-based email routing and assignment
- Email filtering
- Content analysis and fact gathering
- Inbound email linkage to service transactions (e.g., service requests)
- Responses with predefined content and embedded tracking IDs
- Auto responses
- Escalation management
ERMS caters to your customer-service-related processes. With increasing use of the Web and email by an organization’s customer base, it has become imperative for companies to support the email channel for customer service. Email communication also turns out to be an economical alternative to voice-based customer support. By enabling more accurate, quicker responses, ERMS can create value for your organization in terms of improved customer satisfaction.
Looking at the above list of ERMS features, let’s discuss how to prepare predefined responses and embed tracking text IDs using mail forms. These features help agents create quick and consistent responses for inbound mails. They also help in tracing further email communication with the original sender, and association with follow-up service transactions to increase customer service efficiency.
How to Create Email Forms
The steps to create email forms are as follows:
1. Log in the system using an IC_Manager Business Role. This is the default business role provided by SAP.
2. Click Knowledge Management work center, which brings you to the screen shown in Figure 1.

Figure 1
The Knowledge Management work center view
3. Under the Create heading, click the Mail Form field to create a new mail form. The user navigates to the Mail Form creation screen (Figure 2).

Figure 2
General Data information screen
4. Enter the necessary General Data information, including:
- ID
- Description
- Language
- Usage
- Attribute Context
5. SAP by default provides TEXT ELEMENT 1 in the Text Element field, which maintains text in the mail form (Figure 3). Scroll down and you’ll see the text area in which you can type the necessary text required in the mail form. SAP CRM also provides the flexibility to add attributes to the text element. Attributes help to populate variable text at run time based on the business transaction for which you use the email template. For example, suppose a support agent creates a service request for an issue reported by the customer. Now the agent wants to send an email to the customer about progress made on the issue resolution. In the email response, the agent wants to include the service ticket number. To achieve this, create an email form with a service ticket attribute in the email body or the subject line. When the agent uses this email form to send an email from the service ticket, the service ticket number auto-populates in the email body. Similarly, you can use the tracking text attribute to create email threading.
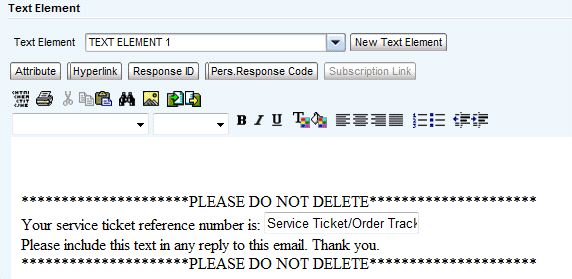
Figure 3
Create a text element
6. To insert an attribute in an email’s body, click the Attribute button. A pop-up window appears, which consists of all the attributes (Figure 4). SAP CRM provides an exhaustive list of attributes to use in the email content or subject line. In our example, for service ticket tracking text, choose the Additional Fields attribute category from the drop-down menu and then the Service Ticket/Order Tracking Text attribute.
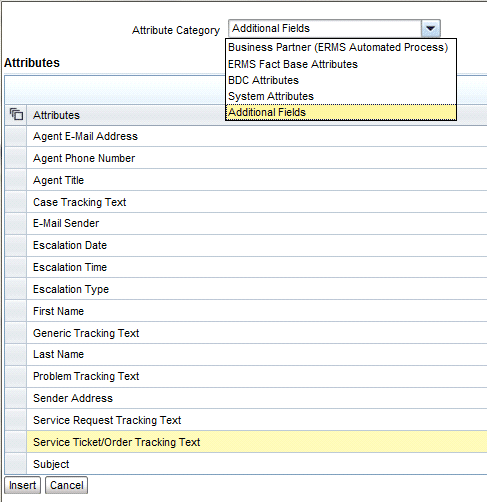
Figure 4
Select an attribute from the Additional Fields choice
The system inserts a tracking ID in the outbound email body or subject line to enable email threading. Let’s say an agent creates a service request in SAP CRM. The agent then sends out an email to the customer by inserting a tracking ID in the email body. Now, when the customer responds to this email, the message automatically is associated with the business transaction (i.e., the service request). You can arrange to have this email automatically route to the same agent by setting up routing rules. The email response is seen in the Business Context screen of the Service Ticket under the Activity Clipboard (Figure 5).

Figure 5
Email responses using tracking IDs show up in the Activity Clipboard
Create New Text Elements
SAP CRM provides the ability to create different text elements to use whenever necessary based on the responses that you send to customers. These text elements become paragraphs in an email that the customer receives. Follow these steps to create new text elements:
1. Click the New Text Element button near the bottom of Figure 2.
2. A pop-up window appears on the screen (Figure 6). Enter the details for Text Element ID, Description, and Format, using any naming convention you want.

Figure 6
Enter details for the new text element
3. The system guides the user to the new Text Element screen (Figure 7), in which you enter the text for use in the outbound emails.
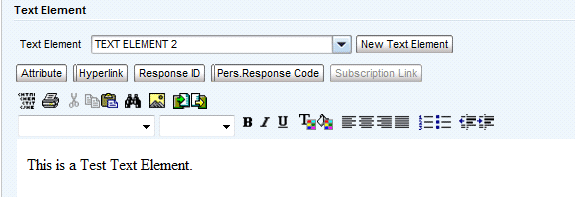
Figure 7
Enter text for the new text element
4. If there is a need to enter any link in the email body, click the Hyperlink button. A pop-up window appears (Figure 8). Add the required Web address in the URL field and click the Insert button.

Figure 8
Enter a new hyperlink
5. The original screen from Figure 2 returns. To set up the rules for what text type to use under which conditions, click the Edit Structure button. This navigates you to the Conditions screen (Figure 9). Text elements are displayed in the bottom half of the screen.
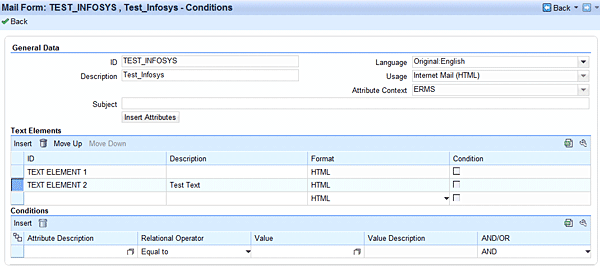
Figure 9
Text elements on the Conditions screen
6. Enter the conditions under which the system uses the text elements by following these steps. Select the text element for which the conditions need to be created in the Text Elements assignment block. In the Conditions assignment block, enter the following details:
- Attribute Description. Click F4 and select the attributes that appear in the pop-up window (same window as in Figure 4).
- Relational Operator. SAP provides the following operators as standard choices in Figure 10.
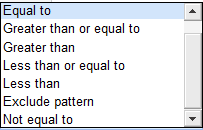
Figure 10
Choose a relations operator
- Value. Select any operator based on the individual requirement. For example, use Equal to when the attribute is Email Sender.
- Value Description. This is the same as what was entered in the Description field of Figure 6 while creating a text element.
- AND/OR. Select an option based on the rule you want to set up.
For example, if you set the conditions as shown in Figure 11, the text element in question will be a part of the email form only if the agent responds to an email sent by customers with addresses of test@test.com or abc@infosys.com. You can use any number of conditions for a text type based on your needs.

Figure 11
Example of conditions filled in for a text element
Use Customer Language Preferences in Email Forms
SAP CRM also provides the ability to maintain email templates in different languages. Using this functionality, the system picks the right template automatically based on the recipient’s communication language selected in the business partner record. Follow these steps to set up a language template:
1. After creating an email template, click the More drop-down menu and select Translate (Figure 12)

Figure 12
Select the Translate option
2. In the screen that comes up, select the language you want to use from the Translate Info drop-down menu (Figure 13). You automatically return to the prior screen.
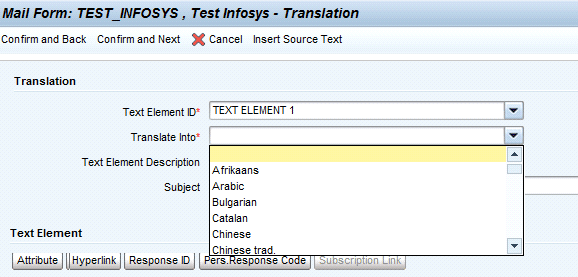
Figure 13
Select a language to translate the email into
3. SAP CRM does not support conversion of text from one language to another. The user can copy and paste the localized language in the text field (Figure 14).
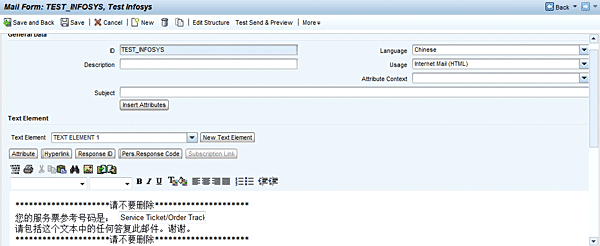
Figure 14
Copy the translated information into the email template
You can also use email forms to insert the tracking text automatically via the ERMS auto-acknowledge action. You can also use Mail Forms in the IC WebClient Email Editor when someone clicks the reply button or when sending a new email to the customer.
SAP CRM allows one email template to be used as a default for every email profile created in the system. This functionality allows this template to be auto-populated on creation of a new email or when responding to a customer email. You can manually insert all other email templates in the email body or subject line.
To assign the default template to the email profiles, follow menu path Customer Relationship Management > Interaction Center WebClient > Basic Functions > Communication Channels > Define Email Profiles (Figure 15).

Figure 15
Define Email Profiles screen
In the Customer Address, Contact Person Address, and Contact Relation Address fields, define the email addresses to be populated in the To line when responding to emails. The configuration auto-populates the recipients of the email. The system can default to email addresses that are associated with the confirmed business partner. In some cases, multiple email addresses exist for the business partner. Choose one of the following to determine which email addresses the system defaults to:
- All: All business partner addresses maintained for the business partner
- Default: Only the email address that is marked as the default address for the business partner
- None: No address is populated
You assign the email profile to the business role of the agent as a function profile by following menu path Customer Relationship Management > UI Framework > Business Roles > Define Business Role (Figure 16).

Figure 16
Assign a function profile for the email profile
Bhanupratap Singh
Bhanupratap Singh is a consultant with Infosys Technologies, Ltd. He has more than three years of SAP consulting experience in the SAP CRM Service module.
You may contact the author at Bhanupratap_singh@infosys.com.
If you have comments about this article or publication, or would like to submit an article idea, please contact the editor.
Vishal Mani
Vishal Mani is an SAP CRM Practice Lead for Knack Systems. He has been working in the CRM domain for over 10 years, working with multiple clients across the globe on major transformation programs. Currently he manages the CRM practice, where he is responsible for new generation solution concepts, project delivery, customer satisfaction, and team management. He is a certified SAP CRM Marketing Consultant.
You may contact the author at VishalMani@yahoo.com.
If you have comments about this article or publication, or would like to submit an article idea, please contact the editor.


