The infotype texts are not stored in the same manner as other fields of an infotype. Rather, they are stored in the form of clusters. The handling and storage of such fields are entirely different from other infotype fields. Learn about their storage architecture and the basic code that makes them accessible.
Key Concept
The HR module uses clusters for storing information in a variety of areas. Clusters provide numerous advantages. They are best for storing long texts and notes related to infotypes, such as infotype texts, which are stored in table PCL1.
A challenging task for HR developers is to access the stored texts for records of infotypes in the Personnel Administration (PA) module or Recruitment submodule. Users may store additional information related to a particular infotype record in the text portion. This information varies in length and sometimes consists of multiple lines, making it unsuitable for storage within an infotype table field. One such example is the comments about an employee’s appraisal.
Users may ask for this text to be displayed in their reports. Most users (and functional consultants) have a common misconception that these texts are stored just like other fields of the infotype.
However, they are not stored in standard transparent relational database tables like other fields of an infotype. Rather, they reside in clusters stored in a separate database table PCL1. The storage architecture of this table is different from the primary infotype table PANNNN. The infotype text resides in table PCL1 in compressed form.
Fetching texts in programs may therefore be confusing. HR consultants and ABAP programmers may have difficulty accessing these texts, especially since standard SAP documentation offers little relevant information. Cluster table keys and information such as entry date and user name are typically accessible through standard SQL calls. However, the desired infotype text is not accessible through the same means. R/3 does not even allow you to view them through the Data Browser, unlike other fields of the infotype. You need to use special statements or function modules for accessing them. For a download with more information about clusters, click here: Download.
I’ll provide an explanation of how infotype texts are stored and the way in which they may be accessed. I will also highlight the importance of clusters in general. Using a custom ABAP program, functional analysts who have the appropriate security and authorizations can access infotype texts by following the provided steps.
Enable Infotype Text Maintenance
SAP R/3 releases 4.5 to 4.7 allow you to manage text functionality via a simple configuration setting. This configuration is stored in table T582A. To enable the infotype text maintenance functionality, follow these steps:
- Follow IMG menu path Personnel Management>Personnel Administration> Customizing Procedures>Infotypes>Infotypes and select the Infotype option. This shows you the maintenance view of table T582A, which contains an infotype attributes table overview.
- Double-click on an infotype to see its configuration. Alternately, you can highlight the infotype number in the Infotype attributes screen and click on the details icon or press Ctrl+Shift+F2 to see the infotype’s configuration. This leads you to the screen shown in Figure 1.
- You must check the Text allowed setting in the Infotype attributes screen if you want to maintain text for a particular infotype. Check the indicator and click on the save icon. Saving the attributes is essential for any changes to take effect.

Figure 1
Control text settings in the Infotype attributes screen
Once you have saved your work, the menu option Edit>Maintain Text is enabled for the relevant infotype entry screen in the Copy, Create, and Change modes via transaction PA30 (Figure 2).

Figure 2
Menu option Maintain Text enabled
If the Text allowed indicator in the Infotype attributes screen is unchecked after storing text for an infotype record, then you may continue to see the maintain text icon, which shows that there is text for that record, but you cannot modify it.
Note
If the Text allowed indicator in the Infotype attributes screen is unchecked after storing text for an infotype record, then you may continue to see the maintain text icon, which shows that there is text for that record, but you cannot modify it.
Display Text is only enabled when a text already exists for the infotype record in question. When an infotype record is deleted, any corresponding information stored in the database cluster is also deleted.
Maintain Infotype Text
To enter new or amend existing text for an employee infotype record while maintaining master data, proceed as follows:
- Call transaction PA30, which brings you to the Maintain Master Data screen. Type the desired personnel number and the infotype number in the fields provided. Choose the icon of the relevant operation mode — for example create, change, etc. The infotype entry screen appears.
- Choose menu option Edit>Maintain Text or press F9. A text editor screen that allows you to enter text related to a particular infotype record appears (Figure 3).
The functionality of storing texts is available in all SAP R/3 4.x releases. However, this sophisticated editor (based on SAP TextEdit Control) is available as of Release 4.6. It is a full-fledged text editor that gives you many features, including cut, copy, paste, search, and import and export text from and to your local PC.
- Enter the text in the editor. The infotype module pool MPNNNN00 incorporates the necessary code for storing and accessing these texts to and from the database. It stores the entire text in an internal table defined within the program.
- After writing the text, click on the save icon. This takes you back to the infotype entry screen. To save the infotype text in the database cluster, you need to click on the save icon in the infotype entry screen as well. This takes you to the initial transaction PA30 screen.
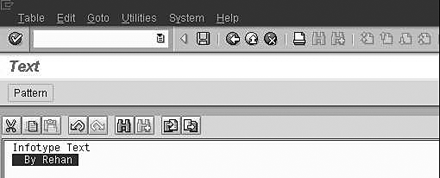
Figure 3
Editor for entering infotype text
To change existing text for an infotype record, follow the above steps with one exception. Go directly to the text editor by clicking on the maintain text icon on the infotype screen header. The appearance of this icon signals that some text already exists for the given infotype record.
How R/3 Stores Infotype Texts
After you save the text in the text editor and click on save in the infotype entry screen, the module pool formulates a key for storing the text in the cluster. Imagine a cluster as another table within table PCL1. The key of a cluster is synonymous to the key of a transparent table. The set of fields that collectively forms the key uniquely identifies a stored text for a particular infotype record. It is essential for storing and reading texts into and from the database. The key is derived from the key fields of the infotype record, which store and retrieve infotype data.
The key fields are based on the structure PSKEY (Figure 4). The infotype text, corresponding to a given key, is exported as a cluster to table PCL1 under the cluster ID TX. For more information on clusters, refer to my sidebar in the Download Section at the bottom of the article. The infotype program also changes an indicator field (ITXEX) in the database table PNNNN to X for that infotype record, indicating the presence of stored text.

Figure 4
Structure PSKEY contains the key fields
When retrieving text via the Display text option, the program formulates the key derived from the fields of the infotype record. This key for importing text is the same as the one used for exporting text of the same infotype record. It reads the data from the database PCL1, which the text editor in display mode then displays.
Access Infotype Texts
You access infotype text in reports, custom ABAP programs, and queries differently than for other infotype fields. Before trying to access texts via programming, try to view the key field in table PCL1 for the corresponding text entry of the infotype via the Data Browser (transaction SE16). This should help you understand the relationship between the stored key field and the correlated fields of the given infotype record. Proceed as follows:
Call transaction SE16. Enter PCL1 in the Table field and press Enter. A field selection screen appears. Type TX in the RELID field. In the SRTFD field, type an employee number followed by an asterisk, and then press F8. You do not need to fill in the Client field, as SAP R/3 populates this field with the current client. The key field is derived from the fields of the infotype record. This key is stored in field SRTFD.
Field SRTFD in Figure 5 shows the key field for text stored for record in infotype number 0045, subtype Z101 of employee number 00000002, valid on dates 01.01.2004 and 15.01.2004.

Figure 5
Data browser entry for table PCL1 showing key field format
You may access the infotype text in a custom ABAP program that may or may not use logical database PNP, depending on the scenario and requirements. Although it is not always necessary, logical database PNP is used many times in queries and custom ABAP programs because of the numerous advantages it offers, such as providing a selection screen and authorization checks and minimizing code. The code I’ll provide works with or without PNP.
To access your infotype text, perform the following steps, which are all required to write the block of code shown in Figure 6. I assume in this example that you want to access the infotype text from infotype 2001 (P2001). You may modify my example to fit any custom program or infotype.
IF P2001-ITXEX EQ 'X'. " For efficiency
        DATA:  KEY LIKE PSKEY.
        DATA: BEGIN OF PTEXT OCCURS 200.
        DATA:   LINE(78).
        DATA: END OF PTEXT.        REFRESH PTEXT.
        MOVE-CORRESPONDING P2001 TO KEY.        IMPORT PTEXT FROM DATABASE PCL1(TX) ID KEY.          LOOP AT PTEXT.
          WRITE :/ PTEXT-LINE.
        ENDLOOP.
    ENDIF.
|
| Figure 6 |
COMPLETE LISTING code |
1. Create a custom program with transaction SE38. Name your program appropriately, such as Z_READ_TEXT, and click on the Create button. This brings you to the Attributes screen. Enter a description and other relevant entries and enter PNP as the logical database. Save your program. This takes you to a screen where you can enter code that allows you to add the COMPLETE LISTING code in Figure 6. Enter the following:
TABLES : PERNR.

INFOTYPES : 2001

GET PERNR.

END-OF-SELECTION.
My code COMPLETE LISTING is inserted between the GET and END-OF- SELECTION.
2. Define and populate the key. The most important step is creating the key to access the text via the IMPORT statement. As already mentioned, this must be based on the dictionary structure PSKEY. A key declaration must follow this format:
DATA KEY LIKE PSKEY.
The above statement defines the key.
You must be extremely careful while formulating the key. It is essential to define the correct structure of the key field and fill it with the right data, or the key does not locate the infotype text. A safe way to define the structure correctly is to assign values to the key field from the corresponding fields of the related infotype record.
If you are in a program that has access to the header row of PNNNN, such as your custom ABAP program, you may use this header row via a MOVE-CORRESPONDING statement. A MOVE- CORRESPONDING statement transfers the header row values from similarly named fields from one structure (or header row) to another, in this case from P2001 to the key fields. For example, for an infotype record stored in the header row of P2001, you should populate the key fields as follows:
  MOVE-CORRESPONDING P2001

TO KEY.
The above statement is equivalent to the following statements:
KEY-PERNR |
=
|
P2001-PERNR |
KEY-INFTY |
=
|
P2001-INFTY |
KEY-SUBTY |
=
|
P2001-SUBTY |
KEY-OBJPS |
=
|
P2001-OBJPS |
KEY-SPRPS |
=
|
P2001-SPRPS |
KEY-ENDDA |
=
|
P2001-ENDDA |
KEY-BEGDA |
=
|
P2001-BEGDA |
KEY-SEQNR |
=
|
P2001-SEQNR |
3. Declare a text container in your program. Data that is read from a cluster must be stored in appropriate text containers (internal tables or flat structures) before it may be displayed. You need to declare these text containers before importing data from the cluster. This declaration may vary according to the type of cluster in question. In the infotype text scenario, the text is stored in an internal table comprised of character lines.
When you are done with the key formulation, declare an internal table for storing the text that is imported from the database cluster by entering this custom code into your custom ABAP program Z_READ_TEXT.
DATA: BEGIN OF PTEXT OCCURS 200.

DATA: LINE(78).

DATA: END OF PTEXT.
4. Call the IMPORT statement for reading the infotype text from the cluster. This step involves reading the text stored in the key under the cluster ID TX from the database table PCL1 via an IMPORT statement. Add the following statement to your custom ABAP program:
      IMPORT PTEXT FROM DATABASE

PCL1(TX) ID KEY.
Since the text is stored as table PTEXT by the infotype module pool, it is necessary to mention the name PTEXT in the IMPORT statement. However, if you use any other internal table name, such as MY_TAB, the statement would change as follows:
      IMPORT PTEXT TO MY_TAB

FROM DATABASE PCL1(TX) ID KEY.
Let’s see how the code fits together into your custom ABAP program. Suppose that at a given point of the program, the header row of table P2001 contains the infotype row that is necessary to formulate the key. For efficiency’s sake, use the field ITXEX to run the IMPORT statement in Step 4 only for rows that have some text stored in them, because you do not want to run the code in Figure 6 for all infotype records.
To increase performance, an IF statement uses field ITXEX to restrict cluster accesses for records that contain text. The IMPORT statement accesses the text from the database and stores it in table PTEXT, which is then displayed via a LOOP statement. Your custom ABAP program that allows the user to read the infotype text should look like Figure 6.
When users access the infotype text via the custom ABAP program in Figure 6, they see a screen output like the one shown in Figure 7.

Figure 7
Infotype text display screen
Retrieve Infotype Text in SAP Query
As already mentioned, the infotype fields reside in table PANNNN. When users require infotype data output, a quick and easy option is to generate an SAP Query. The problem starts when your business process requires the infotype text to be displayed along with the corresponding infotype record. In this case, developers may be required to access infotype texts via additional programming in queries. You can solve this problem by defining an additional character field in the corresponding InfoSet of the query using the following steps:
- Call transaction SQ02. Type the name of the InfoSet related to your SAP Query in the InfoSet field and choose Change. A new screen showing the various field groups (infotypes) appears. Right-click on the Additional fields node of the infotype whose text you want to access and choose Create. A pop-up window appears (Figure 8).
- Enter a suitable name for the additional character field, such as “test,” in the Name field, check the Additional field button, and press Enter. You are then prompted to enter the type and length of the additional field. In the box labeled Format, enter type
C (for character) into the Type field and enter a length that is sufficient for storing your infotype text into the Length and Output Length fields. Press Enter.
- The newly created field then appears under the Additional Fields node of the relevant field group. Place the cursor over the field and right-click to display a context menu. Choose Field code (Figure 9).

Figure 8
Specify the name of the additional field
This takes you to the ABAP editor, where you enter the code of your additional field.
The code for accessing the infotype text is written in this coding area provided for the extra field. Enter the custom code in Figure 10, where TEST is the name of the additional field.
IF P0032-ITXEX EQ 'X'.
     DATA: KEY LIKE PSKEY.
     DATA: BEGIN OF PTEXT  OCCURS 200.
     DATA: LINE(78).
     DATA: END OF PTEXT.
     REFRESH PTEXT.
     MOVE-CORRESPONDING P0032 TO KEY.
     IMPORT PTEXT FROM DATABASE PCL1(TX) ID KEY.

     READ TABLE PTEXT INDEX 1.
     TEST = PTEXT-LINE.
 ENDIF.
|
| Figure 10 |
Code to access the infotype text |
Unlike your custom ABAP program, which can output unlimited lines of data via a LOOP statement, this code varies slightly because you need to define additional fields in SAP Query that can contain a single row for display. After the IMPORT statement in the Figure 10 code, a READ statement accesses the first row of the text table, which is then assigned to the additional field defined in the InfoSet (field name is TEST in our case). READ TABLE PTEXT INDEX 1 accesses the first row of the text.
Once READ is executed, the PTEXT-LINE contains your text’s first line. This value must be assigned to an additional field. The last line assigns this value to the field TEST. Please note that for simplicity’s sake, I have chosen an example that requires reading a single line of infotype text via SAP Query.
The additional field TEST may then be easily used in one or more queries for displaying infotype texts just like any other infotype field. The procedure is documented by SAP. For more information, refer to the SAP Documentation on SAP Query (SAP Library>mySAP Technology Components>SAP Web Application Server>ABAP Workbench>SAP Query>Tools for Queries>Queries>Creating and Changing Queries.)
Troubleshooting Tips
If you think that text is stored for a given record but your program does not retrieve it, check your key formation procedure. Proceed as follows:
- Call transaction SE38. Type the name of the program in the Program field and click Display.
- Place the cursor on the line containing the IMPORT statement. Set a breakpoint at the IMPORT statement by clicking the stop icon. Alternately, you may also write the statement BREAK followed by the user name before the IMPORT statement (for example, BREAK JOHN).
- Execute your custom program. The program stops in the debugging mode if you've set a breakpoint, as mentioned in Step 2.
- Within the debugger, view the value of the key field to make sure it matches the key stored in the database table PCL1 for your infotype record.
Rehan Zaidi
Rehan Zaidi is a consultant for several international SAP clients (both on-site and remotely) on a wide range of SAP technical and functional requirements, and also provides writing and documentation services for their SAP- and ABAP-related products. He started working with SAP in 1999 and writing about his experiences in 2001. Rehan has written several articles for both SAP Professional Journal and HR Expert, and also has a number of popular SAP- and ABAP-related books to his credit.
You may contact the author at erpdomain@gmail.com.
If you have comments about this article or publication, or would like to submit an article idea, please contact the editor.