Manager
Learn how to use ChaRM within your SAP application management department to manage existing SAP applications, and see the benefits resulting from its use. Also, follow this step-by-step process for both urgent corrections and normal corrections.
Key Concept
Change Request Management (ChaRM) contains functionality to manage the life cycle of change requests, and it also contains functionality to control the implementation of change requests in the SAP landscape. This integrated process is an ideal way to manage and control your change requests. It streamlines the change request management process, results in transparency on what was changed as part of each change request, and can speed up issue resolution. Your application management department can use ChaRM to manage all changes resulting from either incidents or change requests from the end-user community.
As you probably know, Change Request Management (ChaRM) manages change requests and controls the implementation and deployment of these change requests in an SAP landscape. As you can see in Figure 1, ChaRM deals with both incidents and change requests. A change request originates from an incident, and it can be raised by an end user.

Figure 1
ChaRM covers both incidents and change requests raised by end users
The total life cycle of a change request is covered in ChaRM — from registration to implementation. You can use ChaRM for an implementation project or within an application management environment. In this article, I cover the use of ChaRM within an application management department.
Using ChaRM in this way provides you with several benefits:
SAP Application Management
An application management department needs to make sure the application is running well so it can support business activities well. As part of your organization’s application management responsibilities, you need to execute two major activities that affect ChaRM:
- Incident Management: software is (or seems not to be) working as designed and needs follow-up by the SAP support team. All incidents can be managed using Service Desk. If a change in software results from an incident, you need to add a change request in ChaRM.
- Change request management: a change in the software is needed because additional functionality is required or there is a change in existing functionality. For every new or changed functionality, you need to add a change request in ChaRM.
As you can see, both of these activities can result in software changes. Depending on the urgency of the needed change, ChaRM distinguishes two kinds of changes: changes that cannot wait for the next application release or changes that can wait for the next release. The former are called urgent corrections, and the latter are called normal corrections (also known as regular corrections).
Release Management and ChaRM
Release management is related to using ChaRM. In general, it is advised that you combine software changes in releases as much as possible to prevent system disturbances. For that reason, it is preferable to have a new release every month or every quarter. Implementation of a new release needs to be accompanied with sufficient testing. By having a new release every month, you have the time to prepare and execute extensive tests, which you don’t have when you implement each change one by one as it happens.
In ChaRM, you combine all normal corrections that need to be implemented in the next release. (I show you how to do this later in this article.) Urgent corrections cannot wait for the next release and are implemented earlier (Figure 2).

Figure 2
Incidents and change requests versus corrections in ChaRM
ChaRM to Support Application Management
ChaRM is based on user roles that participate in the change request management process:
- Change manager: the person responsible for the overall proper execution of the change requests, based on a priority setting done by the business. This often takes place via the change advisory board team at an organization.
- Developer: the person who makes the change (which can be customizing or custom development) in the development system
- Tester: the person who tests whether the changes reflect the change request and accepts the changes
- IT operator: the person who transports the changes over the system landscape
It’s also important to know in which SAP system you perform each action related to ChaRM:
- Make the changes in the development system, also known as DEV. Development and customizing always need to be done in this system.
- Perform acceptance testing in the QA system, also known as QAS
- Function as the production system, also known as PRD
Obviously, an application can use more than one SAP system (e.g., SAP SRM, SAP NetWeaver PI, and SAP NetWeaver Portal). A system landscape needs to exist for each system to develop the changes, perform acceptance testing, and transport the changes into production. The SAP system landscape differs per company and depends on the specific requirements and needs of an organization.
Now we’ll look at the detailed processes to execute both a normal correction and an urgent correction. I should explain some important ChaRM terminology before we begin:
- Change request: SAP CRM transaction type SDCR is used to register the change request. It includes information on whether the change needs to be handled as a normal correction or an urgent correction.
- Change transaction (also known as a change document): This is the SAP CRM transaction type that manages the execution of the change request. It is transaction SDHF for an urgent correction and SDMJ for a normal correction.
- Maintenance cycle: SAP CRM transaction type SDMN is used to manage the phases of a new application release (i.e., to implement a group of normal corrections). Urgent corrections do not have their own maintenance cycle, but they relate to the maintenance cycle of the application release because they affect the same productive SAP systems.
- Tasklist: gives you an overview of your SAP system landscape related to an application release (i.e., a group of normal corrections) or one specific urgent correction. The tasklist is mainly used to release and import all transport requests related to a specific application release (e.g., to implement a group of normal corrections). Release of an urgent correction is not executed via the tasklist, but rather via the change transaction.
To be able to use and understand ChaRM well, it is important you know this terminology. Figure 3 is an extended version of Figure 2 that includes this additional ChaRM terminology.

Figure 3
Extended Figure 2 with additional ChaRM terminology
Now you should have a good overview of ChaRM terminology, which can also be referred to as the building blocks. In the next section, I refer to these building blocks as I review the detailed process to execute both normal corrections and urgent corrections.
Normal Corrections
Table 1 shows a straightforward scenario to follow for your normal corrections process. Depending on your needs, this can be enhanced or extended. In Table 1 you see:
- All activities that need to be done
- Which user role needs to do the activity
- The possible impact on an SAP transport request
- The ChaRM building block to be used in an activity (e.g., change request, change document, tasklist, or maintenance cycle)
Note that you execute most of the activities for every normal correction, but some of them — such as releasing transport requests or importing transporting requests — are done for the group of normal corrections that is part of the application release you are implementing. Also, some of the activities are not associated with the columns on the right side of Table 1 (e.g., Change request and Change document) so I have not marked off anything in the columns for these activities.
Note
In this section, you execute all the activities using the Change Request Management Work Center. All screenprints in this section are based on SAP Solution Manager 7.0 with Support Package 23.

Table 1
Sample detailed normal corrections process
Next, I’ll present you with some images to show you how to execute an activity. For similar activities (e.g., activities 6, 16, and 29 or activities 4, 15, and 20) only one screenprint is added as an example. The numbers used below refer to the activities in Table 1.
Note
In the steps below, I use the phrase “SAP expert.” This generally refers to any person who makes a change in customizing or a custom program.
Step 1. Add a normal correction. Use the Change Request Management Work Center as a start. There you can see an overview of all change requests and change documents per status. On the left side of the screen, click New Change Request (Figure 4).

Figure 4
Add a normal correction change request
Step 2. Add all the appropriate details. It’s important to use the subject Normal Correction (Figure 5).

Figure 5
Add normal correction details
Note
I do not cover step 2 in Table 1 because it would require extensive screenprints and text, and most teams know how to perform the actions required by that step.
Step 3. Approve the normal correction. When you approve the normal correction, you can start working on the change. Do this by selecting the Authorize Change Request option under the action icon (Figure 6).

Figure 6
Approve normal correction
Step 4. Assign a developer in the Current Processor field. You should enter the identification details of the person who needs to start working on the change (Figure 7).

Figure 7
Assign a developer
Step 5. Set the status to In Development. When the individual or team at your organization responsible for making changes starts working on the change, set the status of the normal correction to In Development (Figure 8).

Figure 8
Set the In Development status when changes are being made
Step 6. Unlock the development taskgroup (transaction code SCMA). In the tasklist, you need to unlock the nodes in the development taskgroup to enable authorized individuals to do the activities in this taskgroup. Follow the menu path Source Systems > Development System and right-click the Development System folder to unlock all nodes in that group in one time (Figure 9).

Figure 9
Unlock the Development System taskgroup
Step 7. Create the transport request. The developer should create a transport request to use for the changes (whether they are customizing or development) (Figure 10).

Figure 10
Create a transport request
Step 8. Develop and connect to the transport request. The developer works on the changes in the development system and connects the changes to the created transport request (Figure 11). This process is the same as the way you would do this without ChaRM. When you do use ChaRM, you relate the change to a transport request created using ChaRM.

Figure 11
Connecting a change to transport request
Step 9. The change manager needs to switch the status in the Maintenance Cycle to Development with Release using transaction CRM_DNO_MONITOR. This confirms that you are allowed to release transport requests into the QA system (Figure 12).

Figure 12
Switch phase in MC into Development with Release
Using a test transport, you can copy the customizing to the QA system without releasing the transport request itself. Then you can test this in the QA system. This functionality is not specific to ChaRM and is beyond the scope of this article. Therefore, there are no screenprints of steps 10 through 12.
Step 13. Create test instructions for the tester, if necessary or desirable. You can do this by clicking Overview * to see some possible values (Figure 13). One of the possible values is Test Instruction; click it to add some freeform text.

Figure 13
Create test instructions (optional)
Step 14. The developer changes the status of the normal correction into Complete Development when he or she is done with it (Figure 14).

Figure 14
Complete the development stage
Step 15. Assign an IT operator in the IT Operator field. The person that needs to transport the changes into the QA system is allocated to the normal correction (Figure 15).

Figure 15
Assign an IT operator
Step 16. Release the transport request to the QA system using transaction code SCMA. The IT Operator releases the transport requests by right-clicking Release Transport Request on the left side of the screen and selecting Execute from the options that appear. This produces the pop-up window shown in Figure 16.

Figure 16
Release the transport request to the QA system
Step 17. Import the request into the QA system using transaction code SCMA. The IT Operator imports the transport requests into the QA system (Figure 17). Right-click Import Transport Request and then select Execute. This allows you to see the pop-up window shown in Figure 17.

Figure 17
Import in QA system
Step 18. The tester creates a test report. The tester can document test results by adding a simple note in this step (Figure 18). You can do this by clicking Overview * and selecting the value Test Report. You can click it to add freeform text.

Figure 18
Create a test report
Step 19. Confirm that the test is successful. If the tests were successful, the tester changes the status to Confirm Successful Test (Figure 19). If the tests were not successful, the tester resets the status to In Development. In that case, the individual who made the changes needs to check the changes using the test report.

Figure 19
Confirm a successful test
Step 20. The change manager sets the status to Set Production Status if the change is transported correctly into the Production system (Figure 20).

Figure 20
Set Production status
Step 21. Complete the change request. The change manager completes the change request by selecting Confirms Realization if it has been fully completed including, for example, all necessary changes in documentation) as shown in Figure 21.

Figure 21
Complete the change request
Urgent Corrections
Below you see an example of a straightforward scenario to follow for your urgent corrections process. Depending on your needs, this scenario can be enhanced or extended. In Table 2, you see:
- All the activities that are done
- Which user role performs the activities
- The possible impact on the SAP transport request
- The ChaRM building blocks to use in an activity: change requests, change documents, or tasklists
Note
A tasklist is not used in this process but you can look into it for analysis purposes via transaction SCMA. The maintenance cycle is not applicable for an urgent correction, as I mentioned earlier.

Table 2
Sample detailed urgent corrections process
Just as I did for normal corrections, I have included images below that show you how to execute an activity. Again, for similar activities, I show only one screenprint. In addition, for similar activities shown as part of the normal correction process (e.g., create change request) that are not different for urgent corrections, I did not include repeat screenprints. You can perform all of these activities in the Change Request Management Work Center.
Step 1. Make sure the maintenance cycle is not in the go-live phase (Figure 22). In that phase, normal corrections and previous urgent corrections are merged to prevent problems such as urgent corrections being overwritten by normal corrections. When normal corrections overwrite urgent corrections, your problem simply pops up again, creating frustration for end users.

Figure 22
Check the phase of the maintenance cycle
Step 2. Create a transport request. In this case, the transport request is created automatically (Figure 23).

Figure 23
Create a transport request
Step 3. Pass the correction to the testing system. When you select Pass Correction to Test in the screen shown in Figure 24, the transport request is automatically released to and imported in the QA system.

Figure 24
Pass the correction to the test phase
Step 4. If the tests were successful, the tester changes the status to Confirm successful test (Figure 25). If the tests were not successful, the tester resets the status to In Development. In that case, the individual who made the change needs to check on it using the test report.

Figure 25
Confirm a successful test
Step 5. Release the change into Production. If all requirements have been met, the change manager can transport the changes into the Production system by selecting Released for Production (Figure 26).

Figure 26
Release change to Production
Step 6. The change manager completes the correction when it has been fully completed (including, for instance, all necessary changes in documentation). You can do this by selecting Complete Correction (Figure 27).
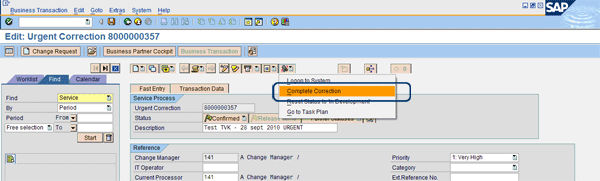
Figure 27
Complete the correction
After completion, you cannot make any changes into the urgent correction anymore. You see the pop-up window shown in Figure 28. Click the Yes button to complete the process.
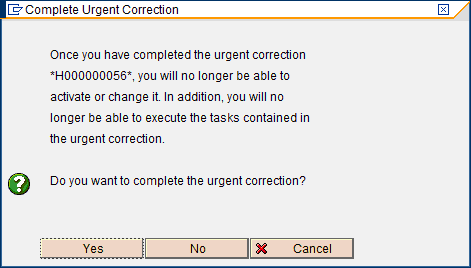
Figure 28
Complete correction pop-up window
Theo van Kaathoven
Theo van Kaathoven is a senior SAP Solution Manager consultant who has worked as an independent consultant for more than 15 years. He has a master’s degree in business administration, and prior to that he finished an IT education on a bachelor level. He is specialized in SAP Solution Manager use for both projects and application management (and their integration). He performed a complete implementation of many of the existing SAP Solution Manager functionality from scratch, up to and including support, for several large companies.
You may contact the author at tovankaathoven@certifica.nl.
If you have comments about this article or publication, or would like to submit an article idea, please contact the editor.


