One of the most complicated aspects of R/3's Payroll functionality is the concept of retrocalculations. It's complex, no getting around that. However, if you understand the basics, you can use that knowledge to figure out what happened to cause the retrocalculation, and what the retrocalculation changed.
One of the most complicated aspects of R/3’s Payroll functionality is the concept of retrocalculations. It’s complex, no getting around that. However, if you understand the basics, you can use that knowledge to figure out what happened to cause the retrocalculation, and what the retrocalculation changed.
A retrocalculation is the calculation of a previous payroll period while in the current payroll period. Retrocalculation happens automatically because some part of an employee’s master data changed for a payroll period that was already calculated.1 Since that data changed, the employee master data is now out of sync with the payroll results. The retrocalculation gets the master data and payroll results back in sync. The differences between the original payroll result and the recalculated result are posted to accounting, show up in various payroll reports, and are transferred to the employee’s current-period net pay.
These changes usually come in two forms – changes to infotypes and changes in time evaluation results. If time evaluation retroactively changes time results, Payroll retrocalculates back to that same date so that it can pick up and process any differences that need to be paid.
You have many options for determining what types of changes cause retrocalculations. You can see a few via IMG menu path Personnel Management> Personnel Administration> Customizing Procedures>Infotypes> Define fields relevant for retroactive accounting. I will explain how the R/3 Payroll calculation determines retroactive differences between the previous and current payroll results, how to interpret retroactive payroll results, and the effects retrocalculations can have on employees and payroll processes. With this knowledge and some practice, you will be able to conquer retrocalculations.
Calculating Retroactive Payroll Differences
Gross-to-Net Equation
To understand retrocalculations, you first need to understand how R/3 comes up with an employee’s net pay. The following equation has worked for me for years:
/101 + /110 - /5U0 + /551 + /552 + /561 - /563 = /560
Or in more friendly terms:
Total cash payments + total employee deductions – total employee taxes + retro differences2 + current claim – previous claim = net pay
All cash employee payments cumulate into wage type /101 and employee deductions into /110. Since deductions reduce pay, they are carried with a negative sign. In the U.S., total employee taxes are contained in /5U0, but the wage type for total employee taxes is country-dependent.
Forming Retro Differences
Using the gross-to-net equation as a guide, an abbreviated payroll result could look like what you see in Table 1. One exception is that you don’t assign FI/CO accounts on /101, /110, and /5U0. Instead, you account for their individual components such as base pay, overtime, cafeteria deduction, and withholding tax. You can show debits and credits to simplify the presentation of the wage types.
|
Wage Type
|
Amount
|
Debit
|
Credit
|
|
/101
|
$1000
|
$1000
|
|
|
/110
|
-$200
|
|
$200
|
|
/5U0
|
$300
|
|
$300
|
|
/560
|
$500
|
|
$500
|
|
|
|
| Table 1 |
Payroll result for period 1 |
Wage type amounts can change retro-actively. For example, if an employee were underpaid by eight hours of overtime in a previous period, the amount of the overtime wage type would increase retroactively. Since overtime is a cash payment, it would cause /101 to increase retroactively, showing that you now need to pay the employee $100 more in this case. But, in a retrocalculated period, you cannot change the amount of net pay, since that pay was already transferred to the bank (or paid via check). The difference between what was paid originally vs. what should now be paid is put into a wage type called “retro differences,” or /551. This keeps the retro payroll period in balance (i.e., debits equal credits). (See Table 2.)
|
Wage Type
|
Amount
|
Debit
|
Credit
|
|
/101
|
$1100
|
$1100
|
|
|
/110
|
-$200
|
|
$200
|
|
/5U0
|
$300
|
|
$300
|
|
/560
|
$500
|
|
$500
|
|
/551
|
-$100
|
|
$100
|
|
|
|
| Table 2 |
Keeping retro payroll period in balance |
Then, in the current period, the system sums all the /551 wage types from the retro periods, multiplies by negative 1, and places that amount in /552. If positive, this adds to the amount of net pay; if negative it reduces net pay. /551 and /552 should always exactly offset each other. Total employee taxes increased because of the retroactive increase in wages. (See Table 3.)
|
Wage Type
|
Amount
|
Debit
|
Credit
|
|
/101
|
$1000
|
$1000
|
|
|
/110
|
-$200
|
|
$200
|
|
/5U0
|
$310
|
|
$310
|
|
/560
|
$590
|
|
$590
|
|
/551
|
$100
|
$100
|
|
|
|
|
| Table 3 |
The retro difference is paid |
Claims
Retro differences (wage type /552) are added to total net pay (wage type /560) in the current period. If /552 is negative, it could reduce /560 to a negative amount, which is not allowed. Negative net pay cannot be paid. The negative amount that cannot be recovered in the current period is stored in /561 as a claim. The claim is the amount of money the employee still owes the company. For example, assume the employee was on a leave of absence beginning in period 1 and you just found out about it. The employee would have had a total gross of zero, but was originally paid $1,000. The results would look like what you see in Table 4.
|
Wage Type
|
Amount
|
Debit
|
Credit
|
|
/101
|
$0
|
$0
|
|
|
/110
|
-$200
|
|
$200
|
|
/5U0
|
$300
|
|
$300
|
|
/560
|
$500
|
|
$500
|
|
/551
|
$1000
|
$1000
|
|
|
|
|
| Table 4 |
Employee is overpaid |
In period 2, the employee is still on leave of absence, so no payments, deductions, or taxes are taken. The $1,000 overpayment from period 1 in 2 is stored as a claim, since there is no net pay to offset it. (See Table 5.)
|
Wage Type
|
Amount
|
Debit
|
Credit
|
|
/101
|
$0
|
$0
|
|
|
/110
|
$0
|
|
$0
|
|
/5U0
|
$0
|
|
$0
|
|
/560
|
$0
|
|
$0
|
|
/552
|
-$1000
|
|
$1000
|
|
/561
|
$1000
|
$1000
|
|
|
|
|
| Table 5 |
Overpayment stored as claim |
The claim (/561) is the amount the employee owes the company. In every subsequent payroll, the system will apply money toward paying off the claim before it uses the money for any deductions or taxes. For example, in period 3 the employee is paid $600, and all of that is allocated to reduce the claim. (See Table 6.)
|
Wage Type
|
Amount
|
Debit
|
Credit
|
|
/101
|
$600
|
$600
|
|
|
/110
|
$0
|
|
$0
|
|
/5U0
|
$0
|
|
$0
|
|
/560
|
$0
|
|
$0
|
|
/561
|
$400
|
$400
|
|
|
/563
|
$1000
|
|
$1000
|
|
|
|
| Table 6 |
Current payment goes towards claim |
Elements of a Retrocalculation
In real R/3 payrolls, dozens of wage types can change retroactively, and it can be challenging to find which ones changed. However, there is a straight-forward way to determine which wage type(s) changed retroactively if you focus on the gross to net equation: All payments cumulate to wage type /101, all deductions to /110, and all taxes (in the U.S.) to /5U0. Compare those wage types between the most recent period and the original period to get a high-level view of what changed. If /101 is different between the two results, then you know that some payment wage type changed retroactively. If /110 is different, then a deduction also changed retroactively. Report RPDLGA20 shows which wage types cumulate to /101 and /110. Simply select cumulation class 01 for wage types that cumulate to /101, or class 10 for wage types that cumulate to /110. (See Figure 1.)
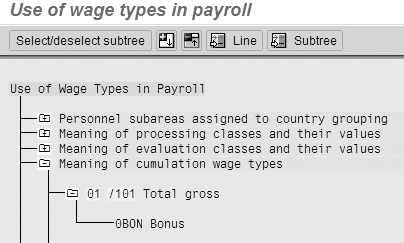
Figure 1
Use of wage types in payroll
Since taxes are country-specific, the method of determining which wage types sum into total employee taxes varies. In the U.S., processing class 72 determines if a wage type is an employee or employer tax. You can also use report RPDLGA20 to see all the employee tax wage types. Instead of selecting the Cumulation wage types node, go to the Processing classes node, then Processing class 72, then the values of 1 for employee taxes. Processing class 72, value 2 is for employer-paid taxes.
In the following example, the employee retrocalculated to period 2 in period 3. Using the Display Results tool (transaction PC_PAYRESULT or via the payroll menu at Tools>Display Results) you can see the retrocalculated period 2.2003 in 3.2003. (See Figure 2.) Both results have a status indicator (the first column) of A, which means they are the most “actual” results. The original period 2 – the 2.2003 in 2.2003 – is marked with a P, which identifies it as the previous result. To determine what changed, compare the 2.2003 in 2.2003 result to the 2.2003 in 3.2003. By double-clicking on the payroll result you can see all the pieces of information stored in it. To compare the two payroll results, print out the results table (RT) for each result or open two R/3 sessions and compare the RT tables.
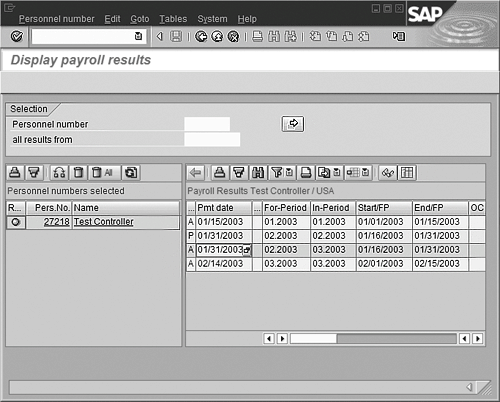
Figure 2
Display of payroll results
In the 2.2003 in 2.2003 result, /101 was $4,200.00 and /110 was -$50.00 (Figure 3).
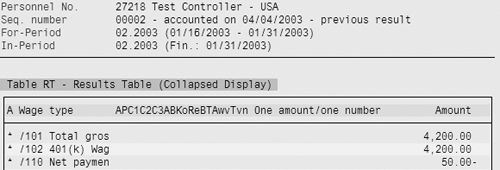
Figure 3
The three tables that make up the ODS in BW 3.0B
In 2.2003 in 3.2003, /101 was reduced to $4,000.00, so you know some sort of payment changed (Figure 4).
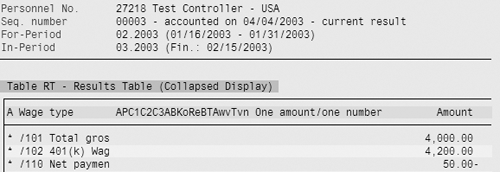
Figure 4
Results table for period 2 in period 3
If you look further in the results table (Figure 5), you find two payments were made in the original period 2.2003.

Figure 5
Payments made for period 2 in period 2
For 2.2003 in 3.2003 (Figure 6), wage type 0BON was reduced to $1,000.00.

Figure 6
Payments made for period 2 in period 3
This case shows that the original bonus payment of $1,200 was paid in period 2.2003. In period 3.2003, that bonus payment was reduced to $1,000. The payroll calculation took that $200 back from the employee on the period 3.2003 payroll, with a -$200 amount in wage type /552 that reduced the net pay (Figure 7).

Figure 7
Retro difference for period 3 in period 3
Reporting Potential Retros
There are ways to know which employees will retrocalculate before you run payroll. The retrocalculation date for each employee is stored in infotype 3 – the Earliest MD change and Mast.data chng.bonus fields (Figure 8).

Figure 8
Retrocalculation date per employee in infotype 3
You could write a simple SAP Query to report all the employees who have dates in those fields that are not blank and are earlier than the begin date of the pay period. Transactions SE16 and SE17 on Table PA0003 also provide a quick view to the same data. Many companies restrict retrocalculations into the prior tax year. The most common way to do this is to use program RPUTRBK0 to set each employee’s Earl. Pers. RA date to the end of the previous tax year. This issues a warning or error to users who update master data prior to that date, depending on the infotype’s Before ERA Date settings in view v_582a_d.
Although infotype 3 tells you which employees are set to retrocalculate, it does not tell you what caused that to happen. It could have been a data entry mistake, or not. Someone may have created, changed, or deleted an infotype. It is difficult to programmatically determine what caused the change, and R/3 does not provide a report for that information. If you have enabled the logging of infotype changes, you can use report RPUAUD00 to see what infotype changes happened for a given employee.
Reporting Retros During Payroll
Many times payroll departments are not concerned so much with the fact that a retrocalculation is going to happen, but they want to know about retros that exceed certain limits. After payroll is run and before it is exited, run payroll reports on the retro wage types /551 and /552 to see what happened. Are there more retros than expected? Are some of the /552 amounts out of range – too high or too low?
The same technique can be used to find claims (wage type /561) before exiting payroll. The claim could be due to a data entry mistake. It would be good to know that before delivering a zero-net payment to the employee. It is much easier to fix errors due to claims before payroll is exited because none of the subsequent payment delivery and accounting has been done.
Living with Retrocalculations
At this point you might be wondering if there is a way to just turn off all the retrocalculation logic. You could do a lot of configuration on the infotypes so that none of them cause retrocalculations and then monitor infotype 3 to make sure no retroactive dates ever show up. You could develop numerous manual processes outside of R/3 to handle retroactive adjustments to wages, deductions, taxes, reversals, and voids. But retrocalculation is designed and programmed into R/3 HR to the extent that it never really goes away. You could try to avoid it, but it will always be there. It’s much better to understand it and use it to your advantage.
______________
Footnotes:
1 For example, period 1 was recalculated when you were calculating the original period 2. In SAP Payroll terminology, you calculated period 1 in 2 and period 2 in 2; the for-period (1) in the in-period (2).
Steve Bogner
Steve Bogner is a managing partner at Insight Consulting Partners and has been working with SAP HR since 1993. He has consulted for various public, private, domestic, and global companies on their SAP HR/Payroll implementations; presented at the SAP user's group ASUG; and been featured on the Sky Radio Network program regarding SAP HR.
Steve will be presenting at the upcoming HR Payroll Seminar November 7-8 in Chicago and November 27-28 in Orlando. For information on the event, click
here.
You may contact the author at sbogner@insightcp.com.
If you have comments about this article or publication, or would like to submit an article idea, please contact the editor.