Follow this process to find out how to display Business Server Page (BSP) applications such as Interaction Center WebClient (IC WebClient) when you receive a "Cannot find server" error message.
Key Concept
A Business Server Page (BSP) application is a complete functional application. Instead of using SAPGUI, you display these applications in a Web or mobile device browser. The browsers use HTTP or HTTPS technology to access BSP applications across networks. For security reasons, all BSP applications are delivered inactive.
The first time you attempt to launch Interaction Center WebClient (IC WebClient) after receiving the mySAP CRM system from your Basis team, you may encounter a frustrating “Cannot find server” error. If this has happened, you may have contacted your technical team to address the problem. However, did you know that you can troubleshoot some of the main causes of the “Cannot find server” error yourself, saving valuable time? I will give you a little background about the technology involved in IC WebClient and provide four basic troubleshooting methods to ensure its successful launch. The techniques I describe here apply to mySAP CRM Release 4.0 and above.
IC WebClient is a Business Server Page (BSP) application (CRM_IC) that consists of sub-applications CRM_IC_RT_REP (runtime repository) and CRM_IC_DT_ REP (design time repository). The runtime repository contains information about the composition and navigation of application components (view sets, views, and areas) at runtime. The design time repository includes all data not necessary at runtime and is separated from the runtime repository for performance reasons.
Usually, Basis and technical teams set up and prepare the CRM system for hand-over to the functional and development teams. At this point the system is considered ready to configure or develop. A functional team member working on IC WebClient would then configure Interaction Center by launching a session in one of three ways:
- Transaction SE80. Click on the test icon located in the standard toolbar found in the top left corner of your screen or press F8.
- Microsoft Internet Explorer. Access a URL provided to you by your network administrator or Basis team. You can also determine this URL by accessing transaction SE80, selecting BSP Application from Repository Browser, and entering
CRM_IC in the field provided. Expand the Pages with Flow Logic folder and double-click on default.htm. Select the Properties tab and scroll to bottom of the page where the URL is displayed.
The URL in Figure 1 is the standard URL for IC WebClient found in the Properties tab. Only three variables exist for this URL: host, domain, and port.
- SAP NetWeaver Portal. The only difference between this method and the Internet Explorer method is that the user does not log into multiple systems to access different applications. SAP NetWeaver Portal provides single sign-on (SSO) functionality that allows users access to multiple systems with only one logon.
| https://.:/sap/bc/bsp/sap/crm_ic/default.htm |
| Figure 1 |
URL for IC WebClient |
When testing IC WebClient for the first time, you may notice that launching it produces a blank screen with the error message Cannot find server or DNS Error (Figure 2). Try the following process to successfully launch IC WebClient. You may not need to follow all of the steps — completing of any one of these steps could possibly correct the issue. I list the methods in order of importance.

Figure 2
IC WebClient fails to launch if BSPs are inactive click here for a larger version of this image
Method 1. Activate Appropriate BSP Services
Activate BSP services by launching transaction SICF. Ensure that sap/bc/bsp/sap/crm_ic service nodes are activated. Refer to Table 1 for services necessary to operate IC WebClient.
| bc |
/default_host/sap/bc/bsp/sap/public |
| graphics |
/default_host/sap/bc/bsp/sap/public |
| crm_ic |
/default_host/sap/bc/bsp/sap |
| crm_ic_rt_rep |
/default_host/sap/bc/bsp/sap |
| crm_bsp_f1_help |
/default_host/sap/bc/bsp/sap |
| crm_bsp_f4_help |
/default_host/sap/bc/bsp/sap |
| crm_bsp_frame |
/default_host/sap/bc/bsp/sap |
| crm_bsp_bab_fra |
/default_host/sap/bc/bsp/sap |
| crm_bsp_bab_pan |
/default_host/sap/bc/bsp/sap |
| crm_bsp_bab_dis |
/default_host/sap/bc/bsp/sap |
| crm_bsp_bab_dss |
/default_host/sap/bc/bsp/sap |
| crm_bsp_survey |
/default_host/sap/bc/bsp/sap |
| crm_bsp_max |
/default_host/sap/bc/bsp/sap |
| crm_ml_preview |
/default_host/sap/bc/bsp/sap |
| crm_preview |
/default_host/sap/bc/bsp/sap |
| crm_cm_viewer |
/default_host/sap/bc/bsp/sap |
| crm_cm |
/default_host/sap/bc/bsp/sap |
| crm_bsp_tm |
/default_host/sap/bc/bsp/sap |
| crm_bsp_segattr |
/default_host/sap/bc/bsp/sap |
| crm_prn_acc_ov |
/default_host/sap/bc/bsp/sap |
| crm_ei_cmp_admn |
/default_host/sap/bc/bsp/sap |
| upx_exec |
/default_host/sap/bc/bsp/sap |
| contentserver |
/default_host/sap/bc |
| crm_bsp_webdav |
/default_host/sap/crm |
|
| Table 1 |
Activate BSP services required for IC WebClient via transaction SICF |
When you access transaction SICF, you see a service tree with active services in black text and inactive services grayed out. To activate a service, select the service and choose Service/Virtual Host>Activate from the menu bar shown in Figure 3. You may also use the context menu (by clicking on the right mouse button) to access this menu.

Figure 3
Activate a service
Tip!
You may receive an “HTTP Error 403 — Forbidden” error message instead of the “Cannot find server message.” This is due to an inactive BSP service and a semi-active IC WebClient — IC WebClient is responding, but some of the necessary BSP services are inactive. Ensure that the services listed in Table 1 are activated to resolve your “HTTP Error 403 — Forbidden” error.
After you activate the service, the screen in Figure 4 appears. Make sure to select the Yes button and not the Y button  . If you select the Y button, you activate all the other sub-services for the root node, which may include services for applications that your system does not use.

Figure 4
Select the Yes button to activate the selected service
Note
Some services in the service tree have sub-service assignments, as is the case with the service default_host. When you activate a service with sub-service elements, be sure to activate only the main service and not all of the sub-service components.
Note
Refer to SAP note 517484 (Inactive services in the Internet Communication Framework). This note contains details about which services you should activate based on your scenario. Each BSP application has a corresponding service entry in the Internet Communication Framework (ICF) service tree. If those service entries are not active, then IC WebClient does not work properly. If you use custom BSP applications to extend IC WebClient via development, the corresponding service entries must also be active
Method 2. Define/Verify System Parameterization
If method 1 does not resolve your issue, you may need to validate parameters in mySAP CRM. Usually the Basis team performs this step when it sets up the system according to SAP best practices and installation procedures. However, you may find some parameters were missed or have incorrect settings assigned. In any case, you should review the parameters ms/server_port_0, icm/server_port_0, and icm/host_name_full (Table 2).
| Parameter 1 |
ms/server_port_0 = PROT=HTTP, PORT = |
Sets load distribution for services such as BSPs, or as of Web Application Server (Web AS) Release 6.40, Web screens, Web services, Internet Transaction Server (ITS) |
| Parameter 2 |
icm/server_port_0 = PROT=HTTP, PORT = , EXTBIND=1 |
Specifies the service/port to use for a protocol. This allows you to configure Web AS for HTTP, HTTPS, and SMTP access |
| Parameter 3 |
icm/host_name_full = |
Specifies the fully qualified hostname for the host |
|
| Table 2 |
These parameters should be present in your mySAP CRM system |
First confirm whether these parameters are valid in transaction RZ10. For more information about transaction RZ10, refer to the sidebar, “About Transaction RZ10.” After launching transaction RZ10, search for the instance or default profile by clicking on the Profile field to access the search icon (Figure 5). You can also press the F4 key to trigger the search. Select the profile (in my example, C40_INSTANCE) and the Extended maintenance option. Click on the Display button to check if the instance and default profiles (Figure 6) contain the parameters listed in Table 2 with the correct information.
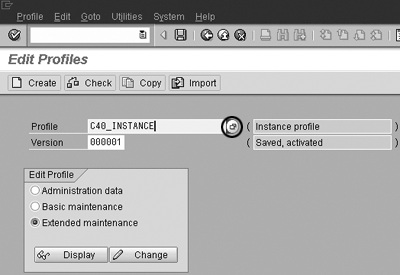
Figure 5
Select Extended maintenance to view the parameters in a profile

Figure 6
Subset of Instance profile parameters. Note ms/server_port_0 in the last line.
When you certify the existence of these parameters, refer only to the default or instance profiles. If you must create any of these parameters, ensure that a particular parameter appears only in the default or instance profile. There is a slight chance that a parameter might exist in two separate profiles — you can clearly see this in the screen, although the settings may not match. While you do not need to delete a duplicated parameter if the details match, the best practice is to have only one reference for each parameter.
If you review the profiles and determine that you must add a parameter to a profile or that you must edit a setting, the system assigns a new version number when you save it. This requires you to temporarily shut down and restart the CRM server. If you are not authorized to make changes within transaction RZ10, seek assistance from your Basis/ technical team.
Method 3. Verify/Update Host File
This method confirms that the computer can call the host properly. The host is linked to the qualified hostname of Web AS, which is embedded in the URL used to launch IC WebClient. Each computer has a host file in the locally stored etc folder relative only to that computer. This local copy stores mappings of IP addresses to hostnames. If you attempt to call a BSP application that contains a hostname not stored in this file, you cannot view that application correctly. Follow these instructions to certify that your hostname exists within this file or create the relationship.
Note
Windows 2000 is the operating system (OS) I used in this example. The file name for hosts depends on the OS used in your particular scenario. For example, the directory for a Windows XP OS is C:/WINDOWS/ system32/drivers/etc.
Right-click on the Start button in the lower left corner of your desktop and select Explore from the list. Locate the hosts file in directory C:/WINNT/system32/drivers/etc. Next, open the hosts file in the etc folder. Click once on the file, then right-click on the file name. Select Open With>Notepad (Figure 7).
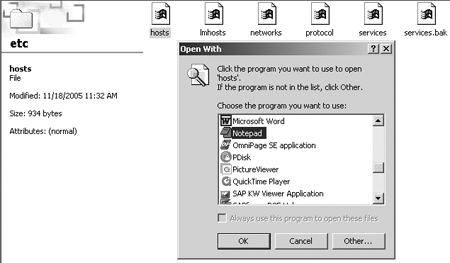
Figure 7
Open the hosts file in Notepad
After opening the hosts file, verify that the IP address (server address) and hostname for IC WebClient are listed. Refer to the section of the file where text is not commented out by a number symbol (#). The first column contains the IP address while the second column in that row holds the hostname for that address followed by a brief description denoted by the # symbol. For example:
| IP address: |
102.5.33.97 |
| Hostname: |
rhino.sap.com |
| Description: |
# source server |
The default setting for the hosts file typically has a reference only for one server address known as the localhost so you must add your particular address and hostname to this file. Access transaction SMICM in a separate session. You can use this transaction to monitor and administer Internet Communication Manager (ICM), which handles all inbound and outbound connections to Web AS and is responsible for send/receive requests to and from the Internet. Now select Goto>Hostname Buffer>Display from the menu area (Figure 8) to find the appropriate settings for the hostname.
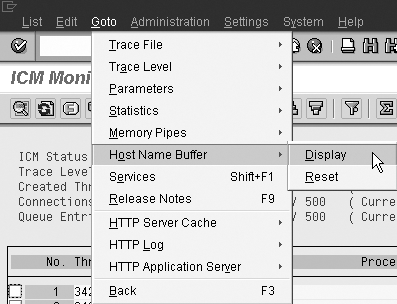
Figure 8
Display the settings for the host name
The next screen displays the IP address and hostname settings (Figure 9). You already know what the hostname is, so now you are trying to determine the relevant IP address for that hostname. Pick the relevant settings and add the information to the hosts file immediately following the localhost reference as shown in Figure 10. Save the contents when complete and close the file.
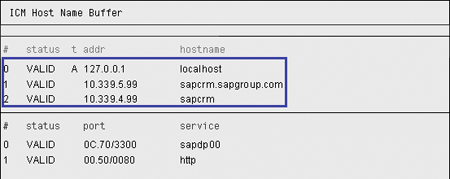
Figure 9
Locate the relevant IP address
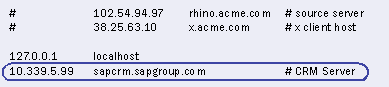
Figure 10
The relevant IP address in this example is 10.339.5.99
Consider the following during this procedure:
- You should place the IP address in the first column followed by the corresponding hostname
- You should separate the IP address and hostname by at least one space
- You should denote comments with the # symbol
Method 4. Clear Web Browser Settings
The previous three methods address the majority of concerns with initial IC WebClient launch issues. However, if you have tried the other methods without success, your browser window may be using settings that conflict. Browsers collect cookies and files that at times affect the performance of the Web browser, ultimately affecting IC WebClient since it launches via the Web browser.
To work around this issue, try the following. Open a Web browser session in Internet Explorer and select Tools>Internet Options from the menu. Click on the Delete Cookies and Delete Files buttons contained in the General tab. Click on the Advanced tab and click on the Restore Defaults button. Finally, click on the Connections tab and click on the LAN Settings button. Make sure that none of the selection options are checked (Figure 11). Click on the OK button and in the Internet Options screen, click on the OK button again.
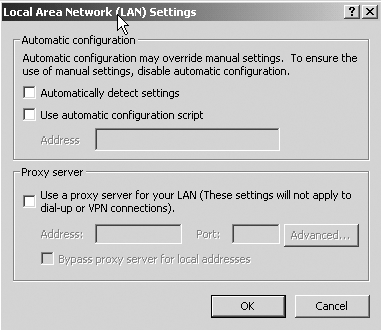
Figure 11
Uncheck all of the selection options if checked
Close all active browser sessions and test the BSP application. Launch transaction SE80 and select BSP Application from the Repository Browser (Figure 12). Type CRM_IC into the field and click on the display icon.
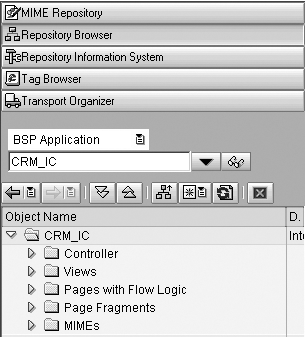
Figure 12
Enter CRM_IC in the BSP Application field
In the screen that opens, double-click on CRM_IC folder (Figure 13) and click on the Test button located in the standard toolbar in the top left corner of the screen or press F8. IC WebClient should now launch successfully and you should see the Enter Network Password screen. Log in with your SAP CRM credentials (user name and password) to gain access to IC WebClient.

Figure 13
Test the BSP application from the CRM_IC folder
If you cannot access IC WebClient after completing the four methods outlined here, you may have a VPN, firewall, or internal network issue. In this case, you should contact your network administrator or Basis team to discuss possible solutions.
|
Transaction RZ10 manages SAP profiles, which are operating system files that contain instance setup details. SAP systems can consist of one or more instances. Individual setup parameters are customized to the requirements of each instance. These parameters allow you to configure tasks such as:
- Runtime environment
- Work processes
- Location of other services
There are three types of profiles (default, instance, and start). The default profile (also known as the system profile) contains values that apply to all application servers. The instance profile contains application server-specific configuration parameters to complete the set values of the default profile. The start profile contains parameter settings used to automate the startup or shutdown of servers such as the application server, message server, and system log. These profiles hold an important relationship with the application server.
|
Gil Magana
If you have comments about this article or publication, or would like to submit an article idea, please contact the editor.