Manager
Discover best practices on how to authorize users of SAP Solution Manager Change Request Management (ChaRM) with user roles. Learn about the biggest pitfalls you may encounter and precautions you should take when you set up authorizations.
Key Concept
In Change Request Management (ChaRM), users can use actions to perform status changes and execute changes (e.g., creation of a transport or a system logon) in satellite systems. To keep these systems under control, you must ensure that users who are allowed to execute an action are authorized to do so, while users who are not authorized cannot execute actions. To do this, you set up user roles for authorizations.
Standard SAP roles address the authorization needs of many companies. However, standard roles leave some gaps for companies with strong authorization requirements, such as banks or industrial companies. If your organization has strict authorization requirements, you should know about the authorization concept in Change Request Management (ChaRM), where you can set these authorizations, and how you can control them.
When I started constructing user roles in SAP Solution Manager, I couldn’t find sufficient information about authorizations in ChaRM. I searched in books and all over the Internet. All I could find was standard information about authorizations. In this article, I’ll share what I’ve learned in my many experiences setting up authorizations for ChaRM. I’ll describe the most important parts of ChaRM so you can get the most from your authorizations, and also show you how to avoid pitfalls I encountered.
Note
I assume that if you have created roles, you understand transaction PFCG. An explanation of this transaction is beyond the scope of this article. My focus is on the objects used in setting up authorizations for ChaRM.
Before you begin, you should know that if you only use standard SAP roles for ChaRM in your organization, then you could encounter a significant pitfall: Your organization may work differently than the roles provided by SAP for ChaRM. Your first instinct might be to combine a few of the standard SAP roles to address your specific business requirements. For example, you might be able to combine a key user role and dispatcher role if your business needs require both of these roles. However, you’ll soon discover that this combination approach is not always an option because the roles don’t always match up with your organization’s particular needs. Copying and adjusting the standard roles can be an option if you are willing to change the ChaRM flow on a few small points (e.g., an extra action or status, which I explain later in this article), and if you’re willing to change the way that people work in your organization. I would advise using newly created roles rather than adjusting the standard SAP versions.
Build an Authorization Plan
Whether you have the option of using existing roles or need to create new ones, your best starting point is to read the Business Blueprint and try to get as much information as possible from it. If you’ve created your Business Blueprint in SAP Solution Manager, you can find it in transaction SOLAR01 or SOLAR02.
From the Business Blueprint, you can identify the different type of users of ChaRM and Service Desk flows (ChaRM uses Service Desk functionality). Create a matrix of actions that can be performed by each role (Figure 1). As you develop the matrix, you will see which actions are redundant (e.g., two actions done by the same person or two actions that can be combined as one action) and which actions are missing altogether (e.g., back-outs).

Figure 1
Sample matrix of role-based actions
Note
If there is already a drawing, flowchart, or process diagram created for your project in the Business Blueprint or anywhere else, you can use it as the basis for your authorization plan. If there are no drawings or diagrams, you can create your own with a third-party flowchart program such as Microsoft Visio or Dia.
At this stage, it’s important to discuss the authorizations with the organization using the matrix (if it is not your own). You should make sure that the company understands what each role entails before you begin constructing the roles. You should also discuss ChaRM and Service Desk flows with the team members who are responsible for setting up the flows in ChaRM. They will adjust redundant or missing actions in the flow and in the Business Blueprint, if necessary.
Document Types
A document type is a document with its own fields and functions. It has a number range and can be opened on its own, and it can exchange information with other document types. Therefore, documents can be used as a chain. Document types are at the heart of Service Desk and ChaRM; they enable interaction between the Service Desk and the users and ensure that the order of processes is followed (with nothing left out). Table 1 has a list of the most commonly used ChaRM document types.
|
SLFN
|
Support Message
|
This is the initial document where the support message is handed in SAP Solution Manager. Using this document, the rest of the flow can be chosen.
|
|
SDCR
|
Change Request
|
This is the document where it is decided if a change request must be created
|
|
SDAD
|
Administrative Change
|
Change document for changes not involving transports (e.g., printer setup, adding an existing role)
|
|
SDHF
|
Urgent Change
|
Change document involving urgent changes
(i.e., changes that need to be in PRD as soon as possible)
|
|
SDMJ
|
Normal Change
|
Change document involving normal changes
(i.e., all changes that can wait until the normal import/development cycle)
|
|
SDTM
|
Test Message
|
Correction for normal changes before they go to production. This is used if an error is found in the normal change during integration test.
|
|
SDMN
|
Maintenance Cycle
|
All transports from one maintenance cycle are controlled in this document type
|
|
| Table 1 |
Common document types |
To open a document type, enter transaction CRMD_ORDER and click the create icon. Here, you can select the Service Process menu and the name of a document type (listed in the second column of Table 1).
If you want to control the document types, you need to know the appropriate authorization objects. The following objects must be used to authorize document types:
- CRM_ORD_OE
- CRM_ORD_OP
- CRM_ORD_PC
- CRM_ORD_PO
- CRM_ORD_PR
With these objects, you can control:
- Creation (object activities 1, 2, and 3), making it possible to create a document
- Changing (object activities 2 and 3), making it possible to change a document
- Display (object activity 3), providing the rights to display a document
An object activity is a sub-level of an object authorization. All five authorization objects must be used together for the authorization of a document type. To make authorizations flexible, create one role for creating, one role for changing, and one role for displaying per document. For example: for SLFN – Support Message, create the following roles with the format : SLFN_DISPLAY - Support Message: Display, SLFN_CHANGE - Support Message: Change, and SLFN_CREATE - Support Message - Create.
Actions and Statuses
Document types show actions and statuses. Actions can create a transport, log on to a satellite system, and change statuses. A status is a phase that a document is in and tells you where multiple actions with the same status are listed. An action is an option in a menu, and when it is selected, it is executed directly or executed after you save your work.
Figure 2 shows the action, Send Message to SAP, and the status, New, for a particular support message.

Figure 2
Status and action for a support message
Note that while you can make changes in the document types listed in Table 1, you can only make simple adjustments. If you and your team are planning to make big changes, such as adding more than one extra action to a document type, make a copy of that document type and replace the first letter with a Z or Y. Then you should only make big changes in Z or Y document types. The reason for this is that it’s always handy to use the original SAP version of the document type as a reference. For the SLFN, the new name can be ZLFN or YLFN. For my examples, I’m only using the SLFN name.
Authorization on Actions
SAP provides a table to control the authorization of statuses per document type. You can find the table by following menu path SAP Solution Manager > Configuration > Scenario-Specific Settings > Change Request Management > Extended Configuration > Change Transaction > Transaction Types > Status Administration > Change Status Profile for User Status. First, you can view a list of all document types (Figure 3).

Figure 3
List of document types
Find the status profile of the document type you want to change. You can select the one you need by looking for the name of the document sequence flow followed by a number. For the SLFN: Service Desk Message flow, there is a status profile called SLFN0001. Open the status profile for SLFN0001 by double-clicking its name. The authorization code SLFN is delivered standard by SAP, as shown in Figure 4.
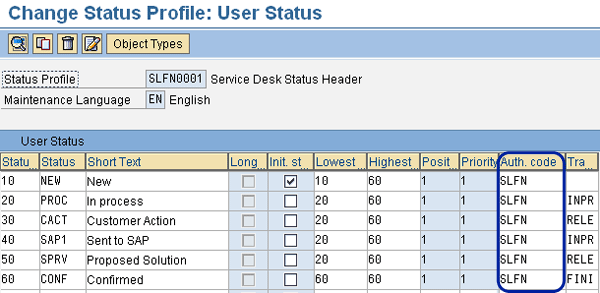
Figure 4
Status profile SLFN0001
If SLFN is listed under the Auth. code column, only one authorization is possible. You must change this so you can authorize different actions. You can use the authorization code names from the statuses shown in the Status column in Figure 4. Alternatively, you can use the document type names followed by the status numbers (listed in the Statu… column on the left in Figure 4). In my example, I’m using the document type numbers and status numbers (i.e., SLFN10).
Select the field in the Auth. code column where you want to change the authorization and press the F4 key. The authorization key table appears (Figure 5). This is the list of authorization keys that can be used to authorize actions.

Figure 5
Authorization key table
Search in this table to see if, for example, variants such as SLFN10 or SLFN20 exist — sometimes variants can already be in use for other purposes. In my example, only SLFN exists, so my only option is to create the variants myself. Click the create icon and enter the IMG project you are working on (Figure 6). Then click the green check mark execute icon.

Figure 6
Choose your project
The IMG activities overview screen appears. Double-click Status Management and the SAP CRM portion of the IMG pops up (Figure 7). Double-click the node Define Status Authorization Keys to go to the next step.

Figure 7
Select the Define Status Authorization Keys node
In the next screen that appears (Figure 8), you find a list of the authorization keys that were also listed in the authorization key table shown in Figure 5. Because the SLFN> types are not on this list, click the New Entries button.
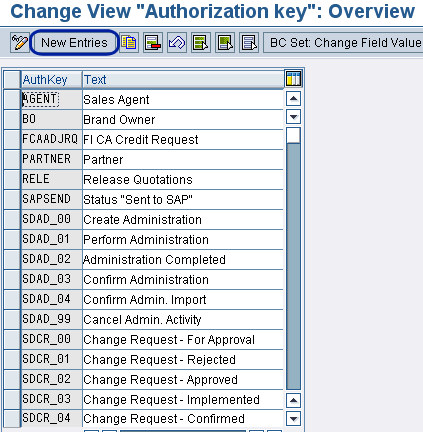
Figure 8
Change authorization keys
In the New Entries screen, you can add the authorization keys you need and a description in the Text field (Figure 9). In my example, the description of the action is used as the status name.

Figure 9
New authorization key entry
After saving your work, you are asked to create a transport request, which is mandatory. You’ll see a standard pop-up screen for creating transports. After creating a transport, close the open screens until you are back at the updated authorization key table (Figure 10). This will have been updated automatically by the system. The newly created key SLFN10 is now listed in the table.

Figure 10
Authorization key table updated with SLFN10
Double-click SLFN10 to confirm that it’s been added as an authorization object for the action New (Figure 11). You can set the authorization code for all other fields if needed. In that case, you need to create other authorization code values from the steps described earlier (see Figure 4). If you have changed the values in the Auth. code fields, you can create roles for the separate action statuses. You can refer to the next section, “How to Use Authorizations in Roles,” for information on creating these roles.
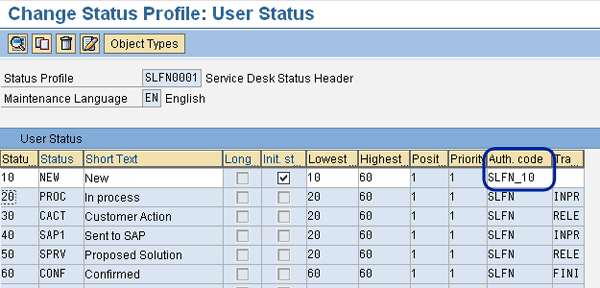
Figure 11
Updated SLFN0001 status profile
Tip!
If you are planning to perform all authorization code field changes at one time, you can create a Microsoft Excel file first with all actions, flows, and authorization object names, and make changes there. This saves time and reduces repetitive work.
How to Use Authorizations in Roles
The authorization object B_USERSTAT is used to set the authorization code values (e.g., setting SLFN or SLFN10 to a user role). To keep your authorizations as flexible as possible, I recommend that you create one role per status in a flow. This means that you create one role for the New action in the SLFN and one role for the action PROC in the SLFN. This process was previously explained in the “Document Types” section of this article.
Combine These Roles
Now that you have created roles, I will explain how they must be used. I recommend using them in the way I describe because it is very flexible.
If you want to authorize someone to create an SLFN document, he or she needs to have two roles: the role of the document type (SLFN_CREATE for Support Message: Create) and t he role to set the action (SLFN_NEW for Support Message: New). With these two roles, he or she can create the document and set the initial status as New.
If you want to authorize someone to change an SDHF document via the In Development status, this person needs the role of the document type (SDHF_CHANGE for Urgent Correction: Change). The role to set the In Development action (SDHF _NEW for Urgent Correction: In Development) is also necessary. With these roles, he or she can change the document and set the status as In Development via the corresponding action.
You can also combine three roles together. If you combine the role of the document type (SLFN_CREATE), the role to set the action In Process (SLFN_IN_PROCESS for Support Message: In Process), and the role to set the New action (SLFN_NEW), the authorized person can create the document, put it in with the initial status of New, and then put it in with the In Process status via the corresponding action.
With these separate roles, you can reuse the roles for every character and type of user role. It allows you to control more of the process, and in the development phase you can change authorizations quickly by adding or removing roles. When you are finished testing your solution, you can add these roles to a template user or composite role. Note that a composite role is a role comprised of several small or single roles. When you assign a composite role, all of its included roles will be assigned to the user.
Authorizing in the Task Manager
In the Task Manager workflow (transaction SCMA), you can control transports as well as enable and disable actions separately (Figure 12).

Figure 12
Task plan
To help you see which actions are the most important to authorize, here’s a list of the authorization objects of the most important items:
- /TMWFLOW/M — Task phases control
- /TMWFLOW/D — Transport movement development
- /TMWFLOW/O — Transport movement follow-on (quality assurance and pre-production)
- /TMWFLOW/P — Transport movement Production
You should authorize these authorization objects for the following action values:
- 1000 - Create Transport Request
- 2000 - Create Transport Request Task
- 3000 - Release Transport Request
- 4000 - Import Transport Request
- 5000 - Display and Approve Critical Transports
- 6000 - Synchronize UC Level in MC Test and Prod. Syst.
- 7000 - System Logon
- 8000 - Complete CTS Projects
For example, if someone needs to be able to import and log on to your quality assurance system (QAS), you need to authorize the object /TMWFLOW/O — Transport Movement Follow with the values 4000 and 7000.
You must be clear about what users are able to do. If the policy of your company is that the Basis administrator or IT operator is not able to create transports, for example, you can follow this policy by not authorizing the objects 1000 — Create Transport Request and 2000 — Create Transport Request Task for the role.
Additional Settings and Considerations
Some extra settings are needed for the satellite system logon. Remote Function Call (RFC) connections are needed, and the same user account name must exist in the satellite system. For example, if the account name is SMITH_J in SAP Solution Manager, it must be SMITH_J in the satellite systems as well. You must also ensure that the authorization object S_RFCACL (which ensures access to the satellite system) is assigned in the satellite system and correctly set up. Finally, the last requirement is that you must ensure the user is not locked in the satellite system.
There is also one large authorization gap, and that is when an action is executed when it is not allowed. I must clarify some things: If you execute an action you are not allowed to carry out, you’ll see a message stating that you are not allowed to perform the action that was executed. You can reset the document status to the previous status and let someone who is authorized perform the action. This is the same standard way SAP reports an error in authorization.
There is a problem that occurs as soon as you choose the Create Document action to create the follow-up document (the next document in the flow). If you’re not allowed to create that document, the error appears in the follow-up document. Your system numbers up the document range (reserves the number) of the document you are trying to create. It also does not show a new document in the document flow screen. I recommend that you accept this or develop your own solution. For example, a developer can create a check on a Z table that makes it possible to hide actions. If you hide an action for users who are not allowed to execute these actions, they can’t see them and will never execute it.
Ensure that your organization has roles for maintaining maintenance cycles, creating business partners, and maintaining the organizational model (otherwise known as the master data of SAP Solution Manager). I recommend your organization assign the create-user team, create the business partners, and assign them in the organizational model before you create the roles.
The rest of ChaRM authorization is more or less standard compared to what you do in other SAP systems. You’ll find many SAP CRM components and some SAP ERP HCM components (especially if you set up the business partners, the organizational model, and its reference from the document types). Don’t forget that the maintenance project must be maintained as well, so you need to use the authorization of the SOLAR_ADMIN_PROJECT transactions to maintain the maintenance project. You can copy most of these authorizations from the SAP_SOLAR_ALL role, which is delivered standard by SAP.
Note
Study the document
security guide if you plan to set up authorization RFC connections. This document lists SAP Solution Manager background jobs and applies to all modules of SAP Solution Manager. You can download this document from the SAP Service Marketplace at
https://service.sap.com/support by performing an advanced search for documents using the term “SECURITY GUIDE SAP Solution Manager 7.0 as of SP16.”
Eddy Kostons
Eddy Kostons is the SAP Solution Manager specialist at Illumni. He is also an SAP Basis administrator and authorization specialist. Both of these specializations are very handy when setting up SAP Solution Manager implementations. Eddy has experience in all facets of SAP Solution Manager.
You may contact the author at ekostons@hotmail.com.
If you have comments about this article or publication, or would like to submit an article idea, please contact the editor.