As an alternative to using the COM interface (which can be cumbersome) for creating Microsoft Word and Excel files in ABAP, you can use the Office Document Toolbox, an open-source solution, to create word processing documents in Rich Text Format (RTF) and spreadsheets in Excel XLS format. Learn how to read and write Excel files using ABAP and to create a new Excel file. Also, learn how to extend the functionality of the toolbox.
Key Concept
The Office Document Toolbox is built upon two external Java libraries: the iText library (at www.lowagie.com/iText) for creating RTF documents and the Apache HSSF library (at https://poi.apache.org/hssf/index.html) for reading and writing Excel spreadsheets. The toolbox contains three ABAP object-oriented (OO) classes and a private programming interface. It also contains a Java RFC server that can run on any computer equipped with a Java runtime environment (JRE) 5 and with SAP Java Connector (SAP JCo). You don’t need a Java 2 Platform Enterprise Edition (J2EE) system; the JRE 5 is sufficient.
When you need to create Microsoft Office files, such as Microsoft Word documents and Microsoft Excel spreadsheets, from an ABAP system, you can use the Microsoft Component Object Model (COM) interface. Although this interface is a valid option, there are some challenges to using it:
- First, you need detailed knowledge of the Office application’s API that you want to expose as the COM interface for it to function properly.
- Second, you can’t use the COM interface in the background because you need to use an SAP GUI to use an application’s COM interface.
- Third, using the COM interface for Office applications in ABAP necessitates technical knowledge of the tool, which not all developers may have.
To address these challenges, I developed an open-source toolbox solution as an option for ABAP developers creating word processing documents in Rich Text Format (RTF) and spreadsheets in Microsoft Excel file format (XLS) — the focus of this article. My most recent article, “The Office Document Toolbox for Creating RTF Documents and Spreadsheet Files Using ABAP: Part 1 — Introducing a Toolbox for Creating RTF Documents,” launched the Office Document Toolbox as an alternative to the COM interface.
Part 1 explained the underlying design structure of the toolbox and the process of setting up document properties and formatting specifications for the RTF documents you generated. It also explained the RTF portion of the toolbox, including the methods and parameters. Finally, it covers how to deploy the Remote Function Call (RFC) server because the toolbox is implemented as an RFC server.
This article on the Office Document Toolbox shows you how to read and write Excel files using ABAP. Part 2 is divided into three sections: The first section shows you how to read data from an Excel file. The second section shows you how to create a new Excel file (to write the cells) or to read the cells of an existing Excel file. Be aware that the Office Document Toolbox is designed for reading and writing Microsoft Excel 2003’s XLS files, not for reading and writing the XML-based Microsoft Excel 2007’s XLSX files. The third section gives you an overview of some of the toolbox’s implementation details and is intended for developers interested in extending its functionality.
Working with Spreadsheet Data
The primary objective of the Excel part of the Office Document Toolbox is to provide an easy-to-use API for reading and writing the cell values of Excel files. The API allows some basic formatting of the cells of an Excel file, such as setting the background color of a cell. However, the toolbox does not provide advanced formatting options. The numerous formatting options available for Excel spreadsheets would add a huge amount of complexity to the API. The toolbox does, however, allow you to restrict a workbook sheet to read-only and to adjust the width of a column to the content of its cells.
The class ZCL_XLS_DOCUMENT handles the spreadsheets. This class allows you to extract cell values from an existing Excel file (i.e., reading data) or to create a new Excel file (i.e., writing data). First, let’s look at how to extract data from an Excel file, and then we’ll look at creating an Excel file.
Reading Data from an Excel File
Reading data from an Excel file is a one-step process. To read an existing file, you use the method READ_FILE, which has two parameters: one for importing and one for exporting (Table 1). The importing parameter refers to an object of the class ZCL_FILE (explained in Part 1), which handles files on either an SAP server or a local client. The exporting parameter RETURN provides status information on the success or failure of the operation.
|
FILE
|
The file
|
Refer to ZCL_FILE
|
|
RETURN
|
Return status
|
BAPIRETURN
|
|
| Table 1 |
Import and export parameters of the READ_FILE method |
The method READ_FILE performs the actual data extraction. It opens the Excel file, reads the cell values for each sheet from the file, and stores these values in an object of type ZCL_XLS_DOCUMENT. Then, you access the extracted data by calling the method GET_DATA, which has the three exporting parameters shown in Table 2.
|
T_SHEET
|
Table with sheet information
|
ZTSHEET
|
|
T_CELL16
|
Table with cell information
|
ZTCELL16
|
|
T_CELL256
|
Table with cell information
|
ZTCELL256
|
|
| Table 2 |
Export parameters of the GET_DATA method |
The first exporting parameter, T_SHEET, stores the names of the sheets of the Excel file. The other two exporting parameters, T_CELL16 and T_CELL256, have to do with cell information, which I discuss below. Table 3 defines these parameters as ABAP internal tables.
|
ZTSHEET
|
Table of ZSHEET
|
|
ZTCELL16
|
Table of ZCELL16
|
|
ZTCELL256
|
Table of ZCELL256
|
|
| Table 3 |
ABAP table types for sheet and cell information |
The type ZSHEET has two components: INDEX and NAME (Table 4). The INDEX has a starting value of 1 for the first sheet, 2 for the second sheet, and so on, and it defines the order of sheets in which they appear in the Excel file. NAME represents the text shown on the tab of the Excel sheet; INT4 and C are the data types of the structure component.
|
|
| Table 4 |
The components of type ZSHEET |
Because an RFC server cannot handle data of variable lengths, I created two data types to handle the cell data. The type ZCELL16 (Table 3) handles cell values up to a length of 16 characters, and the type ZCELL256 handles cell values up to a length of 256 characters. I found that because most cell values are numbers or consist of a short text, a length of 16 characters is sufficient for most cells, and dividing the cell data into two parts helps to reduce the memory requirements of the RFC server. When you have a sheet for which only 10% of the cells have values with more than 16 characters, splitting the data into two tables reduces the memory requirements by approximately 25%.
As you may know, the position of a cell in an Excel spreadsheet is defined by three entities: SHEET, COLUMN, and ROW (e.g., Sheet1:A1). Furthermore, a cell has a type (e.g., numeric, text, or formula). The only difference between the two types is the length of the VALUE field. Keep in mind that the sheet, column, and row values are 1-based; in other words, when you want to address the first sheet in an Excel file, you supply a value of 1 for the sheet. Table 5 shows the components of types ZCELL16 and ZCELL256, respectively.
|
SHEET
|
INT4
|
|
|
ROW
|
INT4
|
|
|
COLUMN
|
INT4
|
|
|
TYPE
|
C
|
1
|
|
STYLE
|
C
|
2
|
|
VALUE
|
C
|
16 or 256
|
|
| Table 5 |
Components of type ZCELL16 and ZCELL256 |
The type of a cell might be text, numeric value, or formula. The corresponding values of the field TYPE are defined as constants in the interface I_CELL_TYPE (Figure 1). The component with the name STYLE is only used when you create an Excel file. I will discuss this later in this article.
INTERFACE i_cell_type. CONSTANTS: numeric TYPE c VALUE 'N', formula TYPE c VALUE 'F', text TYPE c VALUE 'T'. ENDINTERFACE.
|
| Figure 1 |
Constants defined in I_CELL_TYPE interface |
Tip!
When you read a numeric cell formatted as a date, the method READ_FILE returns the number of days since 1900/12/31.
Now that you know the data types used for reading an Excel file, let’s look at the actual ABAP coding. The coding is taken from an ABAP report included in the download files for this article. As you can see from Figure 2, the complete code for reading an XLS file consists of four steps:
DATA : xls_file TYPE REF TO zcl_file, xls_document TYPE REF TO zcl_xls_document lt_sheet TYPE ztsheet, lt_cell16 TYPE ztcell16, lt_cell256 TYPE ztcell256. *#1 xls_file = zcl_file=>create_from_client( 'c:read_test1.xls' ). *#2 CREATE OBJECT: xls_document. *#3 CALL METHOD xls_document->read_file EXPORTING file = xls_file IMPORTING return = lreturn. *#4 CALL METHOD xls_document->get_data IMPORTING t_sheet = lt_sheet t_cell16 = lt_cell16 t_cell256 = lt_cell256.
|
| Figure 2 |
Read the cell values from an Excel file |
Step 1. Create an object of type ZCL_FILE by reading an Excel file from the local computer.
Step 2. Create an object of type ZCL_XLS_DOCUMENT.
Step 3. Call the method READ_FILE for the object created in Step 2.
Step 4. Get the data that was read in Step 3.
After Step 4, you can process the extracted data further, if needed, or you might just want to print the extracted data for testing purposes. You can print this data by using the code shown in Figure 3.
DATA : wa_sheet TYPE zsheet, wa_cell16 TYPE zcell16, wa_cell256 TYPE zcell256. *-- show all sheets WRITE : 'Sheet Info'. SKIP. WRITE ' Sheet | Text' . NEW-LINE. ULINE (90). LOOP AT lt_sheet INTO wa_sheet. WRITE : / wa_sheet-index, '|', wa_sheet-name. ENDLOOP. SKIP. *-- show the cell16 info WRITE : 'Cell16 Info'. SKIP. WRITE : ' Sheet | Row | Column |Type| Value '. NEW-LINE. ULINE (90). LOOP AT lt_cell16 INTO wa_cell16. WRITE : / wa_cell16-sheet, '|', wa_cell16-row, '|', wa_cell16-column,'|', wa_cell16-type,' |', wa_cell16-value. ENDLOOP. SKIP. *-- show the cell256 info WRITE : 'Cell256 Info'. SKIP. WRITE : ' Sheet | Row | Column |Type| Value '. NEW-LINE. ULINE (90).
|
| Figure 3 |
Print the data extracted from the Excel file |
Figure 4 shows a simple Excel file that I used as a test. The file consists of two Excel sheets:
- The first sheet, named “sheet 1,” demonstrates the handling of different cell types. It calculates the total price (i.e., 760.50) for three different materials based on unit price and quantity.
- The second sheet, named “sheet 2,” demonstrates the handling of cells containing text with a length greater than 16. Sheet 2 contains only two text cells, one with a short text entry and one with a long text entry.

Figure 4
Excel file used for a test
Figure 5 shows the information extracted from the test Excel file using the coding above (Figure 2 and Figure 3).
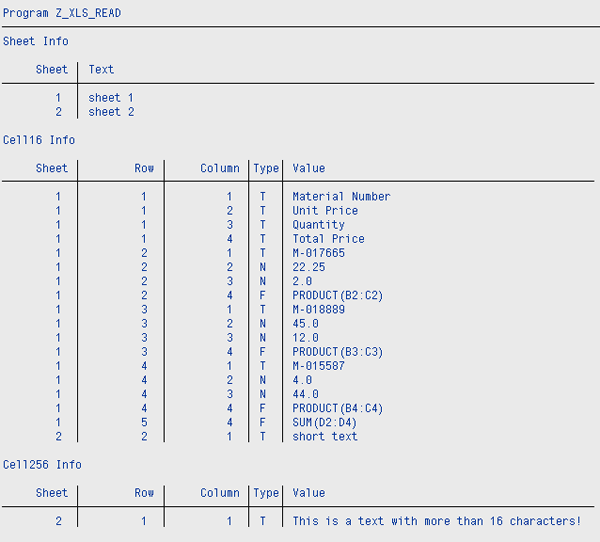
Figure 5
Extracted data from the Excel test file
First, the code prints the extracted sheet information, starting with two entries that show the text on the sheet’s tab (Figure 4). Then, the code prints the information for cells that have a text length of less than or equal to 16 characters. This shows you all cell values from the first sheet. Lastly, the code prints the cells that have a text length of more than 16 characters, and you can see the text in the first cell of the second sheet.
Note
Reading an XLS file using the Office Document Toolbox is surprisingly fast because the underlying Java library is very efficient. For example, reading the data of an XLS file with approximately 120,000 cells takes about 5 seconds when the RFC server runs on a laptop equipped with 2GB of RAM and a 2GHz dual-core processor. (See Part 1 for more information on the Java library used in the toolbox.)
Create or Modify an Excel File
Creating a new Excel file is slightly more complex than just reading the data from an Excel file, as you have more options when you create one on your own. Let’s start by looking at the code necessary to create the Excel file shown in Figure 6. This file consists of only one sheet with six non-empty cells. The three cells in the first row are text cells; the first two cells in the second row are numeric cells; and the third cell in the second row is a formula cell that calculates the product (i.e., multiplication) of the two preceding cells. This Excel file isn’t a typical Excel file, but it is sufficient to show the basic steps needed to create and write to one.

Figure 6
Create a simple Excel file with the toolbox
Figure 7 shows the corresponding ABAP code used to create the file.
DATA : lreturn TYPE bapireturn, xls_file TYPE REF TO zcl_file, xls_document TYPE REF TO zcl_xls_document. * #1 create objects for the Excel document and the local file CREATE OBJECT: xls_document, xls_file. *#2 add cells CALL METHOD xls_document->add_cell EXPORTING sheet = 1 row = 1 column = 1 type = i_cell_type=>text value = 'Factor 1'. CALL METHOD xls_document->add_cell EXPORTING sheet = 1 row = 1 column = 2 type = i_cell_type=>text value = 'Factor 2'. CALL METHOD xls_document->add_cell EXPORTING sheet = 1 row = 1 column = 3 type = i_cell_type=>text value = 'Product'. CALL METHOD xls_document->add_cell EXPORTING sheet = 1 row = 2 column = 1 type = i_cell_type=>numeric value = '20.50'. CALL METHOD xls_document->add_cell EXPORTING sheet = 1 row = 2 column = 2 type = i_cell_type=>numeric value = '10.50'. CALL METHOD xls_document->add_cell EXPORTING sheet = 1 row = 2 column = 3 type = i_cell_type=>formula value = 'PRODUCT(A2:B2)'. *#3 create the file CALL METHOD xls_document->create_file IMPORTING return = lreturn file = xls_file. *#4 write the new file to the local computer IF lreturn-type = 'S'. CALL METHOD xls_file->save_to_client EXPORTING path = 'C:write_test.xls'. ELSE. NEW-LINE. WRITE lreturn-message. ENDIF.
|
| Figure 7 |
ABAP code snippet to create an Excel file |
The code can be divided into four steps:
Step 1. Create an object of type ZCL_XLS_DOCUMENT and an object of type ZCL_FILE. The first object is used to actually create the Excel file, and the second object is used to store the Excel file that the first object creates.
Step 2. Call the method ADD_CELL for each cell you want to create. Table 6 shows the importing parameters of the method ADD_CELL. The first parameter, SHEET, defines the sheet on which to create the cell, and the parameters COLUMN and ROW define the position of the cell on that sheet. The parameter TYPE defines the type of the cell, and the I_CELL_TYPE interface defines the available constants. The parameter STYLE (unused in the example) defines some basic formatting options for the cell (see the section “Formatting Cells” below). The last parameter VALUE defines the text in the cell; VALUE can have a length of 256 characters.
|
SHEET
|
The sheet of the cell
|
I
|
|
|
COLUMN
|
The column of the cell
|
I
|
|
|
ROW
|
The row of the cell
|
I
|
|
|
TYPE
|
The type of the cell, see I_CELL_TYPE interface
|
|
|
|
STYLE
|
The name of the style to format the cell
|
C
|
2
|
|
VALUE
|
The cell value
|
C
|
256
|
|
| Table 6 |
Importing parameters of method ADD_CELL |
Step 3. Call the CREATE_FILE method to create the Excel file. Table 7 shows that this method has two exporting parameters. The parameter RETURN provides information on the success or failure of the operation creating the Excel file, whereas FILE refers to an object of the ZCL_FILE class in which the new Excel file is stored.
|
RETURN
|
Return status
|
BAPIRETURN
|
|
FILE
|
The file
|
REF TO ZCL_FILE
|
|
| Table 7 |
Exporting parameters of method CREATE_FILE |
Step 4. Check to see whether the Excel file was created successfully. If so, write it to the local computer; if not, display the error message so it can be fixed.
Formatting Cells
To format cells, you use the parameter STYLE of the method ADD_CELL. Before you use a style, you need to create it using the CREATE_STYLE method. Table 8 shows the importing parameters of the CREATE_STYLE method.
|
NAME
|
The name of the style
|
ZPARAM_FLAG
|
|
FILLCOLOR
|
The background color of the cell
|
ZPARAM_INT_VALUE
|
|
ROTATION
|
The rotation of the text in degrees
|
ZPARAM_INT_VALUE
|
|
ALIGNMENT
|
The horizontal alignment of the text
|
ZPARAM_INT_VALUE
|
|
VALIGNMENT
|
The vertical alignment of the text
|
ZPARAM_INT_VALUE
|
|
FONT
|
The font of the cell
|
ZPARAM_VALUE
|
|
FONTSIZE
|
The size of the font
|
ZPARAM_INT_VALUE
|
|
FONT_BOLD
|
The flag for using a bold font
|
ZPARAM_FLG
|
|
FONT_ITALIC
|
The flag for using italics
|
ZPARAM_FLAG
|
|
FONTCOLOR
|
The color of the cell text
|
ZPARAM_INT_VALUE
|
|
| Table 8 |
Importing parameters of the CREATE_STYLE method |
The first parameter, NAME, describes the name of the style. To reduce memory requirements, a style’s name consists of only two characters. All other parameters define formatting options:
- FILLCOLOR defines the background color of the cell.
- ROTATION rotates the cell text; the value of the parameter must be from 0° through 90°.
- ALIGNMENT defines the horizontal alignment.
- VALIGNMENT defines the vertical alignment.
- FONT defines the font of the cell.
- FONTSIZE defines the size of the cell’s font.
- FONT_BOLD establishes that the font is bold.
- FONT_ITALIC establishes that the font is italics.
- FONTCOLOR defines the color of the font.
The options for the horizontal and vertical alignments are defined as constants in the I_CELL_ALIGNMENT interface, as shown in Figure 8.
INTERFACE i_cell_alignment. CONSTANTS: left TYPE zparam_int_value VALUE 1, center TYPE zparam_int_value VALUE 2, right TYPE zparam_int_value VALUE 3, justify TYPE zparam_int_value VALUE 5, top TYPE zparam_int_value VALUE 0, bottom TYPE zparam_int_value VALUE 2, center_vertical TYPE zparam_int_value VALUE 1. ENDINTERFACE.
|
| Figure 8 |
Define options for aligning cell text in I_CELL_ALIGNMENT interface |
All available colors are defined as constants in the I_CELL_COLOR interface, as shown in Figure 9.
INTERFACE i_cell_color. CONSTANTS: black TYPE zparam_int_value VALUE 8, grey_80_percent TYPE zparam_int_value VALUE 63, grey_50_percent TYPE zparam_int_value VALUE 23, grey_40_percent TYPE zparam_int_value VALUE 55, grey_25_percent TYPE zparam_int_value VALUE 22, white TYPE zparam_int_value VALUE 9, yellow TYPE zparam_int_value VALUE 13, light_orange TYPE zparam_int_value VALUE 52, orange TYPE zparam_int_value VALUE 53, red TYPE zparam_int_value VALUE 10, light_green TYPE zparam_int_value VALUE 42, bright_green TYPE zparam_int_value VALUE 11, green TYPE zparam_int_value VALUE 17, blue TYPE zparam_int_value VALUE 12, blue_grey TYPE zparam_int_value VALUE 54. ENDINTERFACE.
|
| Figure 9 |
Color definitions defined in the I_CELL_COLOR interface |
As an example of how to use styles, Figure 10 shows the ABAP coding that defines four different styles named S1, S2, S3, and S4.
CALL METHOD xls_document->create_style EXPORTING name = 'S1' fontcolor = i_cell_color=>red font = 'Times New Roman' font_bold = 'X' font_italic = 'X' rotation = 90 fontsize = 22. CALL METHOD xls_document->create_style EXPORTING name = 'S2' fillcolor = i_cell_color=>red fontcolor = i_cell_color=>white font = 'Times New Roman' font_bold = 'X' font_italic = 'X' rotation = 45 fontsize = 14. CALL METHOD xls_document->create_style EXPORTING name = 'S3' fillcolor = i_cell_color=>grey_50_percent font = 'Verdana' font_bold = 'X' fontsize = 12 valignment = i_cell_alignment=>center_vertical. CALL METHOD xls_document->create_style EXPORTING name = 'S4' fillcolor = i_cell_color=>grey_25_percent font = 'Verdana' fontsize = 10 alignment = i_cell_alignment=>center valignment = i_cell_alignment=>top.
|
| Figure 10 |
Define styles for cell formatting |
You can see the visual effects of these styles in the Excel file in Figure 11. Each of the four cells in this file is formatted with one of these styles. The download files for this article, mentioned above, include the complete ABAP code to create the Excel file.
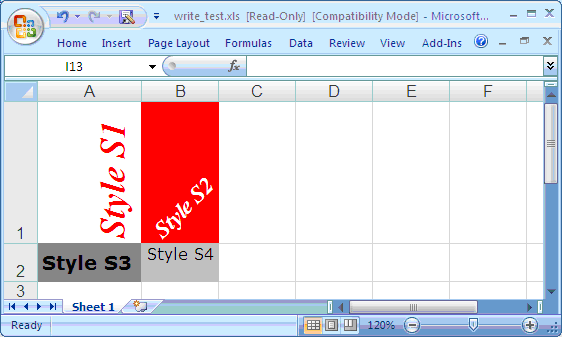
Figure 11
An Excel file showing different styles for formatting cells
Adjusting the Width of a Column
You can set the width of a column so that it automatically adjusts according to the width of the content using the AUTO_SIZE_COLUMN method. Note that for large sheets, this process is relatively slow.
Protecting an Excel File
The methods of the ZCL_XLS_DOCUMENT class, mentioned above, allow you to read and create Excel files. However, some other methods that allow the use of some options in Excel might also be of interest. One of these options is to protect an Excel file against an inadvertent change using the PROTECT_WORKBOOK method. When you open a protected Excel file, a dialog appears for you to enter a password for write access or to open the file as read only, as shown in Figure 12.
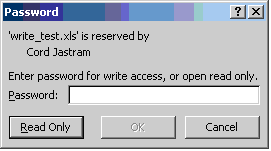
Figure 12
Password dialog when a protected spreadsheet is opened in Excel
To protect an Excel workbook, you call the PROTECT_WORKBOOK method using two importing parameters, as shown in Table 9. The parameter USER defines the username in the dialog, and PASSWORD is the password for the file.
|
USER
|
The username shown in the password dialog
|
ZPARAM_VALUE
|
|
PASSWORD
|
The password of the Excel file
|
ZPARAM_VALUE
|
|
| Table 9 |
Importing parameters of the PROTECT_WORKBOOK method |
Note
Password protecting an Excel file is intended to prevent the inadvertent change of a document. It is not intended to provide any kind of access control on the document.
An Overview of the Implementation
You have seen one example of reading an Excel file and one of creating an Excel file. Now, you can start to write your own programs using the Office Document Toolbox. The corresponding ABAP OO classes introduced in this article hide all of the technical details. However, if you want technical details, let’s look more closely at the implementation of the ABAP and Java parts of the Office Document Toolbox.
Implementation of ABAP and Java Classes
Creating an XLS file (or an RTF) is a four-step process, as shown in Figure 13. The toolbox’s ABAP OO classes perform the first two steps (implemented in ABAP), and the RFC server performs the third and fourth steps (implemented in Java).
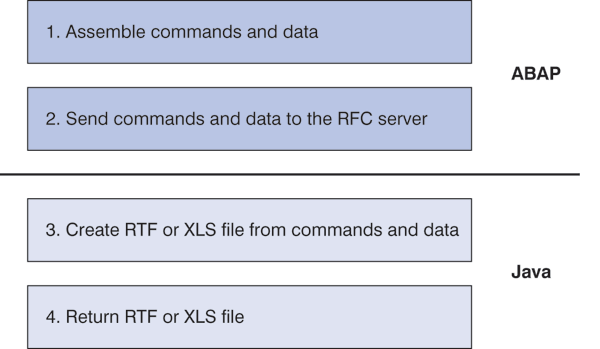
Figure 13
Four-step process to create an XLS (or RTF) document
First, you assemble the commands, the parameters of these commands, and the data that you need to send to the RFC server. The methods for assembling these commands and parameters are implemented in the ZCL_ABS_DOCUMENT class, as shown in Figure 14. This class is a base class for the ZCL_XLS_DOCUMENT and ZCL_RTF_DOCUMENT classes.
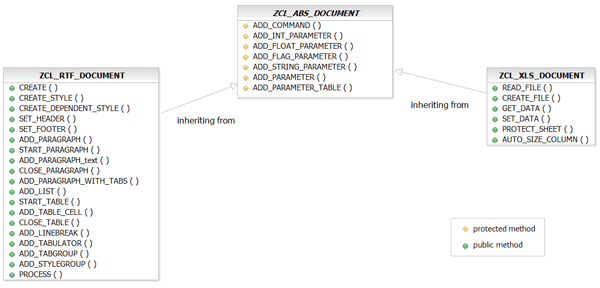
Figure 14
Class diagram for the ABAP OO classes of the toolbox
The ZCL_ABS_DOCUMENT class has seven methods for assembling commands and parameters. You should only use these methods to implement the public methods of the classes derived from the ZCL_ABS_DOCUMENT class. If you declare these methods as protected, that will enforce this restriction. Table 10 shows a short description of each of these methods, which add commands and parameters to the internal data structure.
|
ADD_COMMAND
|
Adds a new command to the command list
|
|
ADD_INT_PARAMETER
|
Adds the name of a parameter and its integer value to the command list
|
|
ADD_FLOAT_PARAMETER
|
Adds the name of a parameter and its floating-point value to the command list
|
|
ADD_STRING_PARAMETER
|
Adds the name of a parameter and its string value to the command list
|
|
ADD_FLAG_PARAMETER
|
Adds the name of a parameter and its value (“X” or space) to the command list
|
|
ADD_PARAMETER
|
Adds the name of a parameter and its value to the command list
|
|
ADD_PARAMETER_TABLE
|
Adds the name of a parameter and its values (in table form) to the command list
|
|
| Table 10 |
Methods of the ZCL_ABS_DOCUMENT class |
Visibility in ABAP OO
Methods and attributes of an ABAP OO class are grouped in three sections in terms of visibility: PUBLIC SECTION, PROTECTED SECTION, and PRIVATE SECTION. Components defined in the PUBLIC SECTION are globally visible; components defined in the PROTECTED SECTION are visible only to the class itself; and all subclasses and components defined in the PRIVATE SECTION are visible only to the class.
As an example of how to use these methods, look at Figure 15, which shows how to implement the PROTECT_WORKBOOK method of the ZCL_XLS_DOCUMENT class. First, add a new command, named protectWorkbook, to the command list. Then add a parameter, the named user, and a second parameter, named password, and their corresponding values to the command list.
METHOD protect_workbook. me->add_command(‘protectWorkbook’). me->add_ parameter( parameter = 'user' value = user ). me->add_parameter( parameter = 'password' value = password ). ENDMETHOD.
|
| Figure 15 |
Implement the PROTECT_WORKBOOK method of the ZCL_XLS_DOCUMENT class |
From a less technical point of view, these three lines of code instruct the RFC server to call a Java method named protectWorkbook with the supplied values for the user and password parameters. Next, the method sends the commands and data to the RFC server; for example, look at the implementation of the CREATE_FILE method of the ZCL_XLS_DOCUMENT class, as shown in Figure 16.
METHOD create_file . CALL FUNCTION 'Z_XLS_CREATE' DESTINATION me->destination EXPORTING e_file_length_in = file->size IMPORTING e_file_length_out = file->size TABLES t_file_out = file->data t_sheet = mt_sheet t_cell16 = mt_cell16 t_cell256 = mt_cell256 t_command = me->items EXCEPTIONS communication_failure = 1 system_failure = 2 OTHERS = 3. return-type = 'E'. CASE sy-subrc. WHEN 1. return-message = 'Communication failure!'. WHEN 2. return-message = 'System failure!'. WHEN 3. CONCATENATE sy-msgv1 sy-msgv2 sy-msgv3 sy-msgv4 INTO return-message. WHEN 0. return-type = 'S'. return-message = 'OK!'. WHEN OTHERS. return-type = 'Unknown Error'. ENDCASE. ENDMETHOD. "create_file
|
| Figure 16 |
The CREATE_FILE method of the ZCL_XLS_DOCUMENT class |
Here, you can see that this method calls the Z_XLS_CREATE function module, which the RFC server implements. When you look at the TABLES parameters of this function module, you can see that file data, cell data, sheet data, and command data all go to the RFC server. Now, as the RFC server receives the commands and data, you have reached the Java part of the solution for creating the Excel sheet. The RFC server consists of several packages and classes that I do not discuss in detail in this article. However, let’s look at an overview of the RFC server’s design. Figure 17 shows a simplified overview of the packages and the most important Java classes used to implement the RFC server.

Figure 17
Overview of the packages and Java classes used to implement the RFC serve
The com.cjastram.handler.rfcserver package contains a group of Java classes that I wrote to implement the RFC server. The most important class in this package is OfficeDocumentServer, which implements the actual RFC server. When the RFC server needs to create or read an Excel file, it delegates the work to an object of the XlsHandler class and an object of the CommandProcessor class. (To create an RTF document, the work is delegated to an object of the RtfHandler class and an object of the CommandProcessor class.)
Cord Jastram
Cord Jastram works for Computer Sciences Corporation (CSC) in Germany as a software developer. His main focus lies in software development using Java, ABAP, and C++. He holds a Ph.D. from Hamburg University, where he did research in the field of numerical seismic modeling. Before joining CSC in 2000, Cord worked as a software developer for various companies.
You may contact the author at cord.jastram@gmail.com.
If you have comments about this article or publication, or would like to submit an article idea, please contact the editor.