See how to configure your SAP R/3 or mySAP ERP Central Component system for inbound transportation. These eight configuration steps also help prepare you for future use of advanced transportation tools, such as Transportation Planning and Vehicle Scheduling.
Key Concept
A shipment document, generated in the transportation solution in R/3 or mySAP ERP Central Component (ECC), represents a combination of goods transported from a specific departure point to a specific destination point. It is the fundamental document for planning, monitoring, and carrying out physical transportation of goods in R/3 or ECC. The shipment document distinguishes between shipments going from the company to customers (outbound shipments) and the ones coming from vendors to the company (inbound shipments).
SAP provides a number of tools to help companies manage their inbound transportation activity — from simple use of the transportation solution in R/3 or mySAP ERP Central Component (ECC) all the way through advanced transportation optimization in Transportation Planning and Vehicle Scheduling (TP/VS), part of the mySAP SCM suite.
You must maintain several key configuration settings in the IMG for R/3 or ECC for the system to generate shipment documents. Only then can any advanced transportation optimization tool, such as TP/VS, successfully trigger the generation of shipment documents in R/3 or ECC once the system finishes the optimization run.
The eight steps I present will guide you through all of the necessary configuration settings to start tracking inbound shipments within R/3. Not only does this bring more visibility to the inbound transportation process in your online transaction processing system, it also prepares you to implement a transportation optimization tool, such as TP/VS, because this configuration must be in place before you can use it.
Step 1. Maintain the transportation planning point (TPPt). This is the only enterprise structure configuration object that you need to maintain for the transportation solution; it is the only assignment to other organizational units that is necessary (or possible). Depending on your business process, TPPt represents a centralized dispatch location or all of the individual plants.
Generally, if you would like plants to update the statuses of their shipments themselves, it is a good idea to create a separate TPPt for each plant that uses the transportation solution in R/3. Keep in mind that each TPPt is assigned to only one company code. Follow IMG menu path Enterprise Structure>Definition>Logistics Execution>Maintain transportation planning point.
Click on the New entries button at the top of the screen and enter a four digit number, a useful description, and company code to which the TPPt belongs. Finally, select your new entry and click on the envelope icon at the top of the screen to maintain the address for the new transportation planning point. Figure 1 demonstrates where you create the TPPt.

Figure 1
Maintain the TPPt
Step 2. Create a delivery document type for the inbound deliveries that the purchase order generates. Although standard SAP provides document type EL, often you need to create a new custom one to change the configuration settings of the delivery type to ensure the mapped business process is represented correctly in the system. Proceed to IMG menu path Logistics Execution>Shipping>Deliveries>Define Delivery Types or use transaction code 0VLK.
Select the standard document type EL and click on the copy as icon at the top menu bar. Provide a technical name that starts with character Z or Y, a useful description, and a valid document number range. Try to use a number range that is different from outbound delivery documents, so that you can easily identify inbound deliveries. You can leave the rest of the settings as is.
Refer to Figure 2 for a demonstration of a possible custom delivery type ZL. Save your new delivery document type and make sure to click on the Yes button when prompted to also copy the copy control settings.
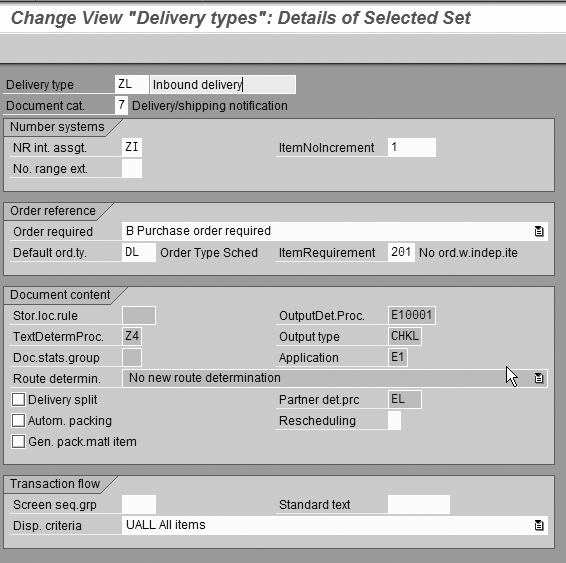
Figure 2
Maintain the delivery type
Step 3. Enable the system to create inbound delivery documents against purchase orders via confirmation control. You configure confirmation control within the Materials Management (MM) module of R/3. To access the Confirmation Control screen, follow IMG menu path Materials Management>Purchasing>Confirmations>Set Up Confirmation Control or use transaction code OMGZ.
The key factor for defining the configuration of confirmation control keys is the desired business process for receiving goods. Standard SAP provides confirmation control key 0004, which ensures that the system processes all goods receipts against the inbound delivery document, not the purchase order. This is useful when you often have purchase order line items with quantities for more than one shipment and you want to make sure that users can only receive goods for the quantity that the system processed through the inbound delivery document.
However, assuming this is your first implementation of inbound deliveries, this also often means that the current process, where you process goods receipts against the purchase order, must change. You can put an alternative configuration in place to allow the system to process the goods receipt against the purchase order or the inbound delivery, thus having no impact on the end user.
First, click on the Internal confirmation categories button and assign the new inbound delivery document type ZL to confirmation category 2 for shipping notifications as shown in Figure 3.

Figure 3
Confirmation category configuration
Next, return to the Confirmation Control screen and click on the Confirmation control keys button. Select the standard confirmation control key 0004 and click on the copy as icon at the top menu bar. Give the new confirmation control key a technical name that starts with either a Z or a Y and a useful description and press Enter. You should end up with a new custom confirmation control key that looks similar to the one in Figure 4.

Figure 4
Create the custom confirmation control key
Click on the back icon (the green arrow) to return to the Confirmation Control screen. Use the Confirmation sequence button to continue to configure the new confirmation control key Z004. Figure 5 provides an example of the confirmation sequence that makes the creation of inbound delivery documents possible and also allows the system to process the goods receipt against the purchase order or the inbound delivery. You must uncheck the GR assignment setting for this to happen.

Figure 5
Configure the confirmation sequence
You now need to define the confirmation control key determination settings. Use IMG menu path Logistics Execution> Shipping>Deliveries>Define Order Confirmations for Inbound Deliveries. Here the purchasing document category, purchasing document type, plant, and storage location assign the confirmation control key. For example, assign control key Z004 to standard purchase order type NB and plant 1001.
While in this section of IMG you also maintain another important setting — assign receiving point to plant. Follow IMG menu path Logistics Execution>Shipping>Basic Shipping Functions>Shipping Point and Goods Receiving Point Determination>Assign Goods Receiving Points for Inbound Deliveries. Simply assign the relevant shipping/receiving points to each plant. Optionally, you can specify the receiving points by storage location as well.
Step 4. Configure copy control. The copy control functionality within the Logistics Execution System (LES) of R/3 controls the way the system copies data from one document to another. In my scenario you need to configure copy control between the purchase order and the inbound delivery document.
Proceed to IMG menu path Logistics Execution>Shipping>Copying Control>Specify Copy Control for Deliveries. You also can use transaction code VTLA for quicker access. Locate and select the configuration entry with document type ZL as target and DL as the source. Double-click on the selected entry to access the copy control settings for the header information.
The most powerful feature of copy control is the possible use of custom routines. You can use them to control the data the system copies or to detail the requirements for creating an inbound delivery.
You could also use these routines to specify the split criteria. For example, a single purchase order can have line items for different plants and different destination addresses. Depending on your business process, it could be necessary to split these into separate inbound deliveries. Figure 6 shows an example of the configuration settings with the use of custom routine 902 for data transfer.
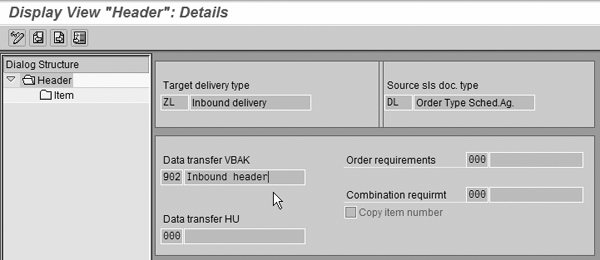
Figure 6
Copy control for header
Create custom routines for copy control through transaction code VOFM. Note that you probably will need to work with an ABAP developer because creating new routines requires an access key. Use the top menu Data transfer>Deliveries to create a new data transfer routine. Figure 7 shows the syntax for a data transfer routine that ensures the system creates multiple inbound deliveries if the purchase order number, plant, and destination address do not match among the line items.

Figure 7
Data transfer routine — split criteria
Returning back to copy control settings, you can access line item copy control configuration if you double-click on the Item node in the Dialog Structure on the left side of the screen in Figure 6. Here you are able to define even more detailed copy control settings by item category. You can use standard item category ELN for inbound delivery items. Again, possible use of custom routines for data transfer and copy requirements provides for powerful customization alternatives.
Step 5. Configure the inbound shipment type, which is the main piece of the puzzle. The inbound shipment type controls the behavior of the new document — shipment — that the system creates from the inbound delivery document in the transportation solution in R/3.
Begin with the specification of the number range. Follow IMG menu path Logistics Execution>Transportation>Shipments>Define Number Ranges for Shipments. You also can use transaction code VN07. I strongly advise that you provide a unique number range that allows the user to identify easily the document as a shipment. For example, this can become quite handy while looking at document flow.
Next, ensure that you have maintained the transportation relevance settings correctly. Use IMG menu path Logistics Execution>Transportation>Shipments>Maintain Transportation Relevance to access the configuration settings. First, choose the Maintain transportation relevance for delivery types option and make sure that you check the Rel. for transport check box next to delivery type ZL. Next, go back and choose the Maintain transportation relevance for delivery item types option and check the Rel. for transport check box next to item category ELN.
Proceed to the shipment type configuration. You can use transaction code 0VTK or IMG menu path Logistics Execution>Transportation>Shipments>Define Shipment Types. You probably will need to create a custom shipment type. To do so, select the standard shipment type 0010 and click on the copy as icon at the top of the screen. Provide the new shipment type with a technical name that starts with the character Z or Y and a useful description. Figure 8 demonstrates the possible configuration of a custom shipment type Z002.
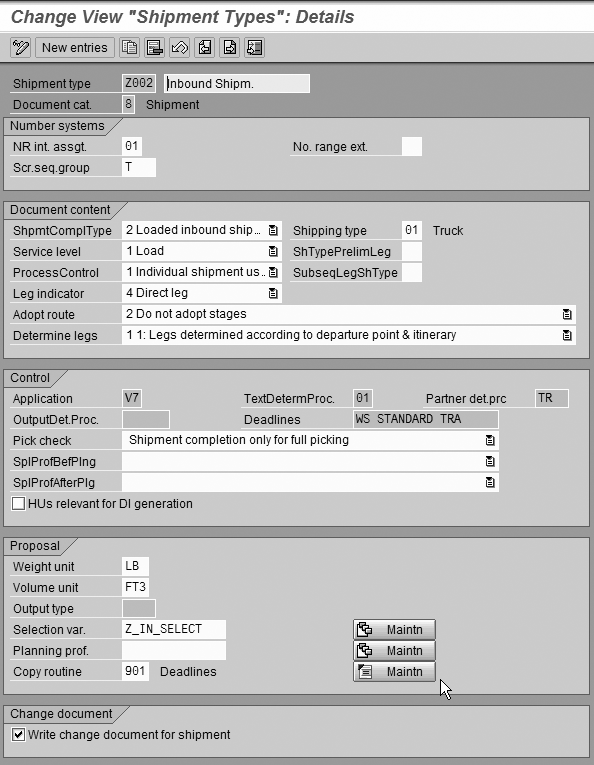
Figure 8
Define a shipment type
In Figure 8, I selected the Do not adopt stages setting for Adopt route, since you are not using routes. You can set Weight and Volume units to LB and FT3, respectively, for companies where such units of measure apply. You can maintain a custom selection variant (in my example, Z_IN_SELECT) to control the selection screen on which users select inbound deliveries for inbound shipment creation.
For example, you can minimize the selection screen to include only the inbound delivery document number, purchase order number, and plant. This avoids overwhelming end users with the number of fields that appear on the screen. Plus, users won’t need to scroll to get to the ones that they actually need to use.
To do so, specify the selection variant name and click on the Maintn button next to the selection variant assignment. Next, click on the Variant attributes button at the top of the screen and mark every field invisible, except for plant, purchase orders and inbound delivery. As a last step, make sure to save your new variant.
Finally, you can use a custom ABAP routine to control the flow of data between the inbound delivery and the shipment document. Such a routine can specify the logic for determining the planned dates within the shipment for loading, shipment start, and shipment completion for cases in which the system assigns multiple inbound delivery notes to a single shipment document.
Step 6. Assign activity profiles. Activity profiles are a very handy feature within the transportation solution. Not only do they allow you to automate the generation of output (e.g., bill of lading) or goods issue posting and customer invoice creation (for outbound transportation process), they also allow you to specify which fields in the shipment are mandatory before you update the shipment with a specific status, such as planning, check-in, or completion.
Proceed to IMG menu path Logistics Execution>Transportation>Shipments>Define and Assign Activity Profiles. In my example, I made sure to specify the freight vendor before marking the inbound shipment with status planning. Specify the technical name for the variant, for example Z0021, for shipment type Z002 under the column For planning and click on the Maintn button at the top of the screen. Check the Dialog box for fast entry during setting of status setting and click on the Select flds button next to it. Next, make sure to select the field VTTK-TDLNR Service agent as a required field, while marking the rest of the fields as invisible. Click on the copy icon and save your changes. Figure 9 provides an example of these configuration settings.
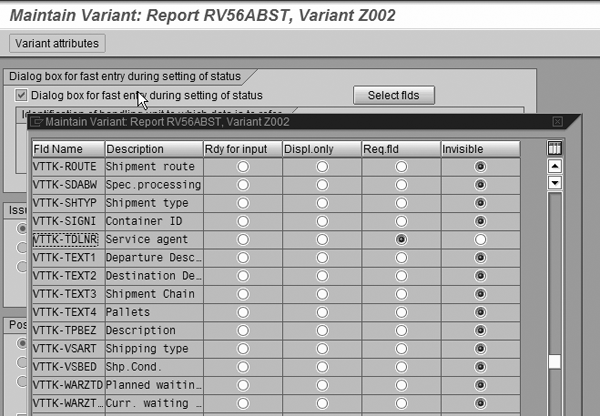
Figure 9
Maintain the activity profile
Step 7. Select user exits. Thankfully, the transportation solution comes loaded with a variety of powerful, yet controlled, user exits. You may or may not use some of the user exits listed in Table 1. This listing is meant to provide you with some insight on what is available.
You can view these user exits through transaction code SMOD and an ABAP developer can implement them.
| V56LDELI |
• Populate the additional fields on the shipment document based on data in inbound deliveries
• Re-determine departure and destination addresses on the shipment. This can become handy if you use many third-party (drop-ship) line items on your purchase orders. |
| V56UCHCO |
• Put custom checks into place, which the system validates before the shipment document can be saved. For example, you could check that the service agent specified in the shipment is indeed a freight vendor by looking at the vendor’s account group.
• Copy text from the inbound delivery document to the shipment document |
| V56USVDP |
• This user exit is executed right before the actual save of the shipment, so use
with caution as the majority of checks will no longer take place
• Populate desired fields on the shipment document, knowing that nothing will be changed before the shipment document gets saved |
| V56SLDET |
• Alter standard leg determination — the sequencing of stages within the shipment. For example, you could force the shipment to always adopt the sequence with which the delivery documents were assigned to the shipment. |
| V56BMOD |
• Set certain fields as unavailable for input on the shipment document, so that users could not change their value |
|
| Table 1 |
User exits in the transportation solution |
Step 8. See it in action. You are now ready to take the purchase order all the way through to the shipment document. The process outlined below demonstrates all of the steps necessary to create an inbound shipment.
First, create the actual purchase order. Use transaction code ME21N or follow SAP Easy Access menu path Logistics> Materials Management>Purchasing>Purchase Order>Create>Vendor/Supplying Plant Known to access the purchase order create screen.
Once you’ve populated the organization data, vendor, and material information, make sure that system populated the custom confirmation control key field with Z004 in the line items’ Confirmations tab (Figure 10). Save the purchase order document.

Figure 10
Create the purchase order click here to view a larger version of this image
After you create the purchase order with the correct confirmation control key, you can proceed to transaction code VL31N to create the inbound delivery document. You also can use SAP Easy Access menu path Logistics>Logistics Execution>Inbound Process>Goods Receipt for Inbound Delivery>Inbound Delivery>Create>Single Documents.
Input the purchase order number and press Enter. The transportation planning status should default to A if you have maintained all of the settings correctly (Figure 11). Make sure to save the inbound delivery.
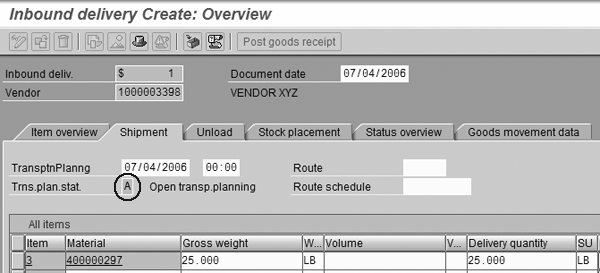
Figure 11
Create the inbound delivery document
Finally, you are ready to create the inbound shipment. Proceed to SAP Easy Access menu path Logistics>Logistics Execution>Transportation>Transportation Planning>Create>Single Documents or use transaction code VT01N. Specify a valid TPPt and choose the inbound shipment type Z002 that you created in step 5.
Click on the Select deliveries button at the top of the screen. You are presented with a selection screen that you configured in step 5 under the selection variant settings for the shipment type Z002. Enter the inbound delivery number and click on the execute icon.
Depending on the configuration of the selection variant that you maintained for shipment type Z002 in step 5, the system either automatically assigns the inbound delivery to the processed shipment document or drops it into the Deliveries not assigned portion of the planning screen. From there you need to manually drag and drop it into the shipment document at the top of the screen. Save your shipment document and you are done.
Look for my next article about shipment freight costing in R/3 for a detailed guide about how to generate a shipment cost document against the inbound shipment, calculate the freight costs, and transfer those costs back to the purchase order upon goods receipt, so that freight is included in the valuation of inventory.
Anton Karnaukhov
Anton Karnaukhov is a senior IT manager at Pacific Coast Companies, Inc., in Sacramento, California. He earned an MBA degree at Heriot-Watt University and a BS/BA degree with a specialization in computer information systems at Western Carolina University. Anton has more than eight years of SAP implementation and development experience focusing on business intelligence and logistics modules in the manufacturing and resale industries.
You may contact the author at anton.karnaukhov@paccoast.com.
If you have comments about this article or publication, or would like to submit an article idea, please contact the editor.


