See how to synchronize master data between a customer and business partner in an SAP ERP system. With this synchronization, you streamline master data, avoid redundancy, and protect master data integrity.
Key Concept
Master data such as products, customers, suppliers, and employees is most important for making business transactions. The SAP system uses the Business Partner (BP) concept in its applications such as Flexible Real Estate Management (RE-FX). Traditional modules such as FI make use of customers. Because you can also define a BP as a customer, you need to create the customer as a business partner for making any customer transactions with the business partner.
You need to integrate customers with business partners when you are using FI along with the components of the SAP ERP system, such as Customer Relationship Management (CRM), Supply Chain Management (SCM), and Advanced Planning and Optimization (APO). In FI, you use AR to manage accounting data for all customers. FI does not use the concept of business partners, instead it uses its own customer master records. Many SAP FI users also use modules such as Flexible Real Estate Management (RE-FX). RE-FX uses SAP Business Partner (BP) functionality. These SAP systems require BPs that are managed as customers in FI and as business partners in other applications.
The benefit of synchronization is that you need not update master records separately. After creating the customer master, the system automatically creates the BP, which then reflects any subsequent change to the customer master record. Due to this, the system maintains master data consistency and avoids duplication. When you refer to a customer as 123, for example, the system uses the same number as the BP throughout the functionality that uses BP functionality.
Customer integration with BP is bi-directional. While the direction for creation of master data is one-sided (either from customer to BP or BP to customer), any subsequent changes to customer master records are reflected in BP and vice versa. It also applies to the company code level. When the customer master data at company code level is changed, BP master data is also changed at company code level, which means that the same BP can have different payment terms for different company codes. The screenprints and the menu paths I show are from ECC 6.0 and may slightly vary in other versions.
The settings I discuss in the article are applicable for automatic synchronization from customer master to BP. Users can follow similar settings for vendor and BP synchronization in both directions.
Approach
To enable synchronization, you need to follow steps at three basic levels:
- Customer master settings
- BP settings
- Synchronization settings
Customer Master Settings
Customer master settings are relevant for FI and SD for making transactions with the customer. In FI, you make invoices and receive payments, among other activities, with the customers.
Step 1. Define the customer account group. Follow menu path Financial Accounting (New) > Accounts Receivable and Accounts Payable > Customer Accounts > Master Data > Preparations for Creating Customer Master Data > Define Account Groups with Screen Layout (Customers) (
Figure 1). In
Figure 1, I’ve created account group ZTST by entering the group in the Account group field and then filling in a Name in the General data section.

Figure 1
Create customer account group ZTST
Step 2. Create number range. Use transaction XDN1 or follow menu path Financial Accounting (New) > Accounts Receivable and Accounts Payable > Customer Accounts > Master Data > Preparations for Creating Customer Master Data > Create Number Ranges for Customer Accounts (
Figure 2).
Figure 2 shows the screen for creating the number range interval. Identification of the number range is a crucial step here. Because the number range should be the same for both customer account group and BP grouping, you need to identify the common available number range between the customer account group and BP grouping. (See step 2 in the “BP Settings” section for the BP number range.) In my example I have identified the number range from 100101 to 100999 for both customer and BP. See the sidebar, “Number Range Settings” for scenarios in which I have described the number range settings.
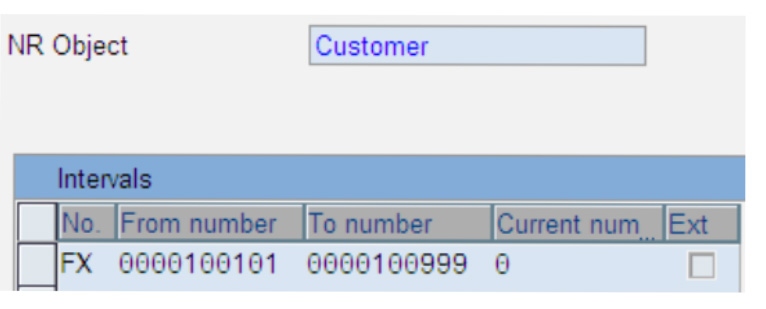
Figure 2
Create the number range interval (FX, in this example) for the customer master
Step 3. Assign the number range to the customer account group ZTST. In this step, you assign the number range that you created in the previous step (FX, in this example) to account group ZTST. Follow menu path Financial Accounting (New) > Accounts Receivable and Accounts Payable > Customer Accounts > Master Data > Preparations for Creating Customer Master Data > Assign Number Ranges to Customer Account Groups.
Figure 3 shows how to assign the number range interval FX (created in the previous step) to the account group ZTST.
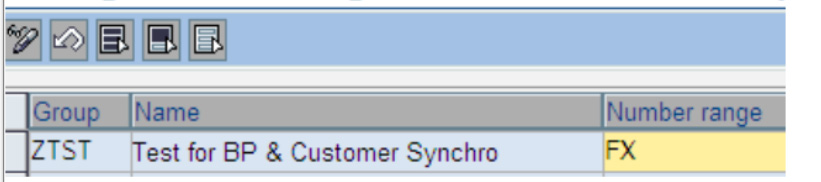
Figure 3
Assign number range interval to the account group ZTST
BP Settings
BP is the entity in which the organization has a business interest. It can be a person or a group of persons or organizations. You can create a business partner in different business partner roles. During the course of the business relationship, the BP can assume other business partner roles. You do not need to create the general data, which is the same for all BP functions. Due to this, you can use the same BP for different applications. For example, you can reach business partner with number 1000 as a customer in a customer role and as a vendor in a vendor role. In this way, it can play multiple roles.
Step 1. Define a BP role category and BP role, and then assign the BP role to the BP category. The BP role category defines the attributes of the BP roles assigned to it. You can check the possible BP categories such as organization and person. In my example, I have created one BP role category called ZTEST (
Figure 4). Access the transaction by following IMG menu path Cross-Application Components > SAP Business Partner > Business Partner > Basic Settings > Business Partner Roles > Define BP Roles.

Figure 4
Define BP role category ZTEST
Click on BP Roles in the navigation area to produce the screen in
Figure 5. Click on the New Entries button and enter the details. Enter ZTEST in the BP Role Cat. field. The BP View field controls the screen layout of the BP master data maintenance. I recommend entering FLCU00 in the BP View field for customer BP roles. With this BP view, you can maintain BP master data at the company code level.
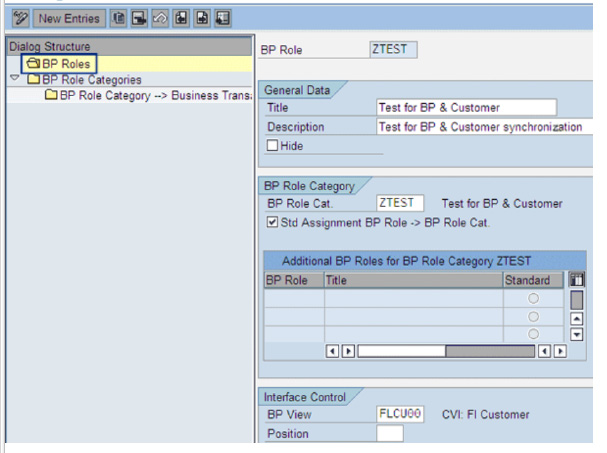
Figure 5
Define BP role
Step 2. Define BP number range. Use transaction BUCF or follow menu path Cross-Application Components > SAP Business Partner > Business Partner > Basic Settings > Number Ranges and Groupings > Define Number Ranges. Note the number range should be the same as the number range defined in
Figure 2. Because the settings in my article enable the direction from customer to BP, the BP number range is set as external (
Figure 6). After the user creates the customer, the system creates the BP with the same number due to the synchronization settings that you’ll define later.
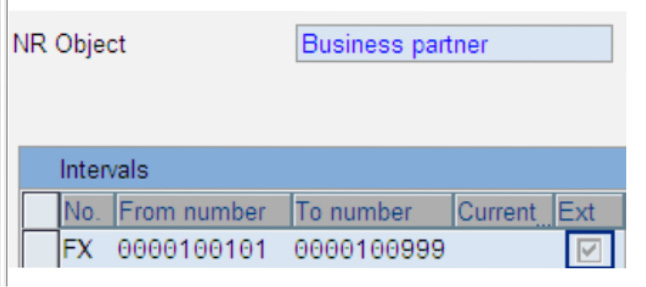
Figure 6
Define BP number range
Step 3. Define BP groupings and assign the number range. Follow IMG menu path Cross-Application Components > SAP Business Partner > Business Partner > Basic Settings > Number Ranges and Groupings > Define Groupings Assign Number Range (
Figure 7). I created BP Grouping ZTST and assigned it to Number range FX.

Figure 7
Assignment of the BP number range to the BP grouping
Synchronization Settings
Master data synchronization syncs up master data in an SAP system that is similar from a business, but not technical, point of view. This allows you to integrate different SAP applications, such as FI and RE-FX. You can use master data synchronization, as in my example, to set up integration of the business partner with the customer master.
Step 1. Set up the synchronization objects. Follow IMG menu path Cross-Application Components > Master Data Synchronization > Synchronization Control > Synchronization Control > Synchronization Objects (
Figure 8). This is a SAP standard setting. You don’t need to do any processing on the screen.
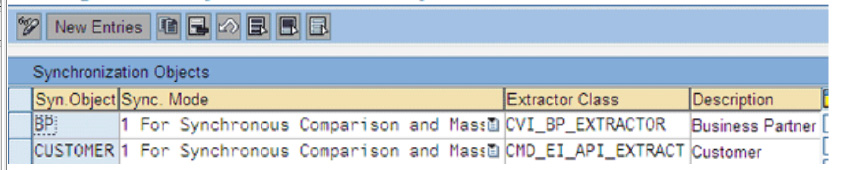
Figure 8
Assign the synchronization objects to the extractor class
Step 2. Activate the post processing office (PPO) requests for BP. Follow IMG menu path Cross-Application Components > Master Data Synchronization > Synchronization Control > Synchronization Control > Activate PPO Requests for Platform Objects in the Dialog (
Figure 9). Check the PPO Active check box for the row with the BP. The setting is helpful when you are using Synchronization Cockpit. See the sidebar, “Synchronization Cockpit,” for more information. The cockpit spots the errors during synchronization. The setting allows the system to write on the platform object. In my example, because the direction is from customer to BP, the synchronization object has been checked as BP. The source object is customer and the target is BP.
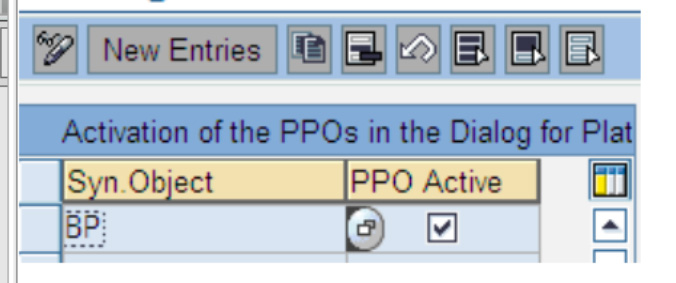
Figure 9
Activate the post processing office function against BP
Step 3. Activate the synchronization options (source object and target object). Access the transaction from the IMG menu path Cross-Application Components > Master Data Synchronization > Synchronization Control > Synchronization Control > Activate Synchronization Options (
Figure 10).

Figure 10
Activation of synchronization direction
Check the Act.Ind. (activation indicator) check box against the rows with BP and CUSTOMER as source object and target object. This setting is necessary for synchronization from both directions. If you remove any check mark (e.g., against source object BP to customer), then changes to the BP do not reflect in the customer master.
Step 4. Define BP role for integration with customer. Follow IMG menu path Cross-Application Components > Master Data Synchronization > Customer/Vendor Integration > Business Partner Settings > Settings for Customer Integration > Define BP Role for Direction Customer to BP (
Figure 11). Here you specify the account group ZTST created in step 1 of the customer master settings and the BP role created in step 1 of the BP settings.
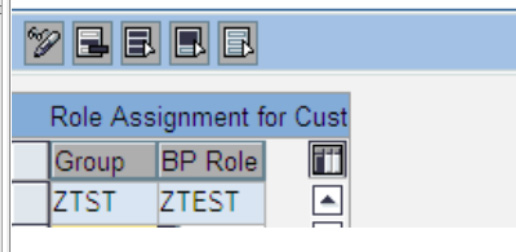
Figure 11
Role assignment from the customer master to the BP role
Then follow IMG menu path Cross-Application Components > Master Data Synchronization > Customer/Vendor Integration > Business Partner Settings > Settings for Customer Integration > Field Assignment for Customer Integration > Assign Keys > Define Number Assignment for Direction Customer to BP (
Figure 12). Because the BP number range is set as external, the BP number is the same as the customer number. Check the same number against the customer account group ZTST and BP group ZTST.
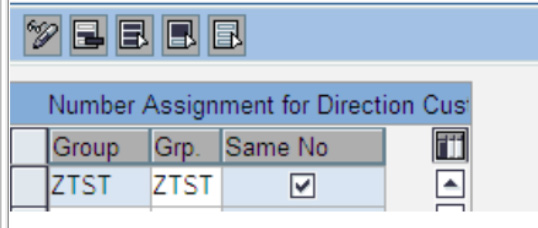
Figure 12
Synchronizing the number range for BP grouping and customer account group
With the above steps, you are ready with the configuration and now ready to test.
Note
For the synchronization to happen between customer and BP, you need to check that the field status of the customer and BP is consistent. Synchronization Cockpit can detect any such errors in synchronization arising out of inconsistent field status.
Testing
First create a customer master data using account group ZTST. Use transaction code XD01 (
Figure 13). In the Address tab, choose Company as the Title and fill in a Name and other details. Then click on the Company Code Data tab, enter the reconciliation account, payment terms, and so on, and save the customer (
Figure 14). In my example, I have created customer 100101.
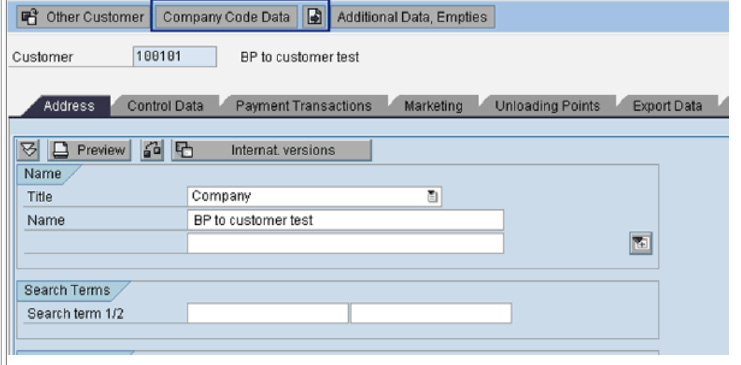
Figure 13
Create customer master in the account group ZTST

Figure 14
Company code dependent data for customer 100101
With these settings, after you create the customer the system creates the BP automatically. Go to the Maintain Business Partner screen by using transaction BP and enter 100101 in the Business Partner field (
Figure 15). Check whether BP is automatically created or not and look at the details in the BP general data. Then change the role to ZTST, go to the Company Code section of the screen, and check that the company code- dependent data is the same as the customer’s data (
Figure 16).

Figure 15
Automatically created BP with the same customer number
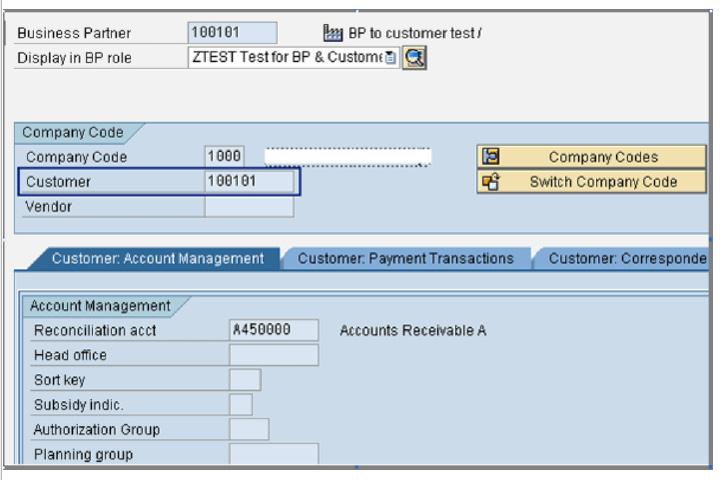
Figure 16
BP master data in role ZTEST (automatically created)
Similarly, you can also test the following other scenarios to test the synchronization.
1. Change the values in the customer master data and then save it. See whether these changes have been reflected in the BP master data.
2. Change field values in the BP and see whether the same have been reflected in the customer master data. This ensures that the synchronization happens correctly from BP to customer.
3. The synchronization also works for blocking and setting deletion indicators. You can test this scenario by blocking or setting the Deletion indicator in the customer master data and seeing that the same are also effective in the BP master data. (Note that in BP master data the Deletion indicator is named the Archiving indicator). Even after setting the Deletion or Archiving indicator, the synchronization still takes place because any changes to the customer take effect in BP and vice versa.
Note
For the synchronization to happen between customer and BP, you need to check that the field status of the customer and BP is consistent. Synchronization Cockpit can detect any such errors in synchronization arising out of inconsistent field status.
Number Range Settings
Consider two scenarios for setting the number range settings. Scenario 1 describes the number range settings wherein you create customer/vendor and the system creates the BP. Scenario 2 describes the setting in which you create BP and the system creates the customer/vendor. With this example, you can see how certain situations, such as the possibility of having the same number for customer, vendor, and BP, are handled.
Scenario 1. You create customer/vendor, the system creates BP. Because there is a limitation in FI, the numbers cannot be the same for both customer and vendor. This is due to the different number ranges assignment to different account groups. Even in the case that the customer is also a vendor, they have to be created separately. In this scenario, the numbers might be:
- Customer number — 1000 —> BP 1000 — BP customer role
- Vendor number — 2000 —> BP 2000 — BP vendor role
In this case, the BP numbers are different because of the limitation from an FI perspective.
Scenario 2. You create BP, the system creates customer/vendor. In this case, when you create the BP first, the system then automatically creates the customer/vendor. If you can assign the same number range to the BP grouping, customer account group, and vendor account group, it is possible to have the same number for the BP, customer, and vendor (
Table 1).
| 1000-2000 |
BP number: 1000 |
Internal. If you create the BP in the customer role, the system automatically creates customer 1000. If you create the BP in the vendor role, the system automatically creates vendor 1000. |
| 1000-2000 |
Customer number: 1000 |
External |
| 1000-2000 |
Vendor number: 1000 |
External |
|
| Table 1 |
Assign number ranges to BP, customer, and vendor numbers |
|
Using an external number range for BP, customer, and vendor account groups is not practical and so is not recommended. When the direction is from customer to BP, set the customer number range as internal (
Figure 2 in the main article) and BP as external (
Figure 6 in the main article).
Synchronization Cockpit
You use Synchronization Cockpit to troubleshoot any issues arising out of synchronization. Access the transaction with IMG menu path Cross-Application Components > Master Data Synchronization > Synchronization of Mass Data > Execute Synchronization Cockpit. You choose the synchronization direction in this example as customer to BP. After you execute the synchronization, you can display the errors by calling the PPO in the Monitor tab. This helps you identify the reasons for such errors. After you correct the errors, you can rerun the synchronization. This is helpful when you are not sure why the synchronization did not happen between source and target object. You run Synchronization Cockpit especially when the master data is out of sync due to any changes to the customization settings. Correct the customization and rerun the cockpit to ensure proper synchronization.
Sivaprasad Ramachendruni
Sivaprasad Ramachendruni is a solution architect (SAP Financials and SAP S4/HANA Finance) with SAP professional certification. He is currently working for a multinational corporation in the IT sector. He has more than 17 years of functional and SAP system experience spanning across several industries. He has expertise with various modules, including FI, Controlling (CO), Funds Management (FM), Flexible Real Estate Management (RE-FX), Financial Supply Chain Management (FSCM), and SAP S4/HANA Finance. He helps companies design, implement, deploy, and streamline business processes and gain efficiency. He is an Indian cost and management accountant and has a master’s degree in financial management.
You may contact the author at
sivaprasadr@rediffmail.com.
If you have comments about this article or publication, or would like to submit an article idea, please contact the
editor.