The Extended Computer Aided Test Tool (eCATT), successor of SAP’s CATT, can test a wide range of SAP applications running in the SAPGUI for Windows or Java environments. It can also access data in the database (including customizing data) and ABAP coding on the application server. See how to use eCATT to speed up testing over multiple users.
Key Concept
eCATT was designed to enable testing of as many SAP transactions as possible automatically. That includes EnjoySAP release transactions such as FB50, FV50, or ME21N. eCATT provides a simplified concept of testing in a complex system landscape that can include multiple systems such as R/3, CRM, and BW. The testing is done using remote function calls. You can use a central test system for administering tests running in any other system.
For any SAP project, whether an implementation, upgrade, enhancement of new functions, or even a Support Package application, testing is vital for its success. The more you test, the better it is for the project. The Extended Computer Aided Test Tool (eCATT), the successor to SAP’s Computer Aided Test Tool (CATT) is an automated testing tool that greatly enhances the process.
eCATT allows you to reuse test data by storing it in separate container objects. eCATT has a provision for an external interface, so if you have already invested in another testing option, you can have an external interface from eCATT to that tool, using both of them to your advantage.
I’ll show you how to use eCATT, including a procedure that uses eCATT to automate security testing involving multiple users. First I’ll briefly explain how eCATT differs from CATT.
Note
Several testing tools are available in the market, which are mostly Windows-based. SAP’s own solution — CATT — has been around since Release 3.0. CATT’s successor eCATT is available with SAP Web Application Server (Web AS) Release 6.20 (R/3 Enterprise, Solution Manager 2.2 or higher). As far as backward compatibility is concerned, you can remotely test a system running R/3 Basis Release 4.6C or higher.
eCATT vs. CATT
Unlike CATT, which had embedded test data and used a special variable for remote destinations, eCATT has the following components (Figure 1):
-
Test script — the set of commands and parameters that form the test and interface for data transfer
-
Test data container — reusable sets of data that can be assigned to tests maintained independently of test script
-
System data container — information about systems in which tests would be conducted
-
Test configuration — Contains a set of references to test script, a system data container, and test data containers used for running automated tests.
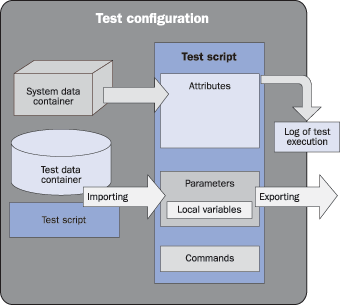
Figure 1
Sample testing landscape
An eCATT test script consists of three principal parts: its attributes, the script commands, and the parameters that can be passed to and from the script. You can also create local variables to store data temporarily in the script. I will show how to maintain attributes and script commands in steps 1 and 2 of the procedure below, but I am not using any parameters.
Since eCATT was built on top of CATT, certain script execution drivers (also known as command interfaces) are similar to some CATT recording and execution commands, such as the TCD (transaction code) command. eCATT allows you to check tables and test function modules. You can simulate customizing changes to assess the effects. CATT did allow you to run tests remotely, but wasn’t flexible enough. With eCATT, it is easy to run the same test script over several different systems. eCATT can record and test transactions that use the Control Framework, such as FB50, using a new command SAPGUI. In eCATT, you can insert blocks of ABAP code between ABAP and ENDABAP commands to meet special requirements. You can also use logical functions such as IF, ELSEIF, ELSE, ENDIF, DO, and ENDDO, as you could in CATT.
In eCATT test scripts, XML structures represent interfaces of function modules and BAPIs, screens and fields in transactions, the SAPGUI object model, and the import and export parameters of the referenced eCATT scripts. The eCATT editor contains an XML editor for maintaining parameter values.
Unlike CATT, the version of eCATT accompanying SAPWeb AS 6.20 does not allow you to upload test data except in XML format. You cannot upload a text file using eCATT commands. You have the following options: import/export in XML format, use a clipboard to copy and paste data into test data containers, or use ABAP code between the ABAP and ENDABAP commands to upload the required file. From SAPWeb AS 6.40 (mySAP ERP 2004), SAP has reintroduced the support of external variants, whereby you can import .txt files.
For those who fear what would happen to the development you have done in CATT, SAP allows you to call CATT objects from eCATT scripts using commands REFCATT and REMOTECATT, both of which invoke the CATT interpreter. SAP has also provided an automated migration tool to convert CATT procedures into eCATT scripts. You can do this easily by choosing the menu option eCATT Object>Migrate CATT in transaction SECATT. eCATT objects are new objects and you could continue to use old CATT objects for the short to medium term.
Automating Security Testing
Although eCATT provides more functionality than CATT, it still does not eliminate logging in as multiple user IDs to check a transaction code or a set of transactions for the assigned authorizations. However, you can automate this part of the process using the procedure I describe below.
Before you use the procedure, check the following prerequisites: You should have enabled the eCATT and SAPGUI scripting in your system. Refer to SAP notes 519858 (“Setting up SAP systems to use eCATT”) and 480149 (“New profile parameter for user scripting at the front end”) about these tools. You must also have the desktop applications Microsoft Word and Microsoft Excel installed. Since you are testing multiple user IDs, the user IDs you want to test need authorization for object S_RFC with function group STTF in addition to the other authorizations they may have.
This procedure uses eCATT script, SAPGUI script, and Microsoft Office (MS Office) components and is divided into five steps.
Step 1. Record an eCATT script
Create an eCATT test script via transaction SECATT. Choose the option Test Script and enter a name for the test script, such as ZJ01_FV50_DEMO_SAPGUI in my example. Click on the Create Object button. This leads to the Attributes maintenance screen of the test script (Figure 2).
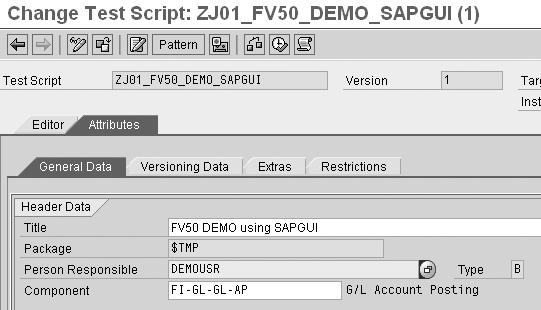
Figure 2
Attributes of test script ZJ01_FV50_DEMO_Figure 2 SAPGUI
Assign a title to your test case, say FV50 DEMO using SAPGUI, and an application component (FI-GL-GL-AP for my example). Save the details entered so far by clicking the save icon. Save it under the Package $TMP (Local Object) for this demo. If the object needs to be transported to another system, then you assign a suitable package, which would usually begin with letter Z. If you are unsure, you can ask for help from your Basis or technical team.
Note
“Package” was known as “development class” in SAP releases prior to R/3 Enterprise.
Next, choose the Editor tab of the test script. For my example, I’m using the new command interface SAPGUI, which enables me to record SAP transactions with a control framework such as FV50. Click the Pattern button and choose the Command as SAPGUI REC SAPGUI (Record) from the drop-down list Command Interfaces as shown in Figure 3. Click the enter icon to continue.

Figure 3
The command SAPGUI Figure 3 REC is shown as an insert statement in the test script
After clicking on the enter icon, you see a message specifying that the System Data Container Is Missing and connections to the current system will be recorded, which means the system is going to record all the actions you would do in the current system and client. This is OK. You’ll maintain the system data container later. Click the Yes button to continue.
The next screen asks how the recorded data should be written in the script (i.e., the granularity of the script — whether it should generate command interface with the granularity you specify under automatic generation, or it should generate only one command interface for all the transactions you would perform in the newly generated session). For this demo, I’m using Manual Generation, which is one command interface for all activities I would be recording. The check box Manual Generation is selected by default. Click the enter icon to continue with the recording of the SAPGUI command.
A new session opens along with a dialog box in the current session asking if you want to record the new session. Select the Yes button to continue with the recording. For my example, I do not wish to check the initial values of any field contents, and I do not need to record the clicking of menu buttons. Therefore, I am not changing any value on the dialog box shown in Figure 4. Instead, continue with the recording of the transaction in the new open session. If you wish to change these options at any time during the recording, you can go back to this screen and make the required change.

Figure 4
Options for recording: no changes are needed for this example
If you are using SAPGUI version 6.40, the new open session to be recorded shows moving red and white striped lines in the bottom right corner of the status bar, indicating that the recording is active in the current session.
Continue to work through the transaction (in this case FV50) in the new session as you would normally. After processing the transaction completely, remember to return to the main SAP screen before you end the recording of the session.
After you have successfully executed the chosen transaction, click on the End Recording button on the dialog box Recording Running. You may choose to close the recording session by selecting the option Close Recorded GUIs.
Note
You may want to perform a few dry runs to familiarize yourself with the transaction before you record it. This helps eliminate unnecessary screens and messages during the recording.
After the script ZJ01_FV50_DEMO_SAPGUI is recorded, the Editor tab has the recorded command in the Command Editor area of the window, highlighted in Figure 5 with a rectangle. It is a good idea to save the script now. The text SAPGUI_1 in brackets with the recorded command SAPGUI is the command interface recorded. Double-click it to display its details, which opens in a new frame in XML structure format to the right of Command Editor (Figure 5). You may choose to parameterize it, but in this example, I shall not. Instead I’ll run the tests with the values recorded in the script, so I’ll accept the values entered in the recording.
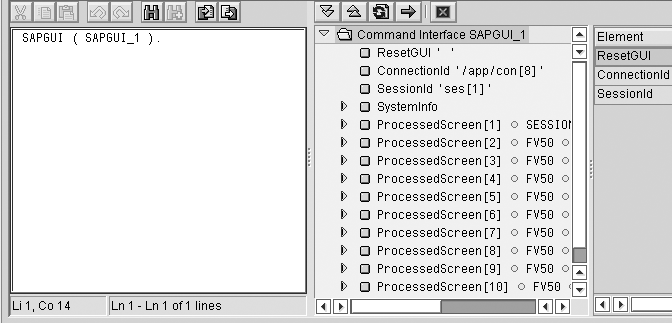
Figure 5
Verify the recorded command, along with the command interface details
Now test the script recorded so far. Click the Execute button to execute the recorded script. On the Start Options screen that comes up, accept all the default values and click the Execute button. The system then opens a new session and performs the transaction that you just recorded. After performing the transaction, the system displays the log of the script just executed. You should see green lights in the log, as you have executed the script without any change, with the data used earlier.
Step 2. Modify the recorded eCATT script in the command editor
In this step, you modify the script recorded in the first step so that the log shows the various messages it came across prominently with the command LOG. Go back to transaction SECATT and open up the script recorded in the previous step (ZJ01_ FV50_DEMO_SAPGUI in my example) in change mode. Go to the Editor tab and modify the script in the command editor by inserting a new Pattern MESSAGE. Move the command SAPGUI between the commands MESSAGE and ENDMESSAGE as shown in Figure 6.
MESSAGE ( MSG_1 ).
* Move the SAPGUI command here i.e.
* between MESSAGE and ENDMESSAGE commands.
SAPGUI ( SAPGUI_1 ).
ENDMESSAGE ( E_MSG_1 ).
LOG ( E_MSG_1 ).
Figure 6 Enter new commands in the script
Accept the default command interface name (i.e., MSG_1 and E_MSG_1). Insert the LOG command with interface E_MSG_1 at the end to display the messages generated in the log. Execute the script ZJ01_FV50_DEMO_ SAPGUI to test the new commands. This time the log shows the messages generated by the transaction under the command LOG (Figure 7).
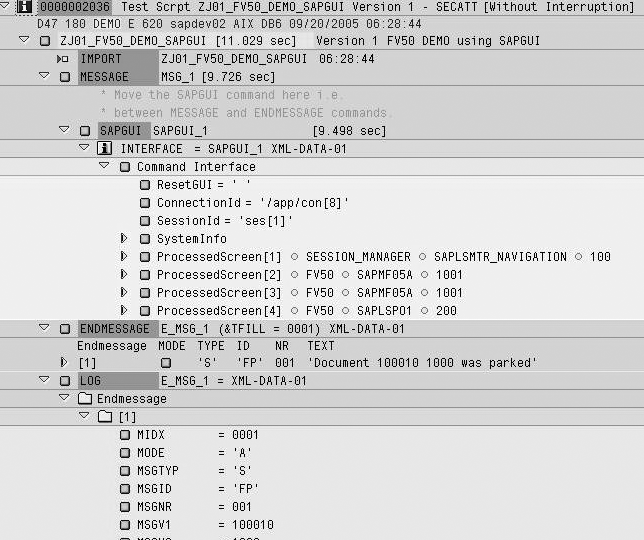
Figure 7
Log of the execution after inserting new commands. It is now easy to find the
Step 3. Create a system data container
To create the system data container for use in the script, check the RFC destinations available via transaction SM59. Those who do not have access to this transaction should seek the help of their Basis team, which usually establishes RFC destinations for each new system it installs.
If the required destination (the target system for testing security) is not available, then establish it as follows: Enter the RFC destination name, description, and connection type as 3 and click on the enter icon. On the Technical settings tab in the Target Host field, enter the name of the application server with the appropriate system number next to it. Enter a Client value on the Logon/Security tab. Do not mark the indicator Current User or save a password (Figure 8).

Figure 8
Set the details of the RFC destination
For my example, I use the same system as the target system. Since it is the same system, I use a client value different than my current client so that I am prompted to log in through the RFC connection. This is important, as you use this method to log in with different user IDs using the SAPGUI script.
Next, you create a system data container using the RFC destination, modify your test script from step 1 to include it, and then test it. To create a system data container, go back to transaction SECATT. Choose the option System data and give a name, say ZJ01_FV50_SD01. Click on the Create Object button. Enter a title, FV50 Demo in this example, for the system data container. Save it as a local object (package $TMP). On the System Data tab, click on the Create (Append Row) button. Enter the name of the test system, FV50D in this case, and choose the RFC destination you just established (Figure 9). Save your changes.

Figure 9
Details of the system data container ZJ01_FV50_SD01
Next, you assign this system data container to your test script (Figure 10). Open the script from step 1 via transaction SECATT in change mode by clicking on the change button on the initial screen of transaction SECATT after you enter the test script name. On the Attributes tab, enter the SystemData Container along with the target system established, FV50D in this case. Save your changes. Execute the test script again to test it with modified parameters. This time you are prompted to enter the logon information to finish the test.

Figure 10
View test script with system data container and target system
Step 4. Record a SAPGUI script
Although through an eCATT script you can call and execute another eCATT script, you are not able to parameterize the RFC logon information. It is essential to parameterize the logon information to test the security of various user IDs. To do that, use SAPGUI Scripting. If SAPGUI Scripting is active in your system and your prerequisites are all in place, then the GUI option Script Recording and Playback… in Figure 11 will be active for use.
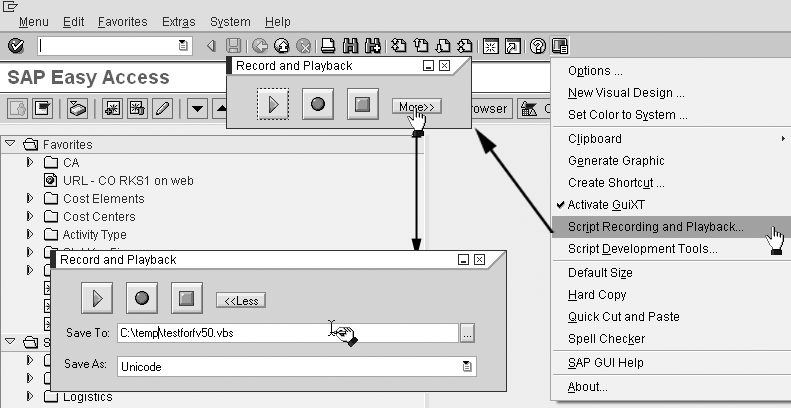
Figure 11
Confirm that GUI option Script Recording and Playback… is active and opens
When you click the option Script Recording and Playback …, the SAPGUI starts the Record and Playback menu (Figure 11). Before you start recording a session, make sure you are on the main R/3 (Session Manager) screen. You can verify this by checking the transaction by clicking the pull-down menu on the right side of the status bar. Click on the More>> button on the Record and Playback menu and specify the name and location of the script file you want to save. The button text changes from More>> to <<Less when you click it. In SAPGUI version 6.20, a prompt for a file name is given after recording ends.
Note
To carry out the Step 4 successfully, you have to log off and log back into the system if you tested the script after adding the system data container.
Click the Record (red dot) button on the Record and Playback menu. If you are on SAPGUI version 6.40, you’ll see the red and white moving stripes in your current session, indicating that the recording has started. Start transaction SECATT in the current recording session and execute the test script. Make sure when you execute the test script that you select the check box Close RFC connection. This enables you to log in with different user IDs.
Execute the test script transaction from the SECATT screen. When prompted for logon parameters, enter the system logon information with a suitable user ID. The test script after successful execution shows the log. Exit back to the SECATT screen. To better explain the logic of script commands, I will execute the script again with a different user ID. Again, after successful execution, the script displays the log. Return to the main R/3 screen. Stop the recording and view the recorded file in a text editor such as Notepad. You can now close the record and playback menu. Figure 12 shows the recorded file. Note that the recording does not store any passwords.
Not IsObject(application) Then
Set SapGuiAuto = GetObject("SAPGUI")
Set application = SapGuiAuto.GetScriptingEngine
End If
If Not IsObject(connection) Then
Set connection = application.Children(0)
End If
If Not IsObject(session) Then
Set session = connection.Children(0)
End If
If IsObject(WScript) Then
WScript.ConnectObject session, "on"
WScript.ConnectObject application, "on"
End If
session.findById("wnd[0]").maximize
session.findById("wnd[0]/tbar[0]/okcd").text = "SECATT"
session.findById("wnd[0]").sendVKey 0
session.findById("wnd[0]/usr/ctxtECATT_VER-NAME").text =
"ZJ01_FV50_DEMO_SAPGUI"
session.findById("wnd[0]/usr/ctxtECATT_VER-NAME").caretPosition = 21
session.findById("wnd[0]/tbar[1]/btn[8]").press
session.findById("wnd[1]/usr/subSTARTOPTIONS:SAPLECATT_EXECUTE:0211/
chkETEXECDATA-TWB_RFC_CLOSE").selected = true
session.findById("wnd[1]/usr/subSTARTOPTIONS:SAPLECATT_EXECUTE:0211/
chkETEXECDATA-TWB_RFC_CLOSE").setFocus
session.findById("wnd[1]/tbar[0]/btn[8]").press
session.findById("wnd[0]/usr/txtRSYST-MANDT").text = "180"
session.findById("wnd[0]/usr/txtRSYST-BNAME").text = "USR1"
session.findById("wnd[0]/usr/pwdRSYST-BCODE").text = "********"
session.findById("wnd[0]/usr/pwdRSYST-BCODE").setFocus
session.findById("wnd[0]/usr/pwdRSYST-BCODE").caretPosition = 8
session.findById("wnd[0]").sendVKey 0
session.findById("wnd[0]/tbar[0]/btn[3]").presssession.findById("wnd[0]/tbar[1]/btn[8]").press
session.findById("wnd[1]/usr/subSTARTOPTIONS:SAPLECATT_EXECUTE:0211/
chkETEXECDATA-TWB_RFC_CLOSE").selected = true
session.findById("wnd[1]/usr/subSTARTOPTIONS:SAPLECATT_EXECUTE:0211/
chkETEXECDATA-TWB_RFC_CLOSE").setFocus
session.findById("wnd[1]/tbar[0]/btn[8]").press
session.findById("wnd[0]/usr/txtRSYST-MANDT").text = "180"
session.findById("wnd[0]/usr/txtRSYST-BNAME").text = "USR2"
session.findById("wnd[0]/usr/pwdRSYST-BCODE").text = "********"
session.findById("wnd[0]/usr/pwdRSYST-BCODE").setFocus
session.findById("wnd[0]/usr/pwdRSYST-BCODE").caretPosition = 8
session.findById("wnd[0]").sendVKey 0
session.findById("wnd[0]/usr/cntlCC_LOG_TREE/shellcont/shell").unsel
ectAll
session.findById("wnd[0]/tbar[0]/btn[3]").press
Figure 12 Review the recorded SAPGUI script
In the script, you see transaction SECATT, the script name ZJ01_FV50_DEMO_ SAPGUI, and the user IDs used. Certain lines are repeated for the new users. The lines that repeat are in bold in Figure 12. You may now choose to test the script file. Modify the script file in a text editor to add passwords for the user IDs where “********” appears in the code. Open the recording and playback menu from the main R/3 screen and then click on the Play (green triangle) button. Choose the script file you wish to play. It should execute the same way you recorded it.
Step 5. Parameterize user IDs and execute security tests
If you repeat the bold SAPGUI script lines for a given number of users in the script, you can test their authorization for the transaction you recorded in the eCATT script in step 1 earlier.
Those who are familiar with Visual Basic (VB) programming and Excel macros can take the above script code and run it through a DO loop in VB for your number of user IDs and passwords stored in a file you want to test. If you are not familiar with VB, here is a simple method: Open up your desktop application Microsoft Excel and create a data source file for user IDs in a new worksheet with two columns, User ID and Password. Then create a new document in Microsoft Word. Copy the lines that repeat for all the users from your SAPGUI script and paste them into your new document. In Microsoft Word, open the Mail Merge toolbar. Click on the Open Data Source button (Figure 13).
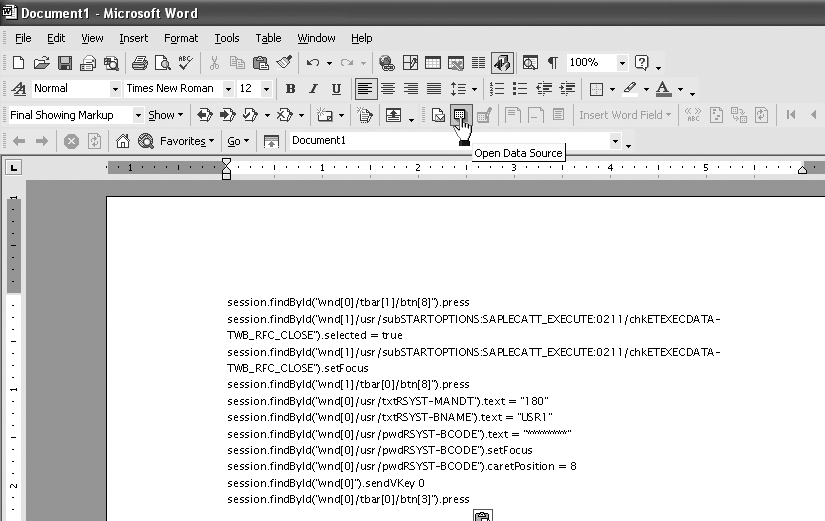
Figure 13
Repetitive lines from SAPGUI script in Microsoft Word and Mail Merge toolbar
Note
Parameterizing is creating variables for the values you recorded in the script and then passing different values. For example, in the script you recorded G/L account 10000, but now you want to pass 20000 or 30000 and see the effects of different values in the test script. Once you parameterize the G/L account, you would be able to supply these different values.
Choose the Microsoft Excel sheet as your data source that has the user IDs with passwords you want to test. In the Microsoft Word document, replace the user ID and password in the script lines with the database fields User ID and Password, as in Figure 14.

Figure 14
Database merge fields in the Microsoft Word document with script lines
Start Mail Merge to create a new document. Mail Merge repeats the SAPGUI script lines with different user IDs and their passwords into a new document. ment as a plain text file. Change the file extension to .vbs. To start your user security testing, go back to your R/3 session main screen and open the Script Recording and Playback menu (Figure 11). This time choose the Play option and choose the text file with file extension .vbs you just saved from Microsoft Word.
Once you click on the Play button, the SAPGUI (.vbs) script is going to run the eCATT script for the users you inserted in it by calling the SECATT transaction. eCATT script in turn executes the transaction (FV50 in this example) using the RFC connection. Since you are passing different users as RFC users through the SAPGUI script, you are running the transaction by logging in as different users.
This way you now can test multiple user IDs in a short span of time. You can check the eCATT logs after successful execution of the script to verify the results of your testing. Double-click on any log to view its details.
Tip
It is always a good idea to test the recorded script before enhancing it further or making any additional changes. Also, if you are going to use the chain of transactions and test scripts with the SAPGUI command, it is a good idea to record the closure of the newly generated session by completely exiting the transaction and session (pressing Exit button [or Shift + F3] until the new session closes). Otherwise, while running the chain of transactions and test scripts, a new session would open for each of your recordings, and you may reach the maximum session limit quickly.
Figure 15 shows the eCATT logs created for various user IDs.
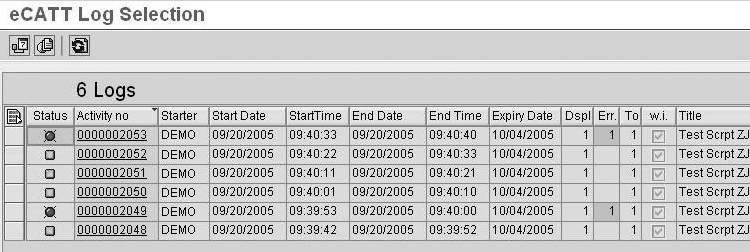
Figure 15
eCATT logs after the SAPGUI script with users is executed
Additional Steps
You can enhance the scripts used in this demo via other eCATT commands such as TCD and CHETAB or even by a chain of transactions connected through a new eCATT script. All available commands are shown in the drop-down menu in Figure 3. This way, you can check transactions or authorizations related to table access for a particular user ID and modify the SAPGUI script to call other eCATT scripts.
Jayesh Narwaney
Jayesh Narwaney works for a financial services organization as a senior SAP support specialist in the SAP production support department. He has an MBA in finance and more than nine years of SAP experience, including six as a consultant in the FI and CO modules. He now works on the FS-CD module, the industry solution for financial services in SAP.
You may contact the author at jayeshrn@yahoo.com.
If you have comments about this article or publication, or would like to submit an article idea, please contact the editor.


