Disabling the A/P Online Check Register is possible and it has some real advantages. Doing so returns tasks such as cashing, voiding, and research to standard transactions in the G/L. As a result, you can achieve benefits such as simplification of reconciling to the bank's records and making it easier to fix check-printing errors.
The shift over the past few years at R/3 sites has been from adding more and more functionality to making what’s already active simpler. A good example can be found in the Accounts Payable (A/P) department, where some companies have done away with the dedicated check register (table PAYR). Instead, they return tasks such as cashing, voiding, and research to standard transactions in the G/L such as G/L Account Clearing and Display a G/L Account’s Line Items.
This approach to A/P check printing and management has been around since the days of R/2 and is considered to be within the context of "standard" SAP. However, its use is much more common in Europe than it is in North America. I believe this is due to a lack of a clear explanation regarding its setup and use.
I will describe the three main customization steps involved in eliminating the Check Register. I have made no judgments on the benefits it may or may not offer to your R/3 site, but I’ve listed a few of the pros and cons of doing so in Figure 1; you must decide what benefits, if any, the No Check Register option offers to your A/P department.
All screenprints shown here are from SAP R/3 version 4.6B. However, I have been working with the No Check Register option for years, and you may assume this design to be available on any R/3 release still having a maintenance status at SAP.
|
|
 The check number becomes the FI payment document number, and that FI document has a direct link to the original vendor invoice. This makes for easy online research of questions from vendors concerning what has and has not been paid. The check number becomes the FI payment document number, and that FI document has a direct link to the original vendor invoice. This makes for easy online research of questions from vendors concerning what has and has not been paid. |
 Fixing a check-printing error becomes easier because during check printing, the Check Register got neither “good data” nor “bad data.” It got no update at all. Thus, cancellations are performed with the standard G/L transaction for reversing a FI document. Fixing a check-printing error becomes easier because during check printing, the Check Register got neither “good data” nor “bad data.” It got no update at all. Thus, cancellations are performed with the standard G/L transaction for reversing a FI document. |
 The reconciliation to the bank’s records (i.e., the “cashed checks” matching process) becomes a simple G/L-only step. This is done with the standard transaction called G/L Account Clearing. The reconciliation to the bank’s records (i.e., the “cashed checks” matching process) becomes a simple G/L-only step. This is done with the standard transaction called G/L Account Clearing. |
|
|
| Figure 1 |
Pros and Cons of Eliminating the Online Check Register |
Implementation Steps
Just three steps get you a No Check Register design. My goal is to make you aware of the main areas in customization that you will need to touch. The following information is not meant to be a comprehensive set of instructions. A/P has just too many site-specific details for me to offer complete A-to-Z documentation. However, the steps here will help you on your way to a final design.
Step 1. Link Your Payment Method "C" to SAP Standard Print Program RFFOD__S (or to a "Z" Copy of that Program)
By changing either to SAP’s standard-delivered RFFOD__S check-printing program or to a copy of it, you will completely deactivate the check register. Figures 2a, 2b, and 2c show the navigation for doing this.
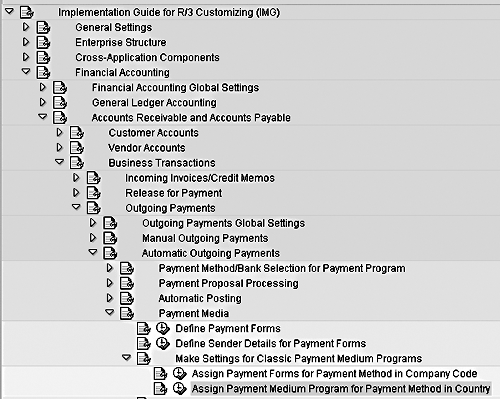
Figure 2a
IMG Path to the Assign Payment Program (APP) Transaction (R/3 Release 4.6)
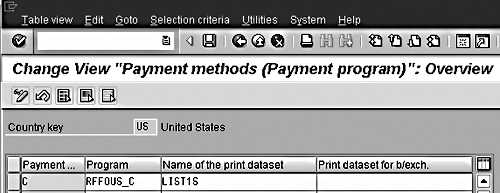
Figure 2b
The Typical Setting in North America for the APP Transaction
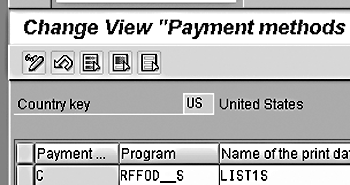
Figure 2c
The SAP Standard Setting for the APP if the No Check Register Option is Desired
Step 2. Make Sure that Your SAPscript Form References the Correct Field for Check Numbering
In general, you need two customization pieces to give your instructions to any R/3 end-user transactions that allow check printing requests to be made: a Print Program, and a SAPscript form. The Print Program (such as RFFOD__S, mentioned in Step 1, or RFFOUS_C) goes out and retrieves A/P data that could potentially be printed on a hardcopy check. The SAPscript form is where you give R/3 the instructions as to which subset of that data to actually print. So, Step 2 is to verify one important setting in the SAPscript form.
You can find out which form is linked to any particular combination of Company Code and Payment Method by accessing almost the exact same path shown in Figure 2a. Instead of choosing "Assign Payment Media Program for Payment Method in Country," choose the row right above that called "Assign Payment Forms for Payment Method in Company Code."
To review the settings of any given SAPscript form, access transaction code "SE71." Then type in the name of the form, choose the Page Windows option, and click on the eyeglasses icon (Display).
If you want to implement the No Check Register option, make sure that the data field that stores the FI Payment Document number acts as the reference to the SAPscript for the check-numbering instruction. You accomplish this by changing the respective sections in your SAPscript form to print the REGUH-VBLNR field value instead of the REGUD-CHECT field value. An example of this is shown in Figure 3, which is a screenprint of the Text Elements detail from the Page Window called "CHECK" of the SAP standard-delivered form F110-IN-CHECK (International Check without Check Management).
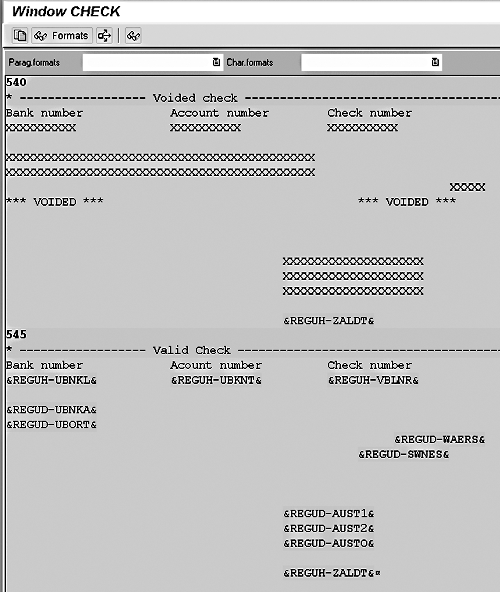
Figure 3
An Example of Referencing the REGUH-VBLNR Field in the SAPscript Form
Step 3. Make Sure Your G/L Account Master Has the Needed Settings
The Cons section of Figure 1 lists the need to create a 1:1 relationship between your bank accounts and your bank-related "Issued Checks" G/L accounts. This is because your G/L account for posting the outgoing check will become your de-facto check register. You will then be able to use standard G/L transactions such as "Display a G/L Account’s Line Items" for researching posted checks, and transactions such as "G/L Account Clearing" for marking a check as having been cashed. This creates simplicity but also creates the need for the master data of those G/L accounts to have a couple of important settings: having both the Line Items and Open Item Management checkboxes active, and having the Sort Key equal to the document number (see Figure 4).
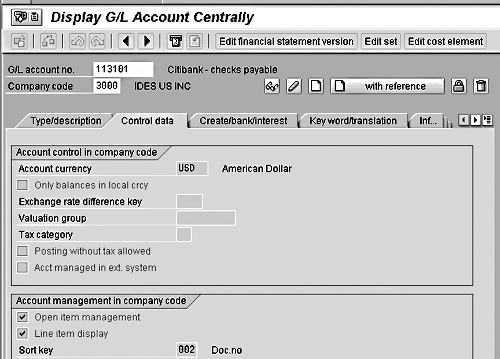
Figure 4
An Example of the Needed G/L Account Master Data Settings
Additional Warnings
 Having the FI payment document number become the check number can be a nice source of simplicity, but this design will only work for the printing of A/P checks and not HR module payroll checks. This is because check printing originating from the HR module will not have a 1:1 relationship with individual FI payment document numbers per each issued check for the print program to reference.
 If you are using transaction FCKR (program name RFEBCK00) for reconciling your R/3 cashed checks records with the cashed checks information reported to you by your bank, it will still work in this No Check Register design. However, the end-user must remember to deactivate the prenumbered check indicator on the selection screen.
Conclusion
You have to decide if eliminating the Check Register is appropriate for your situation, and expect to adapt the instructions I’ve given here to accommodate the specifics of your implementation. By providing knowledge of the No Check Register approach, however, I hope I’ve given you another tool with which to simplify your A/P application.
Boris de Vries
Boris de Vries is an SAP Platinum Consultant specializing on the Finance and Controlling components within R/3. He has been with SAP since November 1990 and transferred from SAP AG in Germany to SAP America, Inc. in September, 1996. He has gained extensive implementation experience while working on numerous SAP projects across different industries varying in size from multi-national enterprises to a 200-employee family-owned business. He works out of the SAP office in Parsippany, N.J.
You may contact the author at boris.de.vries@sap.com.
If you have comments about this article or publication, or would like to submit an article idea, please contact the editor.


 If you are using transaction FCKR (program name RFEBCK00) for reconciling your R/3 cashed checks records with the cashed checks information reported to you by your bank, it will still work in this No Check Register design. However, the end-user must remember to deactivate the prenumbered check indicator on the selection screen.


