Seven Essential Tips and Tricks for Queries and Tables – Part One
Key Takeaways
⇨ Make you own queries with Quick Viewer (transaction SQVI)
⇨ SAP: How you can find specific Tables in the Customizing path
⇨ How to turn spool requests into PDF files
Have a look to these tips and tricks, which will make your day easier and faster in SAP. Learn how you can create your own queries even in your Production environment, discover how to find specific tables in the customizing and see how to convert your spool requests into PDF files automatically.
Make you own queries with Quick Viewer (transaction SQVI)
For sure, many times you needed to search data in certain tables and, at the same time, combine them. Perhaps you downloaded the tables to an Excel file and obtained the data you needed by using some specific formulas in your spreadsheets.
Well, to avoid this, you have the SQVI transaction, that allows to make your own reports for one or more tables at the same time.
Explore related questions
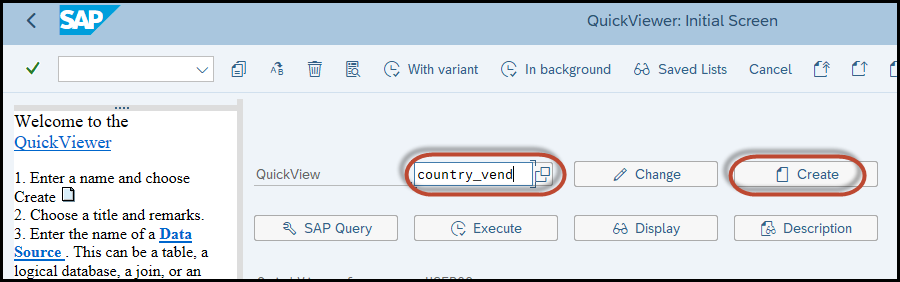
Have a look to see how it works! Let´s do an easy example first. Suppose you want to list all vendors from a specific country. First, you need to know which table to use. For our example the table is the LFA1.
Access to the transaction SQVI, give your report a name and press the “Create” button.
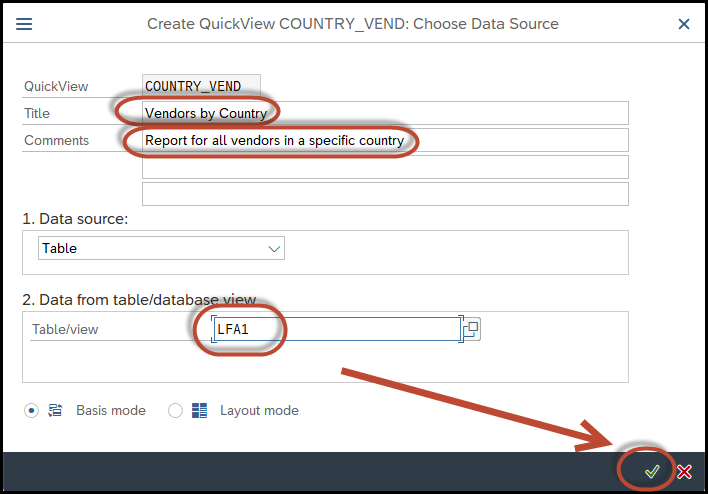
Give your report a Title, a Description, select the table you want and press the “Enter” button.
Select on the first tab which fields you want to see in your report. For our example we select from the right column the fields “Country Key”, “Name 1” and “Postal Code” and press the “Arrow to the left”, so these fields are available for the report, by being displayed on the left column.
You can also press “SHIFT + F5” to see the technical names for the fields instead of their descriptions.

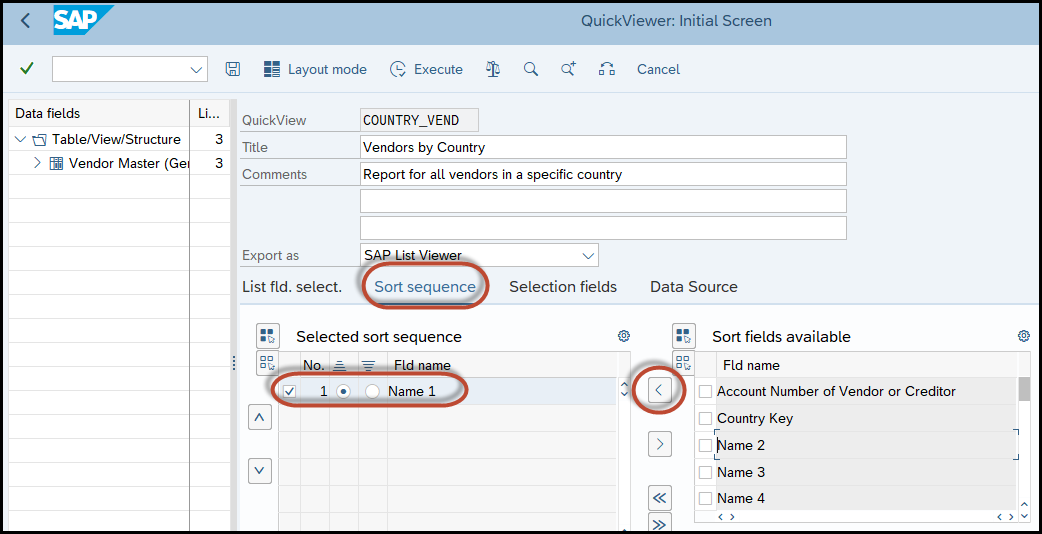
Select on the second tab the sort order. Mark the fields you want and choose the desired criteria. In our case, we will order the vendors alphabetically by their names
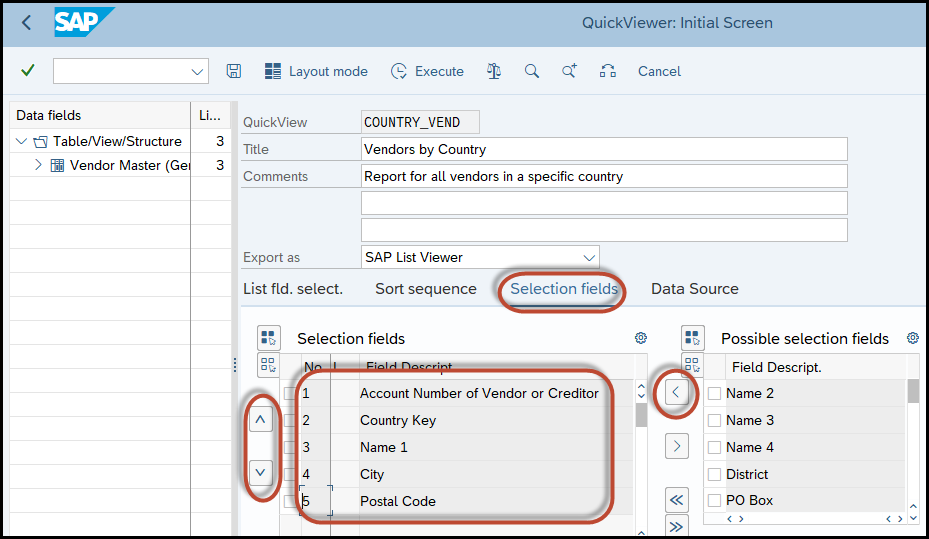
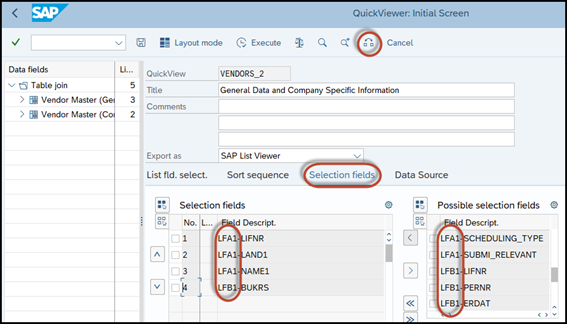
On the third tab, you must define the selection fields. Choose from the right column the fields you need. You may also change the order in which they may appear later on the transaction.
Once you are ready with the 3 tabs, press the “Save” button.
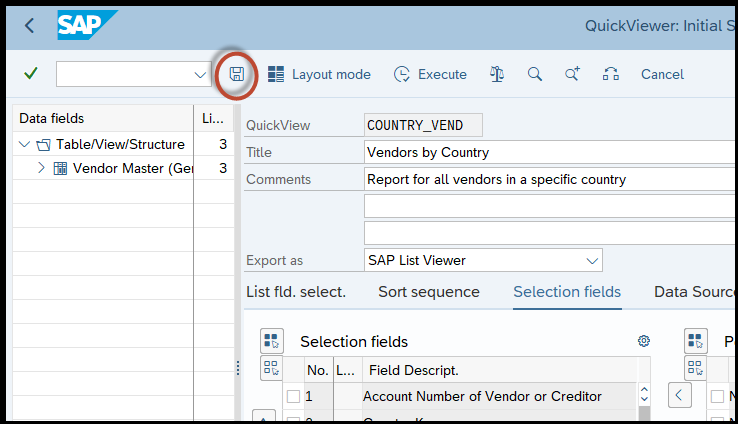
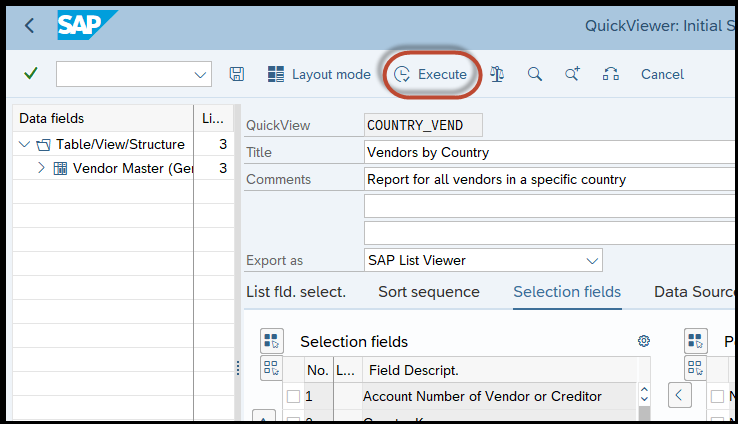
Then press the “Execute” button.
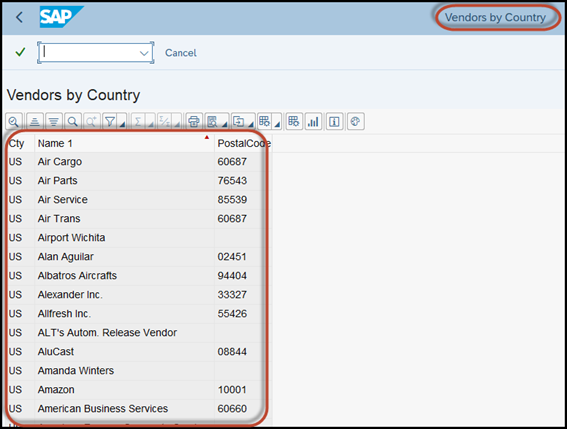
You will see a screen, like one from a standard program, but with your own description and specifically for the fields you have defined.
For our example we select a specific country and press the “Execute” button.

Now, you see the result! The specific list that you were looking for is now available!
Please remember that you can access this report at any moment, by entering to the SQVI transaction and selecting the specific report, which is already saved.
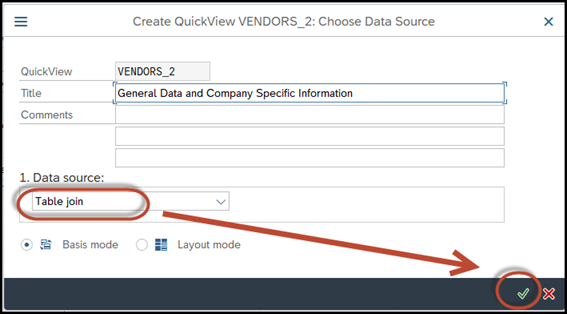
Easy, right? Well, let´s do a more complex example. We will choose 2 tables now, instead of just one. We will combine tables LFA1 and LFB1, to obtain General Data and Company Specific Data for vendors.
For this, create a new Quick Viewer by accessing the SQVI transaction like before, but when you define the characteristics now, select for “Data Source” the value “Table Join” instead of “Table”.
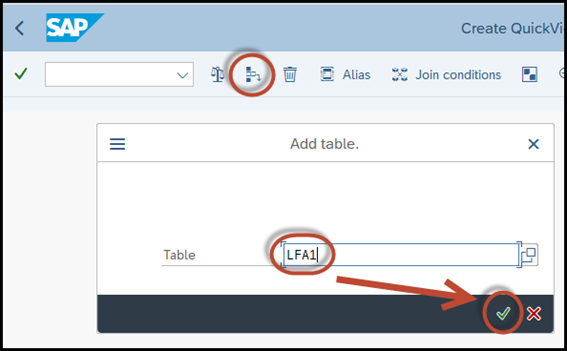
You will access a new screen, where you need to enter the tables and their connections between each other. Hit on the “Insert Table” button and enter the first table.
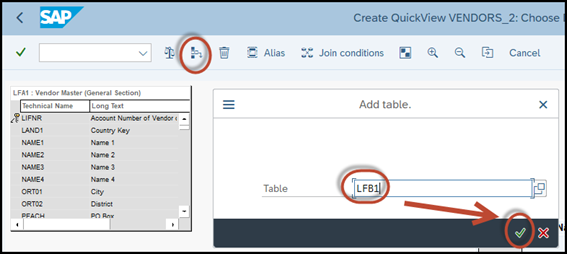
Select then the second table by pressing the following button:
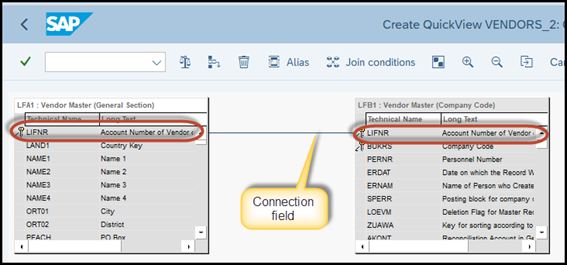
You will see now how both tables connect to each other. Key fields with the same characteristics (like vendor number in our case) are automatically proposed, but you may change the connection fields if you need.
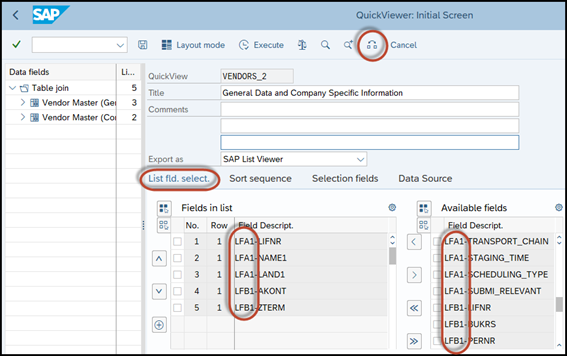
Now, go back with the arrow and define like before, the data for the first, second and third tab. You will see now that you have both tables available and not just one for all the three tabs.
Tab 1 (fields to appear on the report):
Tab 2 (sort order):
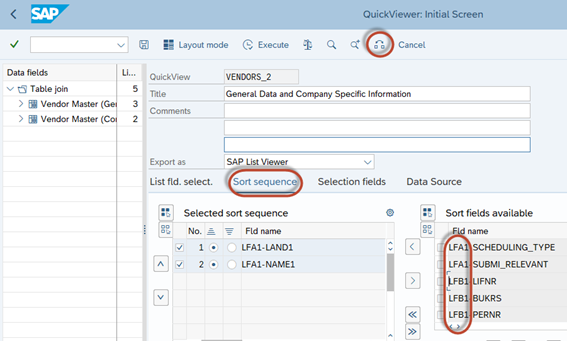
Tab 3 (selection fields):
Now, save your selection and execute the program. You will see as the selection fields, the fields you have chosen from both tables. Enter the parameters you need and execute the program.
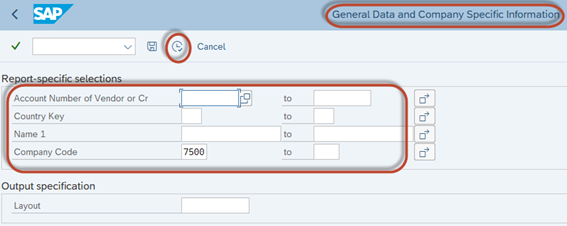
And here it is!!! The report you needed, with information from 2 or more tables (LFA1 and LFB1 in our case) is here!

The best thing is that since you saved your report, you can run it as many times as you want, by accessing transaction SQVI and selecting the specific report. I hope this helps you!
SAP: How you can find specific Tables in the Customizing path
It often happens that you know the name of a specific SAP table and that you would like to know where this table is located in the customizing path. It can be useful to identify the SAP process to which the table belongs to or to complete an additional customizing related to the table you know.
The way to do this is the following:
1) Suppose, for example, that you know the table “T030H” (Account Determination for Open Item Exchange Rate Differences) and you want to locate where to complete it in the customizing. For this, access transaction SM30, complete the table name and hit on the “Customizing” button:
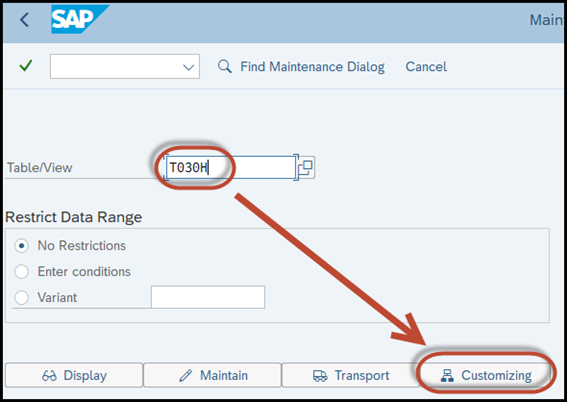
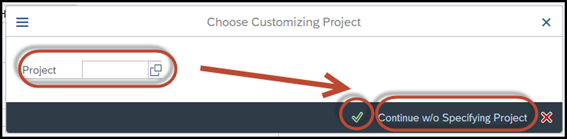
2) Press the corresponding button, bases on your project:
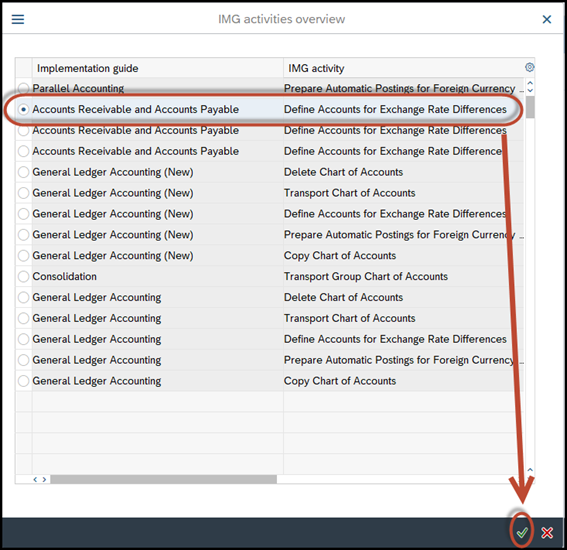
3) You will see a window with a list of customizing entries that may be related to the table you are looking for (T030H in our case). Choose from the list the entry that according to the description better fits your needs and press the “Enter” button:
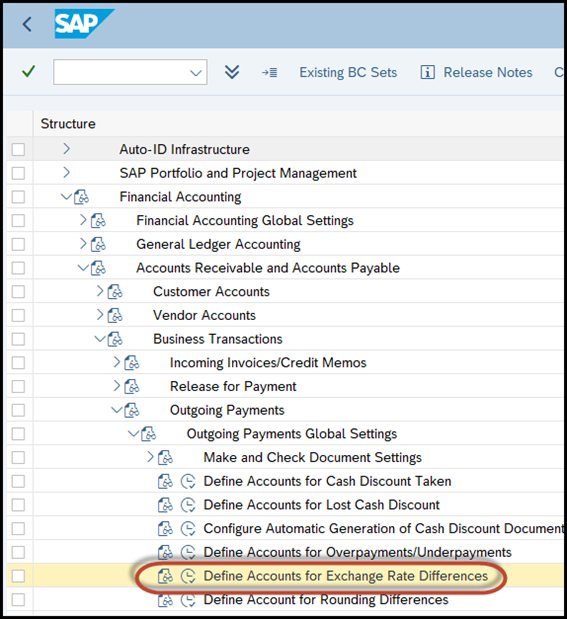
4) You will access the customizing, exactly in the option you have chosen (highlighted in yellow), according to the table and the option you were looking for.
Easy, right? It is very useful and can save you many time!
How to turn spool requests into PDF files
For sure in the past in more than one opportunity you had the need to generate a PDF file from a certain SAP report. It is very easy, since we only need to generate a spool request and execute a standard SAP program, without any assistance of an abaper!
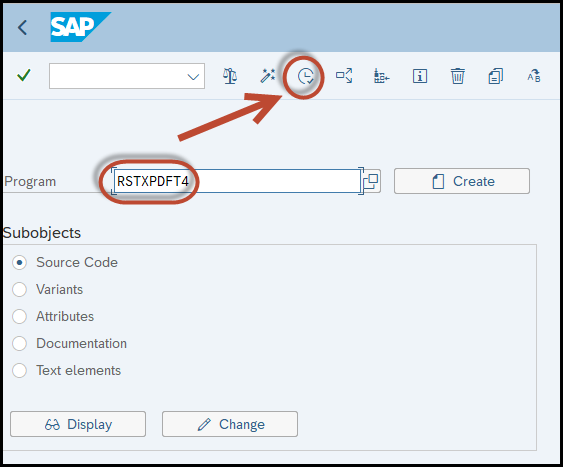
The standard report RSTXPDFT4 allows to convert every spool request into a PDF file.
The way to use it is very simple:
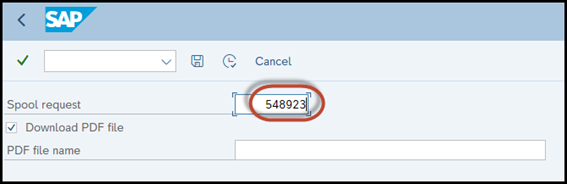
1.) Generate any spool request from any SAP transaction, without “immediate output”. Take note of the generated spool request number in transaction SP01 or SP02.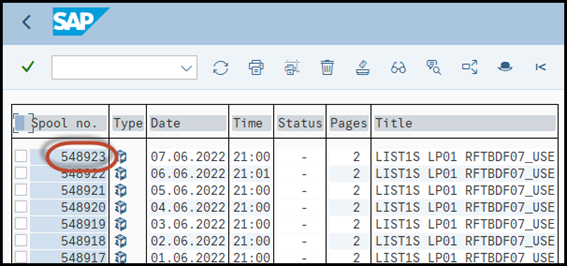
2.) Access transaction SE38 orSA38 and execute the report RSTXPDFT4.
3.) Type the spool request number obtained in step 1.
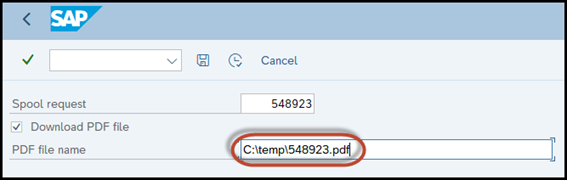
4.) Define the folder and the name of the PDF file to be created.
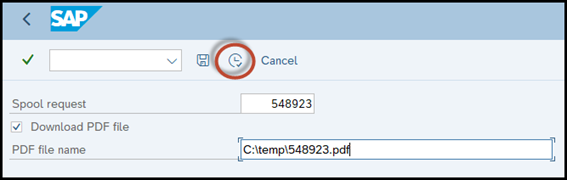
5.)Execute the program.
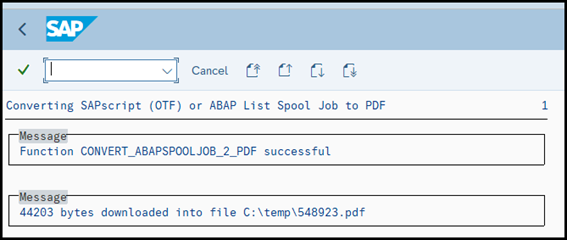
6.) Access in Windows to the defined path and file defined in step 4.

7.) Open the selected file. You have now your spool request in a nice PDF format!

I hope this helps for your daily tasks!