Wouldn't it be great if there were a tool you could use to see all the workflows related to a particular employee? Well, there is. It's called generic objects services (GOS). It's available as of R/3 Release 4.0.
The phone rings. Again. It’s Ted Bullpit. “I put in a leave request last week, but I changed departments on Friday, and I’m not sure who’s approving it now. Can you help me? . . . ” “While you’re there, can you tell me if my transfer has been completed? My former manager said she’s done her part, but workflow sends the rest to my new boss, and he’s been in meetings all week.”
Wouldn’t it be great if there were a tool you could use to see all the workflows related to a particular employee? Well, there is. It’s called generic object services (GOS). Figure 1 shows you all the workflows that are in place for Ted Bullpit. In addition to the transfer and leave, he has raised an issue about his pay. This view even shows you the status of his requests. It’s easy to answer his questions now.
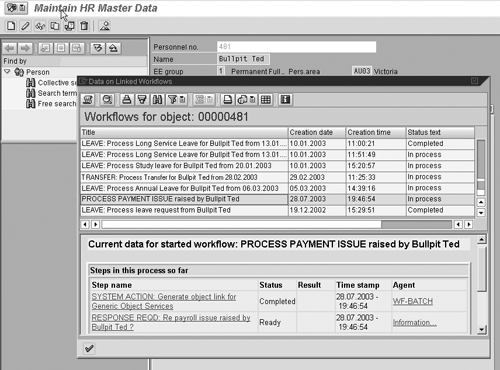
Figure 1
Generic object services workflow overview display
This functionality is available for those of you running R/3 Release 4.0 or greater. I’ll show you how to set this up so managers with the right authorizations can see this handy view of things.
GOS Is at Your Disposal — You Probably Just Never Noticed
You’ve been using transaction PA30 (Maintain HR Master Data) for a while. You have noticed that whenever you select an employee and press enter, an extra icon appears in the top left corner of the screen. This is the GOS icon .
You tried clicking on it once and a menu appeared (Figure 2). One option mentioned a Workflow overview, but when you pressed it, the message No workflows linked to this object appeared. You knew that some workflows had been run for that employee, but what’s this “object” thing? And how can you get this button to work properly?
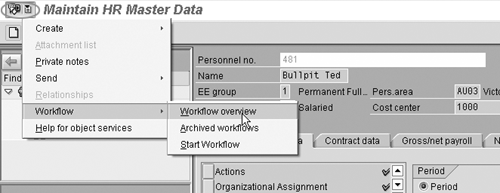
Figure 2
GOS button on transaction PA30
It’s time for a little background knowledge about GOS. Then I’ll show you how to implement it.
The GOS/Workflow Overview
GOS is a way of attaching common services to objects. For example, in addition to seeing what workflows have been run against an object, you can perform other functions, such as sending email with the object as an attachment or creating documents linked to the object. The “object” in GOS is otherwise known as a “business object,” which is the way SAP software describes things such as a customer, a vendor, a cost center, an order, an invoice, a document, a notification,
a job, a position, or an employee. Transactions like PA30 deal with these formally defined business objects. In the case of PA30, the business objects are all types of employees. Each business object reference refers to one employee.
An employee business object describes:
- Where in the SAP system to find information about that type of entity (from where the transaction gets the employee name, to how to format it)
- What HR activities can be performed for that “employee,” such as updating an employee’s details or assigning an employee to a position
- What changes in status can occur. This may include hiring, assignments, and updates.
So when the GOS workflow overview option says, There are no workflows linked to this object, it really means that PA30 has looked for workflows with a formal “employee” business object reference to the employee selected and did not find any.
To make the GOS Workflow overview option work for you, all you need to do is create what’s known as a “business object reference” in your workflow for an employee by following these three steps:
1. Find the technical name of the business object you want to use
2. Create a data variable (in workflow terms, a “container element”) in your workflow to hold the business object reference
3. Fill the data variable with the business object reference
You usually want to link only one employee to a workflow.
I explain these steps for linking your employee-based workflows to the GOS button showing in transaction PA30 below. You follow these steps for each workflow. Although it is fairly simple, you may need a little help from your workflow developer if you don’t usually change workflows yourself. Or just ask your workflow developer to make the changes for you. (Remember that workflows are essentially graphical programs, not just configuration. Therefore, they need to be changed in your development system and then transported to your quality assurance and production systems just like other programs.)
Step 1: Find the technical name of the business object you want to use.
Understand the business object you’re dealing with. Transaction PA30 operates against the employee business object. However, “employee” isn’t the technical name by which the R/3 system refers to this business object. The technical name is BUS1065. (See Figure 3.)
Tip!
If you ever need to know the technical name by which R/3 refers to an object, you can find it by using transaction SWO1 to search the Business Object Repository, which is the registry of all business objects. If you are still not sure which business object is relevant to your transaction, it’s best to check with SAP.
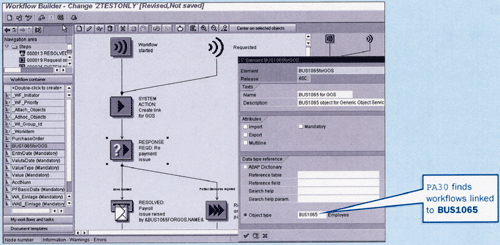
Figure 3
First step in the workflow to create the GOS link and the container element
Next, you need to know what makes up the key of the business object. Transaction SWO1 includes an option to display the business object. Expanding the Key section shows you the key fields. For business object BUS1065, the key is the employee number. Knowing the technical name and key of the employee business object, you are ready to put the business object reference into your workflow.
Step 2: Create a data variable in your workflow to hold the business object reference.
Create a new container element (i.e., data variable) in your workflow to hold the business object reference. It needs to refer to the technical name of the business object, e.g., BUS1065. To do this, you need to change your workflow using transaction SWDD (Workflow Builder). You can create a container element in the workflow container section. On the left side of the screenprint in Figure 3, notice the Double-click to create line that indicates how to create a new
container element. On the right side of Figure 3, a pop-up window shows the details of the container element definition. Notice that you need to select the data type reference Object type and enter the technical name of the business object next to it to correctly define the container element.
Step 3: Fill the data variable with the business object reference.
You have a few ways to fill the new container element with the business object reference. One easy method is to add a new activity step to the start of your workflow. You can see an example of an activity step in Figure 4. Link the activity step to a standard task that creates the object reference. If you don’t have an existing standard task to do that, you may need to create one using transaction PFTC, or ask your workflow developer to create one for you. For example, you can create a standard task using object type SYSTEM method GENERICINSTANTIATE, which helps you create a business object reference for any business object. Enter the task ID in the Task field of the activity step, which you can see in Figure 4.
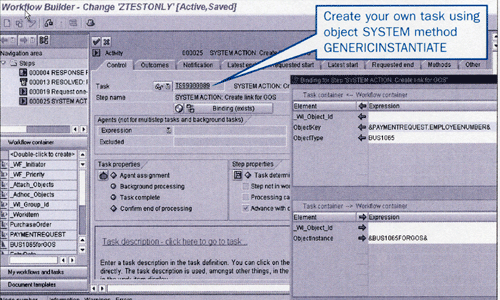
Figure 4
Linking workflow to generic object services
Workflows have a special kind of parameter passing called Binding. In Figure 4, you can see the Binding button underneath the step name in the activity step. On the right side of Figure 4, you can see the pop-up window where the binding is entered. From the workflow to the task (i.e., in the Task container ? Workflow container section), pass across BUS1065 as the ObjectType and the employee number as the ObjectKey.
You’ll probably want to pass the employee using a variable that was filled as the workflow started. Use the drop-down help in the Binding window to find an appropriate variable. In Figure 4, for example, the workflow is based on a payment request, and the payment request is filled in by the transactions that start the workflow. The employee number entered on the payment request can then be used to create the employee business object reference. If you can’t find an appropriate variable, call your workflow developer.
From the task back to the workflow (i.e., in the “Task container ? Workflow container section), pass the object reference (Objectinstance) generated by the task back to your workflow container element. Use the drop-down help in the Binding window to make sure you enter the container element in the correct format.
Reactivate your workflow by pressing the activate button at the top of the workflow builder screen, and that’s it. All future runs of this workflow will be accessible in transaction PA30. To test your changes, start a new run of your workflow, and then go to transaction PA30. Enter the relevant employee number, click on the GOS icon (top left in Figure 1), and try out the workflow overview.
Once you have done this for one workflow, you can make sure all your employee-based workflows are linked to transaction PA30 by following the same steps for each workflow. Then you will have a consistent way of finding all workflows related to a particular employee.
Jocelyn Dart
Jocelyn Dart is a senior solution consultant at SAP Consulting working in Australia/New Zealand. She currently specializes in workflow and Supplier Relationship Management (SRM). As well as speaking at various SAPPHIREs and at ASUG, Jocelyn is a co-author of the book, Practical Workflow for SAP.
You may contact the author at jocelyn.dart@sap.com.
If you have comments about this article or publication, or would like to submit an article idea, please contact the editor.


