SAP S/4HANA Adoption Tips
Subsequent Implementation of the Parallel Ledger
SAP S/4HANA requires you to implement the SAP General Ledger as a prerequisite or activate the SAP General Ledger technically to reap the benefits of using SAP S/4HANA. Activating the SAP General Ledger is a way to use the SAP General Ledger while converting to SAP S/4HANA without implementing its new features, such as parallel ledgers and document splitting. The SAP General Ledger provides a major benefit in terms of parallel ledgers, which in turn provides you flexibility to report in various statutory reporting frameworks. There are various approaches available for a company with the classic general ledger to shift to SAP S/4HANA. I outline these approaches and explain how to introduce the additional ledger subsequently in a live SAP S/4HANA environment to use parallel ledgers functionality. The scenario I describe is relevant for companies that are looking to convert their existing SAP Business Suite system that uses the classic general ledger (G/L) into SAP S/4HANA or companies that have already shifted to SAP S/4HANA and want to add a new statutory reporting framework via the parallel ledger.
In today’s global environment, business is not limited to a single country, and thus, companies need to comply with accounting and regulatory requirements of various countries. The most common frameworks are US Generally Accepted Accounting Principles (US GAAP), International Financial Reporting Standards (IFRS), and country-specific reporting standards such as standards in India, Germany, Brazil, and Mexico. Each reporting framework acts as an accounting principle in the SAP system.
SAP provides two approaches to meet these multi-reporting requirements as represented in Figure 1: the account approach and the ledger approach.

In the account approach, the chart of accounts is designed in a way that usual business transactions applicable to all accounting principles are stored in a unique range of general ledger (G/L) accounts. Then, accounting principle-specific postings are posted in separate sets of G/L accounts. So the financial reports are prepared using the specific sets of G/L accounts in the same chart of accounts within the same ledger.
In the ledger approach, a separate ledger is used for each accounting principle, but the same set of G/L accounts is used. Financial reports are prepared using the separate ledger set.
(Note: The ledger approach makes it easy to roll the results into the consolidation system. The rolling is based on the ledger filter.)
The account approach requires a significantly large number of accounts as every accounting principle needs a separate range of G/L accounts. It is also difficult to maintain such a complex chart of accounts. Moreover, if local reporting is in a different fiscal year, the Special-Purpose ledger (FI-SL) would be needed. FI-SL can be replaced by the parallel ledger in the SAP General Ledger. In SAP S/4HANA, FI-SL is not needed. However, if a company wants to continue its old way of working for FI-SL, SAP has not taken away this feature. Using the ledger approach unleashes the true potential of the SAP General Ledger capabilities and SAP S/4HANA platform. It minimizes the number of G/L accounts, and the ledger concept is built into various business transaction flows, such as foreign currency valuation and Asset Accounting (FI-AA), and even in reporting outputs for financial statements and cash flows.
Here are SAP General Ledger migration scenarios offered by SAP in the SAP Business Suite environment:
- Scenario 1: Merge of FI Ledger.
- Scenario 2: Merge of FI, PCA, and /or SL Ledger.
- Scenario 3: Scenario-2 + Segment Reporting (supported by Document splitting).
- Scenario 4: Scenario-2 + change to ledger solution for parallel ledger Accounting.
- Scenario 5: Scenario-3 + change to ledger solution for parallel ledger Accounting.
These additional scenarios are offered for subsequent implementation in SAP Business Suite Environment:
- Scenario 6: Subsequent Implementation of Document Splitting.
- Scenario 7: Subsequent Implementation of further Ledgers.
- Scenario 8: Subsequent change from account solution to Ledger solution.
When a company is using the classic G/L in the SAP Business Suite system and wants to use the parallel ledger approach, it can choose the following options while adopting SAP S/4HANA:
- Migrate to the SAP General Ledger (with parallel ledger functionality) and then to SAP S/4HANA (using scenario 4 or 5)
- Migrate to SAP S/4HANA activating the SAP General Ledger technically and then add the parallel ledger subsequently (using scenario 7)
The first five scenarios are not applicable to SAP S/4HANA. If you want to use these scenarios, then you have to migrate to the SAP General Ledger before migrating to SAP S/4HANA. Beginning with SAP S/4HANA Enterprise Management 1610 and SAP S/4HANA Finance 1605 Support Package Stack (SPS) 05, SAP has enabled scenario 7 as the subsequent introduction of a further accounting principle. However, scenario 6 is planned for SAP S/4HANA Enterprise Management 1709, and scenario 8 is not yet supported or planned for in SAP S/4HANA.
So what are the use cases for subsequent implementation of the parallel ledger in SAP S/4HANA?
- An already live business wants to introduce a new accounting principle or ledger
- A company was using the classic G/L in its source system and has converted to the SAP General Ledger as part of an SAP S/4HANA conversion project and now wants to shift to the ledger approach.
I explain in detail the process to implement the accounting principle and parallel ledger subsequent to an SAP S/4HANA conversion as facilitated from SAP S/4HANA Enterprise Management 1610 or SAP S/4HANA Finance 1605 SPS 05. Figure 2 summarizes the various activities involved in a project for subsequent introduction of the accounting principle and the parallel ledger.
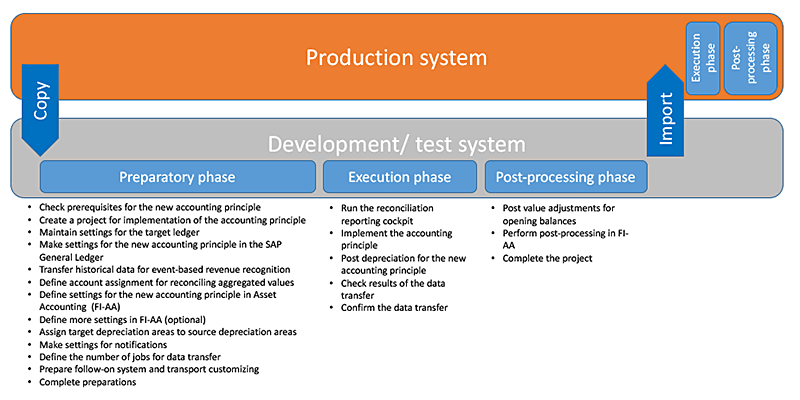
In my example scenario, I am adding a new ledger ZL copying data from source ledger 0L.
The Preparatory Phase
This section details the various consideration elements and configuration and setup steps needed to implement the accounting principle and the parallel ledger.
Check Prerequisites for the New Accounting Principle
Certain accounting principles such as IFRS may apply to all company codes, and other accounting principles are applicable to a specific country (for example, US GAAP, Indian GAAP, and Russian GAAP). Therefore, before starting the implementation, consider this question: For which company codes should the new accounting principle be implemented subsequently? If your selected company codes contain cross-company code postings in the current fiscal year, then all the company codes that are affected by such cross-company code postings should be included in the project for implementing the new accounting principle.
Create the new accounting principle (if it does not already exist) in customization by executing transaction code S_PL0_86000069 and following customization path SPRO > Financial Accounting (New) > Financial Accounting Global Settings (New) > Ledgers > Parallel Accounting > Define Accounting Principles. This action opens the screen in Figure 3. Click the New Entries button to create a new accounting principle.
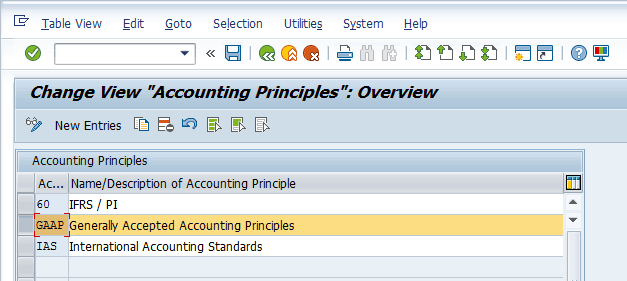
For my example, create new accounting principle GAAP. In the Accounting Principles section in Figure 3, enter GAAP in the field under the Ac… (accounting principle) column and enter Generally Accepted Accounting Principles in the field under the Name/Description of Accounting Principle column (Figure 3).
The introduction of an additional ledger can be done only in the fiscal year subsequent to the fiscal year of an SAP S/4HANA conversion. (This requirement is purely a technical limitation from SAP on this solution to avoid mix-ups in the conversion logic and new ledger logic in universal data table ACDOCA.)
If archiving for accounting documents is in place for, archiving object FI_DOCUMENT, the introduction of an additional ledger can be done only in the fiscal year subsequent to the fiscal year in which last archiving is done for accounting documents.
If FI-AA is implemented in the system, then check which charts of depreciation are assigned to which company codes. It may be necessary to couple individual company codes with another chart of depreciation because the new accounting principle should not be implemented for all company codes.
To check which charts of depreciation are assigned to which company codes, execute transaction code S_ALR_87009192 and follow customization path SPRO > Financial Accounting (New) > Asset Accounting (New) > Organizational Structures > Assign Chart of Depreciation to Company Code.
To check which company codes are actively used for FI-AA, execute transaction code S_EEI_69000032 and follow customization menu path SPRO > Financial Accounting (New) > Asset Accounting (New) > General Valuation > Depreciation Areas > Define Depreciation Areas.
To check which fiscal year is open in FI-AA, execute transaction code S_ALR_87009081 and follow customization menu path SPRO > Financial Accounting (New) > Asset Accounting (New) > Preparations for Going Live > Tools > Reset Year-End Closing.
Create a Project for Implementation of the Accounting Principle
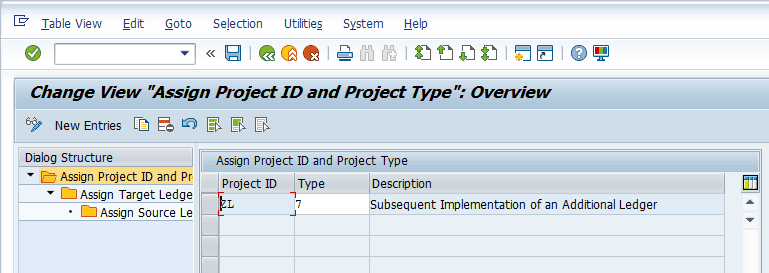
To complete this step follow menu path SPRO > Financial Accounting (New) > Financial Accounting Global Settings (New) > Tools > Subsequent Implementation of a Further Accounting Principle > Preparatory Phase > Create Project for Implementation of Accounting Principle. This path takes you to Figure 4. Click the New Entries button and enter details for the new project as shown in Figure 4. In the field under the Project ID column, enter an alphanumeric identification key for the implementation project that can be a maximum of 10 characters long. For my example, enter ZL. In the field under the Type column, enter 7 and enter a description in the field under the Description column (e.g., Subsequent Implementation of an Additional Ledger) and press Enter.
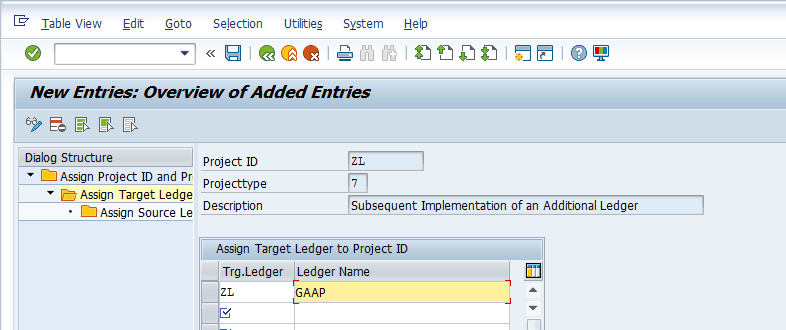
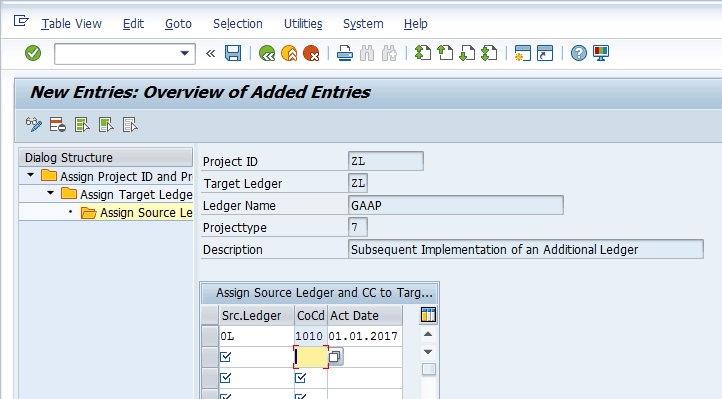
Then double-click the Assign Target Ledger to Project ID folder in the left side of Figure 4 to go to Figure 5. In Figure 5 enter the target ledger (new ledger) id and name and then double-click the Assign Source Ledger and CC to Target Ledger folder in the left side of the menu.
This action opens the screen shown in Figure 6. In the field under the Src.Ledger (source ledger) column, enter the source ledger details from which you want to copy the data. In the field under the CoCD (company code) column, enter the company codes to which the new accounting principle should apply. In the Act Date column, enter the activation date and then click the save icon.
(Note: If you want to implement more than one accounting principle subsequently, then you need to create a separate project ID for each accounting principle and during the execution phase, each should be executed one after the other. Only one project ID can be executed at a time, so consider the downtime needed during the execution phase.)
Maintain Settings for the Target Ledger
For the next activity, follow menu path SPRO > Financial Accounting (New) > Financial Accounting Global Settings (New) > Tools > Subsequent Implementation of a Further Accounting Principle > Preparatory Phase > Maintain Settings for Target Ledger. This path takes you to Figure 7 in which you need to select the line for your previously created project ID and click the Maintain Target Ledger Settings button.
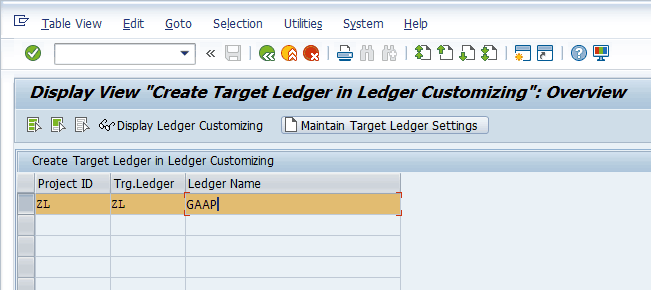
This action opens the screen in Figure 8.

In Figure 8, you can see the new target ledger. In the field under the Ledger Type column, choose Standard Ledger from the drop-down list of options. The Standard Ledger option enables full postings for an accounting principle. In Figure 8, select the new target ledger line and double-click the Company Code Settings for the Ledger folder in the left side of the screen.
In the next screen (Figure 9), you define the currency settings and fiscal year variant for the target ledger. After defining the company code settings, select the company code line and double-click the Accounting Principles for Ledger and Company Code folder in the left side of the screen.

(Note: The target ledger must have the same set of currencies and currency types as in the source ledger. However, the currencies in the target ledger can be defined in a different order. Just as during an SAP S/4HANA conversion, you cannot introduce a new currency mapping in the setup; similarly, in subsequent addition of the ledger, you also cannot add new currency in the setup. Note also that target ledger should have the same fiscal year as the source ledger if FI-AA is in scope, as asset values are updated only if the fiscal year is identical in the source and target ledgers. Transfer pricing in the target ledger also can be implemented only if it is already implemented in the source ledger.)
In the screen shown in Figure 10, enter the accounting principle to be implemented and click the save icon.
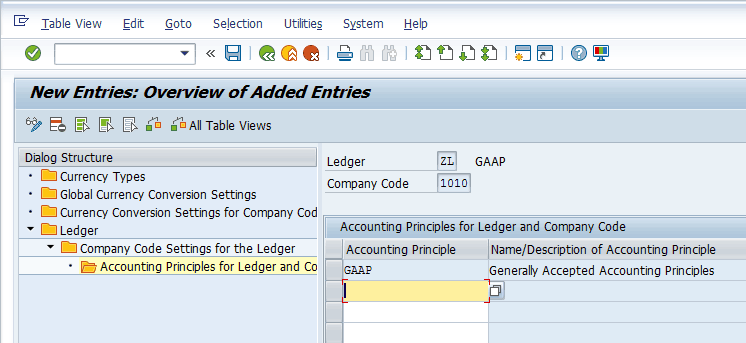
After you click the save icon in Figure 10, the SAP system displays a message like the one in Figure 11.

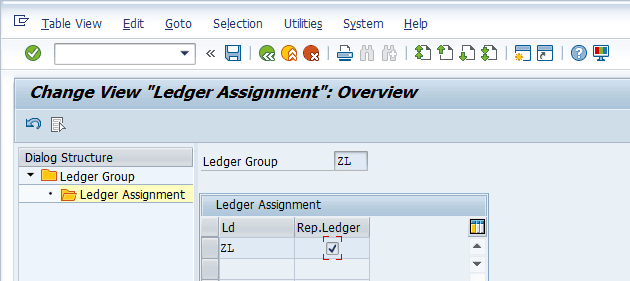
You can verify this setting by executing transaction code S_AL0_19000001 or follow menu path SPRO > Financial Accounting (New) > Financial Accounting Global Settings (New) > Ledgers -> Ledger > Define Ledger Group as shown in Figure 12. Select the new ledger group and double-click the Ledger Assignment folder.
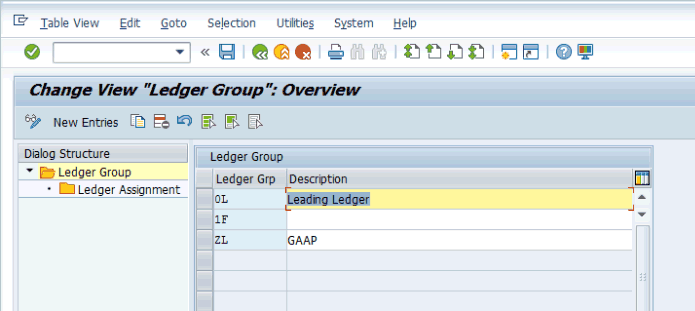
In the next screen (Figure 13), you can verify the new ledger assigned to this ledger group.
(Note: It is not possible to assign the new ledger to an already existing ledger group as doing so creates inconsistency in already posted data.)
Assign a Target Ledger Group to the Accounting Principle
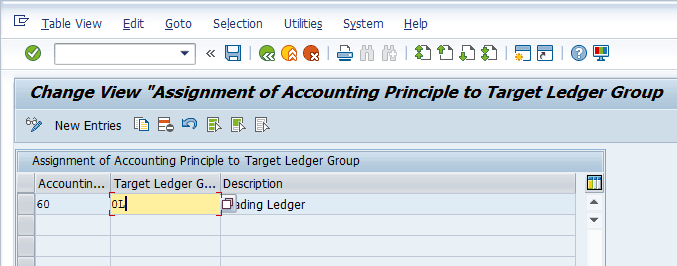
For the next activity, follow menu path SPRO > Financial Accounting (New) > Financial Accounting Global Settings (New) > Ledgers > Parallel Accounting > Assign Accounting Principle to Ledger Groups. This path takes you to Figure 14 in which you need to click the New Entries button.
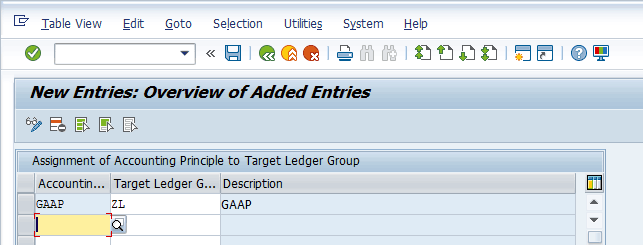
In the next screen (Figure 15), enter the new accounting principle and the new target ledger group created earlier. Then click the save icon.
Make Settings for the New Accounting Principle in the SAP General Ledger
This new accounting principle is to meet a specific reporting framework, and therefore, it has certain differentiating postings compared with a normal leading ledger. To enable such differentiated postings (such as valuation difference and local adjustments), there needs to be a document type that allows the posting specifically to such a ledger. For this purpose, you need to complete configuration of various settings for document types.
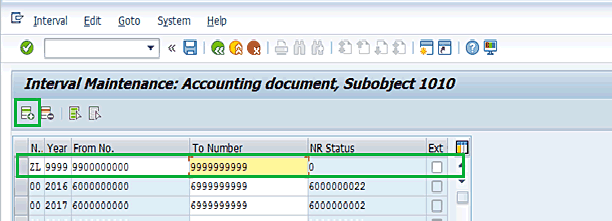
First, you need to define number ranges for entry view. It is not mandatory to have a different number range, but having it facilitates the identification in subsequent reporting and tracking of such special documents. For this activity, execute transaction code FBN1 or follow menu path SPRO > Financial Accounting (New) > Financial Accounting Global Settings (New) > Document > Document Number Ranges > Documents in Entry View > Define Document Number Ranges for Entry View. This path takes you to Figure 16 in which you need to enter a code in the Company Code field and then click the Intervals button.
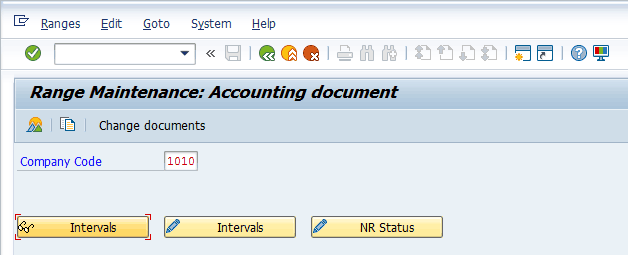
After you click the Intervals button in Figure 16, click the insert line icon in the next screen (Figure 17) and then enter details for the new number range. For my example, create a new number range with the same name (ZL) and then click the save icon.
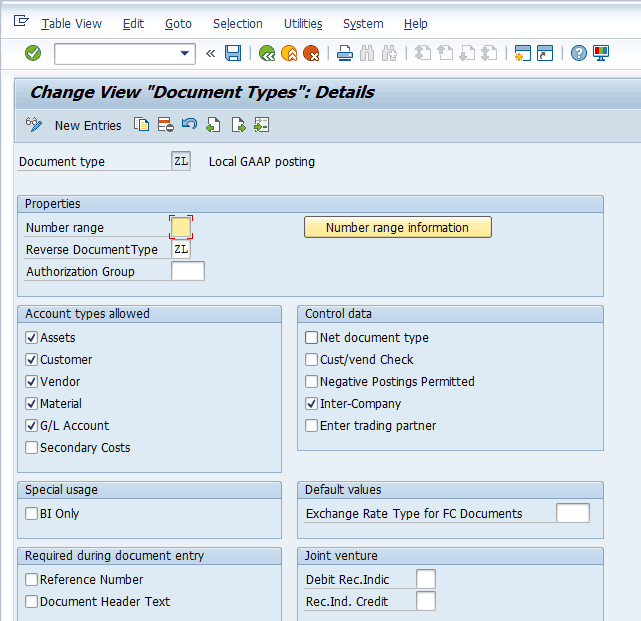
Now you define document types for the entry view. Execute transaction code OBA7 or follow menu path SPRO > Financial Accounting (New) > Financial Accounting Global Settings (New) > Document > Document Types > Define Documents Types for Entry View. This path takes you to Figure 18 in which you need to click the New Entries button, fill out the details for the new document type, and click the save icon.
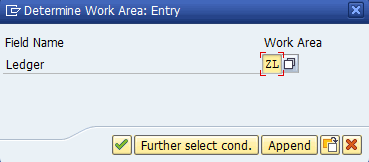
The next activity is defining document types for the entry view in a ledger. Execute transaction code S_ELN_06000012 or follow menu path SPRO > Financial Accounting (New) > Financial Accounting Global Settings (New) > Document > Document Types > Define Documents Types for Entry View in a Ledger. This path takes you to Figure 19 in which you need to enter the ledger group created earlier and press Enter.
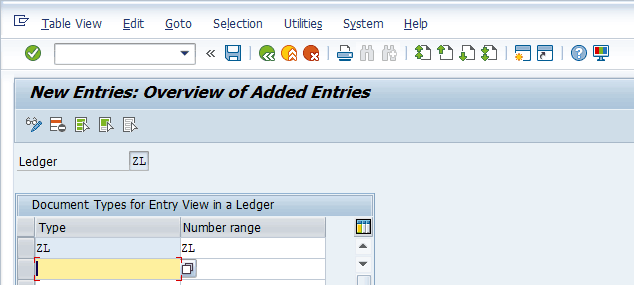
In the next screen (Figure 20), enter the document type created earlier and link to the number range created earlier for this specific ledger.
This new accounting principle may have additional requirements for foreign currency valuation, for which you can make the following ledger-specific settings:
- Foreign Currency valuation settings
- Define Valuation Methods
- Define Valuation Areas
- Assign Valuation Areas and Accounting Principles
- Define Account Determination for Currency Translation
(Read Rohana Gunawardena’s article, “Functionality and Performance Improvements for Currency Valuation in the SAP General Ledger,” for this functionality.)
Transfer Historical Data for Event-Based Revenue Recognition
If you want to use event-based revenue recognition in the SAP General Ledger for existing projects and sales orders, the historical profit and loss values from the orders, projects, and sales orders need to be transferred. In this activity, you need to specify the takeover year from which the data is to be transferred. For all values prior to the takeover year, the aggregated value is posted into the last period of the year preceding the year of data transfer.
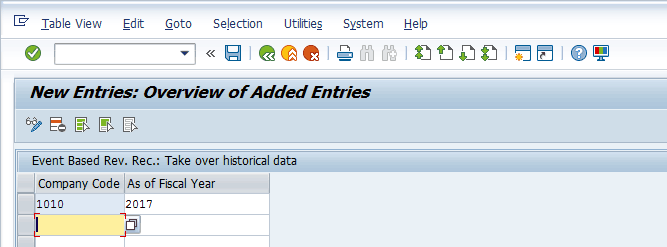
For this activity, follow menu path SPRO > Financial Accounting (New) > Financial Accounting Global Settings (New) > Tools > Subsequent Implementation of a Further Accounting Principle > Preparatory Phase > Transfer Historical Data for Event-Based Revenue Recognition. This path takes you to Figure 21 in which you enter details for company code and from which fiscal year data is to be taken over. Click the save icon to save your entries.
Define Account Assignment for Reconciling Aggregated Values
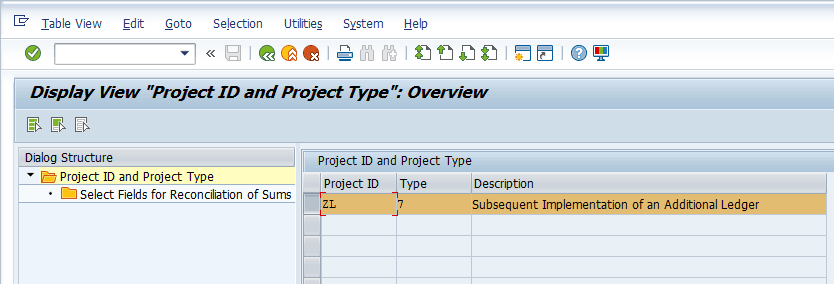
In this step you can define the fields in the target ledger on which the sums are calculated during reconciliation after the migration of values from the source ledger to target ledger is completed.. To complete this activity, follow menu path SPRO > Financial Accounting (New) > Financial Accounting Global Settings (New) > Tools > Subsequent Implementation of a Further Accounting Principle > Preparatory Phase -> Define Account Assignment for Reconciling Aggregated Values. This path takes you to Figure 22 in which you need to select the project ID and then double-click the option Select Fields for Reconciliation of Sums from the left side of the screen.
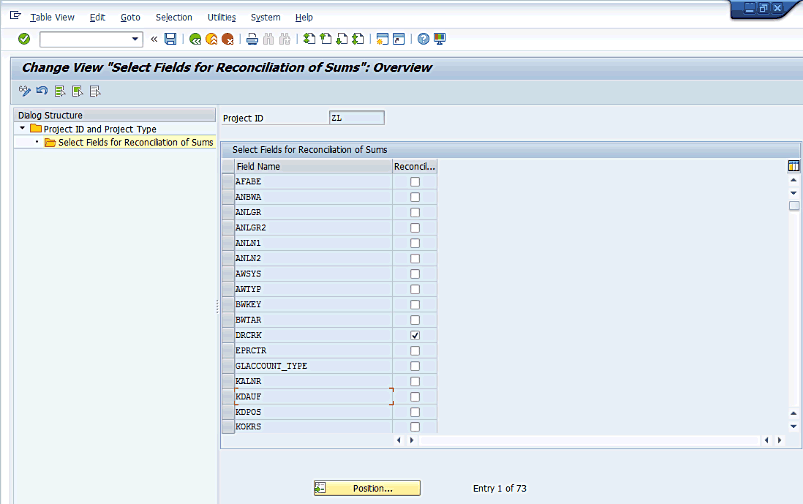
In the next screen (Figure 23), select the check box against the field for which you want to reconcile the aggregates—for example, DRCRK (for debit/credit indicator) or PRCTR (for profit center). Click the save icon. (Note: There are more fields available, which you can see by scrolling down.)
Define Settings for the New Accounting Principle in FI-AA
If FI-AA is implemented, then you need to integrate this new accounting principle into the FI-AA setup due to accounting framework-specific depreciation rules. Go through the following settings for FI-AA.
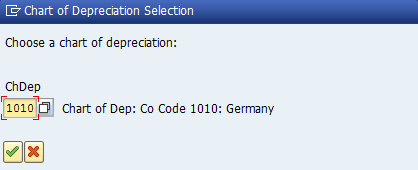
You can define a separate depreciation area for the new accounting principle. For this activity, follow menu path SPRO > Financial Accounting (New) > Asset Accounting (New) > General Valuation > Depreciation Area > Define Depreciation Area > Define Depreciation Area. This path takes you to Figure 24 in which you need to enter the chart of depreciation relevant for the company code to which the new accounting principle is being assigned.
In the next screen (Figure 25), select a reference depreciation area and click the copy icon to create a new one.
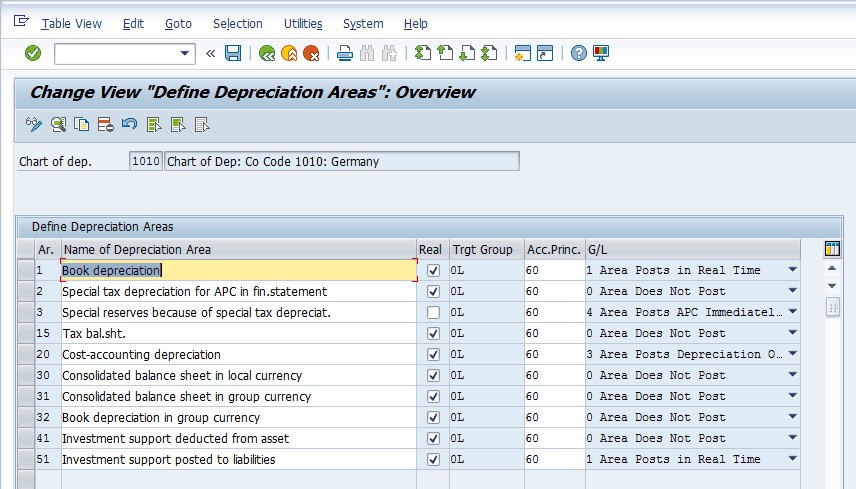
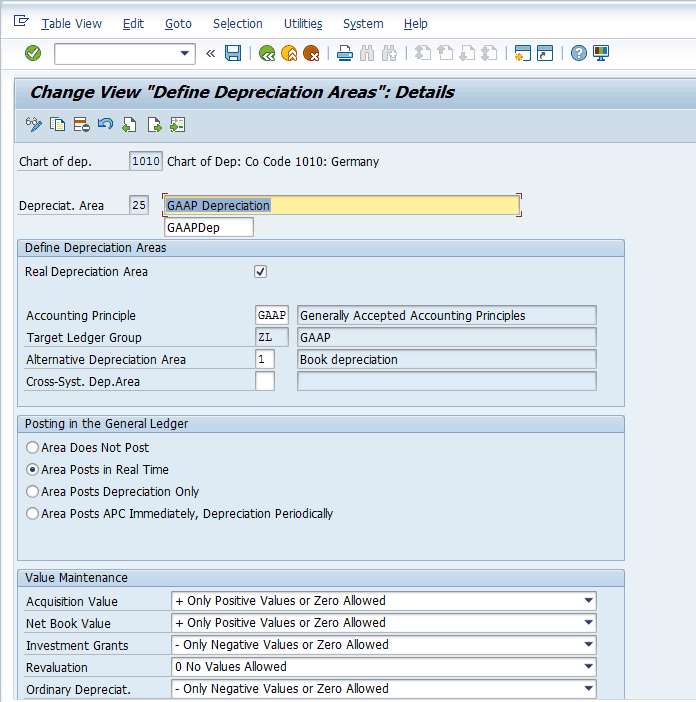
In the next screen shown in Figure 26, specify the settings for the new depreciation area (e.g., specifying the accounting principle or acquisition and production costs [APC] posting behavior, and so on) and then click the save icon.
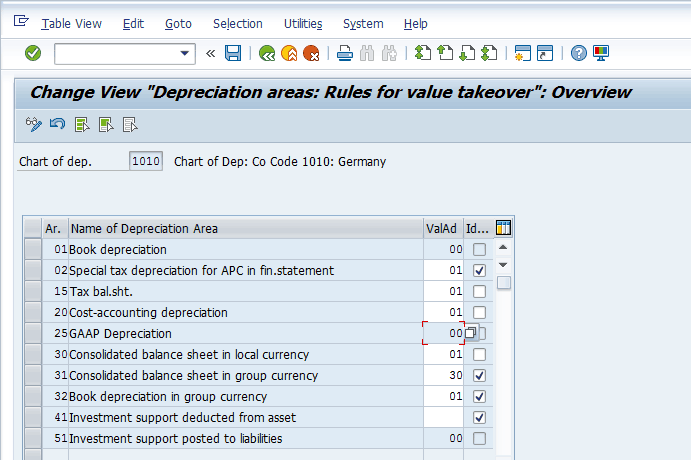
Now you need to specify the transfer of APC values. For this activity, follow menu path SPRO > Financial Accounting (New) > Asset Accounting (New) > General Valuation > Depreciation Area > Specify Transfer of APC Values. This path takes you to Figure 27. In this screen you can verify or change the transfer settings for APC values.
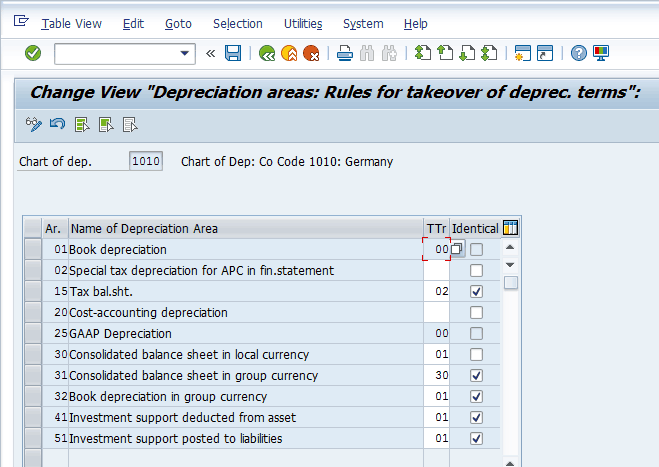
To specify the transfer of depreciation terms, follow menu path SPRO > Financial Accounting (New) > Asset Accounting (New) > General Valuation > Depreciation Area > Specify Transfer of Depreciation Terms. This path takes you to Figure 28 in which you can verify or change the transfer settings for depreciation terms.
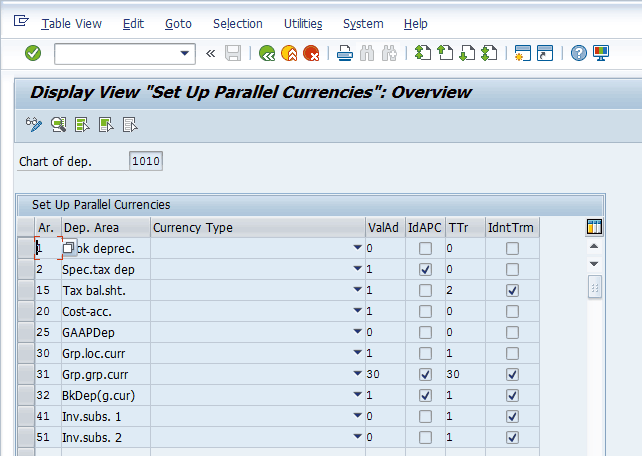
To specify the use of parallel currencies, follow menu path SPRO > Financial Accounting (New) > Asset Accounting (New) > General Valuation > Currencies > Specify the Use of Parallel Currencies. This path takes you to Figure 29 in which you can verify or change the use of parallel currencies (if used).
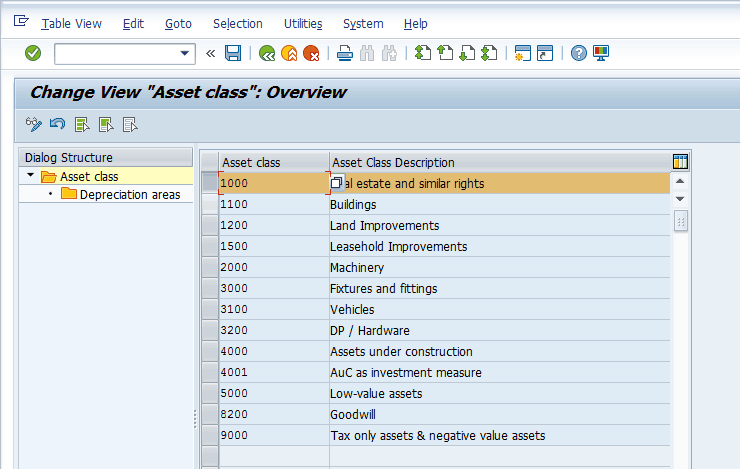
To determine the set of depreciation terms in the asset class, follow menu path SPRO > Financial Accounting (New) > Asset Accounting (New) > General Valuation > Determine Set of Depreciation Terms in the Asset Class. This path takes you to Figure 30. Select the asset classes (one by one) and then double-click the Depreciation areas folder on the left side of the screen.
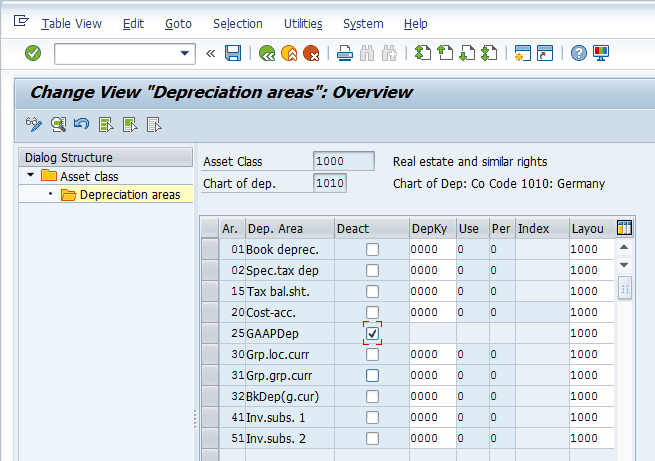
In the next screen shown in Figure 31, deselect the check box against the new depreciation area and then click the save icon.
Define More Settings in Asset Accounting (Optional)
In addition to the above mentioned configuration steps for FI-AA, there can be various other settings that may be relevant to businesses based on their processes. Go to the notes for customizing activity in menu path SPRO > Financial Accounting (New) > Financial Accounting Global Settings (New) > Tools > Subsequent Implementation of a Further Accounting Principle > Preparatory Phase > Define More Settings in Asset Accounting (Optional). It contains a reference list (e.g., group assets settings, investment support settings, and so on).
Assign Target Depreciation Areas to Source Depreciation Areas
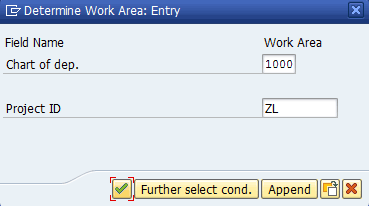
In this step you link the source depreciation area to the target depreciation area. For this activity, follow menu path SPRO > Financial Accounting (New) > Financial Accounting Global Settings (New) > Tools > Subsequent Implementation of a Further Accounting Principle > Preparatory Phase > Assign Target Depreciation Areas to Source Depreciation Areas. This path takes you to Figure 32 in which you need to enter the chart of depreciation and the project ID created earlier.
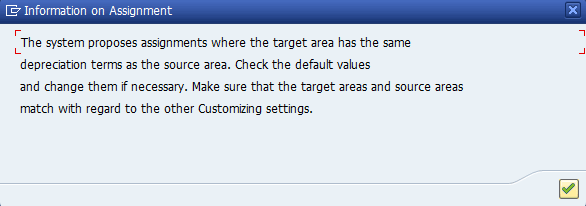
The system displays the message shown in Figure 33 for the system automatic proposal criteria.
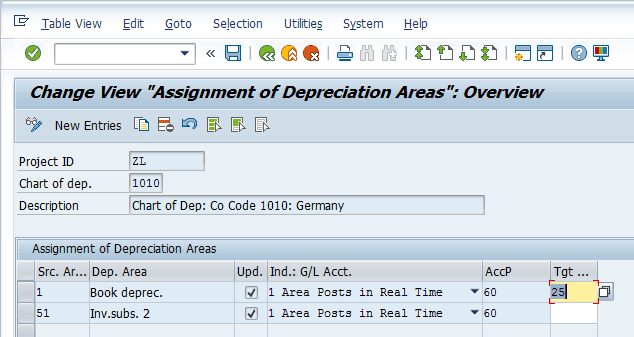
In the next screen (Figure 34), verify or change the depreciation area mapping and click the save icon.
Make Settings for Notifications
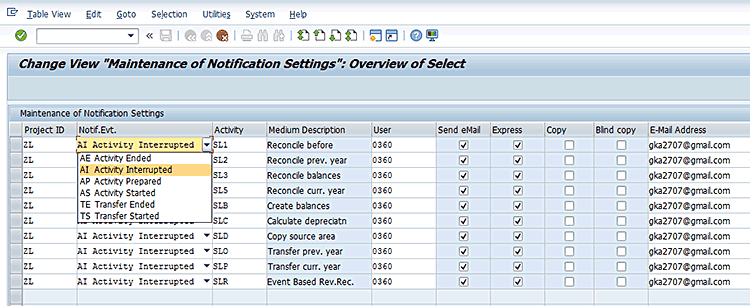
Notification settings can be customized for activity progress during the execution phase of the implementation of this project. For this setting, follow menu path SPRO > Financial Accounting (New) > Financial Accounting Global Settings (New) > Tools > Subsequent Implementation of a Further Accounting Principle > Preparatory Phase > Make Settings for Notifications. This path takes you to Figure 35 in which you need to specify various activities, notification settings, and the email address to be notified. Click the save icon.
Define the Number of Jobs for Data Transfer
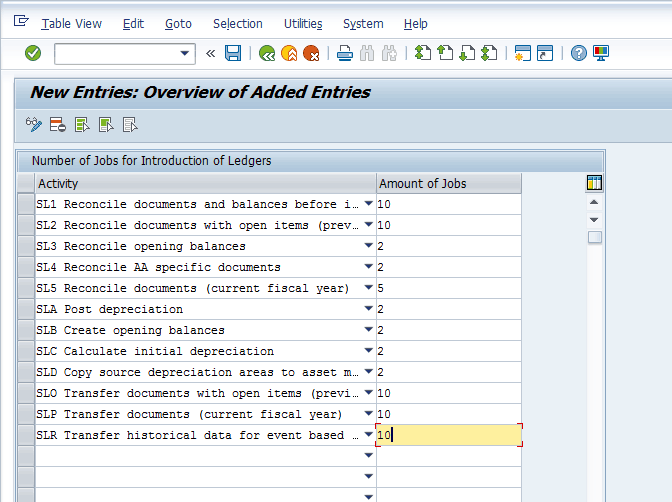
Based on the system capacity and system load, you can specify the number of jobs that this project will use to transfer the data from the source ledger to the target ledger. If no batch job is specified, the SAP system takes the maximum possible number in the system minus three jobs. For specifying the number of jobs, follow menu path SPRO > Financial Accounting (New) > Financial Accounting Global Settings (New) > Tools > Subsequent Implementation of a Further Accounting Principle > Preparatory Phase > Define Number of Jobs for Data Transfer. This path takes you to Figure 36. In this screen you can specify the number of jobs for various activities in the execution phase. Click the save icon to save your data.
Prepare the Follow-On System and Transport Customizing
All the above mentioned settings are done in a development environment and then transported to a follow-on system (unit testing system, quality system, and finally to a production system) via transport.
Go to the notes for customizing activity in menu path SPRO > Financial Accounting (New) > Financial Accounting Global Settings (New) > Tools > Subsequent Implementation of a Further Accounting Principle > Preparatory Phase > Prepare Follow-On System and Transport Customizing.
It contains a reference list for the various activities to be done in the follow-on system before the downtime starts for actual execution phase for additional ledger(s) introduction (e.g., closing the previous fiscal year in various applications). Once all such prerequisite settings are done in the follow-on system and the customizations are transported, you then execute the steps listed for downtime in the note in the reference list of the same customization (e.g., locking all users for postings, opening posting periods for the current fiscal year, and so on).
Complete Preparations
Once all the above mentioned settings are done, you can mark the preparation phase as completed in the system in which you want to execute the project. Without marking this step, you can’t start the execution activities. For this step, follow menu path SPRO > Financial Accounting (New) > Financial Accounting Global Settings (New) > Tools > Subsequent Implementation of a Further Accounting Principle > Preparatory Phase > Complete Preparations. This path takes you to Figure 37 in which you need to enter the project ID and then click the Complete button.
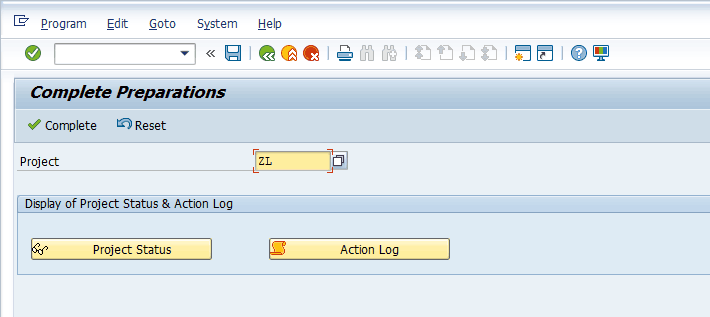
The SAP system once again shows a warning message, as shown in Figure 38, to confirm that you completed all the activities in the preparation phase. You need to confirm to continue the completion.
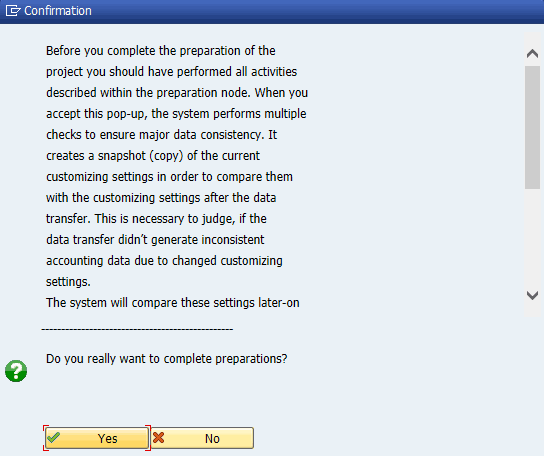
After you click the Yes button, the SAP system displays the information message shown in Figure 39 (provided there is no error in the setup).
![]()
The Execution Phase
This phase is executed in a follow-on system (e.g., a unit testing system or a quality system and finally the production system). Once all the configuration setup is transported, follow-on activities are performed and downtime is started.
Run Reconciliation Reporting
In any migration or conversion project, the success is substantiated by a robust and accurate reconciliation. So business should identify what reports are critical and should take a dump of those to be compared later after the data is transferred to the target ledger. This snapshot should be taken after downtime starts to ensure that it captures all the financial records posted before the download. Some of the useful reports for such data reconciliations are listed in Table 1.
|
Report name |
Program/ Transaction |
|
Financial Statements by Company Code |
Program RFBILA00 |
|
Asset History Sheet with Last Day of the Closed Fiscal Year as Reporting Date |
Program RAGITT_ALV01 |
|
Depreciation Run for the Planned Depreciations |
Program RAHAFA_ALV01 |
|
Compact Document Journal |
Program RFBELJ00 |
|
Recurring Entry Documents |
Program RFDAUB00 |
|
Customer Open Item list |
Program RFDEPL00 |
|
Customer Sales |
Program RFDUML00 |
|
Vendor Open Item list |
Program RFKEPL00 |
|
Vendor Sales |
Program RFKUML00 |
|
General Ledger Line Items List |
Program RFSOPO00 |
|
G/L Account Balance List for Current Fiscal Year and Completed Fiscal Year |
Program RFSSLD00 |
|
Totals Report for Cost Centers |
Transaction code GR55-> 1SIP |
|
Totals Report for Orders |
Transaction code GR55-> 6O00 |
Table 1
List of useful reports for data reconciliation
Cockpit: Implement Accounting Principle
This is the heart of this entire exercise of introducing the additional ledger subsequently in the system. After this activity is done, the target ledger is populated with relevant data.
For this step, follow menu path SPRO > Financial Accounting (New) > Financial Accounting Global Settings (New) > Tools > Subsequent Implementation of a Further Accounting Principle > Execution Phase > Cockpit: Implement Accounting Principle. This path takes you to Figure 40. In the Project field, enter the project ID and then click the Show Cockpit execution button.

The next screen (Figure 41) displays various activities of the project execution. Click the Execute button.
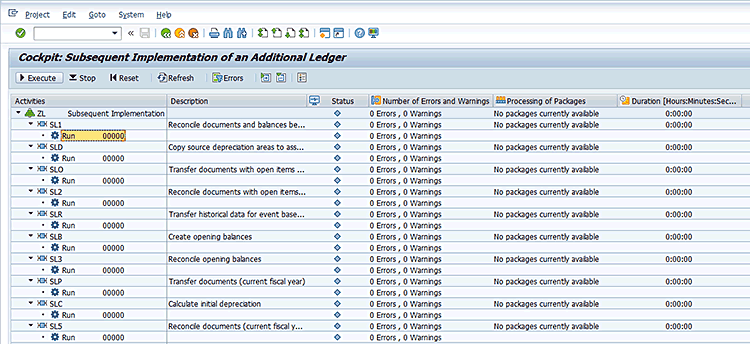
The SAP system then shows a confirmation message shown in Figure 42. Click the Yes button to start the execution.

After confirming the execution, the SAP system displays a status message indicating that the background jobs have been triggered for various activities in the cockpit (Figure 43).

Once all the background jobs are finished successfully, the cockpit shows a green status for various activities shown in Figure 44.
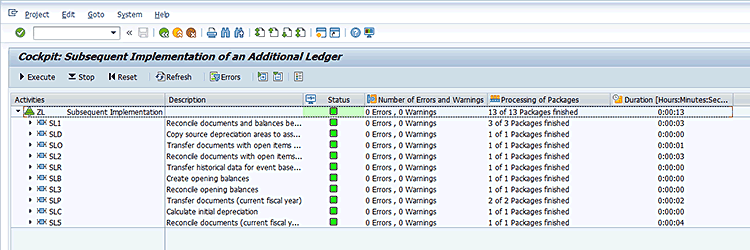
(Note: You are very fortunate if you have such green lights after your first execution. There can be multiple errors or warnings during the execution, and the system displays these messages all at once for all the activities, as shown in Figure 45.)
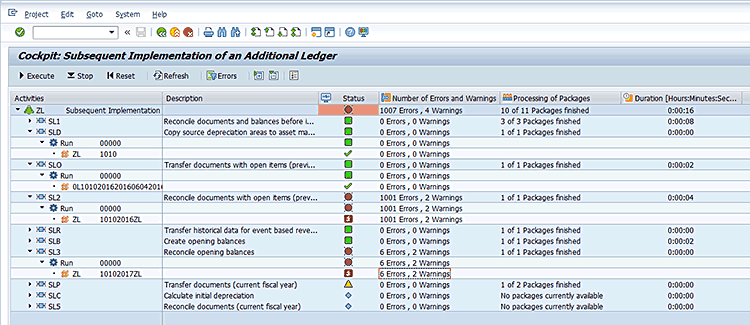
After double-clicking the error node, you can see the details of the errors, as shown in Figure 46.
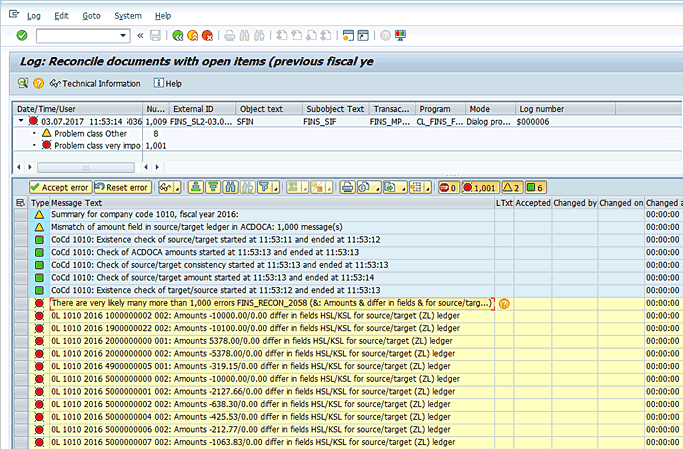
Such errors’ root causes should be rectified, and then you can reset the cockpit execution by clicking the reset button as shown in Figure 44 and then execute the cockpit again.
(Note: To remove the error shown in Figure 46, I have implemented SAP Note 2439831 in the system. As this feature of subsequent introduction of parallel ledger is provided by SAP from SAP S/4HANA Enterprise Management 1610 version last year, there are a lot of SAP Notes released by SAP that are relevant for such a project. Therefore, I recommend that you keep your system Support Package to the latest one to avoid issues during the actual execution. However, the execution in a pre-production system should give you a fairly detailed understanding of possible issues in production and enable you to be ready to solve them.)
Post Depreciation for the New Accounting Principle
Now after the cockpit has been executed completely, you execute the depreciation run for the new accounting principle if FI-AA is implemented in the business. For this simply execute transaction code AFAB and run the depreciation run for all the periods from the start of the current fiscal year up to the go-live date.
Check the Results of Data Transfer
Execute the various reports you extracted earlier before running the cockpit and compare the results. Refer to Table 1 for a list of such reports. Make sure that you use the same selection criteria for running the report to enable an apple-to-apple comparison.
Confirm the Data Transfer
After you are satisfied with data transfer, you can mark the data transfer as completed. For this step, follow menu path SPRO > Financial Accounting (New) > Financial Accounting Global Settings (New) > Tools > Subsequent Implementation of a Further Accounting Principle > Execution Phase > Confirm Data Transfer. This path takes you to Figure 47 in which you need to enter the project ID and then click the Confirm button.
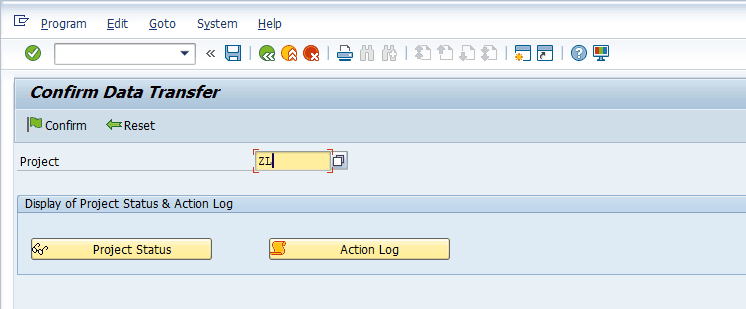
Then you can see the project status for data transfer as completed as shown in Figure 48.

The Post-Processing Phase
After the data transfer is completed, the target ledger can function on its own for its special accounting principle. However, before starting to use it for regulatory reporting, the figures in the target ledger may need adjustments that are specific to this ledger to differentiate it from the leading ledger.
Post Value Adjustments for Opening Balances
If the opening balances for the target ledger need adjustments, then you can post such adjustments using transaction code FBCB. Take into consideration the following elements while making such adjustment postings:
- The posting has to be done in the newly defined ledger group containing this ledger (refer to Figures 12 and 13), in the ledger group field in FBCB posting.
- Enter relevant amounts in all currencies in the line item while making FBCB posting, as it does not translate the amounts and works like foreign currency valuation postings.
- Use only the balance-managed G/L accounts for posting in FBCB.
Perform Post-Processing in FI-AA
Similar to the previous step, you may also need to adjust the asset accounting figures due to the new depreciation area introduced for the new accounting principle. You can also make FBCB postings for the same; however, consider SAP Note 937940 and its related notes to avoid issues during posting into asset reconciliation accounts.
Complete the Project
After you have completed all the post-processing adjustments to the target ledger, you can mark the data transfer as completed. For this step, follow menu path SPRO > Financial Accounting (New) > Financial Accounting Global Settings (New) > Tools > Subsequent Implementation of a Further Accounting Principle > Post processing Phase > Complete Project. This path takes you to Figure 49 in which you need to enter the project ID and then click the Confirm button.

Then you can see the project status marked as completed as shown in Figure 50.

To summarize, the introduction of an accounting principle opens up parallel ledger benefits of the SAP General Ledger and provides a way to handle the dynamically changing or increasing regulatory reporting requirements. SAP has shown a delta scope item as a subsequent introduction of document splitting in upcoming SAP S/4HANA 1709 releases, which will further help companies to exploit SAP General Ledger benefits.


