Beginning with SAP R/3 Enterprise 4.7, SAP offers a comprehensive way to compare your salaries with market rates. You can set up vendors and import survey jobs and market data with SAP’s Job Pricing functionality.
Key Concept
SAP’s Job Pricing functionality is available as of SAP Enterprise 4.7 Extension Set 1.1. It is a new module within Enterprise Compensation Management (application area PA-EC). Many companies that have deployed or are in the process of deploying EC are considering using the Job Pricing functionality to market price internal jobs. By using this new module, companies can expect to leverage the latest market analysis functionality from SAP as well as increase the ROI of their systems.
To retain key talent, champion morale, and maintain competitive advantage in a tight job market, paying your employees at or above the market rate is one the most important functions of compensation professionals. With SAP’s Job Pricing functionality, assessing your salary structure is easier. It allows you to create survey providers and upload survey jobs, survey job descriptions, and market data.
Using Job Pricing, users can export detailed salary information to survey providers using standard SAP Query functionality. You can import survey jobs, survey job descriptions, and market data from external vendors into Job Pricing or match SAP internal jobs (object type C) with provider survey jobs. Job Pricing can also weight (i.e., give priority to one survey job over another) and age (i.e., date market data from the survey date to your desired effective date) jobs online. HR professionals can use Job Pricing to create job composites based on a mix of survey jobs from different vendors, and then compare internal pay structures to market data and make subsequent adjustments to pay structures to remain competitive. Finally, Job Pricing can provide pricing data to SAP Business Information Warehouse (BW).
Compensating employees efficiently and fairly is the key to retaining talent. Being competitive with your compensation in the marketplace requires a constant knowledge of what other companies are paying, including base pay, short-term incentives, long-term incentives, and perquisites. In Job Pricing, you can perform market analysis to gauge how your company measures up to the competition. By knowing how others pay, you can structure your pay levels based on your company’s remuneration philosophy. Follow these steps to set up Job Pricing in your system.
Note
In
part 2 of this series, I discuss matching your internal jobs to survey jobs, aging data, creating a job composite, and comparing your internal salary structures to market salary structures.
Job Pricing’s Web-Based User Interface
SAP delivers all Job Pricing functions with a Web-based user interface (UI); no back-end R/3 equivalents exist. To access Job Pricing in your system, use transaction PECM_START_JPR_BSP. This transaction launches the Job Pricing home page on the Web (Figure 1). The system uses Business Server Page (BSP) technology to render all its Job Pricing functionality through Web pages on your browser. Users access all functionality from this start page.
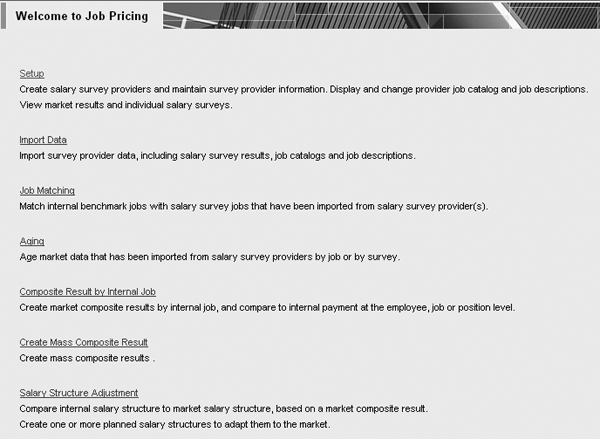
Figure 1
Use transaction PECM_START_JPR_BSP to see the Job Pricing main screen
When the BSP page first launches, the system may prompt you again for your SAP user name and password. If this happens, you can ask your Basis resources to refer to SAP note 612670 and related notes to resolve any single sign-on (SSO) issues. You can also house this BSP within SAP Enterprise Portal 6.0 or SAP NetWeaver Portal. If you decide to go this route, work with your portal team so that it can create a portal role for those compensation specialists or anyone else who will need this functionality.
Create Survey Providers
The first step in setting up Job Pricing is creating survey providers, also known as vendors. Vendors such as Mercer, Towers Perrin, and Radford provide a variety of surveys for companies to participate in or purchase. These surveys sometimes have a theme such as executive or administrative. You can import surveys into your R/3 system for your market pricing analysis. To get started, however, you must create providers. Specify a four-digit alphanumeric provider code, a provider name, and (optionally) a URL for the provider’s Web site. You can create as many providers as you need, but note that you can only associate one set of survey jobs to a provider. Figure 2 shows an example listing of providers.
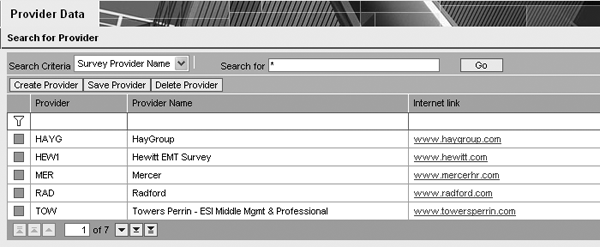
Figure 2
Job Pricing providers
This is particularly important when you have a vendor with a different set of jobs for each survey. In this case, you might want to create a vendor/survey combination for your provider. For example, a vendor might have a “Directors and Above Survey” and a “Professionals and Administrative Survey” whose job survey codes overlap. Therefore, you should create two separate providers with distinct survey job codes.
To set up a provider, click on the Setup link from Figure 1. Another Web page pops up. To create a provider, click on the Create Provider button at the top left of the screen in Figure 2. You must create all providers manually. You can edit the job catalog, survey names, and market criteria at any time after you have imported this data.
Upload Survey Jobs, Survey Job Description, and Market Data
The second step in using the job pricing functionality involves uploading three separate files in the form of tab-delimited text files. Use the survey information that you received from your providers to create these three files.
The imported files contain three types of data elements: data type, length, and example entry. Tables 1 and 2 list the data elements that you need to import for the survey job catalog and survey job descriptions for your previously imported jobs, respectively. Each field is associated with a data type (alpha, numeric, or alphanumeric), length, and an example entry. Create an Excel file template for this information. Later, you’ll use this file during the import process.
Note
You can find a table listing the data elements for survey market data here:
Download.
|
Job code
|
Alphanumeric
|
8
|
FIN2200
|
|
Text of survey job
|
Alphanumeric
|
60
|
Finance analyst
|
|
Job level
|
Alphanumeric
|
2
|
G1
|
|
Survey job family
|
Alphanumeric
|
8
|
FIN
|
|
Text of survey job family
|
Alphanumeric
|
60
|
Finance
|
|
Survey job grade range upper limit
|
Alphanumeric
|
8
|
G1
|
|
Survey job grade range lower limit
|
Alphanumeric
|
8
|
G8
|
|
| Table 1 |
Data elements to import for the survey job catalog |
|
Job code
|
Alphanumeric
|
8
|
FIN2200
|
|
Job level
|
Alphanumeric
|
2
|
G1
|
|
Job description
|
Alphanumeric
|
unlimited
|
Manages organization operations by directing and coordinating activities consistent with established goals, objectives, and policies. Follows direction set by CEO and board of directors. Implements programs to ensure attainment of business plan for growth and profit. Provides direction and structure for operating units. May participate in developing policy and strategic plans.
|
|
Experience
|
Alphanumeric
|
unlimited
|
15 + years, 5 in corporate finance
|
|
Reports to
|
Alphanumeric
|
unlimited
|
Reports to director of finance or finance manager
|
|
| Table 2 |
Data elements to import for the survey job description |
You should create three templates for your compensation team: one each for the job catalog, job descriptions, and market data. You should make the templates in Excel and save them as tab-delimited .txt files when ready for upload. Make sure that you fully understand the data requirements for import, such as the data type (e.g., alphanumeric, decimal) and length. If you don’t do so, you may have problems importing data. If this happens, consult an ABAP resource on your team or project for assistance in determining what type of data the system is expecting for upload.
To import files, select the Import Data link on the main job pricing screen (refer to Figure 1). Select the check box for the provider from whom you received the data (a vendor such as Towers Perrin, Radford, or Mercer). To import the survey job catalog go to the Specific Import Parameters tab (Figure 3). In the Field Upload Parameters section, select Survey job catalog as the Data Type. If your text document has a header row or rows, specify this in the drop-down selection called No. of Header Lines. Specify the language for the imported jobs. The default is English. In the Upload section, click on the Browse... button to locate the file on your hard drive. For instance, you might have named the file Mercer2006_ Job_Catalog_Import.txt. Click on the Upload button to save the information to the system to prepare for the field mapping process described below.
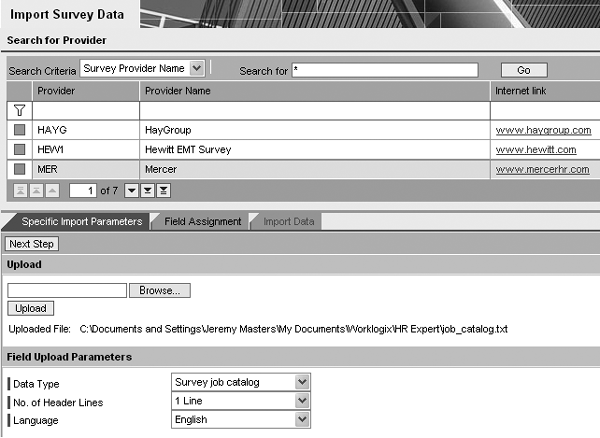
Figure 3
Use the Specific Import Parameters tab to import the survey job catalog
Click the Next Step button to take you to the Field Assignment tab. Here, match survey provider file fields in the column entitled Provider Field Name with SAP fields in the SAP Field Name column (Figure 4). To do this, you must select the drop-down list in the SAP Field Name column for each File Column row representing provider fields. Once you have mapped these fields, you do not have to perform this again unless your vendor adds or changes fields.
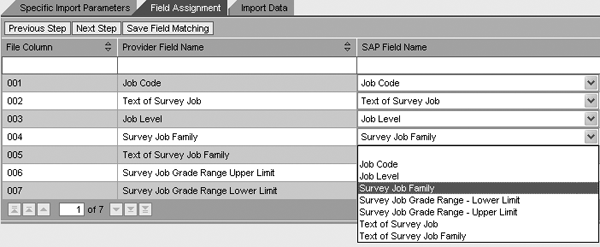
Figure 4
Map the survey provider fields to SAP fields
Click the Next Step button to go to an overview screen where you review your imported data. Click on the Show All Columns button to see all imported information (Figure 5). Review the data carefully. If you see any incorrect data at this point, you should abort the process, fix the data, create a new text file, and re-import.
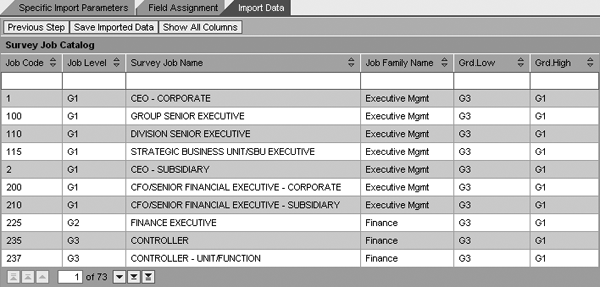
Figure 5
Overview of imported data within the Import Data tab
Follow the above steps to import survey job descriptions. The process is exactly the same as the job catalog file.
To import market data, click on the Specific Import Parameters tab and another section called Survey appears (Figure 6). For a first-time import, you should leave the Survey Code field blank. In the event that you need to re-import market data, R/3 populates this field with the survey code after you have finished your first import. You might re-import data if you realize that the information you had uploaded was wrong or corrupt in some way.
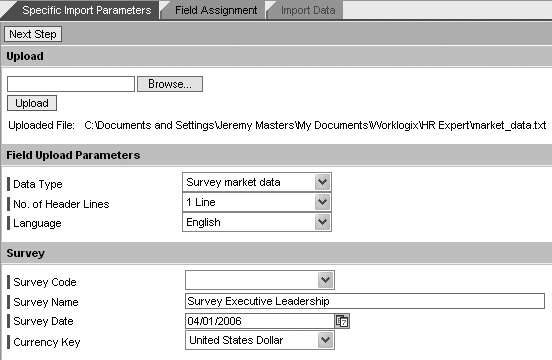
Figure 6
Specific Import Parameters tab in import data section for mark
Input a suitable name for the survey that is clear and understandable in the Survey Name field. Select the Survey Date. The survey date should be the date when the provider conducted the survey. This field is important when the system ages your market data. Lastly, make the appropriate selection for Currency Key. When selecting your currency key, remember the difference between United States Dollar (USDN) and United States Dollar (USD). USDN has five decimals, so it provides more precise calculations. Select the currency based on your configuration. If you have questions about this, ask your payroll or compensation systems specialist for assistance.
In the Field Assignment tab, associate any monetary fields with a pay category. See Figure 7. In addition to identifying an SAP Field Name to each corresponding File Column, users need to map pay categories for any monetary data during the field assignment of market data. For example, users could map percentile information to a pay category called Base Salary or map bonus amounts to a pay category called Bonus.

Figure 7
Field Assignment tab where you associate monetary fields to a pay category
The pay category configuration is available in the IMG under menu path Personnel Management > Enterprise Compensation Management > Job Pricing > Salary Surveys > Define Additional Pay Categories. Typical entries include Base Salary, Total Compensation, and Bonus. These categories enable you to equate market data to logical groupings for comparison. Pay categories are important during salary participation time because you can use them to distinguish which data to extract depending on what the survey is asking for. For example, you might want to pull only base pay-related data, such as percentiles and midpoint, for those surveys asking for base salary and not total compensation.
Edit Your Imported Data
SAP’s Job Pricing functionality allows you to make minor edits to the data you have imported. I’ll describe what imported data you can and cannot update after import.
To perform manual edits to your uploaded information, click the Setup link from the main screen (refer back to Figure 1). To make minor edits to the job catalog, first click the box to the left of a provider name shown in the top part of Figure 3. A list of jobs for that survey appears (Figure 8).
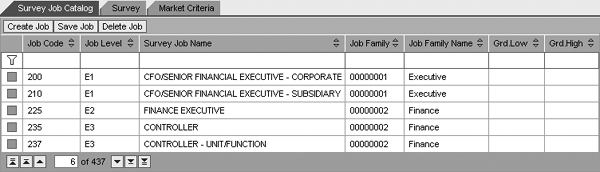
Figure 8
The Survey Job Catalog tab allows you to make minor edits to the job catalog
After import, you can also view and make edits to the survey names from the provider in the Survey tab (Figure 9) by clicking the tab entitled Survey for that provider. Lastly, you can rename the relevant market criteria (e.g., industry, region, revenue size, company size, company type, length of service) if desired by clicking on the tab entitled Market Criteria (Figure 10). You can use these scope elements for your data cuts later. Analysts frequently use cuts of data such as revenue size, industry, and employee population during market pricing analysis.
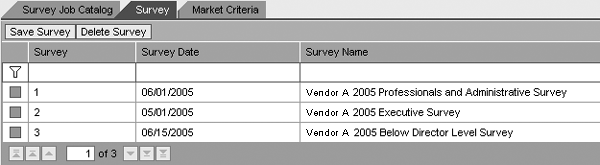
Figure 9
View and edit the survey names in the Survey tab
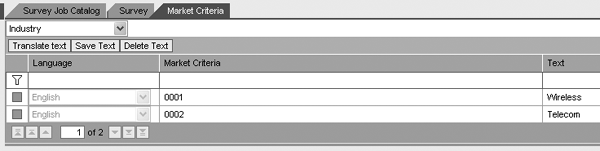
Figure 10
The Market Criteria tab lets you rename the relevant market criteria
You can view detailed survey job information by selecting a job within the Survey Job Catalog tab. The first tab, entitled Market Data, enables you to view (but not edit) all market data (raw and aged) from each survey as well as the job description. Figure 11 shows an example survey job called Finance Executive. Raw data (captured from the salary survey) and aged data (the raw market data that you have aged) are available to view in the tabs Market Data and Aged Market Data, respectively.

Figure 11
Job description for Finance Executive job
You can also view and edit imported survey job descriptions. Figure 12 shows how you can edit the Job Description, Line of Reporting, and Experience in the Job Description tab. If you have imported your survey job descriptions using the previously explained functionality, these fields are populated already. You may want to edit survey job descriptions if you feel that the vendor’s descriptions are incomplete or if you want to add a nuance that pertains to your line of business or the business function of the job. For example, you may amend a job description of a finance executive to include more accounting and budgeting functions versus taxation if you have included a tax executive job within your catalog.
Jeremy Masters
Jeremy Masters is an author, speaker, and SAP ERP HCM subject matter expert with more than 12 years of experience. Jeremy is also the co-founder and managing partner of Worklogix, which provides SAP ERP HCM professional services and software solutions to Fortune 1000 companies. Jeremy has been involved in more than 20 projects, many of them global in scope. In addition to ECM, Jeremy has worked with the talent management functionality, including performance management, succession planning, and e-recruiting as well as the employee and manager portals in SAP ERP. For more information on Enterprise Compensation Management, you can reference his book Enterprise Compensation Management with SAP ERP HCM.
You may contact the author at jmasters@worklogix.com.
If you have comments about this article or publication, or would like to submit an article idea, please contact the editor.