Upgrading plug-ins is a necessary part of maintaining BW. Discover how to make the process as painless as possible with these expert suggestions.
Key Concept
The plug-in is a component in the source system (such as SAP R/3, Customer Relationship Management [CRM], BW) that is responsible for tightly integrating these systems. Plug-ins have software that contains functions, programs, extractors, and DataSources that help extract and transfer data from the SAP source system into BW. You install plug-ins on your SAP source system from which you pull data into BW. The R/3 plug-in supplies SAP components with transaction data and master data in real time. It also allows you to use SAP components such as Advanced Planning and Optimization or CRM together with certain industry-specific components.
Any software product, including plug-ins, must change to improve and provide new features and functionality. SAP constantly enhances its products to keep them current with users’ demands and allow them to communicate with its latest products. Plug-ins are available in different versions (e.g., Plug-In [PI] 2002.1, PI.2003.1 etc.). Plug-ins affect two systems, the SAP source system and the target system.
You must take great care while upgrading plug-ins. We’ve used SAP BW for more than three years and have upgraded plug-ins three times. We’ve noticed that many problems can arise during a plug-in upgrade if you do not follow a systematic process. We have gained a good amount of expertise from our three plug-in upgrades and we’ll share our proven, step-by-step procedure to limit the problems you encounter.
You should view the plug-in upgrade as a small project that requires more effort than applying Support Packages. Thoroughly prepare for the upgrade by following these steps:
Step 1. Prepare for the plug-in upgrade
Step 2. Delete the setup tables
Step 3. Stop all scheduled background jobs
Step 4. Lock all users
Step 5. Run update jobs
Step 6. Start your process chain
Step 7. Check the delta queue
Step 8. Check the extract structures
Step 9. Record the number ranges of all areas (optional)
Step 10. Ensure that R/3 contains no update errors
Step 11. Deactivate the extract structures in the Logistics Cockpit
Step 12. Activate the extract structures
Step 13. Record the number ranges of all areas (optional)
Step 14. Activate the R/3 connection
Step 15. Activate all DataSources (transfer structures)
Step 16. Start V3 updates and background jobs in R/3
We’ll discuss these steps in more detail later. All steps are necessary except the preventive steps 9 and 13. We have omitted the Basis aspects and focused on application and functional aspects. The procedure includes activities both on the BW side and on the R/3 side in sequence. We’ll use R/3 in our example, but our advice also applies to mySAP ERP Central Component (ECC).
Note
All industry-specific components based on R/3 4.6B or higher require an R/3 plug-in, which is an add-on to R/3. From 1999 until 2004, SAP delivered several R/3 plug-in releases. After 2005, SAP delivers new and extended interfaces for integrating R/3, R/3 Enterprise, and ECC with their own add-on (SAP R/3 plug-in). Plug-In 2004.1 is the final SAP R/3 plug-in release delivered separately.
Why Upgrade?
Before we deal with the process, you should understand the four major reasons to upgrade your plug-in.
- Your current plug-in release is leaving the declared maintenance period. Like every other SAP product, plug-ins have a defined support period. After this period ends, the user may have to resolve product-related issues alone.
- To implement new dimension products from SAP, your system must have the latest plug-in version. For instance, if you want to implement SAP SCM 4.1, you need plug-in Release 2004.1 on the R/3 side.
- You also need to upgrade your plug-in when upgrading a connected SAP solution. For instance, you need to upgrade the plug-in to a higher version when upgrading Advanced Planning and Optimization (APO) from APO 3.1 to APO 4.1. The same is the case with the Support Packages of a certain plug-in. If APO requires a higher version than BW or CRM (which connect to the same source system), you have to upgrade the plug-in because it affects all connected SAP components.
- A higher plug-in version could introduce desired features and functions. For instance, extracting data from new modules on the R/3 side requires DataSources from a current plug-in release. Some features are version specific; for example, the mirror system functionality, which copies the production system for minimum system downtime for initial extraction from R/3 to BW, is available only in Plug-In 2002.1.
Note
Upgrading a plug-in in the source system affects all connected SAP components, so you must test all these systems. Let’s say you have a system landscape with R/3 as the source system connected to BW and APO. You must test R/3, APO, and BW. We recommend that you perform the plug-in upgrade in a development system landscape (or even better in a sandbox), and then transfer it to your production system. This ensures that you contain any errors that may arise during the upgrade. Even after following this process, you should allow additional time for upgrading the production system."
In ECC 6.0 and up, plug-ins are an integral part of the source system. Plug-In 2004.1 is the last plug-in shipped separately. New Support Packages for plug-ins will continue to be available.
Step 1. Prepare for the Plug-In Upgrade
On the BW side, you need to make a list of all scheduled process chains, including their frequency and time required to complete the chain for each. This helps you to estimate the system downtime calculation. You should also remove all process chains from scheduled background jobs to stop the extraction/pull jobs in BW. This restarts after you upgrade the source system with the new plug-in. Removing the process chains from the schedule ensures that the process chain does not start accidentally and create problems since the available time window is usually limited.
Step 2. Delete the Setup Tables
In R/3, for all logistics applications (e.g., purchasing, production, billing), delete all the setup tables created for the initialization run of BW (a historical snapshot of transactional data). If the setup tables contain data, the system can not perform the upgrade, so you need to get rid of the data.
To do this, enter transaction SBIW and then follow the menu path Settings for Application-Specific DataSource (PI)>Logistics>Managing Extract Structure>Initialization>Delete the Contents of the Setup Tables. Otherwise, you can use transaction LBWG, enter the application number into the Application field shown in Figure 1, and click on the execute icon .

Figure 1
Enter the application number
This process deletes the existing setup tables for the application. You need to repeat this process for all the active applications. SAP predefines application numbers. For example, 03 is purchasing and 13 is SD billing.
Step 3. Stop All Scheduled Background Jobs
R/3 systems generally run many background jobs. Because it’s difficult to cancel and reschedule each background job correctly, use program BTCTRNS1 to stop all the jobs.
Note
Remember to inform your users well in advance of stopping the background jobs, unless you want to face an inbox full of angry emails from your users. Also, make sure to plan the activity with R/3, APO, BW, and CRM team members to find a convenient time for everyone.
Enter transaction SA38. Type the program name BTCTRNS1 into the Program Name field and click on the execute icon  . The system shows the following message: Transport: Move Jobs with Status “Rescheduled due to Upgrade.” Jobs were suspended for upgrade (Figure 2).

Figure 2
Cancel all scheduled background jobs
After completing the above task, all the scheduled jobs display the status released/suspended. Check this using transaction SM37 (job overview).
Step 4. Lock All Users
No activities should occur in R/3 during the upgrade, so you must lock all the users with report EWULKUSR (mass locking). Enter transaction SA38. Type the program name EWULKUSR into the Program Name field and click on the execute icon. The system displays a list of all users, including name, type, and status. Click on the Choose User button on the top left side of the screen to select users to lock. Save the list and click on the back arrow icon. Click on the Lock User button next to the Choose User button to lock all users in the list you just saw.
Tip!
Keep a list of users who are authorized to perform upgrade-related activities so you do not prevent them from working. For instance, BW administrators check the status of the delta queue, R/3 technical team members review SPDD/SPAU lists (explained in step 11), and background/dialog users extract data after executing InfoPackages from BW. Don’t lock these users.
Step 5. Run Update Jobs
In R/3, run the manual scheduling (V3) update jobs for all applications to move data from the extraction queue/update tables to the BW delta queue. This step may not apply to those applications where Update Mode is set as Direct Delta because R/3 writes direct delta documents to the BW delta queue as soon as they post on the R/3 side. You can check your update mode setting using transaction LBWE in R/3. Figure 3 shows the three update modes.
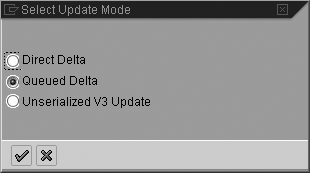
Figure 3
The three update modes for logistics applications
Use transaction LBWE (Logistics Data Extraction: Customizing Cockpit) to see the screen in Figure 4. You need to run the V3 job for all the active applications (e.g., purchasing, billing). To do this, click on the Job Control option available for each application in the Update column. You’ll see the screen in Figure 5. Maintain the Job parameters tab. Click on the Start date… button and start the job once by clicking on the Immediate button (Figure 6).
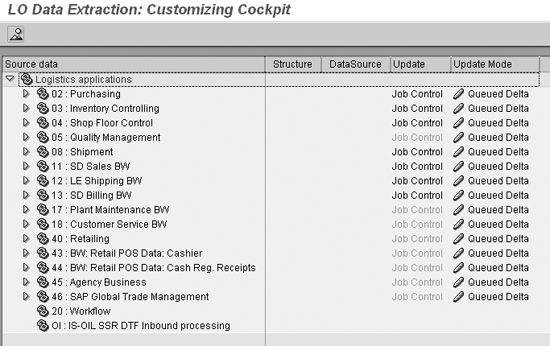
Figure 4
Use Job Control to reschedule jobs
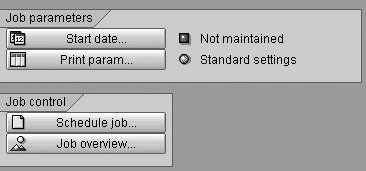
Figure 5
Select the Start date… button

Figure 6
Click on the Immediate button to start the job
The Logistics Data Extraction: Customizing Cockpit requires you to set print parameters using the Print param… button. The standard setting is LOCL as shown in Figure 7. Click on the Schedule job… button in Figure 5 to move the data from the extraction queue/update tables to the BW delta queue. Sometimes the job schedule does not start immediately because of its priority. You can check its status using transaction SM37 and use the drop-down menu to change the priority of the job from C to A (top priority). Ensure that you have the proper authorization to execute these jobs so that you don’t face a delay.
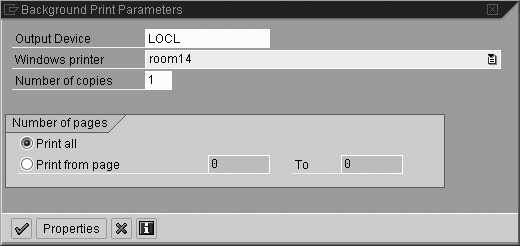
Figure 7
Set print parameters
Step 6. Start Your Process Chain
In BW, start your regular process chain that extracts data from the source system and pulls the delta data into BW. You must empty the delta queue in the source system before upgrading the plug-in. To do this, execute the process chain (or associated InfoPackage) and extract data and make sure that no new deltas are generated. You should run this twice to make sure completely that the delta queues are empty.
Step 7. Check the Delta Queue
In R/3, run transaction RSA7. You need to make sure that all DataSources have the value of 0 in the Total column. The value 0 indicates that the delta queue is empty for the DataSource. To verify this setting, use transaction RSA7 to see the screen in Figure 8. Your R/3 system maintains this number in the Total column, so you cannot change it. If the value in the Total column is not 0, you need to pull the delta again and ensure that this value changes to 0.
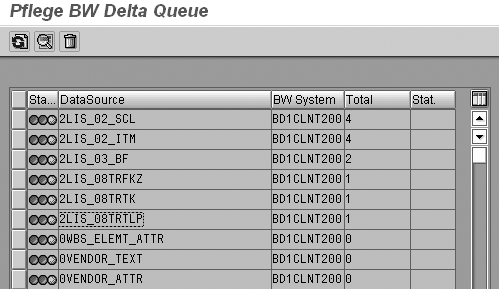
Figure 8
Check delta queue status in R/3 using transaction RSA7
Note
If you are new to BW terminology, here is a review of some basic concepts. An extract structure is available for each DataSource in R/3. A DataSource combines an extractor (e.g., function module, view, etc.) and an extract structure in the source system (in this case, R/3). The extractor extracts all the relevant data based on the underlying logic and passes that data to an extract structure in R/3. When you replicate a DataSource in BW, the extract structure associated with that DataSource is available to BW as a template to create a transfer structure in the transfer rule maintenance screen (this screen opens automatically when you attach a DataSource to an InfoSource). When you activate the transfer rule in BW, it creates the transfer structure and copies it to R/3. So when you activate the extraction from BW, the associated R/3 DataSource extracts the data in the form of an extract structure and passes that to the R/3 transfer structure. In turn, the R/3 transfer structure passes the data to a BW transfer structure
Step 8. Check the Extract Structures
In R/3, you need to check whether extract structures are ready for the upgrade. Use transaction SA38 and enter the program name RMCSBWCC into the Program Name field and click on the execute icon to see the screen in Figure 9.

Figure 9
Use program RMCSBWCC to check the status of extract structures
Press the F4 key or click on the pick list icon to see a drop-down list (Figure 10). Select an extract structure from the Field name column and repeat the process to check all structures. Once you have selected the extract structure, click on the execute icon. If the extract structure is ready for the upgrade, you see the output shown in Figure 11.
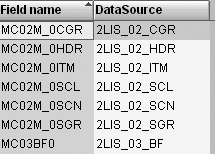
Figure 10
Select each of the structures for checking

Figure 11
A green circle in the log message indicates that the extract structure is ready for the upgrade
However, you may get the message in Figure 12 instead. Here, the structure of application 02 is not ready for upgrade because the data is still available in the setup tables. Another reason for a warning in the log could be that data is available in the delta queue and hasn’t been extracted to BW yet. You have to repeat this process for all extract structures and take appropriate action to make them ready for upgrade. If you receive the message in Figure 12, the appropriate action is to delete the setup table in R/3 using transaction LBWG. If you receive a message that says data is still available in the delta queue, then you need to start your process chain (or associated InfoPackage) from BW.

Figure 12
A red square in the log message indicates a problem that you need to resolve
Step 9. Record the Number Ranges of All Areas
This precautionary step confirms that you do not miss a document in R/3. The number range varies by company depending on how important each business process is. For instance, accounting, material, sales, and billing documents are critical, so you record the last document numbers in the R/3 system using transaction SNRO. Then, download the status of each number range object (e.g., RV_BELG for SD billing) and compare this list with the same number range object status after the upgrade but before end users create transactions in the system. The comparison should confirm that no one created new documents during the upgrade. If documents were created, you have to create setup tables for the new documents and upload them fully from R/3.
Step 10. Ensure that R/3 Contains No Update Errors
In R/3, transaction response time is crucial. To minimize response time, R/3 uses asynchronous update. Errors may arise while doing final updates to the database due to a variety of reasons such as insufficient memory or disk space. Update management in R/3 is a core system activity to monitor the status of all database updates. Before upgrading a plug-in version, you need to assess whether any updates are pending in update management using transaction SM13. This is because any incomplete update tasks could lead to data inconsistency within R/3 or between R/3 and BW. Your Basis support person should have the proper authorization for this transaction.
Step 11. Deactivate the Extract Structures in the Logistics Cockpit
Once you complete the previous few R/3 tasks, you need to deactivate the existing plug-in’s extract structures. View extract structures in the Logistics Cockpit through transaction LBWE.
This is a mandatory activity for a plug-in upgrade because active extract structures could result in errors and delay the upgrade schedule. Refer to this list of errors that can result if you don’t deactivate the existing plug-in’s structures:
- The initialization of data that R/3 generated before the change no longer works (error CONNE_IMPORT_WRONG_COMP_LENG).
- Delta requests terminate (error CONNE_IMPORT_WRONG_COMP_LENG).
- The V3 update no longer processes.
- The update from the extraction queue (delta queued update mode, as of PI(-A) 2002.1) does not finish. (Note that Release 2002.1 is the last release for which a PI-A version is available. After Release 2002.2, only PI versions of SAP R/3 plug-ins are available.)
- The protocol terminates (error CONNE_IMPORT_WRONG_COMP_TYPE).
Use transaction LBWE to deactivate the extract structures. Expand the logistics application hierarchy tree to view all extract structures for an application. Figure 13 illustrates the process for 02 (purchasing) applications. First, make a list of all DataSources in Active status from all applications. Use the Update column of Figure 13 to make this list. You’ll use this list to make the active DataSources inactive in the next step.

Figure 13
Deactivate all the Active extract structures
In the Update column, click on the pencil icon before the word Active and change the update to Inactive status. Repeat this process for all the active extract structures. You may create a single transport request for all extract structures. After changing the status to inactive, the R/3 system prompts you to create a transport request. The R/3 system includes all the subsequent changes in this transport request. Create and manually record this transport request.
Now you’ve finished the prerequisite tasks to allow for a smooth plug-in upgrade. You should hand over the system to your Basis team member who will perform the actual upgrade.
The time it takes to apply plug-in software differs depending on the size of the plug-in and the capacity of your hardware. The Basis team has to perform upgrade tasks such as dealing with the system modification lists (SPDD and SPAU, explained later). In our case, the Basis team needed five hours to upgrade Plug-In 2004.1.
To meet a specific requirement such as including new objects in an earlier version of the same object, R/3 modifies some SAP-delivered objects. Transaction SPDD adjusts dictionary objects, and transaction SPAU adjusts repository objects. During the upgrade, if the plug-in software redelivers the same object, SPDD or SPAU lists these objects. You need to take care of the SPDD list immediately; otherwise, you cannot go to the next upgrade step, IMPORT. Again, we suggest that you involve the technical (development) R/3 team in this activity.
Support Packages may be available for your plug-in version at https://service.sap.com. We recommend that you apply these Support Packages immediately after upgrading the system to the new plug-in. Procedures and timelines for implementing Support Packages differ by company. As a general rule, be sure to set aside additional time (about 25 percent extra) if you have many customizations in the system. Once the Basis team has upgraded the plug-in and required Support Packages, you need to perform post-plug-in activities before end users can access the R/3 system.
Step 12. Activate the Extract Structures
In R/3, activate all extract structures that you deactivated before the upgrade in step 11. Use transaction LBWE. Find the Update column and click on the pencil icon before the word Inactive. Change the status to Active (refer to our description of Figure 13 if you don’t recall how to modify the status). R/3 prompts you to create a transport request. Create and document the request. You need to repeat this step for all the DataSources you deactivated in step 11.
Note
While testing in development, you may encounter data extraction or performance problems. You should use SAP notes or support to solve them. These activities create transport requests in the development system, so make sure to transport them into production.
Step 13. Record the Number Ranges of All Areas
As mentioned in the pre-plug-in step 9, this is a precautionary step. You should repeat this step by writing down the number ranges of all areas and cross-checking your list with those taken before installing your plug-in. The number range should be the same.
Step 14. Activate the R/3 Connection
After upgrading R/3 with the new plug-in, you need to activate the source system connection from BW. Use transaction RSA1 and follow menu path Modeling>Source Systems>R/3SOURCESYSTEM. Right-click to display the context menu, select Activate (Figure 14), and the system displays the pop-up window in Figure 15. Click on the Replicate As Well button to replicate the DataSources.
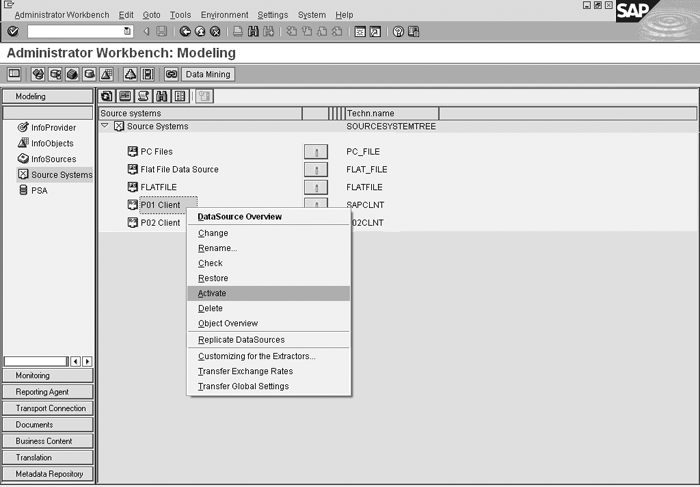
Figure 14
Activate the source system after the plug-in upgrade

Figure 15
Activate the source system after the plug-in upgrade
Step 15. Activate All DataSources (Transfer Structures)
In BW, since you have replicated DataSources from R/3, you also need to activate all transfer structures. You can do this by executing the program RS_TRANSTRU_ACTIVATE_ALL. Use transaction SE38, type the program RS_TRANSTRU_ACTIVATE_ALL, and click on the execute icon.
Enter the following parameters (Figure 16):
- Source System: Name of the source system on which you have upgraded the plug-in (e.g., Q01CLNTXXX)
- InfoSource: (* gen): Type * here.

Figure 16
Activate transfer structure
Click on the execute icon. This may take 30 to 40 minutes depending on the number of DataSources your BW system uses.
Step 16. Start V3 Updates and Background Jobs in R/3
Now that you have updated both BW and R/3, you need to start your V3 updates along with other background jobs that you disabled before handing over the system to end users. Use transaction SE38. Type the program EWULKUSR in the Program field and click on the execute icon.
Click on the Choose user button and select all the users that you want to unlock. This should match the list of users you locked before starting the upgrade. Save the list and click on the Unlock user button. Next, enter transaction SE38, enter the program BTCTRNS2 in the Program field, and execute to see the screen in Figure 17.

Figure 17
Reschedule jobs after executing program BTCTRNS2
Note
We ran into a problem that the plug-in upgrade caused. In the Investment Management module, one of the data views a DataSource used to extract data in full mode was wrongly in one plug-in. Thus, BW was not able to extract all the data using this DataSource. We resolved this problem after reading SAP note 843859 that suggested changing the data view manually. After we did so, the data flowed correctly into BW.
Because all the jobs start together after the upgrade and most of the background processes are busy processing pending jobs, the system becomes very busy. You can check whether the delta queue is filled with records. Since the system is available to end users, you may view records using transaction RSA7.
Last but not least, start your normal process chain from BW and observe the flow of data into BW. We hope that you have an easy and uneventful plug-in upgrade by following our procedure.
Shreekant W. Shiralkar
Shreekant W. Shiralkar is a senior management professional with experience on leading and managing business functions as well as technology consulting. He has authored best selling books and published many white papers on technology. He also holds patents for innovations. Presently he is global head of the SAP Analytics Centre of Excellence at Tata Consultancy.
You may contact the author at s-shiralkar@yahoo.com.
If you have comments about this article or publication, or would like to submit an article idea, please contact the editor.


