Companies implementing SAP HR often wish to retain the employee number from their pre-SAP system because it is deeply embedded in their corporate culture. The SAP personnel number field is frequently not able to accommodate this requirement. However, R/3 offers a way to store your legacy employee number in infotype 0032.
Key Concept
Infotype 0032 (internal data) contains a field labeled Previous Personnel Number. The field's technical name is P0032-PNALT. It is described by the data element PNALT. This field is a 20-character text field that need not be unique. A standard process allows you to change the field label to a name of your choice, such as Badge Number.
I recently worked on an SAP HR implementation for a manufacturing company that wanted its employees to continue using their existing badge numbers. I'm going to show you how the company met that requirement, using examples from the project.
The company, which has two locations, had been in business for about 40 years prior to the SAP implementation. Many of the employees had 30 or more years of service. Through its entire history, including several name changes and system conversions, the company had given each new employee a badge number.
Employees used the badge number for everything from punching the time clock to requesting vacation to calling in sick. Weekly open job listings, seniority reports, and paychecks are all sorted by badge number. The SAP implementation team recognized that eliminating the badge number would have a significant negative impact on the employees.
Standard Location for Legacy Employee Number
The conversion team considered the possibility of converting badge numbers into personnel numbers (PERNR). You can use transaction PA04 to make the PERNR an external number range. The data load program could then assign employees a PERNR equal to their old badge numbers. The team would have selected this option except for one problem. The two manufacturing sites came into existence as separate companies and evolved into one company through a series of mergers and acquisitions. Badge number analysis revealed that some employees at the two sites shared a badge number. Since the PERNR must be unique, this meant that at least some of the employees would be required to change their badge number.
Another option considered was to create a custom infotype for holding badge numbers. This option would provide total control of the data format and screen layout but had some disadvantages.
Many standard SAP reports are based on InfoSet queries. The team would have had to add the custom infotype manually to all InfoSets. Using an existing infotype and data element means that this field is available to all standard queries without further modification.
The team ultimately decided to store badge numbers on infotype 0032. It contains a 20- character field labeled Previous Personnel Number. It would be easy to change the field label to read Badge Number. The team could add the field to the master data screen headers and could build a custom default value and data validation edits. Adding a search help for this field allows users to refer to employees by badge number.
Adjust the Field Labels
The first task is to change the SAP-delivered label of this field into the familiar Badge Number tag. You do this via transaction CMOD. From the CMOD main screen, choose Goto>Text enhancements>Keywords>Change (Figure 1). A dialog box pops up asking for the language and data element to be changed. Enter a language code and the data element PNALT. Figure 2 on the next page shows the field labels adjusted for the installation that I’m using as an example.
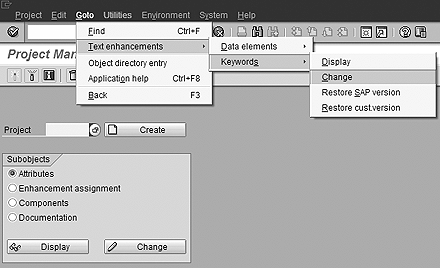
Figure 1
Change keywords for standard data elements
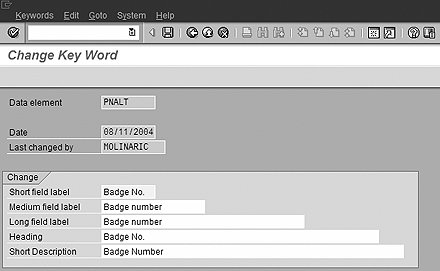
Figure 2
New keywords for PNALT data element
Five different text fields are associated with the data element. You use the label fields when placing the field on a screen or when browsing the PA0032 table. The Heading field is used on reports and the Short Description is used when field help is requested. Click on save and enter a Change and Transport System (CTS) request number to store these changes.
Add the Field to Infotype Headers
The next customization was to add the field to the infotype screen headers via IMG menu path Personnel Management>Personnel Administration>Customizing User Interfaces> Change Screen Header (Figure 3). The view Header Structure per Infotype shown in Figure 4 indicates the header structures used on each infotype screen. Infotype 0008, for example, uses header structure 02. The view Header Modifier shown in Figure 5 indicates the header modifier that defines each header structure. The Tr.class column allows different modifiers to be used for employees (A) and applicants (B). Header structure 02 for employee data uses header modifier 42.
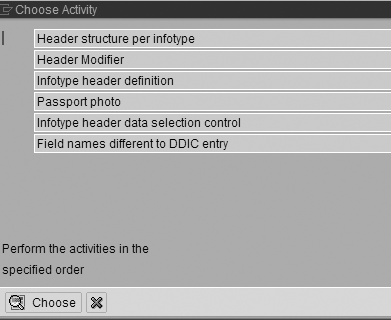
Figure 3
IMG step to change the screen header

Figure 4
Header structure per infotype
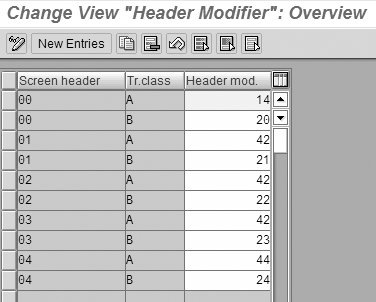
Figure 5
Header modifier view
Tip!
When working on the view infotype header definition, it is helpful to display an infotype record in one session while you make changes to the view in another. Toggle back and forth between the infotype display and the view maintenance so you can decide on which row and column you’d like each field to display. You may need to move some of the other fields around to make room for the PNALT field. The header definition shown in Figure 6 yields the infotype header shown in Figure 7.

Figure 6
Infotype header definition

Figure 7
Sample screen header
Add Defaults Values and Validation Rules
New employees are automatically assigned the next available personnel number in the hiring action. Customer enhancement PBAS0001 was implemented to provide similar functionality for the badge number field. You use transaction CMOD to create custom enhancement projects. Use any name you like for each project, but projects are easier to manage if you give the project the same name as the customer enhancement. Enter PBAS0001 as the project name and click on create. Enter PBAS0001 as the enhancement component and click on save. Double-click on the enhancement name to display the list of components. Double-click on function module EXIT_SAPFP50M_001. Then double-click on the name of include ZXPADU01. R/3 prompts you to create the include if it does not already exist. Figure 8 shows the source code that assigns the next available badge number.
*----------------------------------------------------*
*  Include           ZXPADU02                        *
*----------------------------------------------------*
CASE INNNN-INFTY.
********************IT0032*************************
  WHEN '0032'.
    CALL METHOD CL_HR_PNNNN_TYPE_CAST=>PRELP_TO_PNNNN
      EXPORTING
        PRELP = INNNN
      IMPORTING
        PNNNN = I0032.
    CHECK NOT I0032-PNALT IS INITIAL.
* SEE IF SOMEONE ELSE HAS THIS BADGE NUMBER
    CLEAR PA0032.
    SELECT * FROM PA0032
      WHERE PNALT EQ I0032-PNALT
        AND PERNR NE I0032-PERNR.
* DOES THE OTHER EMPLOYEE BELONG TO THE SAME SITE?
      SELECT * FROM PA0001
        WHERE PERNR EQ PA0032-PERNR
          AND ENDDA GE PA0032-BEGDA
          AND BEGDA LE PA0032-BEGDA.
        SELECT WERKS INTO WERKS FROM PA0001
          WHERE PERNR EQ I0032-PERNR
            AND ENDDA GE I0032-BEGDA
            AND BEGDA LE I0032-BEGDA.
        ENDSELECT.
        IF PA0001-WERKS EQ WERKS.
          MESSAGE e001(zhr) WITH 'Duplicate badge'.
        ENDIF.
    ENDSELECT.
ENDCASE.
|
| Figure 8 |
Logic for providing default badge number |
Function module EXIT_SAPFP50M_002 is also part of customer enhancement PBAS0001. This function enables customer-defined data validation for infotypes. The logic shown in Figure 9 was added to the include ZXPADU02. This logic prevents two employees at the same work site from being given the same badge number.
*----------------------------------------------------*
*  Include           ZXPADU02                        *
*----------------------------------------------------*
CASE INNNN-INFTY.
********************IT0032*************************
  WHEN '0032'.
    CALL METHOD CL_HR_PNNNN_TYPE_CAST=>PRELP_TO_PNNNN
      EXPORTING
        PRELP = INNNN
      IMPORTING
        PNNNN = I0032.
    CHECK NOT I0032-PNALT IS INITIAL.
* SEE IF SOMEONE ELSE HAS THIS BADGE NUMBER
    CLEAR PA0032.
    SELECT * FROM PA0032
      WHERE PNALT EQ I0032-PNALT
        AND PERNR NE I0032-PERNR.
* DOES THE OTHER EMPLOYEE BELONG TO THE SAME SITE?
      SELECT * FROM PA0001
        WHERE PERNR EQ PA0032-PERNR
          AND ENDDA GE PA0032-BEGDA
          AND BEGDA LE PA0032-BEGDA.
        SELECT WERKS INTO WERKS FROM PA0001
          WHERE PERNR EQ I0032-PERNR
            AND ENDDA GE I0032-BEGDA
            AND BEGDA LE I0032-BEGDA.
        ENDSELECT.
        IF PA0001-WERKS EQ WERKS.
          MESSAGE e001(zhr) WITH 'Duplicate badge'.
        ENDIF.
    ENDSELECT.
ENDCASE.
|
| Figure 9 |
Logic for providing badge number validation |
Build a Search Help
The final piece in this customization is to build a search help to allow employees to be located using their badge number. Search helps are ABAP objects that include a selection screen, a database view, and a hit list. They appear when you use the drop-down box (F4) in the personnel number field.
Several steps are required to implement a search help. The standard search help PREMK locates employees by using organizational assignment data. It is similar to the one needed for a badge number. You can copy it as a starting point. You need a database view that includes infotype 0032 to support the search help. Search help PREMK uses a view named M_PREMK. Transaction SE11 (Figure 10) is used to maintain database views and search helps. Enter the view name M_PREMK and choose the Copy button. Give the new view a name that starts with Z. Enter the table/join conditions. Include table PA0001 in your view because HR authorizations are often based on organizational assignment values. Include table PA0002 so the employee name can be displayed in the hit list.
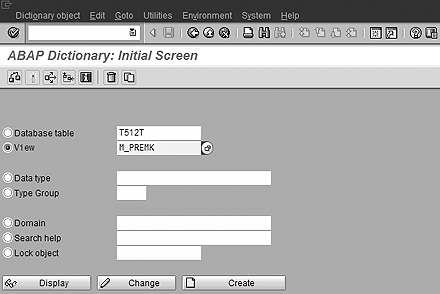
Figure 10
Maintain database views and search helps via transaction SE11
Use transaction SE11 to copy the search help PREMK to a name that starts with Z such as ZPNALT. Modify search help ZPNALT to use the new database view and to contain the desired parameters (Figure 11). Give the search help a hot key. In my recent implementation, the team assigned the letter F to this search help. The hot key allows the search help to be used inside the PERNR field. You can enter =f.2234 in the PERNR field to locate the employee with badge number 2234.
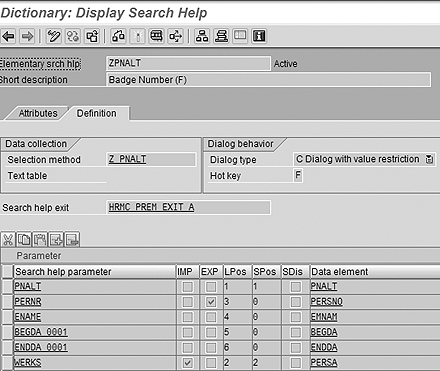
Figure 11
Modify search help ZPNALT
Finally, add the new search help to the list of search helps that appear when you use the drop-down list in the PERNR field. Use transaction SE11 to update the standard search help PREM. Add your custom-built search help to the list of elementary search helps that make up the collective help, as shown in Figure 12.
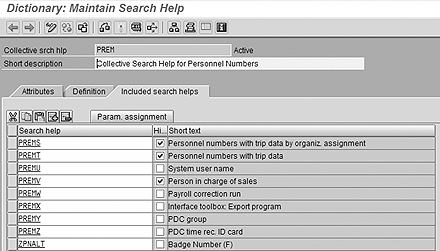
Figure 12
Add custom search help to PREM
Clay Molinari
Clay Molinari has 20 years of experience in the IT industry and has been working as an SAP HR consultant since 1997. He is currently president of C&C Savant, Inc., an SAP consulting firm that specializes in combining standard SAP configuration and custom ABAP programming to help its clients solve unique or complicated requirements.
You may contact the author at claymolinari@comcast.ne.
If you have comments about this article or publication, or would like to submit an article idea, please contact the editor.


