At many companies, ABAP programs are used even for simple one-time data conversion or update projects. The author suggests a free SAP tool, the Legacy System Migration Workbench (LSMW), as an alternative to unnecessary programming. He also discusses LSMW's features and describes helpful data migration steps.
Gone are the days when data conversion was required only during initial SAP implementation projects or for special needs for go-live, mergers, and de-mergers. Now, a logistics functional analyst might be called upon to convert data for a number of day-to-day business scenarios such as:
- Mass update of sales orders to reflect the changes in pricing dates or expected delivery schedules
- Update batch of purchase requisitions/purchase orders (POs)
- Create/extend material master records across organizational entities
- Batch upload of customer or vendor invoices
- Mass update of customer or vendor master records to reflect the revised organization structures
In many cases, even simple data conversions or updates are done with an ABAP program, even for one-time requirements. Take, for example, the last scenario from the above list, updating a few fields of the customer master records to reflect the new organization structure. You might consider using mass maintenance to do mass updates, or perhaps you could use the Computer Aided Test Tool (CATT). Both would work for simple scenarios, but they may not be useful for other situations. For example, mass maintenance cannot be used for transaction-based recordings, and CATT is more suitable for testing transactions.
For any slightly complex data-massaging requirement, you probably call on your technical team to develop an ABAP program. The problem is that ABAP development is a time-consuming process. When you want to perform a simple update or conversion, ABAP development is overkill, especially for one-time requirements. I know of many sites with hundreds of batch data communication (BDC) programs that they are not using anymore.
As a functional analyst, you may have wished that you could quickly update customer master records from an Excel sheet, or wanted to quickly change pricing dates for specific sales orders. SAP offers a free, fully supported tool that might allow you to do just that. It's called the Legacy System Migration Workbench (LSMW). Many people in the SAP community are not aware of it because it was not part of a standard system until after Release 6.20. You can download it from the SAP Service Marketplace (https://service.sap.com/LSMW). I'll first describe its features, and then demonstrate how to use it.
LSMW Features
The following features make LSMW a flexible tool for data conversion and migration:
- LSMW requires no ABAP knowledge. For most typical conversion and migration tasks, you can use standard R/3 programs with built-in conversion routines.
- LSMW handles various requirements from simple mapping rules to complex data massaging rules. Since it is based on standard R/3 posting principles, data consistency is guaranteed. All typical checks are done before the data is posted.
- Although you can use LSMW for data migration from a legacy system, it also can be used for many data massaging tasks within R/3 during the production support phase. (I will demonstrate this with an example.)
- LSMW uses existing standard R/3 conversion interface programs. Standard programs are already available for many objects such as commonly used master data (customer master, material master, equipment master) or transaction data (sales orders, purchase documents). You could use either the batch input or the direct input method for data conversion. Another typical requirement is to update the records based on transaction recording. Using LSMW, you can record your own transaction, making it much easier for you to update only the required fields, as most of the objects have so many fields that sometimes it is confusing.
- If you are using the standard R/3 interface program, you are accustomed to creating a text file with multiple structures. For example, for customer masters program RFBIDE00, you might create a text file with session details (structure BGR00 with Record Type 0), header data (structure BKN00 with Record Type 1), general information (structure BKNA1 with Record Type 2), and so on. With LSMW, this multi-layout file is created automatically from a structured data sheet.
- LSMW's wizard-like feature is easy to follow and makes the next task simple. It is similar to step-by- step instructions.
Figure 1 shows how LSMW works. The legacy data is already available in a specific file format on a PC or application server. LSMW's Read program reads the legacy system data. The Convert program converts this legacy data into an R/3-specific format. During conversion, you have the option of using various conversion rules to map data from one format to another. These conversion rules are reusable for other conversion tasks. Once the data is converted into an internal R/3 format, LSMW can use standard R/3 programs (batch input, direct input, or BAPIs) to upload the data to R/3.

Figure 1
Overview of LSMW
You do the following four tasks to migrate data from a source system to a target system:
Task 1. Define the targets
- Define the business objects (e.g., material master, SD documents).
- Define the import method (e.g., batch input, direct input, IDocs).
Task 2. Define the source structures
- Define how the source file is structured.
- Define the file layouts and attributes.
- Define the relationship between the source and target structures.
Task 3. Define the conversion rules
- Define how source fields are mapped to target fields.
- Define reusable conversion rules across multiple conversion tasks.
Task 4. Import data
- Import data to the R/3 system.
Now, I'll illustrate these tasks with a brief example. Download the link at the bottom of the article for a more detailed step-by-step explanation of this example. Use LSMW to Update Customer Master Records
Suppose that some of your customers are regrouped under a separate grouping as part of a corporate reorganization. You need to change the sales office, sales group, and customer group fields of these specific customer master records. You cannot use transaction code MASS because the customers being changed have specific numbers rather than ranges.
Without LSMW, you would have to manually change these fields from each customer master record with transaction code XD02. After entering the transaction code, you would enter the key information, click on sales view, and update the appropriate fields. This method is cumbersome and prone to errors. LSMW allows you to record transactions so that you can update specific fields for specific screens.
Note
The screenprints in this article are from IDES Release 4.6. They may differ slightly in other versions.
You call LSMW by executing transaction code LSMW. All conversions are grouped under a Project/Subproject/Object structure. The best practice is to use Project to represent various conversion initiatives in your company — e.g., Europe Migration or Upgrade 4.6 — and to use Subproject to represent applications — e.g., SD Conversions or Materials. The idea is that it is easier for you to maintain and retrieve these conversion tasks. For demonstration purposes, I'm creating a Project called LSMW_DEMO and a Subproject as CUSTOMERS for all different customer updates such as transaction recording (CUST_REC) and Object (CUST_OBJ), as Figure 2 shows.

Figure 2
Migration Object with Project and Subproject
The main LSMW screen provides wizard-like step-by-step tasks (Figure 3). To complete your data conversion, you need to execute the following steps in sequence. Note that these steps may look different depending on your Personal menu settings.

Figure 3
Initial screen for the LSMW wizard
Task 1. Maintain object attributes. One of the first tasks is to define the targets and attributes — what object you are going to update and how. LSMW offers various import techniques: batch or direct input for standard predefined objects, transaction recording for updates of specific fields of screens, BAPIs, and IDocs (Figure 4).

Figure 4
Define targets and maintain object attributes
In this example, you update customer master records with the help of recording transaction XD02. Choose the Batch Input Recording button and click on the recording overview icon to record the R/3 transaction. Enter the Recording name as XD02_REC, the description as Customer Master Updates Recording, and the transaction code as XD02.
The system calls transaction XD02 and prompts you to complete the Change Customer transaction. Enter the key customer information (customer number 1000, sales organization 1000, distribution channel 10, and division 00) and make changes to these three fields: sales office 1010, sales group 110, and customer group 01. Save the transaction. Once the transaction is completed, R/3 records the flow of screens and fields and saves the information, as shown in Figure 5.

Figure 5
Transaction recording overview
Note that the fields are populated with default values. The values you entered when you recorded the transaction are set by default.
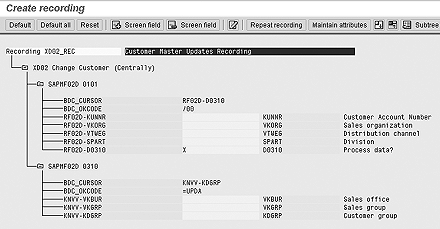
Observe that the transaction-recording process stores field names in a technical format. By pressing the F1 key on individual screen fields and then pressing the F9 key, the system displays technical names. You then can replace the technical names with descriptive names. Double-click on the field RF02D-KUNNR, enter the name as KUNNR and the description as Customer Account Number, and remove the default value. Similarly, double-click on all other fields with default values and make the appropriate changes. Once you have made the changes, the recording overview screen looks like Figure 6.

Figure 6
Transaction recording overview with screen field attributes
The objective of the first task is to define the target and its attributes. In this case, transaction recording XD02_REC is the target structure, and fields in XD02_REC become the target fields.
Save your changes. When you go back to the initial screen, you see that the initial screen steps have changed. Since you want to import data via the BDC method, the Direct Input and IDoc- related steps are hidden, as they are not relevant.
Task 2. Define source structures. You need to designate which fields to transfer from the source system so that their values go to the target structures. Accordingly, you need to define the source structures and which fields are within the source structure. Source data may be in a single structure or in multiple structures with a "header-detail" relationship. Each source structure consists of source fields.
The first step is to create a source structure, which I'll call XD02S. Give it a meaningful description, in this case Source structure for XD02S. Maintain source fields for the source structure by entering Type, Length, and Field description, as shown in Figure 7.

Figure 7
Source fields for the source structure
Tip!
If you have a date field and the batch input session is unable to interpret date value, you can change the date field to a characteristic field (Type C), and then enter date values in the input file according to individual user defaults.
Once the source structures are created and source fields are maintained, relationships between the target and source structures are created. Since there is only one source and target structure in this example, the relationship is automatically defaulted by the system.
Task 3. Define conversion rules. The next task is to define how a field from a source structure is mapped to a field in the target structure. What makes LSMW so flexible is that it offers various predefined conversion rules (Figure 8), which you can reuse across different LSMW objects. One of the most common requirements is to derive target values based on source values. For example, say that in an R/3 system, a field can have only A, B, or C as a value, whereas the source system has 1, 2, or 3 values only. You can create a translation rule so that target values are derived from the source field values.

Figure 8
LSMW offers various conversion rules and samples
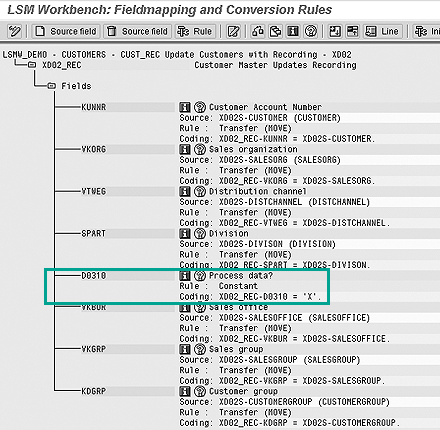
Next, you maintain field mapping for each of the target fields. If your source file provides the field, simply map the source field to the target field by clicking on the source field icon. The system uses the conversion rule Transfer (MOVE) to move the source value to the target field.
Map all the target fields to source fields (Figure 9). Note that for the RF02D- D0310 field, the default should be set to X. Use the constant rule icon to choose the constant value of X for field RF02D-D0310.

Figure 9
Translation rules allow target values to be derived from source field values
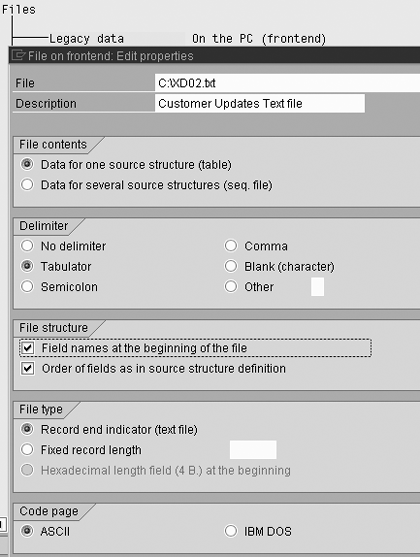
You can also maintain reusable translations and user-defined routines, which can be used across conversion tasks. For example, you could create a reusable conversion routine to translate material numbers that could be used in many other such LSMW conversion tasks. Since the conversion routine is reusable, you don't need to recreate this routine in the next conversion task. Another advantage is that it assures that material numbers are translated the same way in all the conversion tasks. Once mapping is defined, specify the location and names of the files that contain the source data. Also, maintain attributes of the file, whether the input file is delimited or has column headings as shown in Figure 10. Next, assign file names to source structures.

Figure 10
Maintain file attributes
Task 4. Import data. At this stage, all the major activities are done and you are ready to update the customer master records from the Excel file. Prepare a tab-delimited Excel file on your desktop PC's C: drive, with columns as Customer Number, Sales Organization, Distribution Channel, Division, Sales Office, Sales Group, and Customer Group.
Go back to the initial LSMW screen shown in Figure 3. The step Read data reads the data from the local drive. You can display what data was read by the step Display read data. The data is still not reformatted. The step Convert data applies conversion rules and converts it into the target format. You can view converted data by Display converted data to verify that it is reformatted in accordance with the defined conversion rules.
Once you have reviewed the converted data, you can go to Create batch input session. LSMW then creates a batch input session. You can execute it by Run Batch input session. Executing a batch input session is a standard SM35 transaction for managing BDC sessions. Once you have successfully executed the batch input session, the customer master records are updated in the system. You can confirm this by viewing the customer master records (transaction XD03).
Browsing through these four tasks, you may think that this is a time-consuming activity. However, it takes little time from start to finish! After playing around with few simple LSMW scripts, you will find it easy to change and create more complex ones with ease.
I have used the example of updating customer master records with the transaction recording option. As an alternative, you could use the standard SAP object 0050 (customer master) with the predefined SAP interface program RFBIDE00 (batch input interface for customers) to update data. Go to the Download Section of the SCM Expert Web site (www.SCMExpertOnline.com) for step-by-step instructions for this example.

Mitresh Kundalia
Mitresh Kundalia heads the SAP practice at Quality Systems & Software (www.QSandS.com), a consulting firm specializing in SAP S/4HANA, SAP General Ledger, and complex System Landscape Optimization (SLO)-type reorganizations. Mitresh is widely acknowledged as a leading SAP expert, with multiple publications and an SAP-PRESS book to his credit. He has published more than 50 peer-reviewed articles and white papers, and he has given presentations at various SAP conferences and events. Mitresh is the chief solutions architect of General Ledger Migration Optimizer (GLMO), a leading product to accelerate and jump-start the SAP S/4HANA and SAP General Ledger initiatives; SAP Data Reorganization Optimizer (SDRO), an SLO-type product for managing complex system landscape reorganizations; and Group Currency Activation and Conversion (GCAC), a product suite to manage introduction of parallel currencies and conversion of data in a live SAP system.
You may contact the author at Mitresh@QSandS.com.
If you have comments about this article or publication, or would like to submit an article idea, please contact the editor.


