If the revenue from the total billed orders plus the total unbilled orders in your source system doesn’t equal the total amount of order revenue you have in BW, a balance control report can help you reconcile the two. Learn how to create and use one using delta load levels.
Key Concept
Using the delta load level for data reconciliation instead of using all the data shortens the amount of time and work required because the system only has to check the data that has been added, changed, or deleted since the last data update.
When reviewing reports, the business side may encounter a situation in which two reports based on the same calculation provide different results. For example, query A from SAP BW says that you have total revenues of $1,000,000 for 2007, but report B from R/3 says you have $1,005,000 for 2007. Which one is correct?
It can take significant effort to explain this to the business, especially if you don’t have systematic, automated routines in place. The two systems can have different key figure values for many reasons, including that BW didn’t load the data correctly. For example, this could happen if the DataStore object (DSO) settings are not in line with the data (overwrite vs. aggregate).
To prove that BW loaded data correctly, you must be able to reconcile the data via delta processes while SAP BW is moving it from the Persistent Staging Area (PSA) to the DSO to the InfoCube. In our example, the total billed orders plus total unbilled orders in R/3 should equal the total amount of order revenue on the SAP BW side.
We developed a balance control process to reconcile the data as it moves from the PSA to the DSO to the InfoCube via delta processes. You can view the results via a query you run against a MultiProvider that brings together data from the PSA, DSO, and InfoCube. This process applies to SAP BW 3.5.
Business Scenario
Figure 1 displays an overview of how the balance control process works. Starting on the left you can see the original PSA, DSO, and InfoCubes and how the data flows to each. Going across to the right you can see how the objects change as the system ties them together in a MultiProvider. The balance control query then compares the latest delta load across the three objects against the data in the MultiProvider.

Figure 1
Overview of the balance control process
In our business scenario, we want to track the billed revenue as it flows from the PSA to the DSO to the InfoCube. Billed revenue is stored in the InfoObject key figure 0ME_PRICE _M.
We used the formula PSA-ODS Var to capture the price difference between the PSA and the DSO. We also used the formula PSA-CUBE Var to capture the difference between the PSA and the InfoCube values. The formulas compare each record in the PSA for this delta load to the same record in the DSO (or InfoCube) and display the difference.
Figure 2 shows an example of the overall results, which sum up the values at the delta load level indicated by the GUID along with the time stamp of load. Using the query results in Figure 2, we can then prove that all the data successfully loaded from the PSA to the DSO to the InfoCube and the price stayed the same for all three. This allows us to prove that the BW data loaded correctly.

Figure 2
Balance query result
How the Process Works
To implement the balance control process, you need to follow these five steps:
Step 1. Create a remote InfoCube on the PSA
Step 2. Edit the remote InfoCube by adding characteristics 0RECORDNO and 0TCTREQUID to the communication structure
Step 3. Create a MultiProvider that pulls the Remote InfoCube, DSO, and InfoCube together
Step 4. Construct a query that provides you with the balancing data
Step 5. Show the delta load Timestamp and the final results of Balance Control Query
Step 1. Create a remote InfoCube on the PSA. Using transaction RSA1, go to the PSA tree of the Administrator Workbench: Modeling screen, and highlight the PSA. Right- click on it and select Generate Export DataSource. In this example, we are using the PSA PD0CLNT100.
Note
If you previously generated an export DataSource on this PSA, you must first delete the old exported DataSource before you can generate one for this process. Use transaction RSA6 to delete the old export DataSource. If you are unable to delete it, refer to SAP Note 704596.
Next, from the Source Systems tree of the Administrator Workbench: Modeling screen, right-click on your source system and select DataSource Overview. Locate your PSA export DataSource, in our example 70ME_ISM_AM_ORDER3. You assign this DataSource to a new InfoSource you create in the next steps. You later map the InfoSource to a remote InfoCube, which you then integrate into a MultiProvider for querying.
Subsequently, create a folder called Data Validation in the InfoSources tree. Right- click on this folder and select Create InfoSource. In the screen that appears, select Flexible Update in any Data Target (Except Hierarchies) and enter the name for your new InfoSource (e.g., Z_TWP_ORDER3_PSA_EXPORT). Enter the original DataSource 0ME_ISM_AM_ORDER3 as the Template-InfoSource and click on the green check mark icon to continue. The new InfoSource appears under the Data Validation folder.
Note
A DataSource is a collection of related data fields in a flat structure, but SAP BW does not understand it as is. You must map them to InfoObjects — an InfoSource is a collection of InfoObjects. Before the BW system can read the DataSource, you must assign it to the InfoSource.
Right-click on TWP Orders3 PSA Export and select Assign DataSource. This brings up a list of all available source systems. Select the BW system WD0CLNT010 and click on the green check mark icon. In the screen that appears, assign your InfoSourceZ_TWP_ORDER3_PSA_EXPORT to the source system (Figure 3). Click on the green check mark icon. In the pop-up screen, select the export DataSource 70ME_ISM_AM_ORDER3 to assign it to the InfoSource Z_TWP_ORDER3_PSA_EXPORT.

Figure 3
Assign source system to newly created InfoSource
Next, maintain the communication structure and transfer rules. Double-click on Z_TWP_ORDER3_PSA_EXPORT to access the Transfer_Structure/Transfer_ Rules screen (Figure 4). In this screen add the fields REQUEST, RECORD, and STORNO_KZ to the transfer structure and map them to InfoObjects 0TCTREQUID, 0RECORDNO, and 0RECORDMODE, respectively. These fields represent the batch (or delta load) number, the precise record number in the load, and the state of the record (e.g., before image and new image). InfoObjects 0TCTREQUID and 0RECORDNO are crucial because the system joins the data in the PSA, DSO, and InfoCube on these fields in the balance control query. 0RECORDMODE plays an important role in filtering the records for delta loads.
Tip!
To use 0RECORDMODE as a navigational attribute in the InfoCube, define a new InfoObject ZRECMODE, bring in the transfer rules, and associate 0RECORDMODE to ZRECMODE.
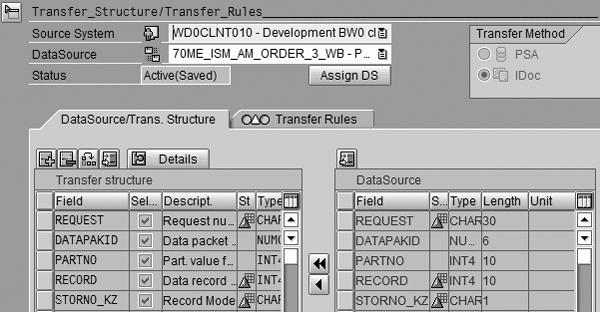
Figure 4
Select the required fields
Using transaction RSA1 again, create another Data Validation folder in the InfoProvider tree to help keep the balance control objects grouped together for easier maintenance. Recall that the previous Data Validation folder that you created was in the InfoSources tree. Right-click on the new Data Validation folder and select Create InfoCube to begin the remote InfoCube setup. After you create this remote InfoCube, you can integrate it into the final MultiProvider, which ties the PSA, DSO ZMAMO003, and InfoCube ZMAMC004 together.
In the screen that appears, enter the name and description for the InfoCube (Figure 5). Choose SAP RemoteCube as InfoCube Type and select the InfoSource that you created (Z_TWP_ORDER3_PSA_EXPORT, in our example). Click on Clear sources because BW is the source system for the remote InfoCube. Finally, click on the create icon in the lower left corner of the screen.
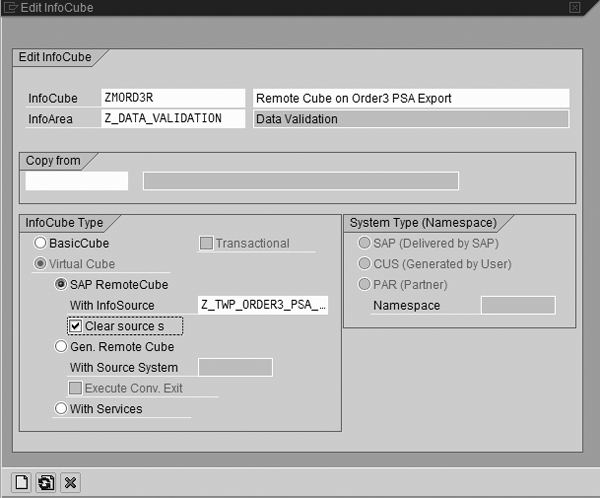
Figure 5
Define the InfoCube for remote access on the PSA
In the next screen, select characteristics and key figures of interest from the template on the right side and click on the left arrow icon to bring them in your new remote InfoCube (Figure 6). You want to prove that the money is correct at the order level, so include the order number, order item number, billing dataset, service date, and price group as the main characteristics. The record mode, GUID, and record number are other important characteristics needed to prove technical aspects of the delta load.
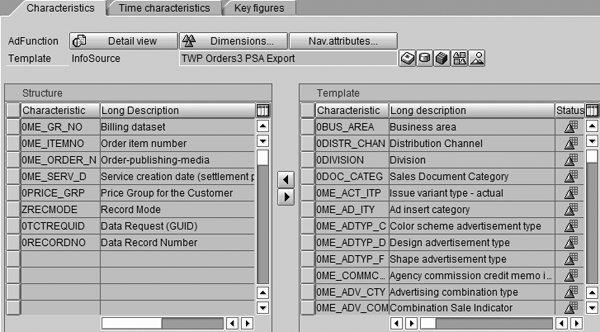
Figure 6
Create InfoCube for remote access on PSA
Right-click on the Dimensions folder and select Create New Dimensions. Before using any characteristic in an InfoCube, you need to associate it with dimensions in an InfoCube. In our example, we assign the characteristic Billing dataset to a dimension by dragging and dropping it from the left panel to the Billing DataSet as shown in Figure 7. Then drag and drop the key figures you want to balance to the structure. The only key figure we are using in this remote InfoCube is Price because that is what we are trying to prove is correct (unchanged) across the objects (PSA, DSO, and InfoCube).
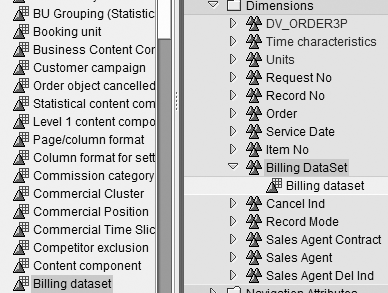
Figure 7
Assign the characteristics to dimensions in the remote InfoCube
Finally, from the context menu of the InfoProvider tree in Administrator Workbench, right-click on the remote InfoCube and select Assign Source System. Select the source system, in our example WD0CLNT010.
Step 2. Edit the remote InfoCube by adding characteristics 0RECORDNO and 0TCTREQUID to the communication structure. You need both of these for the MultiProvider procedure to work correctly and join the remote InfoCube, PSA, DSO, and the regular InfoCube together. 0RECORDNO is the actual record number that BW assigns to each row in the PSA. 0TCTREQUID is the request ID that BW assigns uniquely to each load, whether delta or full. This example balances delta batch loads.
In the PSA tree on the Administrator Workbench: Modeling screen, locate the InfoSource with which you want to balance your data (in this case, 0ME_ISM_AM_ORDER_3) and double-click on it. Click on the add icon in Figure 8 to insert new rows for 0RECORDNO and 0TCTREQUID. This makes the InfoObjects available so that the InfoProviders, DSOs, and InfoCubes can update them. Save and activate them.

Figure 8
Add fields 0TCTREQUID (request ID) and 0RECORDNO (record number) to the PSA Communication Structure
Below the Communication Structure on the same screen, you can see the DataSource/
Transfer Structure tab and the Transfer Rules tab. Click on the Transfer Rules tab, and then click on 0RECORDNO. In the screen that appears, select Routine and click on the create icon. Enter the name for the new routine on the next screen and click on the green check mark icon. We called our routine ZREC.
A blank screen with the title Edit Transfer Rules pops up, which is where you enter the code for 0RECORDNO (Figure 9). This routine transfers the value from field RECORD_NO to RESULT, which the system then assigns to InfoObject 0RECORDNO. Similarly, create a routine for 0TCTREQUID and insert the code shown in Figure 10.
|
| Figure 9 |
Code for 0RECORDNO |
| Figure 10 |
Code for OTCTREQUID |
Now add the InfoObjects 0RECORDNO and 0TCTREQUID to the DSO. In the InfoProvider tree of the Administrator Workbench, locate the DSO with which you want to balance data, in our case ZMAMO003. Double-click on it and a new screen Edit DSO appears. Right-click on Data Fields and choose Insert InfoObjects from the menu. Add InfoObjects 0RECORDNO and 0TCTREQUID and click on the green check mark icon. Check the DSO validation and activate it by clicking on the activate icon.
Next, add the update rules for new fields Data Request (GUID) and Data Record Number. Using transaction RSA1 again, open the InfoProvider tree, find the DSO (ZMAMO003) and double-click on the update rules icon (which looks like figure eight) associated with the DSO. Click on the update rule for Data Record Number, and then click on the Overwrite option as the update type. Enter Data Record Number in the Srce Field column, and then click on the green check mark icon. Repeat this process for Data Request (GUID). Save and activate.
Next, in the InfoProvider tree in the Administrator Workbench: Modeling screen, locate the InfoCube ZMAMC004. This is the InfoCube you want to use to balance data. Double-click on it to open the Characteristics tab, and then find 0TCTREQUID and 0RECORDNO in the Template section on the right. Select and move them to the Structure section on the left (Figure 11).
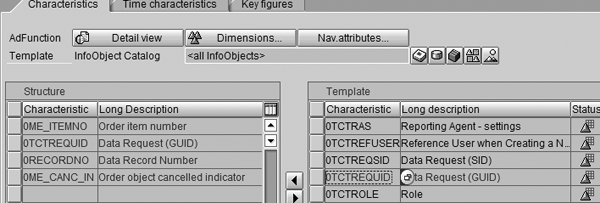
Figure 11
Add 0TCTREQUID and 0RECORDNO to the InfoCube
Right-click on the Dimensions… button to assign dimensions for 0TCTREQUID and 0RECORDNO. Assign 0TCTREQUID to the Request Id dimension and assign 0RECORDNO to the Record Number dimension. Save and activate.
Step 3. Create a MultiProvider that pulls the remote InfoCube, DSO, and InfoCube together. You can report on them in a single query by using 0RECORDNO as the main InfoObject that ties all three entities together, as shown in the star schema in Figure 12.

Figure 12
MultiProvider star schema
Right-click on your Data Validation folder in the InfoProvider tree and select Create MultiProvider. Provide an appropriate name to the MultiProvider and select the remote InfoCube ZMORD3R, the modified DSO ZMAMO003, and the InfoCube ZMAMC004, whose data you want to balance.
Select the remote InfoCube as the template and bring ZRECMODE, 0TCTREQUID, and 0RECORDNO to the MultiProvider structure on the left. Similarly, bring the relevant information into Structure side from Template side under the Key Figures tab. Define the dimensions and assign the selected characteristics to the dimensions.
Next, click on the Identifications button to provide a description for the characteristics you selected.
Step 4. Construct a query that provides you with the balancing data. Open Query Designer and create a query on the MultiProvider you just created. This query displays the result of reconciling the data among the PSA, DSO, and InfoCube. Include the characteristics you want to use from the list of dimensions that the Query Designer imports automatically from MultiProvider. Be sure you include the Data Request (GUID) and Data Record Number.
Next, right-click in the Columns area and select New Structure from the context menu. In the screen that appears, right-click on the structure and select New Selection. This calls a new dialog box, such as the one in Figure 13. Give the new column/structure you created an appropriate name, such as PSA_Price. Then drag the Remote Cube on Order3 PSA Export under the InfoProvider area on the right to the MultiProvider Data Package on the left. Select the key figure you want to compare (in our example, the Final Invoice Price) and drop it into the right panel. Repeat this for DSO ZMAMO003 and InfoCube ZMAMC004.
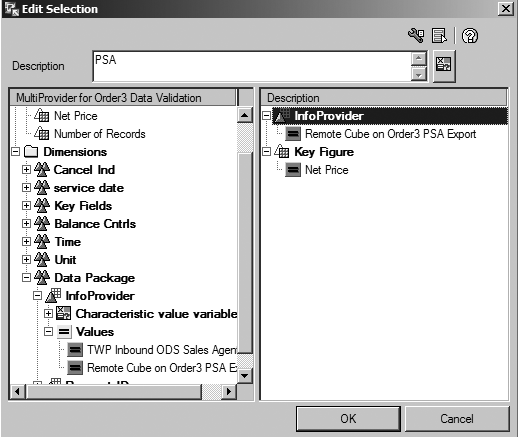
Figure 13
Define the structure in the balance control query
Right-click on the structure again and select New Formula. Give the formula an appropriate name, such as ODS_Var. Use the minus operand and calculate the difference, which appears as a column when you run the report (Figure 14). You might have to implement business rules logic to balance data because the key figure totals could change when data moves from the PSA to the InfoCube through the DSO. For instance, if cancelled orders are allowed to flow into the PSA and then the DSO but are excluded from the InfoCube, you would want to exclude all cancelled orders from the query.

Figure 14
Define the formula in the balance control query
Now you need to automatically filter the query for the last load. Activate the 0LSTRQID variable from the SAP delivered Business Content. In transaction RSA1 follow menu path Business Content>Object Types>Query Elements>Variable. Select 0LSTRQID and click on the Transfer button. Now it is available to use in a query.
Step 5. Show the delta load time stamp and the final results of the balance control query. Create a generic DataSource on the RSICCONT table, which stores the updated information about InfoCube loads such as the time stamp of the load. In our example, these would be ZMAMC004 and 02/26/2007 12:27:35. This becomes the DataSource that displays the time stamp with the balance control query results. Use transaction RSO2 in the Maintain Generic DataSources screen to create a generic DataSource. Enter the name of the new DataSource, ZRSICCONT_TIMESTAMP, and click on the Create button. On the next screen, select RSICCONT as the extraction source (ExtractStruct), and save.
Next, locate Data Request (GUID) in the InfoSource tree of Administrator Workbench. Right-click on it and select Assign DataSource. Choose the generic DataSource ZRSICCONT_ TIMESTAMP. Be sure to transfer the Data Request and Timestamp fields from the RSICCONT table to generic DataSource by using the arrow buttons which move fields from the right side of the screen to the left.
Create an InfoPackage to update the GUID master data, which writes the time stamp in the master data table. Right-click on ZRSICCONT_TIMESTAMP and choose Create InfoPackage. Use the schedule tab to start the data load immediately or schedule it as a batch for later updating.
Note
For more information about this topic, consider attending the SAP Education course BW350 "SAP BW Extraction" for SAP BW 3.5 or BW330 "Business Information Warehouse — Modeling" for SAP NetWeaver BI 7.0.
Brian Hether
Brian Hether is the manager of data warehousing at The Washington Post. He has 17 years of data warehousing experience, most recently with SAP NetWeaver BW, helping take the system live in 2007. He holds a bachelor’s degree in mathematics, a master’s degree in information systems, and a professional development certification in business administration from Georgetown University.
You may contact the author at hetherbk@yahoo.com.
If you have comments about this article or publication, or would like to submit an article idea, please contact the editor.

Opesh Gupta
Opesh Gupta works in the data warehousing solutions group at The Washington Post. He has 13 years of experience in designing, managing, and implementing software solutions on a blend of technologies from mainframe, client-server, Web development, and data warehousing. He has bachelor’s degree in engineering and a master’s degree in information technology.
You may contact the author at om5454@yahoo.com.
If you have comments about this article or publication, or would like to submit an article idea, please contact the editor.


