With the latest version of SAP NetWeaver Composition Environment (7.2), you can write back any business-related data that you find useful for analysis. You can create charts to visualize the aggregated data using SAP NetWeaver Visual Composer. A new reporting activity in your process model allows you to obtain detailed insight into processes by means of performance indicators. Here are the necessary steps to implement analysis on process data.
Key Concept
SAP NetWeaver Business Process Management, which is part of SAP NetWeaver Composition Environment (SAP NetWeaver CE), allows users to model new process ideas using the Business Process Modeling Notation (BPMN). The ability to execute BPMN models was one of the major highlights shipped with SAP NetWeaver CE. Now that process models are executable, users want to optimize these processes. Data written by a reporting activity in business processes can now be taken as input for SAP NetWeaver Visual Composer user interfaces. Users can define their own process key performance indicators and track them closely in real-time.
Process analytics is a topic of increasing interest for users as well as partners. With the right tooling, it is now possible to model business processes based on the widely accepted Business Process Modeling Notation (BPMN) standard.
SAP NetWeaver Business Process Modeling (SAP NetWeaver BPM) offers new possibilities in the business process management domain. Not only can you model and execute your processes, but with the latest release of SAP NetWeaver BPM that is shipped with SAP NetWeaver Composition Environment 7.2 (SAP NetWeaver CE), you can also protocol business-relevant data during process execution time and analyze it later for process optimization purposes.
You can do this without extracting data explicitly into a data warehouse (such as SAP NetWeaver Business Warehouse). You can review your analytical data while the processes are running, resulting in real-time analytical applications. This article explains step-by-step what is necessary to write your analytical data during process execution and how to visualize this data in appealing charts. It is intended for business process experts and developers who want to learn what it takes to benefit from the new process analytical options delivered with SAP NetWeaver CE.
The example process I am going to build reflects a typical scenario between business partners. Assume within your company you have outsourced certain tasks (e.g., hosting of email servers) to several service providers. Of course you have negotiated service level agreements (SLAs) with your providers (e.g., that they have to respond to requests within a certain time frame). You get reports on a monthly basis about the average response times from the different service providers under contract. As the outsourced service is of such high importance for your company, you are not satisfied with the monthly report. You need the current values immediately so that you can react in a timely manner. Let’s see how you can implement such a scenario with SAP NetWeaver CE. The process I am going to build concentrates only on the analytical aspect and is depicted in Figure 1.

Figure 1
Simplified process for demonstrating process analytics
The first step (Simulate Handle Request) represents the external service provider. While working on the request, time passes by. As I am only simulating the service provider, the associated user interface (UI) contains just one input field in which I enter the unique ID of the particular service provider. Later, this allows you to associate the times measured for handling the request to the responsible service provider. Once the request has been finished, the new reporting activity allows you to write back start and end times for serving the request enhanced by the service provider’s ID. These three fields are the basis for the analytical chart you are going to build later with SAP NetWeaver Visual Composer.
Let’s begin with the implementation. I assume you are familiar with SAP NetWeaver CE, its tooling (especially with the process modeler and SAP NetWeaver Visual Composer), and how to build, deploy, and run business processes. If not, I recommend the following SAPexperts articles that guide you through one complete composite application development cycle:
Begin in the process composer, which is part of the SAP NetWeaver Developer Studio to model your process skeleton as is depicted in Figure 1. For this example, name your process Analytical Process and drag and drop one human activity and one reporting activity between the start and end events. Name the human activity Simulate Handle Request and the reporting activity Write Analytical Data. Connect the events and activities accordingly (Figure 1).
Next you generate the UI for the human activity. This is a new feature that helps speed up development. As the UI generation feature relies on the process context, you import an XSD file that represents the process context first. Figure 2 shows what the contents of the XSD file looks like. You can download this code using the link at the end of this article.
<?xml version="1.0" encoding="UTF-8"?><schema xmlns="https://www.w3.org/2001/XMLSchema" xmlns:tns=https://www.example.org/analyticsprocessspj elementFormDefault="qualified" targetNamespace="https://www.example.org/analyticsprocessspj"> <element name="AnalyticsProcessSpj" type="tns:AnalyticsProcessSpj" /> <complexType name="AnalyticsProcessSpj"> <sequence> <element name="startDateTime"/> <element name="endDateTime"/> <element name="serviceProviderID"/> </sequence> </complexType> </schema>
|
The context consists of three fields:
- startDateTime: the point of time when the request is handed over to the external service provider
- endDateTime: the point of time when the external service provider finishes the request
- serviceProviderID: the unique ID of the external service provider who was responsible for handling the request
Once you import the file, you can drag and drop the associated data type as a process context into your process model to make it available for UI generation. For generating a UI based on the data of the process context, proceed as follows:
Step 1. On the Properties tab of the human activity Simulate Handle Request click Task in the left button bar and select New… from the Task dropdown-list (Figure 3).
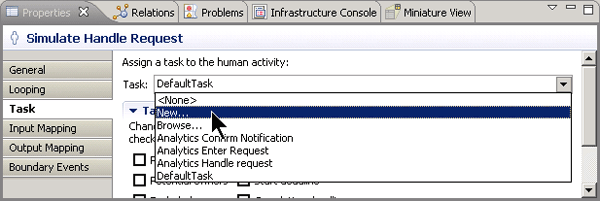
Figure 3
Create a new task for the human activity Simulate Handle Request
Step 2. The New Task wizard opens. Give your task an appropriate name such as Simulate Handle Request Task, check the Generate UI Component checkbox, and click Next (Figure 4).
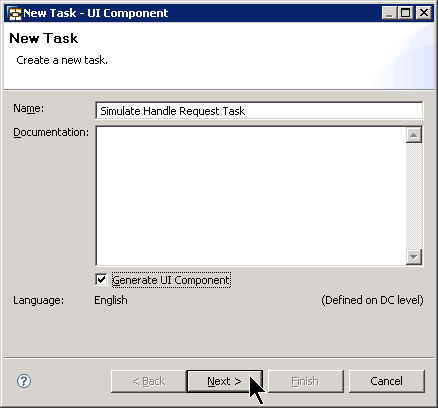
Figure 4
Name the task and set the checkbox for UI generation
Step 3. As you want to generate a Web Dynpro UI, leave all settings on the next wizard screen as they are (Figure 5). In case the Development Component is not set yet, create a new component by clicking the New... button. Follow the wizard that pops up. In essence, you just have to provide a name for your new development component. Finally, click the Next button.

Figure 5
Choose the UI technology
Step 4. Based on the task’s name, the next wizard screen proposes names for the Web Dynpro components it is going to generate. You can leave the entries as they are or adjust them as I did (Figure 6). Click the Next button.
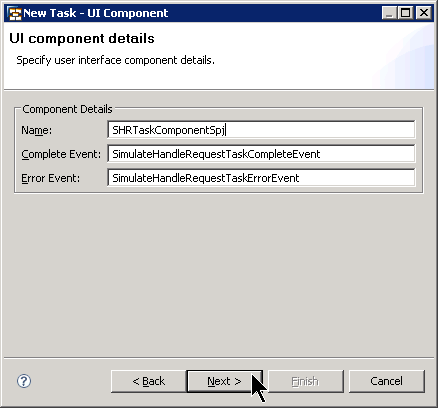
Figure 6
Setting names for the Web Dynpro component
Step 5. You are asked to choose the fields that should appear on the UI. As I am only simulating the service provider, I only need the serviceProviderID field. Select the associated checkbox and click the Finish button (Figure 7).
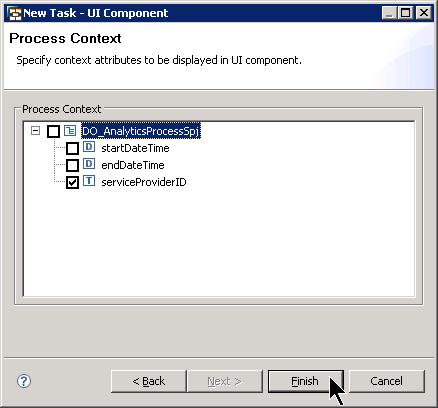
Figure 7
Choose the field for the Web Dynpro UI
Behind the scenes, the Web Dynpro UI is generated and automatically associated with the newly created Task. You could adjust the generated UI within the Web Dynpro perspective but for my purposes, I am leaving the generated UI as is.
Next, you adjust the settings for the reporting activity. For writing analytical data, you need a data source. Data sources allow you to write data that afterwards is either automatically consumable by SAP NetWeaver Visual Composer, or you can use for transferring the contents to SAP NetWeaver Business Warehouse for further analysis. Therefore, select the reporting activity in the process model, switch to the Properties tab, click the Reporting button in the button bar on the left, and choose New… from the Data Source Name drop-down list (Figure 8).
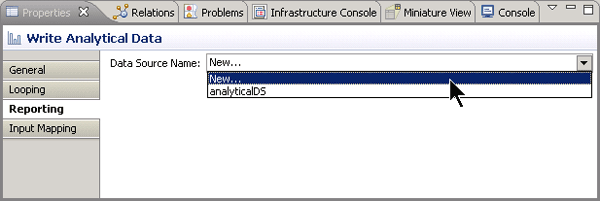
Figure 8
Create a new data source
The New Reporting Data Source wizard opens. On the first screen, enter an appropriate name for your data source such as SpjAnalyticsDS (Figure 9). Click the Next button.
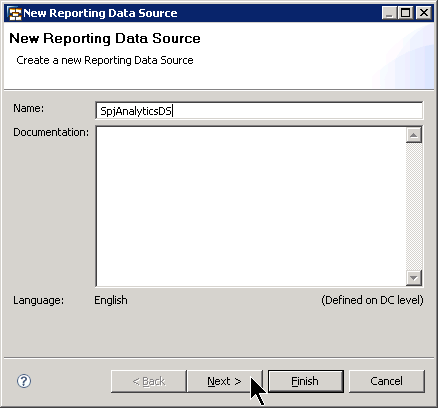
Figure 9
Provide a name for the new reporting data source
On the second screen, select the fields you need for your analytical purposes. As I want to analyze the response times for the different service providers, I selected all the fields offered in this dialog step (Figure 10). The fields are automatically retrieved from the process context. In real-life scenarios, you will probably have more fields to choose from. It is then up to you to decide on which data your reports and charts should rely. Click the Finish button to leave the wizard.
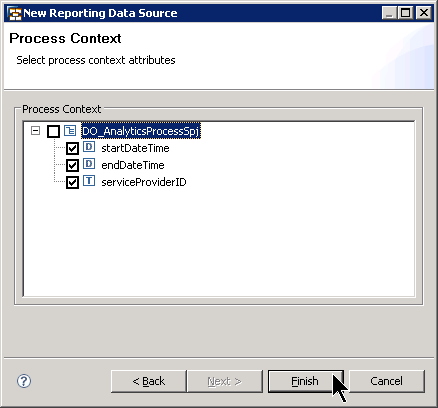
Figure 10
Select fields for reporting
After finishing the wizard, it’s worth taking a look at the mapping from the process context to the reporting activity. Click the Input Mapping button in the button bar on the left side of the Properties tab (Figure 11).

Figure 11
Input mapping of the reporting activity
As you can see, the system has automatically generated the mapping from the process context (left) to the data source (right). Therefore, the filling of the reporting activity’s fields is guaranteed. The next task is to assign values to the fields in the process context.
Step 1. Set the start time. The start time has to be triggered immediately before the human activity Simulate Handle Request is called. On first sight you might want to set the time in the input mapping of the activity. Remember that you can only set fields that are also part of the UI. The UI consists of the serviceProviderID only. Therefore, you cannot set the start time. The solution: set the start time in the output mapping of the preceding step of the process. As this is the Start event, select it in your process model and switch to Output Mapping on the Properties tab (Figure 12).

Figure 11
Set the start time in the Output Mapping of the Start event
Double-click the startDateTime node of the process context to open the script editor. A pre-delivered library function can be used to set the current time as the value for the start time. In the right part of this script editor, you can find function current-dateTime() beneath the node named Rules and Functions > Durations, Dates and Times (Figure 13).
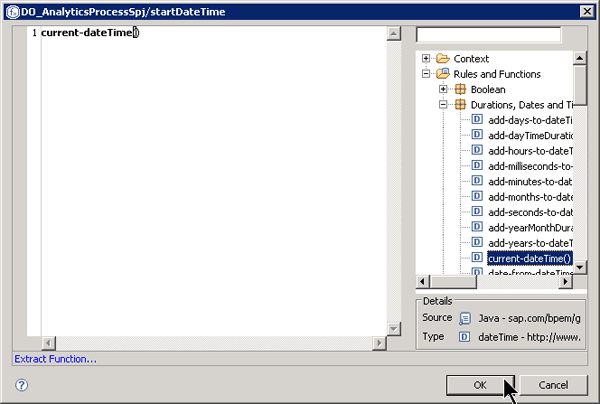
Figure 13
Set the start time by calling the library function current-dateTime()
Double-click the function or drag and drop it into the scripting area. Don’t forget to add opening and closing brackets after the function’s name. Click OK to close the scripting editor. Your start time is set now.
Step 2. Set the end time. The end time can obviously be set in the output mapping of the human activity Simulate Handle Request. Select the activity in the process model and switch to Output Mapping on the Properties tab. Repeat the procedure described in the previous step and assign the current-dateTime() function to the process context variable endDateTime.
Step 3. Last but not least map the serviceProviderID that is set during runtime in the human activity to the identically named process context variable. This also is done in the output mapping of the human activity. This output mapping looks like the one depicted in Figure 14.
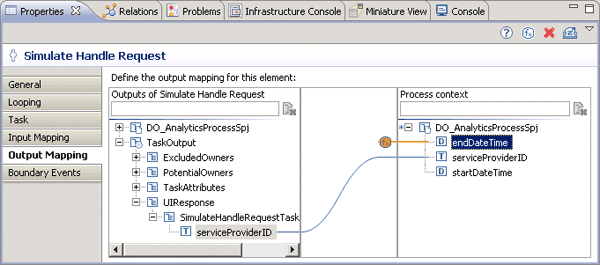
Figure 14
Output mapping of the human activity Simulate Handle Request: endDateTime and serviceProviderID are set
With that, you are done with the process side. UI, reporting activity, and mappings are in place. Don’t forget to set the user and administrator for your process. Finally build, deploy, and run your process. During runtime, enter 4711 as the service provider ID, as shown in Figure 15. Click the Approve button. The task now is closed. The time you needed together with the serviceProviderID are written to the data source. You are now able to start modeling the analytical UI within SAP NetWeaver Visual Composer.
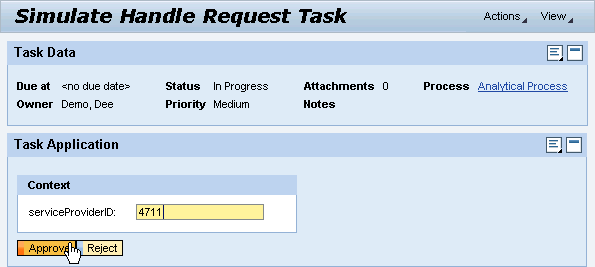
Figure 15
Set the serviceProviderID during runtime as part of the human activity Simulate Handle Request
Model the Analytical UI with SAP NetWeaver Visual Composer
So far I’ve shown how to develop a business process that writes business-related content to a data source. SAP NetWeaver Visual Composer is able to identify the newly created data source out of the box. You can use the data source within SAP NetWeaver Visual Composer to create a bar chart for visualizing the needed times for handling the requests. The goal is to visualize the minimum, the maximum, and the average response times. You achieve this as follows:
Step 1. Open SAP NetWeaver Visual Composer in your browser (Internet Explorer). Create a new model, name it DisplayAnalyticsSpj, and assign it to a new development component named spj_dc (Figure 16).

Figure 16
Create a new model
Step 2. In the button bar on the far right of your SAP NetWeaver Visual Composer window, click the Search button and choose BI Data Sources from the Select provider drop-down list.
Step 3. No other inputs are necessary for the search form. Just click on the Search button and SAP NetWeaver Visual Composer automatically detects the data source that you’ve created within the process composer. Drag and drop the found data source into SAP NetWeaver Visual Composer’s modeling area (Figure 17).

Figure 17
Select the data source as basis for the analytical UI
Step 4. From the FILTER node, create a Start Point via drag and drop (Figure 18).

Figure 18
Add a Start Point to the data source
Step 5. As you want to aggregate the data that was written by the reporting activity, you add an Aggregate Data element to your model. Drag and drop the DATA node located on the right side of the data source shape into the modeling area and select Aggregate Data from the context menu (Figure 19).

Figure 19
Aggregate data from the data source
Step 6. Now you can configure the aggregation element. You need three aggregations:
- Minimum time needed to handle the requests
- Maximum time needed to handle the requests
- Average time needed to handle the requests
All these times have to be grouped by the service provider ID. This is exactly what you have to maintain for the aggregation element.
Select the aggregation element in your model and click the Configure button in the button bar on the far right of the SAP NetWeaver Visual Composer window. Next, click the ellipse (…) close to the Configuration input field (Figure 20). The Define Aggregate dialog opens.

Figure 20
Open the configuration dialog of the aggregation element
The Define Aggregate dialog allows you to define all the aggregations you need for your analysis. Click the plus icon  once to add a new row to the table of aggregates (Figure 21).
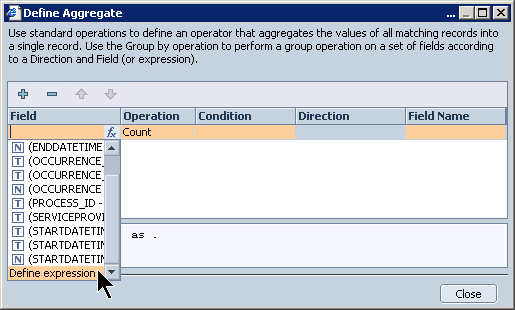
Figure 21
The Define Aggregate dialog
What is your goal? You want to calculate the minimum, the maximum, and the average response times. Do you have the response times already? No, you only have the end and the start times. You have to calculate the response time by subtracting the start time from the end time. As the times are all measured in milliseconds, you divide the result by 1,000 so that you get the response times in seconds.
If you take a look at the Define Aggregate table, you can easily pick a field for aggregation. However, for the calculations for this example it is not appropriate. You have to pick the Define expression entry from the Field drop-down list (Figure 21) to open the Dynamic Expression Editor. This editor allows you to define any calculation you want. In addition, it allows you to pick the fields available in your model (Figure 22).

Figure 22
Dynamic Expression Editor with the data fields available in the model
The formula you have to add in the expression editor now looks like this:
=(@BI_ENDDATETIME_VALUE-@BI_STARTDATETIME_VALUE)/1000
You don’t have to type the variable’s names. You can just pick them from the Data Fields list in the right part of the editor and drag them into the expression editor. The final result looks like the one depicted in Figure 23.

Figure 23
Add the calculation in the dynamic expression editor
After closing the expression editor, the formula appears in the Field column of the Define Aggregate dialog (Figure 24). Finally, you have to define how the result of the calculation should be treated. You want to retrieve the minimum value of the response times. Therefore, pick the Min entry from the drop-down list in the Operation column (Figure 24).
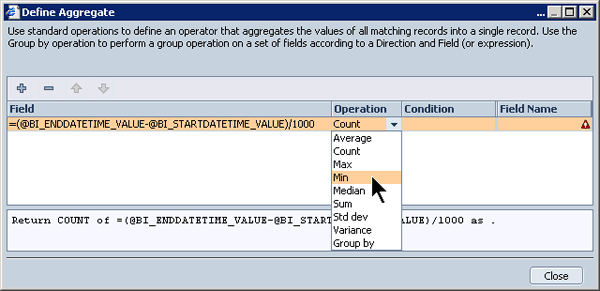
Figure 24
Choose the operation for the aggregation
Now provide a name for this aggregation, which can then be used in forthcoming SAP NetWeaver Visual Composer elements for referencing purposes. Enter the name minDuration into the Field Name column of your aggregate. The final result of the first aggregation looks like the one depicted in Figure 25.

Figure 25
Define a field name for the aggregate
One aggregate is now defined. Repeat the aforementioned steps to add two more aggregations: one for the maximum value and one for the average value. The formula is identical in all three cases. Only the operation and the field names differ. The result is shown in Figure 26.
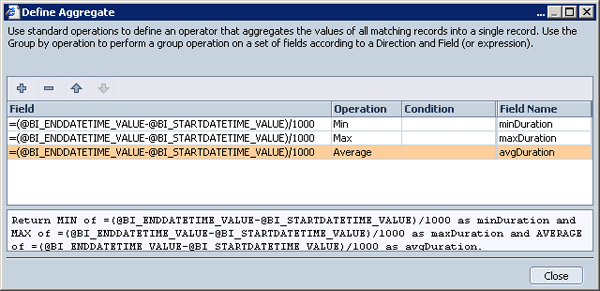
Figure 26
Define Aggregate dialog after specifying three aggregates
Next, group the values by the service provider ID. Add another row to the aggregate table by clicking the plus icon. This time you don’t have to define a formula for your aggregate as the service provider ID is already contained in the Field drop-down list (Figure 27).

Figure 27
Pick the service provider ID for the grouping part of the aggregate
Select the service provider ID field and choose the Group By operation as you want to group all values (minimum, maximum, and average) by the IDs of the several service providers. With that, the configuration of the aggregation is completed as shown in Figure 28. You can close the dialog by clicking the Close button.

Figure 28
The completed aggregation
Now that the values have been aggregated, you can visualize them using one of the predefined SAP NetWeaver Visual Composer charts. Drag and drop the outgoing plug of the aggregate shape into SAP NetWeaver Visual Composer’s modeling area and select Chart View from the context menu (Figure 29).

Figure 29
Add a chart to the SAP NetWeaver Visual Composer model
To configure the chart, you give the chart an appropriate name that also appears as the headline of the chart. In the Title field of the configuration pane, enter External Service Provider Durations (Figure 30).

Figure 30
Providing the title for the chart
The most important aspect is the definition of the data series on which the chart should be based. You can now reuse the names you previously provided for the aggregated data for your data series configuration. In the Data Definition section of the Configure Chart View pane, click the ellipse (…) to open the Edit Data Series dialog. Click the plus icon to add a new series. The system adds a new row (Figure 31). In the Data Series column, enter the name minDuration. In the Formula drop-down list, you find the field definitions I mentioned before. Pick the minDuration entry (Figure 31).
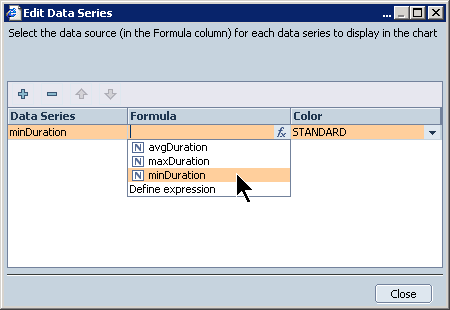
Figure 31
Define data series for the chart
Repeat the previous step and add two more rows representing the maximum response time and the average response time. You are defining the three columns of the resulting chart and associating those columns to the aggregated data defined before. The correct definition of the data series is depicted in Figure 32. You can now close the window.

Figure 32
Definition of all data series for the chart. This results in three chart columns during runtime
The final configuration steps are pretty simple. You provide a label for the X and Y axis of the resulting chart. Enter Service Provider into the input field labeled X title and Seconds into the input field labeled Y title. Now define on which data the X axis should rely. The Y axis represents how many seconds the handling of requests lasted. The X axis, on the other hand, stands for the several service providers. They were grouped during the configuration of the aggregate by the service provider ID. This is the field you choose from the drop-down list that is associated to the X value field of the chart’s configuration pane (Figure 33).

Figure 33
Assign the group-by value to the X axis
Once you’ve deployed and run the SAP NetWeaver Visual Composer UI your final result should look like the one shown in Figure 34. As I ran the process only once, all times are the same.

Figure 34
The SAP NetWeaver Visual Composer chart during runtime filled with the data of the reporting activity
You can play around now with your application. Run your business process several times, enter different service provider IDs, and see how the chart changes after each process execution cycle. You don’t have to re-deploy your SAP NetWeaver Visual Composer application. Just reload the chart and you will recognize that each time you’ve finished a process, the result is instantly reflected in the chart. After several executions the chart might look like the one depicted in Figure 35.
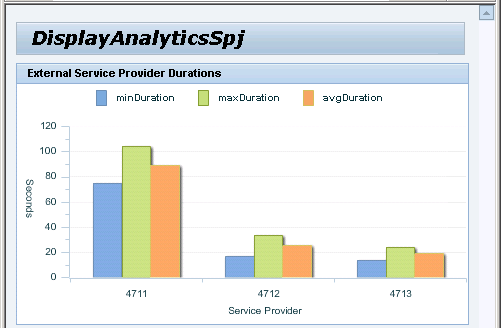
Figure 35
The SAP NetWeaver Visual Composer chart after several process executions

Dr. Volker Stiehl
Prof. Dr. Volker Stiehl studied computer science at the Friedrich-Alexander-University of Erlangen-Nuremberg. After 12 years as a developer and senior system architect at Siemens, he joined SAP in 2004. As chief product expert, Volker was responsible for the success of the products SAP Process Orchestration, SAP Process Integration, and SAP HANA Cloud Integration (now SAP HANA Cloud Platform, integration service). He left SAP in 2016 and accepted a position as professor at the Ingolstadt Technical University of Applied Sciences where he is currently teaching business information systems. In September 2011, Volker received his Ph.D. degree from the University of Technology Darmstadt. His thesis was on the systematic design and implementation of applications using BPMN. Volker is also the author of Process-Driven Applications with BPMN as well as the co-author of SAP HANA Cloud Integration and a regular speaker at various national and international conferences.
You may contact the author at editor@SAPpro.com.
If you have comments about this article or publication, or would like to submit an article idea, please contact the editor.