SAP QuickViewer allows inexperienced users to create QuickViews, which are simple basic lists. However, you should be aware that some companies do not use it as a core reporting functionality because of security concerns. The author shows how QuickViewer works with three data sources: an HR logical database, a table, and an existing InfoSet.
SAP QuickViewer is a reporting tool that made its first appearance in SAP Release 4.6. It is actually a variant of the SAP Query tool. It was designed for new users who need a report to look up information once. Unlike SAP Query, which is a robust end-user reporting method that can be used to create basic lists, statistics, and ranked lists, QuickViewer allows your inexperienced users to create QuickViews, which are simple basic lists. Some of the other major differences between QuickViews created with the QuickViewer reporting tool and queries created by the SAP Query reporting tool are:
- SAP Query allows a user up to 14 different screens with varying functionality to create robust reports. QuickViewer has a single-screen approach to creating QuickViews.
- Configuration of user groups and InfoSets (known as functional areas in releases earlier than 4.5) is required in order to use SAP Query. User groups and InfoSets are not required for QuickViewer.
- SAP Query uses InfoSets as the source of the report’s data. With QuickViewer, the data source (table, database view, table join, logical database, or functional area) is selected dynamically when you create a new QuickView.
- Unlike SAP queries, QuickViews cannot be exchanged among users. However, they can be converted to SAP queries.
- Although creating reports with QuickViewer is quick and easy, QuickViewer is not used as a core reporting functionality in some HR and Payroll environments because of security concerns. (See the sidebar, “Security Concerns with Direct Table Reads in QuickViewer.”) Many companies restrict access to QuickViewer in the same manner that they restrict access to transaction code SE16. Therefore, it can be used in the same situations in which companies permit use of SE16. For example, some organizations permit access to SE16 or QuickViewer for their IT functional analysts or the like who already have access to information without restriction.
I’m going to show how to use QuickViewer to create HR/Payroll reports. In my first example, I’ll create an HR report using an HR logical database as the data source. Then I’ll quickly explain the differences when a table or an existing InfoSet is the data source. A basic casual user with little training could create reports with one of these three methods. However, a fourth data source for QuickViewer — a table join — should be restricted to those who are familiar with the database structure and hierarchy. The technical information on how to build a table join is outside the scope of this article; however, if you want to learn more, you can visit the SAP Help application and search on the words “graphical table join definition.”
Logical Database as Data Source
You can access QuickViewer via transaction code SQVI (or through the menu path System>Services>QuickViewer). The main screen of the QuickViewer tool resembles the SAP Query screen. (See Figure 1.)

Figure 1
Initial screen of QuickViewer in Release 4.6C
To create a QuickView, you first type in a name for your QuickView and select the create button.
Security Concerns with Direct Table Reads in QuickViewer
Not unlike Ad Hoc Query, which is often used for quick one-time lookups of employee data, QuickViewer is designed to give you a quick and dirty look at your SAP data. Using a table as your data source mirrors the functionality many users would experience using SE16 or the like in a more user-friendly format. A predominant reason why many companies block access to transaction code SE16 is that it allows you to perform a direct read of a database table that bypasses the traditional SAP security roles. The concern with QuickViewer is that it too allows this type of access. For example, if my security profile says that I am restricted from seeing employee subgroup XX, which contains our executive-level payroll, then I would not be able to see that data through traditional reporting. However, if I were to use QuickViewer and select the annual salary table PA00008 as my data source, then I would in essence bypass security and have access to that information.
The data source selection dialog box (Figure 2) appears. You need to enter four items on this screen. First, enter a Title for your QuickView. Next, select a Data source from the drop-down menu. Your options are Table, Table Join, Logical database, and SAP Query InfoSet. For this example, I selected the Logical database option.

Figure 2
Data source selection dialog box presented during the creation of QuickViews
Once I select the data source type, the bottom part of the dialog box changes to allow me to specify the data source name. Three different logical databases are available for HR and Payroll. They are PNP for Personnel Administration (PA) data, PCH for Personnel Development data, and PAP for applicant data. I selected the SAP-delivered HR PA logical database called PNP.
The last option is to specify if I wish to use the QuickViewer tool in Basis (standard) or Layout (graphical) mode. I selected Basis mode and clicked on the enter key.
If you choose a logical database as your data source, a second dialog box appears listing all the infotypes associated with the logical database. On this screen, shown in Figure 3, select the checkboxes for any infotype that contains fields that you wish to include in your QuickView. Select the enter button.

Figure 3
Selecting checkboxes
Next, you see the main screen of QuickViewer, as shown in Figure 4.
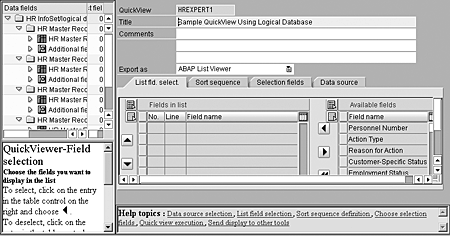
Figure 4
QuickView creation screen of the QuickView reporting tool
The main screen of QuickViewer has four tabs at the bottom. The List fld. select. tab is where you select fields to be included in your report. Place your cursor on the field name in the right side of the window and use the directional arrows to move the fields to the left side of the window. Any field that appears on the left side of the window will be output in your report.
The Sort sequence tab works in the same fashion and allows you to designate a sort order (either ascending or descending) for each field.
The Selection fields tab allows you to add additional fields to appear on the selection screen when you execute the report.
The last tab, Data source, provides a description of the data source that you selected.
After selecting the fields on the List fld. select. tab, choose your Export format from the drop-down box mid-screen. Your options include ABAP List Viewer (default), List display, Word, Microsoft Excel, Graphics, Local file, Display as table, and ABC Analysis.
Select the execute button. Because you used a logical database as your data source, a selection screen appears. Enter any restricting values on the selection screen and click on the execute button to see your finished report. (See sample report in Figure 5.)

Figure 5
Sample HR report using QuickViewer and logical database PNP
Table as Data Source
To create a report using a table as the data source, you start out the same way as in the first example. On the main screen, type in a name for your QuickView and select the create button.
Enter a title in the data source selection dialog box and select Table as your Data source. (See Figure 6.)

Figure 6
Data source selection dialog box with Table selected
Once you choose the data source type, the bottom part of the dialog box allows you to specify the data source name. For this example, I selected SAP table PA0002 and Basis mode.
Using a table as your data source takes you to the main screen of QuickViewer. Use the List fld. select. tab as you did in the first example. The sort sequence works in the same fashion.
Because you used a table as your data source, no predefined selection screen is available as it was when you used a logical database. In this case, you select the Selections fields tab and specify the fields that you wish to be available upon report execution (Figure 7).

Figure 7
Specifying fields for selection
After selecting the fields on the Listfld. select. tab and adding fields on the Selection fields tab, select your Export format and click on the execute button. A screen including only those fields that you designated on the Selection fields tab appears. Enter any restricting values on the screen and click on the execute button to see your finished report. (See the sample report in Figure 8.)
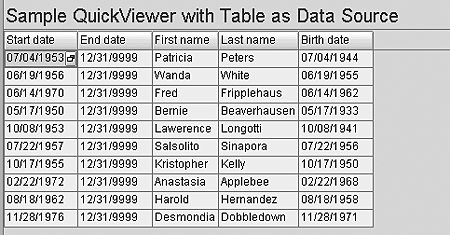
Figure 8
Report using a table as the data source
Existing InfoSet as Data Source
If you are using the Ad Hoc Query or SAP Query reporting tools for HR and Payroll, you already have InfoSets configured. If you do, you can use QuickViewer to create QuickViews using an existing InfoSet as your data source by following this process:
Go to the main screen, type in a name for your QuickView, and select the create button.
The data source selection dialog box (Figure 9) appears. Enter a title for your QuickView. For this example, I’m selecting the SAP Query InfoSet option. The bottom part of the dialog box now allows me to specify the data source name. In this instance, I chose an existing InfoSet I built for use with SAP Query reporting called HRALL-HRIS. This InfoSet is based on the logical database PNP. I also selected Basis mode and clicked on the enter key.
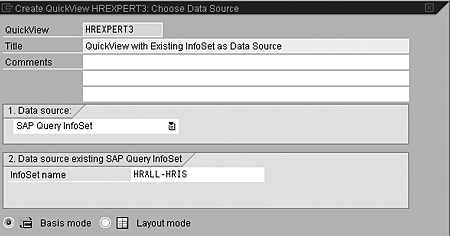
Figure 9
Selecting an existing InfoSet as the data source
This will take you to the main screen of QuickViewer. In the top left side of the window, the InfoSet, including all of the fields within it, appears as shown in Figure 10.

Figure 10
InfoSet with fields
The List fld. select. tab and Sort sequence are the same as in the previous examples.
Because you used an InfoSet built upon a logical database, a selection screen is already created for you. You can select the Selection fields tab to add additional fields.
Choose your Export format. Select the execute button. A screen including the fields designated by the logical database and any fields that you designated on the Selection fields tab appears. Enter any restricting values on the selection screen and click on the execute button to see your finished report.
Note
Like SAP Query in Release 4.6C, QuickViewer is delivered with a standard and graphical mode. You can create reports using the standard screen or a graphical representation of the screen. This article details the easier and more commonly used standard format. A sample of what the graphical format looks like is shown in Figure 11.

Figure 11
Graphical format

Danielle Larocca
Danielle Larocca is currently the Senior Vice President of Human Capital Management for EPI-USE Labs. Previously she was the Executive Vice President of Operations/Chief Knowledge Officer at a technology start-up. She has more than 20 years of strategic leadership experience in multi-national business, business process re-engineering, and project and people management. Danielle is an expert on SAP Human Resources (HR) and reporting and has authored four best-selling books on SAP. She is a regular speaker at numerous conferences around the world on topics such as HR, technology, change management, and leadership. She is an official SAP Mentor, a global designation assigned to less than 160 professionals worldwide, who serve as influential community participants in the SAP ecosystem. This group is nominated by the community and selected by the SAP Mentors’ Advisory Board to keep SAP relevant. Danielle also serves as an expert advisor for SAP Professional Journal.
You may contact the author at me@daniellelarocca.com.
If you have comments about this article or publication, or would like to submit an article idea, please contact the editor.


