Plan for and address the key challenges you are likely to face in your stock migration cutover to SAP Inventory Management and SAP Warehouse Management.
Key Concept
Stock migration is the process of transferring stock from your source to your destination system keeping the same quantity, stock characteristics, and monetary value for each individual piece of stock. At the end of this process, you shouldn't find any differences between your source and destination systems. If any differences exist, your finance and logistics departments must reconcile, document, and approve them.
If there is one key milestone in any SAP project, it is the go-live date. This is the time when you perform the transition from your previous system to your new environment and start running your operation. In the case of projects involving SAP Inventory Management (IM) and Warehouse Management (WM), stock migration becomes a critical point of this activity.
While stock migration cutovers are a daunting task, you can achieve them successfully with proper planning and knowledge. I will help you through your stock migration cutover by first giving you a list of considerations before undertaking the cutover process, and then I will walk you through the actual execution.
Key Challenges in Stock Migration
Completing the stock migration is not as simple as it might look. You have to execute complex activities and overcome potential issues, such as:
-
Clean up and perform a reconciliation of the stock and value in your legacy systems. This can uncover many hidden unresolved issues.
-
Extract the information from the source system, upload it in your SAP system, and resolve technical issues. This is also when you see if you have correctly mapped the capacities of the bins in your warehouse and the placement strategies for your stock in the system.
-
Make sure your finance department concurs with the reconciliation of quantities and values and resolves any difference up to the last cent
-
Get ready to start your operation because any minimal issue might create a snowball effect and block your warehouse operation
You need to execute all these activities in a matter of hours. This means your cutover must be thoroughly planned well in advance by a dedicated and experienced team.
Goals of the Cutover
During the cutover, all the master data, transactional data, and configuration from your source system migrate to your new SAP production environment. I highly recommend that you set the goals you want to achieve with your cutover well in advance. In my projects, I used the following goals, which you can use as overall guidelines:
-
The configuration in the SAP production and testing environments must be the same. This ensures that you do not find surprises during the operation startup. Also, it eases your troubleshooting by not wasting time trying to understand whether the root cause is in your template configuration or if the issue is with its transport to your production environment.
-
Master data and transactional data must be correctly transferred. In terms of WM, this includes the material master views and the warehouse bins. On the other hand, you should not overlook the transactional data in other modules that affect your processes. For example, if the purchase orders are not correctly transferred, you cannot receive material.
-
Stock quantity and value in source and destination system must balance. This is the core of the stock migration process. You need to agree in advance with your finance department on the reports, which are used to perform the sign-off of this goal.
-
Any required interfaces with external applications must be set up. You need to enable your SAP system to communicate with the rest of the environment. If you haven't synchronized it correctly, you cannot start your operation.
-
A full cycle of processes is successfully tested in the destination system. Remember, that a warehouse often runs 24x7. This means that when you release the system to the production users, you struggle to resolve any major issues. Running this cycle testing for the key processes in a controlled environment helps you to reduce your support effort during the operation startup.
After you have considered these points and feel you're ready to tackle them, it's time to examine the stock migration cutover phases: preparation, stock migration, and operation startup.
The Preparation Phase
During your preparation phase, be sure to complete the detailed planning of your cutover. Ensure that your production environment is ready from both configuration and master data perspectives. You should also develop the different tools that enable your cutover. Based on my experience, I have assembled some items that you should check well in advance of the cutover date from a technical perspective.
Create your upload test system. The test system to practice your stock migration should be an exact copy of the production environment.
Create your data extraction and upload tools.
-
Use detailed field-by-field mapping for each piece of master data and transactional data
-
For extraction, you can use standard extraction, transformation, and loading (ETL) tools or customized programs
-
For the upload, you can use tools based on SAP Legacy System Migration Workbench (LSMW), Computer Aided Test Tool (CATT), SAP Automation add-on or customized ABAP programs
Create your data conversion and reconciliation tools.
-
These tools allow you to transform the data extracted into the format required for the upload
-
Reports from these tools can highlight issues before the upload takes place
-
Microsoft Access is an effective way to create these tools
Test hardware components.
Now that you have created your cutover plan and your checklists are ready, you can start with the actual preparation of your production system. Focus on ensuring that you have correctly transported the configuration and that it is the same as what you tested in your testing environment during your business acceptance phase.
When you have completed the configuration of your production instance, you need to maintain your material master data. To enable your stock migration, you need to maintain the General Plant Data/Storage 1 and 2 views for the relevant plants and storage locations for your project. Also, you need to maintain the Warehouse Management 1 and 2 views to store the stock in the relevant warehouse numbers for your project. Create these views via transaction MM01. Figure 1 shows the initial entry screen in that transaction. After you enter the material code, industry sector, and material type, click the Select view(s) button and the system displays all the available views for the selected material type.
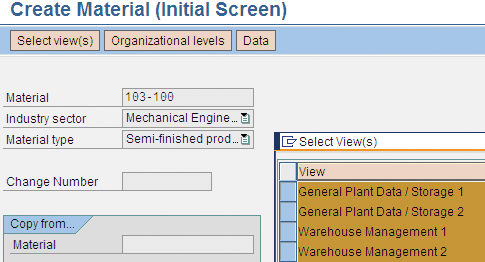
Figure 1
Material master view creation (transaction MM01)
Ensure that you check the result of the maintenance of those views thoroughly so errors don't occur later when running transactions due to incorrect data. First, check that the users or implementation team members have created the General Plant Data/Storage 1 and 2 views for the relevant plant codes and storage locations involved in your project. The existence of those two views enables the storage of stock in those storage locations. The values in those views do not affect the ability to upload stock at the SAP IM level, but the views need to exist to allow this process.
You can check if the General Plant Data/Storage 1 and 2 views are created in the MARD table, which you can also access using transaction SE16. Figure 2 shows how each material (MATNR) contains an entry per plant (WERKS) and storage location (LGORT). In the maintenance status (PSTAT) field, you can find the value L (general plan storage views). Here, it is DLZ. Having the L there means that the General Plant Data / Storage 1 and 2 views have been created. You might find other values in this field (e.g., D means that the MRP views are also created at the Storage Location level), but you only need L. You do not need any other information apart from ensuring that the entry exists and that the L value is maintained.
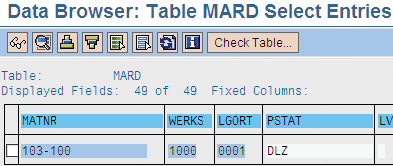
Figure 2
Material master storage views check
Next, check if the user or implementation team created Warehouse Management views 1 and 2 and correctly stored the information. The correct information enables the upload of your stock at the WM level. You can check if the views have been created in the MLGN table. All materials managed in WM must have an entry for the required warehouse number (Figure 3). You can find the warehouse number in the LGNUM field.

Figure 3
Material master WM views check
Along with material master data, you also need to create the bin locations in your warehouse to complete the full set of master data required to run your operation in WM. You can check that the system has properly created the bin locations via table LAGP (Figure 4).

Figure 4
Warehouse master data check for bin locations
In Figure 4, I used bins located in warehouse 001 (LGNUM), storage types 001, 002, and 003 (LGTYP), and storage sections (LGBER) 001 and 002. The code for finding the warehouse number and storage type is made of any three alpha/ numeric digits, which you can define in your configuration. Along with checking that all your bins (LGPLA) exist by having an entry in the table for the relevant warehouse number, storage type, and storage section, you can also ensure the validity of the values for bin type (LPTYP) by comparing it against the information you received from the warehouse users when they completed their warehouse layout design drawings. Check if any bins have been blocked for placement (SKZUE) or removal (SKZUA) by mistake and make sure that the bins are empty (KZLER) before you start the stock upload.
If a bin is not empty, it can mean that someone has created a transfer order to move stock in your production environment. This can create problems in your stock upload reconciliation. If you find this situation, identify the original transfer order and create a new one to move the stock back to the original source bin where the stock was placed. This leaves all the new bins created in your warehouse empty.
The Stock Migration Phase
Once you have completed your preparation, the actual cutover moment arrives. At this point, the move of stock information from the source to the production system takes place. Before you start this process, ensure you have already performed a full inventory count of your warehouse and you have reconciled your stock figures in your source system. This ensures that the information you migrate is reliable. Figure 5 illustrates the key steps in the stock migration process.
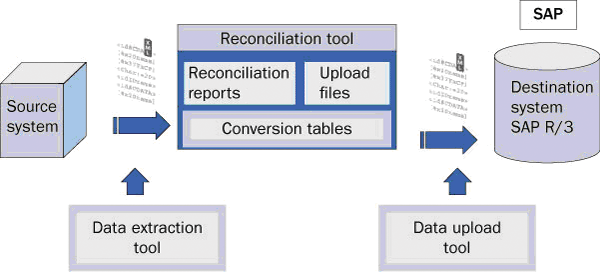
Figure 5
Stock migration technical overview
The actual stock migration starts when the stock values in the source system are downloaded to a file via an extraction tool. This tool is often a custom program created in the legacy source system by the IT team responsible for this application. If you need to extract data from several different source systems that requires a logic in the data extraction, you can use one of the ETL applications available. Your aim is to get the stock data available in a file containing the data you require to perform your SAP IM and WM uploads in the SAP system.
You can insert this data into the reconciliation tool. The project team usually creates this application which could be as simple as generating an Access database. This tool might enable any conversion required for the data extracted from the source system before it is uploaded to the SAP system. For example, imagine that the unit of measure for a material is kilograms, but in the SAP system it is managed in grams. The reconciliation tool could manage those conversions and generate a file ready to be uploaded. Also, this tool could have embedded a set of reports, which could identify potential errors during the stock upload. In that way, the project team is able to fix them before the data is uploaded.
For example, you could create reports in the reconciliation tool to identify pallets placed in bins of storage types not allowed according to the putaway strategies defined in SAP customizing. If this is the case, you can immediately ask the warehouse operators to move them to other bins allowed by the system rather than reacting when the stock upload happens. The use of a reconciliation tool is optional, but it could save you a lot of time during the actual cutover.
The Stock Upload Process
When you have the stock data files extracted from the source system, you can proceed with the upload. For the purposes of this article, I use SAP LSMW to describe the overall upload process steps. This tool has the advantage of being embedded in the SAP system, and it also supports the data conversion, minimizing the need for external reconciliation tools. Not only can it be used to upload stock, but it can also maintain master data.
Step 1. Update the stock quantities and values in SAP IM. To perform the upload of stock in SAP IM, use transaction MB1C or the new MIGO transaction using SAP IM movement types 561 for unrestricted stock, 563 for QI stock, and 565 for blocked stock. You need to upload a large amount of data. I recommend using a tool such as SAP LSMW, which allows you to post the stock automatically by calling those transactions in the background. For this purpose, first perform the recording of a Batch Data Communication (BDC) session, which simulates the data input via a transactional screen. In Figure 6, you can see a recording I did for uploading stock in SAP IM using transaction MB1C. It is very simple. All I had to do was enter the information in the fields for Plant (WERKS), storage location (LGORT), material number (MATNR), and quantity (ERFMG).

Figure 6
Recording using LSMW for uploading stock in SAP IM
Once you have created the recording of the transaction in SAP LSMW, you need to make the link of the SAP fields in transaction MB1C with the column headers in the upload text file. The advantage is that you can use Excel to create the text file containing the stock information to be uploaded. With Excel, you can use the first row to describe the information contained in each column, while the actual stock information is maintained in the rest of the rows. Figure 7 shows how the upload text file looks for my example. Figure 8 shows how the fields in the SAP transaction are mapped with the ones in the first row of the SAP IM upload file.

Figure 7
Example of SAP IM upload file

Figure 8
Example of field mapping between SAP transaction fields and upload file
Using SAP LSMW, you can now upload the stock in SAP IM. This increases the amount of available stock. In my example, I uploaded two lines of stock, one with 20 and the other with 40, adding up to a total of 60. At WM, this upload in SAP IM is also reflected. You can see it, for example, using the bin status report transaction LX03 (Figure 9). You can also see how the 60 pieces of stock are placed in the interim storage type 998 in the bin AUFNAHME. These interim storage types are used as an interface area between SAP IM and WM, which allows you to keep the balance between both systems.

Figure 9
Bin status report in transaction LX03
The way the system knows that the SAP IM stock upload for a plant and storage location needs to be reflected in a WM warehouse is by checking the assignment of these components done in customizing. Figure 10 displays the screen where this configuration is done. In this example, you can see that any SAP IM posting taking place for Plant 0001 and Storage Location 0088 is reflected in Warehouse Number 001. You can access it by following IMG menu path SAP Customizing Implementation Guide > Enterprise Structure > Assignment > Logistics Execution > Assign warehouse number to plant/storage location.

Figure 10
MM-IM storage location assignment to WM warehouse number
Step 2. Move the stock to the destination bins by executing the WM upload. At this point, you still need to get the system to move the stock to the final bin location in the warehouse. You do that by running a different BDC session via SAP LSMW. This time the session creates transfer orders to move the stock in WM by calling transaction LT01. Use the WM movement type 561 and indicate to the system in the upload file the destination storage type, storage section, and bin location for each piece of stock previously uploaded in SAP IM. Figure 11 shows an example of one of the transfers.

Figure 11
Transfer order generated by the WM upload using SAP LSMW
Step 3. Reconciliation of the SAP IM and WM uploads. I showed you how the upload in SAP IM created positive stock in the storage type 998. When uploading in WM, this stock was moved to the destination bins. In principle, this should leave storage type 998 empty. You can check this easily using the bin status report in transaction LX03. If there is still a positive value, it means that you uploaded more stock at the SAP IM level than at the WM level and vice versa in case of having negative stocks. A good practice to avoid any positive or negative stocks left over is to ensure that the aggregated stock quantities in the SAP IM and WM upload files are the same before starting both uploads. This means that once all the information in those files is posted without errors, the stock quantities balance.
Step 4. Reconcile the stock quantity and value between the source and destination system. Finally, you need to ensure that the stock quantities and values are the same in the source and the destination system. You should do this with support and acceptance from your finance department. It is usual to create an ABAP program to create this reconciliation report. This program can upload stock information from the source system in the SAP system and then provide a report making a comparison of the stock quantity and value by material, plant code, and storage location.
In Figure 12, you can see an example of this type of reconciliation report. You can see that the difference in quantity for both material codes is 0, but for the material code 103-101 there is a difference in value of 0.01. This issue is usually seen in cutovers when the standard price of one material is different in the source and the destination system. Your finance department can help you by correcting the price information in the SAP system or by accepting the difference, because the price might have changed right on the cutover date.

Figure 12
Example of stock reconciliation report in quantity and value
Operation Startup Phase
Once you have completed the stock reconciliation, it's time to establish connectivity with other systems to be able to start your operation. A typical example is when you are connecting an SAP system to an automatic storage and retrieval system (AS/RS). In this case, you define in the SAP system a partner profile to manage the inbound and outbound messages to the AS/RS. You can create this partner profile in advance of the cutover date, but it should be activated only after the stock migration is completed to avoid messages being exchanged by mistake. Figure 13 displays how the partner profile status can be set to status Active (A) in transaction WE20.

Figure 13
Partner profile update screen
Now that the system is ready and the data is correctly loaded, it is time to test the system in production. Before the warehouse users are allowed to use the system, I recommend that project team members test a full cycle of at least one process of goods receipt, shipping, internal warehouse transfer, and inventory count. These are the most critical processes in a warehouse and any error in the cycle test gives you an early warning of any possible issues in the system configuration or data.
After the cycle testing has completed successfully, the project team communicates to the users that they can start using the system. This is the time when your support organization comes into the game. They watch to ensure that the key users execute the warehouse processes correctly the first time. They are also responsible for resolving issues identified in the system and the monitoring of the system health. To do this, they check that the transactions are posted correctly in the system.
The Warehouse Activity Monitor (WAM) is a good tool to use for this because it provides the key performance indicators (KPIs), which ensures a healthy operation for a warehouse. You can use the WAM as an early warning system because it displays the number of events by indicator, which has passed the tolerance limits to consider them normal. For example, you can get the system to display all transfer orders that remain unconfirmed after a certain number of hours. Leaving a transfer order unconfirmed might block bins for stock placement and removal in your warehouse, which affects your warehouse operation because you are not able to move stock around.
Access the WAM using transaction LL01. Figure 14 provides an overview of the KPIs that you can track with this tool. You should try to keep all the indicators in green, which indicates that there are zero incidents.

Figure 14
Track KPIs with WAM
Last, but not least, the support organization must monitor the status of the IDoc messages exchanged with the external system, such as the AS/RS or any other systems not part of SAP ERP. Monitoring the status of messages helps to make sure that nothing is left in error.
You can use several transactions for this purpose. You can display the IDoc queue via transaction WE02. In Figure 15, you can see the list of IDocs and their status. The support organization should ensure that all the statuses are green in color, which means that they have been correctly posted. An IDoc left in error means that a certain piece of information has not been updated in the SAP system or has not been transmitted to the external system.

Figure 15
IDoc messages queue monitor
In this monitoring tool, you can double-click each icon to display the information details and the error messages. If you want to modify the content of some fields in the IDoc or even delete or create new segments in it, you can use the test tool for IDoc processing, which you can access via transaction WE19. Figure 16 shows the transaction WE02 details for one of the IDocs in the queue, while Figure 17 shows the details for transaction WE19 for the same IDoc message, which displays how the user can edit the content of each field.
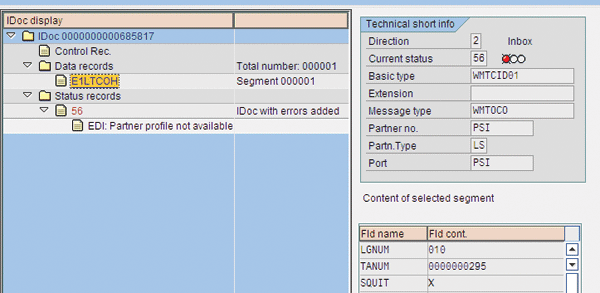
Figure 16
IDoc message detail in transaction WE02
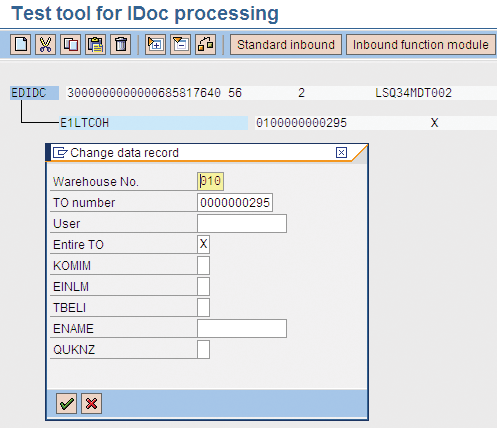
Figure 17
IDoc message detail in transaction WE19

Jose Senra
Jose Senra is a senior solutions architect and project manager (PMP) located in Barcelona, Spain. His focus is on designing and deploying SAP supply chain global business process templates for large international corporations. In his more than ten years of IT experience working for Procter & Gamble and Hewlett-Packard he has covered a wide range of the ERP logistics area. He is certified in SAP Logistics Execution System, Warehouse Management, Production Planning, Plant Maintenance, Project System, and Solution Manager. He also has experience in EDI, Manufacturing Execution Systems (MES), and the design of applications management and development using ITIL principles. He has participated in numerous industry conferences, such as Logistics and Supply Chain Management 2008 in Orlando and the HP SAP upgrade factory event Barcelona 2008.
You may contact the author at jose.senra.jimenez@gmail.com.
If you have comments about this article or publication, or would like to submit an article idea, please contact the editor.


